Connecting to a computer
The first operation that needs to be done is to connect correctly to the Asus router. When performing this work, you can also make serious mistakes, so in order for the connection to a laptop or system unit to be successful, you must perform the work in the following sequence:
- Connect the device to a 220 V outlet.
- Connect your Internet provider cable to the WAN port.
- Connect the LAN cable to the router and computer.
After the above operations, you can begin to directly configure the Asus router.
Features of connecting laptops
Small laptop models may not have a LAN port, so they cannot be connected using a wired connection. In such a situation, there is nothing left to do but connect the devices via Wi-Fi.
To perform this operation, you need to go to the wireless connection setup section on your laptop, find the Asus network and connect to it using a password. The sequence of secret characters can be found on the bottom of the router on a sticker.
If the number for connecting the router was changed and forgotten or was not known, as, for example, when purchasing a used device, then you will need to reset the device settings to factory settings. To do this, you need to press the corresponding RESET button located on the device body.
Wi-Fi connection and settings
The user configures Wi-Fi at the automatic setup stage when logging into the device firmware for the first time. If the previously provided information is no longer relevant, you can change it in the settings.
- Connect to the router's wireless access point via a computer or laptop from which the setup will be performed.
- Launch the router settings interface.
- In the main menu on the left, open the “Wireless Network” section.
- In the “SSID” field you can enter a new name for the router’s wireless network. You can change the password in the WPA Pre-Shared Key field.
How to open settings
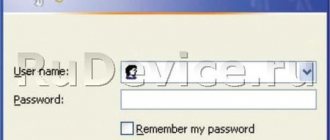
The settings of the Asus router can only be changed in the device’s web interface. To open a page where you can enter the necessary values for the router, just turn on your computer and launch any Internet browser. If you previously connected the computer to the router correctly, then in the address bar you need to enter the IP address of the router, which can also be found on the device body. If the IP could not be found, then the following address should be specified instead of the digital value: “router.asus.com”.
On the new page that opens, you must enter your username and password. By default, the standard values for both fields are both “admin” values, but if you purchase a used device and the password and login for the Asus router are changed, then you should reset the router parameters to factory values using the RESET button located on the case of this device .
After entering the login information and clicking the “Sing in” button, the user is taken to the Asus router settings page.
Setting up a Wi-Fi network
To connect via Wi-Fi you need to do the following:
- In the web interface of the Asus router, you need to select “Wireless Network” in the menu.
- Then you should set the name in the “SSID Name” field. The name will be visible when connecting various digital devices to it. It is recommended to select a sequence of characters in Latin that will be easily recognized even if there are a large number of connections in the receiving range.
- At the final stage of setting new parameters, in the “Channel Width” field you should specify: 20/40/80 MHz.
For most modifications of the Asus router, these settings are sufficient, but to make the connection more secure, it is recommended to change the password required to connect devices.
Setting a password
To set a password, you must perform the following actions in the same “Wireless Network” section:
- Go to "Authentication Method". From the list, select the “WPA2-Personal” option.
- In the “WPA Pre-Shared Key” line, create a complex password that will not be easy for people who want to connect to Wi-Fi without permission.
- When connecting your computer to the router via Wi-Fi, you will need to reconnect to the router.
Setting up an Internet connection
In order to connect to the Internet, you will need to configure access to the World Wide Web. For this purpose, you will need to use the data that was provided by the provider. Setting the router parameters for accessing the Internet is also carried out in the web interface program. Depending on the connection type, the sequence of actions may differ slightly.
Setting up PPPoE
Many Internet providers providing their services in the Russian Federation use the PPPoE protocol. In order to set up a connection of this type, you will need to follow the following chain of actions:
- Go to the “Internet” section.
- In the “WAN connection type” line, select “PPPoE”.
- Then in the fields “Obtain a WAN IP address automatically” and “Connect to a DNS server automatically” you need to o.
- Below you will need to enter an account to access the provider’s services - this is a username and password. This data can be found in the contract that was concluded between the individual or organization and the Internet service provider.
- After making changes using the PPPoE protocol, you must click the “Apply” button.
Setting up PPTP
If you know that your Internet provider provides Internet access using the PPTP protocol, then to make changes you need to:
- Go to the “Internet” section.
- Next, click on the next line called “WAN connection type” and set the value to “PPTP”.
- Then, in the “Obtain a WAN IP address automatically” and “Connect to the DNS server automatically” fields, put “Yes”.
- Next, you will need to enter your account settings. The username and password for accessing the services of the Internet provider are specified in the agreement concluded between the provider and the individual or organization.
- For the connection to work correctly, you will also need to enter in the “VPN” field the address to which all Internet traffic will be redirected. This information can also be found on the pages of the agreement concluded with the provider.
- In the “Host Name” field, you must come up with and enter any sequence of Latin characters.
- After making all the necessary settings, click the “Apply” button.
Setup 2 L2TP
Configuring a router to work via the L2TP protocol is carried out in a similar way. As with the changes described above, you must complete the following steps:
- Go to the “Internet” section.
- Then you should select the WAN connection type - “L2TP”.
- In the fields where you need to mark the automatic acquisition of an IP address and DNS address, you should put “Yes”.
- Then the username and password obtained from the provider must be indicated.
- At the next stage, the “VPN server” is registered. This value can be obtained by calling the operator's support service or finding this redirection address in the contract.
- Finally, you should specify the “Host Name”, which must consist of any sequence of Latin letters.
- To save the entered parameters, click the “Apply” button.
Setting a password for the router interface
If the computer on which the settings for the Asus router were entered can be used by strangers, then you can set a password to protect the router interface. For this purpose it is necessary to carry out the following actions:
- Go to the “Administration” section.
- Find the "System" tab.
- On the tab that opens, specify a new username or leave the previous value.
- In the “New password” and “Repeat new password” fields, you should enter a new value for the security combination of characters.
- Save the changed data using the "Apply" button.
In order not to forget important information for access to setting the main parameters of the router, it is recommended to write it down and save it in a safe place.
Login to router settings
You can go into the settings of the ASUS RT-N10 router using the following instructions:
- In the address bar of any browser, enter the IP address to enter the settings: 192.168.0.1 and press Enter.
- To enter the router firmware you will have to authorize. Enter “admin” in the “username” and “password” fields.
- Click OK.
Typically, standard login and password data are used to enter the settings: admin and admin. However, they may be changed by the provider. In this case, you will have to carefully study the contract or contact the operator’s technical support.
Tips and tricks
The above recommendations on how to set up an Asus router have been tested in practice by many owners of routers from this company. But when making changes, something can always go wrong and the equipment may not work. The following recommendations will help troubleshoot problems:
- If you purchased a used router, it is better to do a full reset.
- Asus routers can be single-band or dual-band. In the second case, it is necessary to make changes for both the 2.4 GHz frequency and the 5 GHz frequency.
- If an agreement is concluded between a provider and an individual, and the service consumer has not ordered the additional “Static IP address” option, then he will be assigned a dynamic IP address each time he connects. This feature should be taken into account when providing other users with remote access to the desktop.
- If the agreement with the Internet provider is lost, and the username and password are forgotten, then most likely, in order to restore access to the network, you will need to personally visit the service provider’s office.
- After making changes to the Asus router web interface, it is recommended to restart the device.
- Sometimes equipment malfunction can be caused by a simple lack of contact between the cable and the port. This problem may be especially relevant if the device was purchased on the secondary market, as well as if a defective new router was purchased.
- If you plan to use the services of mobile Internet providers, then the Asus router should be connected to a 3G/4G modem. Then you will need to enter the necessary Internet connection parameters in the device’s web interface. All data necessary to connect to the Internet can be obtained by calling the mobile provider’s hotline or on the company’s official website.
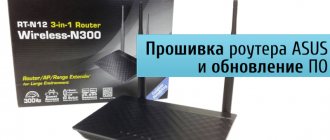
Firmware update
ASUS regularly releases new firmware versions for its routers. It is recommended to update it whenever possible. Outdated firmware can lead to malfunctions of the router.
Instructions for updating the firmware for the ASUS RT N10 router look like this:
- Go to the official ASUS website. From there, download the latest firmware from the special page.
- In the router settings, go to the “Administration” section.
- Open the Firmware Update tab.
- Click "Download" to add the previously downloaded update file.
- Wait for the installation to complete. It runs automatically.
Important! Do not turn off the power to the router while updating the firmware. This may damage the device.