Instructions for setting up Asus RT-N66U
- Authorization
- Setting up Wi-Fi on the router
- Setting up an Internet connection Setting up a PPPoE connection (Rostelecom, Dom.ru)
- Setting up an L2TP connection (Beeline)
- Setting up PPTP (VPN) when automatically obtaining a local IP address
- Setting up PPTP (VPN) with a static local IP address
- NAT when automatically obtaining an IP address (DHCP)
Results
As a result, ASUS RT-N66U is a top-end wireless router with support for 2.4 and 5 GHz bands in the Wi-Fi 802.11n standard, four Gigabit Ethernet ports and two USB 2.0 connectors. This model should be chosen by users with increased requirements for stability and data transfer speeds who do not yet have client devices that support the Wi-Fi 802.11ac standard. Thus, based on the testing results and the totality of indicators, the ASUS RT-N66U deserves the “ Editor's Choice ” sign.
I liked + stability of operation + high declared data transfer speed (up to 900 MB/sec) + operation in the 2.4 and 5.0 GHz bands + four gigabit LAN ports + convenient web interface, maximum number of settings + support for almost all popular technologies and functions
I didn’t like it - noticeable heating of the case - USB ports version 2.0 - cost could have been less
The product was provided for testing by ASUS, www.asus.ua
| ASUS RT-N66U Notify when available | |
| Device type | Wireless router |
| Wireless Standard | IEEE 802.11 b/g/n |
| Dual band operation | + |
| Maximum connection speed (Mbit/s) | 900 |
| Connection interface (LAN port) | 4×10/100/1000 |
| Login (WAN port) | 10/100/1000 |
| Firewall | + |
| NAT | + |
| VPN (virtual network) support | passthrough + PPTP VPN server |
| DHCP server | + |
| Demilitarized Zone (DMZ) | + |
| Antenna type (internal/external) | external |
| Number of antennas | 3 |
| Antenna Gain (dBi) | 3 |
| Transmitter power (dBM) | 19 |
| Information security (WEP, WPA/WPA-PSK, WPA2-PSK, WPA2/RADIUS) | +/+/+/+ |
| Web interface | + |
| Telnet | + |
| SNMP support | — |
| Quantity | 2 |
| Connection (external drive/printer/3G modem) | (+/+/+) |
| Power(PoE/adapter) | -/+ |
| Built-in ftp-server | + |
| Built-in hard drive | — |
| Outdoor installation possible | — |
| Bridge Mode | + |
| Other | With the ability to simultaneously operate in two frequency bands (2.4 and 5 GHz) with a speed of 450 Mbps each, the RT-N66U provides a total wireless data transfer rate of 900 Mbps. 2xUSB 2.0 for connecting HDD and printer, WPS technology, EZ UI easy setup mode |
| Dimensions (mm) | 207×148.8×35.5 |
| Weight (g) | 450 |
Authorization
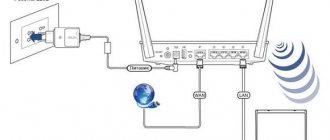
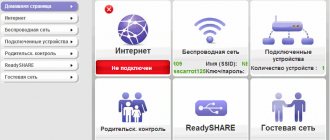
In order to get to the router’s web interface, you need to open your Internet browser and type 192. 168.1.1 in the address bar, Username - admin , Password - admin (provided that the router has factory settings and its IP is not changed).
Login to ASUS RT-N66U router
In order to enter the router configuration interface, we need to open any browser convenient for you (Yandex Browser, Google Chrome, Opera, etc.). Then enter the address of your router in the address bar of your browser; by default it is 192.168.1.1, after which an authorization window will open in front of you, where you will be asked to enter your login and password. By default, login is admin, password is also admin. After entering, click the “Login” button.
After this, the main page of the router interface will open in front of you.
Setting up Wi-Fi on the router
The specifications of ASUS RT-N66U state that this router has High-speed dual-band WiFi, up to 450 + 450 Mbit/s.
Go to the menu item Additional settings - Wireless network. Please note that both radio blocks can be configured here. Name (SSID) - specify the name for the first and second networks, but they must be different.
In the router interface, you need to go to the tab on the left Additional settings , in the list that opens, select Wireless network .
We set the parameters as follows:
- SSID field : enter the name of the wireless network. The value in this field cannot be changed.
- Authentication Method: WPA2-Personal
- WPA encryption: TKIP or AES
- WPA Preshared Key: You must enter any set of numbers between 8 and 63. They also need to be remembered so that you can specify them when connecting to the network.
- Click the Apply
⇡#Technical characteristics
| ASUS RT-N66U Dark Knight | |
| Network standards | IEEE 802.11a, IEEE 802.11b, IEEE 802.11g, IEEE 802.11n, IPv4, IPv6 |
| Wi-Fi speed | 802.11a: 6.9, 12, 18, 24, 36, 48, 54 Mbps 802.11b: 1, 2, 5.5, 11 Mbps 802.11g: 6.9, 12, 18, 24, 36 , 48, 54 Mbps 802.11n: up to 450 Mbps |
| Antennas | 3 x removable, 3T3R |
| Frequencies | 2.4-2.4835 GHz /5.1-5.8 GHz |
| Safety | 64-bit WEP, 128-bit WEP, WPA2-PSK, WPA-PSK, WPA-Enterprise, WPA2-Enterprise, WPS support, 802.1x |
| Firewall | SPI, DoS protection, parental controls, URL/network services filter |
| Network services | UPnP, DLNA, DNS Proxy, DHCP, NTP Client, DDNS, Port Triger, Virtual Server, DMZ, port forwarding/translation |
| VPN Pass-Through | IPSec, PPTP, L2TP, PPPoE |
| WAN connection | Automatic IP, Static IP, PPPoE(MPPE supported), PPTP, L2TP; Dual Link; Multicast Proxy (IPTV) |
| Operating mode | router, access point, bridge |
| Additional features | |
| Download manager | BitTorrent, NZB, FTP/HTTP, ED2K |
| Media server | jpeg, mp3, wma, wav, pcm, mp4, lpcm, ogg, asf, avi, divx, mpeg, mpg, ts, vob, wmv, mkv, mov |
| Guest network | 3x2.4 GHz, 3x5 GHz |
| QoS | WMM, rules for IP/MAC/Port, speed limit, traffic priorities |
| Print server | yes, LPR support |
| File server | Samba, FTP |
| VPN server | PPTP, up to 10 clients |
| Statistics, traffic monitor | There is |
| Connectors and ports | 4 x RJ45 for 10/100/1000 BaseT LAN + 1 x RJ45 for 10/100/1000 BaseT WAN (802.3, MDI-X), USB 2.0 x 2 |
| Buttons | WPS, factory reset, power |
| Indicators | LAN x 4, WAN x 1, AIR x 2, USB x 1 |
| Power adapter | Input AC 110-240V 50-60Hz, Output DC 19V 1.58A |
| Dimensions, mm | 207×148,8×35,5 |
| Weight, g | 450 |
| Price | 6,100 rubles |
The heart of the RT-N66U is Broadcom BCM4706/BCM53003 with a frequency of 600 MHz and built-in PCI-E bus controllers, gigabit network interface and USB 2.0. It is complemented by two independent BCM4331 radio units that support the 802.11n standard with speeds up to 450 Mbit/s (3T3R). Gigabit LAN ports are connected to the BCM53125 switch. The RAM capacity is 256 MB, and the ROM is 32 MB. Inside there is also an Alcor USB hub and a micro-SD card slot. Initially, it was thought that there would already be some kind of drive on which Optware could be installed without the need to connect external media. In the end, this was abandoned, but advanced users can open the case themselves and install a micro-SD. Overall, Dark Knight is currently one of the most powerful SOHO routers.
| ASUS EA-N66 | |
| Network standards | IEEE 802.11a/b/g/n |
| Wi-Fi speed | 802.11a: 6.9, 12, 18, 24, 36, 48, 54 Mbps 802.11b: 1, 2, 5.5, 11 Mbps 802.11g: 6.9, 12, 18, 24, 36 , 48, 54 Mbps 802.11n: up to 450 Mbps |
| Antennas | 3 x R |
| Frequencies | 2.4-2.4835 GHz /5.1-5.8 GHz |
| Safety | 64-bit WEP, 128-bit WEP, WPA2-PSK, WPA-PSK, WPA-Enterprise, WPA2-Enterprise, WPS support, 802.1x |
| Connectors and ports | 1 x RJ45 for 10/100/1000 BaseT WAN (802.3, MDI-X) |
| Buttons | WPS, reset settings |
| Indicators | AIR x 3 |
| Power adapter | Input AC 110-240V 50-60Hz, Output DC 12V 1A |
| Dimensions, mm | 122x111x62 |
| Weight, g | 110 |
Setting up an L2TP connection
- WAN connection type - L2TP
- Enable WAN, Enable NAT, Enable UPnP - set everything to YES
- Get an IP address and connect to DNS automatically - put an end to YES
- Username and password - login and password from the agreement
- VPN server - enter the IP address or name of the VPN server according to the contract
- The remaining parameters can be left unchanged. In the hostname, write something in English. Save your settings .
Equipment
The ASUS RT-N66U wireless router comes in a standard box for this brand, the main part of which is made of thick packaging cardboard, and the removable outer part is made of thinner black cardboard with colorful printing. The amount of information that fits on the packaging can only be envied; it not only lists all the technical characteristics and supported technologies, but also provides several useful illustrations, including a photograph of the rear panel of the device with the topology of the connectors.
The router and all accessories necessary for operation are placed in the compartments of a special pallet. In addition to the device itself, you will find a stand for vertical installation, three removable external antennas made of matte black plastic, an RJ45 network cable, a compact power supply, as well as a warranty card and brief operating instructions in paper and electronic form.
Setting up PPTP (VPN) when automatically obtaining a local IP address
- WAN connection type: PPTP
- Enable WAN, Enable NAT, Enable UPnP - set everything to YES
- Get an IP address and connect to DNS automatically - put an end to YES
- Username: Your login according to the contract
- Password: Your password according to the agreement
- Heart-Beat or PPTP/L2TP(VPN) server: enter the IP address or name of the VPN server according to the contract
- Save the settings with the Apply .
Setting up the Internet on the router
Setting up the Internet on the ASUS RT-N66U router can be done in two ways. The first method: if you bought a new router, when you connect for the first time, it will prompt you to go through automatic setup. The second way is to configure it manually and enter all the settings yourself.
I want to explain to you how to configure the Internet on the router manually, as this will be more correct. And if in the future you have to reconfigure the router, you can easily do it.
Automatically obtaining an IP address.
Everything is simple here. This type of WAN connection is installed by default on the router. But check your settings anyway. To do this, go to the “Internet” item in the left menu. Now check your settings against the picture. Then click the Accept button.
Connection type PPPoE. Setting up ASUS RT-N66U for TTK, Rostelecom, Dom.ru
To set up this type of connection, you need to know two parameters: Login and Password. These parameters should be provided to you by your provider. Usually the login and password are specified in the contract with the Internet company; if not, do not hesitate to call technical support to find out.
Now you need to go to the “Internet” item in the left menu in the router interface.
Let's fill in certain fields:
- WAN connection type: Select PPPoE
- In the Enable WAN, Enable NAT, Enable UPnP parameters, set YES everywhere.
- In the Obtain an IP address and connect to DNS automatically option, put a dot on YES
- Username: Your login specified in the agreement.
- Password: same as login
- MTU: 1472 - this parameter may vary depending on the provider, but only if you have an addendum to the contract in which it is specified.
- Enable VPN + DHCP Connection - No
- Save the settings with the Apply button.
Internet setup ASUS RT-N66U Beeline, Kyivstar connection type L2TP.
This is a relatively new type of connection. Few companies have adopted it, but one of them, the largest in Russia, Beeline.
To connect, go to the “Internet” menu item and fill in certain parameters.
- WAN connection type - L2TP
- Enable WAN, Enable NAT, Enable UPnP - set everything to YES
- Get an IP address and connect to DNS automatically - put an end to YES
- Username and password - login and password from the agreement
- VPN server - enter the IP address or name of the VPN server according to the contract
- The remaining parameters can be left unchanged.
- Save your settings.
Setting up a PPTP connection Aist Togliatti, UfaNet (UfaNet)
Everything is as simple as setting up other connection types. Go to the “Internet” menu item and fill in the settings:
- WAN connection type: PPTP
- Enable WAN, Enable NAT, Enable UPnP - set everything to YES
- Get an IP address and connect to DNS automatically - put an end to YES
- Username: Your login according to the contract
- Password: Your password according to the agreement
- Heart-Beat or PPTP/L2TP(VPN) server: enter the IP address or name of the VPN server according to the contract
- Save the settings with the Apply button.
Setting up PPTP (VPN) with a static local IP address
- WAN connection type: PPTP
- Obtain an IP address and connect to DNS automatically - set the dot to No
- IP address: We enter your IP address according to the contract
- Subnet mask: Enter the mask according to the agreement
- Main gateway: We drive in the gateway according to the contract
- DNS server 1: and DNS server 2: enter the servers of your provider (Rostelecom Omsk DNS 1: 195.162.32.5 DNS 2: 195.162.41.8)
- Username: Your login according to the contract
- Password: Your password according to the agreement
- Heart-Beat or PPTP/L2TP(VPN) server: enter the IP address or name of the VPN server according to the contract
- Save the settings with the Apply .
Setup, operation
The initial setup of the ASUS RT-N66U is very simple, just enter the PIN from the bottom panel of the case and you will be taken to a standard dialog where you are prompted to enter the network name, security level and key, as well as security type. Next comes the procedure for setting up the Global Network, for which you will need to know the access parameters of your provider and finally you find yourself in the proprietary web interface, where you can finally configure all the necessary parameters.
You can study the structure of the web interface in more detail using our screenshots, but we note that the setup process is very simple, and in cases where questions arise, you can use the pop-up tips. The interface is available in 20 languages, of which the typical domestic user will be interested in Ukrainian, Russian and English. Pay special attention to the traffic monitor, which allows you to track the situation in real time and the ability to manually adjust the power of the wireless transmitter (default 80 mW with 100 mW available).
During its operation, ASUS RT-N66U showed itself quite worthy. The router gets noticeably hot, but the aluminum radiators and a sufficient number of holes cope with their task - emergency reboots and freezes were not observed despite the ambient temperature of more than 30 degrees. As already mentioned, there are certain problems with connecting wires during vertical installation; a bunch of cables sticking out between the antennas does not look very aesthetically pleasing. Flashing bright blue activity lights can also cause problems if you place the router in the bedroom, since practically invisible during the day, at night these lights may well interfere with healthy sleep. Both of the above problems can be easily solved by installing the router outside a residential area, because the device does not require regular maintenance or reboots.
A test test of the speed of access to the Internet in wireless and wired modes took place in an office environment with a significant number of connected clients and neighboring networks, so as expected, the maximum performance stated by the manufacturer could not be achieved. Home users rarely encounter such harsh conditions, so they are sure to get more attractive speed test results.
Saving/restoring router settings
After setting up, it is recommended to save them so that if problems arise, you can restore them. To do this, go to the Additional settings , Administration menu; Restore/Save/Load settings tab .
- To save the current router settings, click the Save . The settings file will be saved to the specified location on your hard drive.
- To restore settings settings from a file, you must click the Select file , specify the path to the settings file, then click the Send .
Attention! Clicking the Restore will restore factory settings!
Setting up IPTV on the ASUS RT N66U router
Today, many people are using this Internet TV. This is due to the availability and excellent quality of this connection.
To configure your device to work with it, you must do the following:
- Select the “local network” tab. In it we find IPTV;
- activate the multicast routing point;
- activate Enable efficient multicast forwarding;
- select the “apply” button.
If you need to watch IPTV via Wi-Fi, then do the following:
- go to the “Wireless Network” menu;
- Select the “professional” option;
- enter the required range (2, 4);
- activate Enable Wireless Multicast Forwarding;
- apply the changes made.