In fact, the user you created during the installation of the system is listed in it as “Administrator” and must have the appropriate rights.
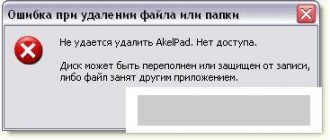
But as it turns out later, this is not the case at all. This is indicated by a special notification “No access. You need permission to perform this operation. Request permission from TrustedInstaller to change folder or file" which appears when you try to change or delete any file or folder.
This happens for one simple reason: all system directories and objects can only be managed by the “TrustedInstaller” user, present by default in every Windows 7, 8 and Windows 10 system. And this is done for security purposes so that an ordinary user or a computer virus cannot delete or change important files required for stable operation of the operating system.
But what if you still need to edit a certain object? The answer is simple: change the owner. And I’ll tell you how to do this a little below. I will also show you how to set the previous owner to return protection to system objects.
We delete the folder that Trustedinstaller does not allow us to delete
The procedure described below will not differ fundamentally from different versions of operating systems. In all cases, the same steps must be performed.
We follow the instructions:
- Right-click on the object and go to the “Properties” section.
- Click on the “Security” tab and click “Advanced”.
- In the owner line, click on the blue “Change” link.
- In the window that opens, click “Advanced” again.
- Then we start “Search”, then select the desired user (most often it is “User”) and click “OK”.
- Click “OK” again, and then “OK” again.
- Moreover, if you change the owner of a directory, then do not forget about.
Now if we check the result, we will see another Windows message stating that we need to request permission to delete or change a specific file or folder. But not from the TrustedInstaller user, but from himself, in my case it’s “User”.
How to disable trustedinstaller
If desired, you can disable trustedinstaller as a process. In some cases it loads the system quite heavily.
Launch the Control Panel through the Start .
Double click to open Administration , then Services .
Find “ Background Intelligent Transfer Service (BITS) ” and stop it.
Then we look for Windows Update and also stop it.
Next, you will need to call the task manager in a way convenient for you, for example, using the key combination Ctrl+Shift+Esc , open the Services . Stop Trustedinstaller.
The module installer will switch to the Stopped .
How to restore desktop icons in Windows 10
If this file was very heavy on your computer resources, then it is possible that a virus . TrustedInstaller protects the main system files and helps install updates. It should boot the system only during the installation of updates. The case of a virus is quite rare, but still run an antivirus and check the system for suspicious and malware.
As you can see, obtaining rights to change system files and disabling the TrustedInstaller.exe service is not difficult at all and will not take much time. The question is whether it's worth doing this - it's up to you to decide. Searching for it and the files protected by it risks losing the system both immediately and in the near or distant future.
Setting permissions
After we changed the owner of the object, it remains to obtain permissions from the current user, in my case “User”.
In order to get rid of the problem, you need to do the following.
- Open the document properties, go to the “Security” section and click on the “Advanced” item.
- In the “Subject” column, find the desired user and double-click on it. If this is not the case, then check out the section below, I will tell you how to add it.
- Then in the “General Permissions” window, check all the boxes and click “OK”.
- Click “Ok” again in the remaining windows.
Done, now you can check the result.
Now let’s talk about how to add a user if he is not in the “Subject” column.
- Click the “Add” button.
- In the “Subject” line, click “Select”.
- Click “Advanced” and perform “Search”.
- In the list displayed below, select an object and click “OK”.
- Click “Ok” again.
- Then, in the “Type” line, set the “Allow” parameter and mark the necessary items below. Save the settings by clicking “Ok” in all available windows.
- Go back to the document properties and in the “Attributes” column, uncheck the existing parameters.
Try editing again, the notification “Access is not available. Request permission from TrustedInstaller to delete a folder or file” should not bother you anymore.
The most common problems with the TrustedInstaller.exe file
There are several types of errors associated with the TrustedInstaller.exe file. The TrustedInstaller.exe file may be located in the wrong file directory on your device, may be missing from the system, or may be infected with malware and therefore not working properly. Below is a list of the most common error messages associated with the TrustedInstaller.exe file. If you find one of the following (or similar ones), consider the following suggestions.
- TrustedInstaller.exe is corrupted
- TrustedInstaller.exe cannot be located
- Runtime Error - TrustedInstaller.exe
- TrustedInstaller.exe file error
- TrustedInstaller.exe could not be loaded. Module not found
- Unable to register TrustedInstaller.exe file
- TrustedInstaller.exe cannot be loaded
- The file TrustedInstaller.exe does not exist
TrustedInstaller.exe
The application failed to start because TrustedInstaller.exe is missing.
Reinstall the application to resolve the issue. Problems related to TrustedInstaller.exe can be resolved in various ways. Some methods are only for advanced users. If you are not confident in your abilities, we advise you to consult a specialist. Correcting errors in the TrustedInstaller.exe file should be approached with extreme caution, since any errors can lead to an unstable or incorrectly functioning system. If you have the necessary skills, please continue.
We return it to the previous owner
After making changes to system files, you may need to return the settings to their original state. But it will not be possible to return TrustedInstaller access in the same way as was previously done with “User”; you need to act differently.
Namely:
- Follow step “1” from the beginning of the previous section and click “Change”.
- In the name entry line, write the command NT SERVICE\TrustedInstaller and click “OK”.
- Check the box next to “Replace subcontainer owners” and click “OK” again.
After completing these simple steps, TrustedInstaller will regain its previous level of access, and deleting or changing a folder or individual file will no longer be possible.
Download and Replace TrustedInstaller.exe File
The final solution is to manually download and replace the TrustedInstaller.exe file in the appropriate folder on your drive. Select the file version that is compatible with your operating system and click the Download button. Then go to your web browser's Downloads folder and copy the downloaded TrustedInstaller.exe file.
Navigate to the folder you want the file to be in and paste the downloaded file. Below is a list of directory paths for TrustedInstaller.exe files.
- Windows 10: C:\Windows\servicing\
- Windows 8.1: C:\Windows\servicing\
- Windows 8: 1: C:\Windows\servicing\
- Windows 7: C:\Windows\servicing\
- Windows Vista: C:\Windows\servicing\
If these steps do not resolve your issue with the TrustedInstaller.exe file, contact a professional. There is a possibility that the error(s) may be device related and therefore need to be resolved at the hardware level. A new installation of the operating system may be required—an incorrect system installation process may result in data loss.
Using special programs
There is an alternative option - you can use special programs that can unlock the document to open the possibility of editing.
Such utilities include the following programs: Unlocker, including those from the developer iObit, LockHunter or Unlock IT.
Their list of features is approximately the same, so you can safely use any of them. For example, I prefer the Unlocker program. It's free and works great on any version of Windows.
Using LiveCD
When none of the above helps get rid of the “Request permission from TrustedInstaller” notification, then LiveCDs come to the rescue. This is a kind of life preserver (a drive with Windows installed). By booting from such a drive you will be given unlimited access to editing any type of files and directories.
Since the download is carried out from under a different system. Creating a boot disk is also quite simple; for this you need a special LiveCD image and the UltraISO program.
By the way, I recently wrote a similar article on the topic of accessing the goals folder, so if you haven’t found a solution, I recommend that you read it. Perhaps some methods will come in handy.
Video on the topic
Fix TrustedInstaller.exe errors
- 1 Information about the file TrustedInstaller.exe
- 2 Errors related to the TrustedInstaller.exe file
- 3 How to fix errors related to TrustedInstaller.exe?
- 3.1 Scan for malware
- 3.2 System and driver updates
- 3.3 System File Checker Tool
- 3.4 System Restore
- 4.1 List of versions of the TrustedInstaller.exe file
File information
| basic information | |
| File name | TrustedInstaller.exe |
| File extension | EXE |
| Description | Windows Modules Installer |
| Software | |
| program | Microsoft® Windows® Operating System |
| author | Microsoft Corporation |
| details | |
| MIME type | application/octet-stream |
| File type | Executable application |
| system | Windows NT 32-bit |
| Copyright | © Microsoft Corporation. All rights reserved. |
| Character set | Unicode |
| tongue cod | English (US) |