Welcome to another article about setting up the TP-Link TL-WR842ND router. A new router with updated functionality, replacing the legendary 841 model. Due to the popularity of the first one, I could not completely oust it from the market, but I still brought my own innovations. Read about how to properly configure it from scratch from connection to the Internet and Wi-Fi in this article.
Found any strange non-human errors? Do you have anything to add? Is your experience different from mine? Write in the comments. Perhaps it is your word that will significantly make life easier for some person who comes here.
Instead of a preface
I could safely send you to our article about setting up the 841ND, but this router has some innovations that were not there before:
- USB port – file server (connect a flash drive and share files), print server (connect a printer and print from the network). For versions starting from version 2, support for USB modems was added.
- White antennas instead of black ones (not great, but someone was waiting for this).
- Creation of 4 Wi-Fi networks with different settings.
Those. everything is the same, only it becomes possible to use a USB port. Usually everything works out of the box, and some cases require special attention, so here I propose to focus on the basic wired Internet connection and creating a Wi-Fi access point. I suggest turning all other highlighted settings into comments. This is still the same good TP-Link with a sea of possibilities.
Setting up an L2TP connection
- WAN Connection Type : select L2TP/Russia L2TP
- User Name : your contract login
- Password and Confirm Password : your contracted password
- We put an end to Dinamic IP
- Server IP Address/Name - server address or name (specified in the contract)
- MTU size - change the value to 1450 or less
- WAN connection mode - Connect Automatically (connect automatically)
- After entering the above settings, click Save . The Internet is configured.
About quick setup
The steps above allow you to do everything the way you want. For the very first setup, it is quite convenient to use the “Quick setup” option:
This is a step-by-step wizard that will guide you through all the steps above, but in its own interface - it will set up the Internet, Wi-Fi, and change the password. Its only drawback is that it completely resets the saved settings every time it is saved. Those. if in the future you want, for example, to simply change your Wi-Fi password, it will be much easier to go to Step 4 of this guide than to reset everything and look for the Internet password again. But for the very first setup it is quite convenient. You can use it!
Wi-Fi setup
- On the left select Wireless mode
- Fill in the Wireless Network Name field. Latin! This will be the name of your Wi-Fi network
- Save. We ignore the reboot offer for now.
- On the left select Wireless Security
- Select WPA/WPA2 – Personal
- Set a password, at least 8 characters
- Save
- Reboot the router for the changes to take effect.
About USB setup
There is a separate section for setting up the USB port:
When connecting something to USB, pay special attention to these sections:
- 3G/4G – for connecting a USB modem. Connect, select settings for it, it should activate successfully. Those. The most important thing is not to just connect the modem and wait for a miracle, but to go to this section in the configurator and select your operator (optional, enter the operator settings manually). And after that the modem will connect.
- Sharing – to access a connected flash drive or hard drive.
- FTP server – to activate a connection to a flash drive or disk storage via FTP.
- Media server – for viewing the contents of the same flash drive or disk, for example, from a TV via DLNA.
- Print server – I have a printer connected here. I use it myself, it’s very convenient. I print from any device.
Setting up a PPPoE connection
- On the left select the Network , then MAC Clone
- Click Clone MAC address , then Save
- In the WAN Connection Type field: PPPoE
- User Name : your contract login
- Password and Confirm Password : Your contracted password.
- WAN Connection Mode : Connect Automatically
- After entering the above settings, click Save . The Internet is configured.
About WPS
Does everyone know about the technology of connecting to Wi-Fi via WPS? In everyday life I prefer to disable this option. You can also set a PIN code here:
I will end here. There are a lot of settings, and even more specific tasks. Most of the questions have been described above, but if you need something extravagant, write in the comments. Let's try to update the article and understand your situation.
Setting up the TP-Link TL-WR842ND router
- Setting up a local network connection
- Connecting the TP-Link TL-WR842ND router to a computer
- Authorization
- Setting a password for wi-fi
- Setting up PPTP
- Setting up PPTP with a static IP address
- L2TP setup
- Setting up L2TP with a static IP address
- Setting up PPPOE
- Setting up PPPOE with a static IP address
- Changing the web interface password
- Resetting the web interface password
- Firmware update
- Setting up an FTP server on the TP-Link TL-WR842ND router
- Setting up a media server on the TP-Link TL-WR842ND router
- Setting up a print server on the TP-Link TL-WR842ND router
- Connecting a computer to wi-fi
Setting up a local network connection
Before we start setting up the router, let's check the local network connection settings. For this:
Windows 7
Click on “ Start ”, “ Control Panel ”.
Then click on “ View network status and tasks ”.
Next, click on “ Change adapter settings ”.
In the window that opens we see “ Local Area Connection ”. Right-click on it and select “ Property ”.
Then select “ Internet Protocol Version 4 (TCP/IPv4) ” from the list and click “ Property ”.
In the window that opens, you need to check the “ Obtain an IP address automatically ” and “ Obtain DNS server address automatically ” checkboxes, then click the “ Ok ” button.
Windows 10
Click on “ Start ”, “ Settings ”.
Then click on “ Network and Internet ”.
Next, select “ Ethernet ” and click on “ Configure adapter parameters ”.
In the window that opens we see “ Ethernet ”. Right-click on it and select “ Property ”.
Then select “ IP version 4 (TCP/IPv4) ” from the list and click “ Property ”.
In the window that opens, you need to check the “ Obtain an IP address automatically ” and “ Obtain DNS server address automatically ” checkboxes, then click the “ Ok ” button.
Connecting the TP-Link TL-WR842ND router to a computer
The next step is to connect the TP-Link TL-WR842ND to your Laptop or Personal Computer (PC). To do this, you need to connect the cable that your provider provided to you to the blue port of the router (that is, this is the cable that goes to your apartment, house, office, etc. from outside), and the cable that came with router, one end into one of the four ports, which are marked in yellow on the router, and connect the other end to your laptop or PC. And yes, don't forget to connect the power cable.
Authorization of the TP-Link TL-WR842ND router
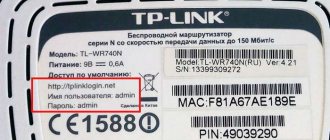
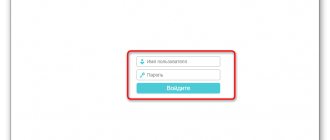
So, we have connected the router, now you need to access its web interface through any browser (be it Google Chrome, Mozilla Firefox, Internet Explorer, etc.). To do this, open the browser and enter the router address in the address bar: 192.168.0.1 and press the “ Enter ” button on your keyboard.
After we see that the router requires you to log in, i.e. asks for username and password. By default, Tp-Link routers have:
- Username - admin
- Password - admin
So, enter the data and click “ Login ”
Setting up the Tp-Link TL-WR842ND router
And finally we got to the router’s Web interface and now you need to configure the equipment. First of all, let's secure the wireless network by setting a password for wi-fi. Then you will need to find out what type of connection is used to access the Internet, is it PPTP, L2TP or PPPOE. You can find out by calling your provider (this is the organization with which you entered into an agreement to provide Internet services). So, let's start setting up the router.
Setting a password for wi-fi
the Tp-Link TL-WR842ND router using the Tp-Link TL-WR1043ND router as an example.
Let's also take a written and illustrative look at setting up a wi-fi password on the Tp-Link TL-WR842ND . On the Web interface, select the “ Wireless Mode ” tab in the menu and find yourself in the “ Wireless Mode Settings ”. Here you need to come up with and indicate the name of your wireless network in the “ Wireless network name: ” column; this name will be displayed in the future when you connect to the network. Then select “ Region: ” - Russia . After that, click “ Save ”.
Next, go to the menu and go to the “ Wireless Protection ” tab. Here we will set up a password for the wireless network invented above; to do this, select the encryption type “ WPA/WPA2-Personal (Recommended) ”, and then below in the “ PSK Password ” field we come up with and enter a password. Then click “ Save ”.
After we clicked “ Save ,” a message will appear above this button indicating that the settings have been saved and now we need to reboot the router. This is what we do by clicking on the “ click here ” button, sending the router to reboot. After the reboot, the name of your wireless network will appear in the network settings of your computer.
Setting up PPTP
I bring to your attention Video instructions for setting up the PPTP on the Tp-Link TL-WR842ND using the example of the Tp-Link TL-WR1043ND router.
Let's also take a written and illustrative look at setting up a PPTP on the Tp-Link TL-WR842ND . So go to the menu, go to the “ Network ” tab, then “ WAN ”. In the “ WAN connection type: ” select “ PPTP/PPTP Russia ”, below you will be asked to indicate the user name (in the “ Username: ” line) and password (in the “ Password: ” line). You will also need to specify the server's IP address (in the line " IP address/Server name: "). All of the above data is provided to you by the provider (the organization that provided you with the Internet). All this data is usually specified in the contract with the provider. If for some reason you could not find them, you need to call your provider's hotline and find out how you can get them. After you have entered all the necessary data, check the box next to “ Connect automatically ” (This setting will keep your connection to the Internet constantly, so if you do NOT have an unlimited tariff, I recommend checking the box next to “ Connect on demand ”, that is, the Internet is connected only when case when you start using it). After all manipulations with the settings, click the “ Save ” button.
Setting up PPTP with a static IP address
Let's look at setting up a PPTP connection with a static IP address on the Tp-Link TL-WR842ND . Typically, a static IP address is provided to legal entities, or as an additional service to the basic tariff to individuals. So go to the menu, go to the “ Network ” tab, then “ WAN ”. In the “ WAN connection type: ” select “ PPTP/PPTP Russia ”, below you will be asked to indicate the user name (in the “ Username: ” line) and password (in the “ Password: ” line). Since the connection uses a static IP address, you check the box next to “ Static IP address ”, then indicate the server IP address (in the line “ IP address/Server name: ”), IP address (in the line “ IP address : "), subnet mask (in the line " Subnet mask: "), default gateway (in the line " Default gateway: ") and DNS (in the line " DNS: "). All of the above data is provided to you by the provider (the organization that provided you with the Internet). All this data is usually specified in the contract with the provider. If for some reason you could not find them, you need to call your provider's hotline and find out how you can get them. After you have entered all the necessary data, check the box next to “ Connect automatically ” (This setting will keep your connection to the Internet constantly, so if you do NOT have an unlimited tariff, I recommend checking the box next to “ Connect on demand ”, that is, the Internet is connected only when case when you start using it). After all manipulations with the settings, click the “ Save ” button.
L2TP setup
L2TP connection on the Tp-Link TL-WR842ND . So go to the menu, go to the “ Network ” tab, then “ WAN ”. In the “ WAN connection type: ” select “ L2T/L2T Russia ”, below you will be asked to indicate the user name (in the “ Username: ” line) and password (in the “ Password: ” line). You will also need to specify the server's IP address (in the line " IP address/Server name: "). All of the above data is provided to you by the provider (the organization that provided you with the Internet). All this data is usually specified in the contract with the provider. If for some reason you could not find them, you need to call your provider's hotline and find out how you can get them. After you have entered all the necessary data, check the box next to “ Connect automatically ” (This setting will keep your connection to the Internet constantly, so if you do NOT have an unlimited tariff, I recommend checking the box next to “ Connect on demand ”, that is, the Internet is connected only when case when you start using it). After all manipulations with the settings, click the “ Save ” button.
Setting up L2TP with a static IP address
Let's look at setting up an L2TP connection with a static IP address on the Tp-Link TL-WR842ND . Typically, a static IP address is provided to legal entities, or as an additional service to the basic tariff to individuals. So go to the menu, go to the “ Network ” tab, then “ WAN ”. In the “ WAN connection type: ” select “ L2T/L2T Russia ”, below you will be asked to indicate the user name (in the “ Username: ” line) and password (in the “ Password: ” line). Since the connection uses a static IP address, you check the box next to “ Static IP address ”, then indicate the server IP address (in the line “ IP address/Server name: ”), IP address (in the line “ IP address : "), subnet mask (in the line " Subnet mask: "), default gateway (in the line " Default gateway: ") and DNS (in the line " DNS: "). All of the above data is provided to you by the provider (the organization that provided you with the Internet). All this data is usually specified in the contract with the provider. If for some reason you could not find them, you need to call your provider's hotline and find out how you can get them. After you have entered all the necessary data, check the box next to “ Connect automatically ” (This setting will keep your connection to the Internet constantly, so if you do NOT have an unlimited tariff, I recommend checking the box next to “ Connect on demand ”, that is, the Internet is connected only when case when you start using it). After all manipulations with the settings, click the “ Save ” button.
Setting up PPPOE
I bring to your attention Video instructions for setting up the PPPOE on the Tp-Link TL-WR842ND using the example of the Tp-Link TL-WR1043ND router.
Let's also take a written and illustrative look at setting up a PPPOE on the Tp-Link TL-WR842ND . So go to the menu, go to the “ Network ” tab, then “ WAN ”. In the “ WAN connection type: ” select “ PPPoE/PPPoE Russia ”, below you will be asked to indicate the user name (in the “ Username: ” line), password (in the “ Password: Confirm password:” line "). All of the above data is provided to you by the provider (the organization that provided you with the Internet). All this data is usually specified in the contract with the provider. If for some reason you could not find them, you need to call your provider's hotline and find out how you can get them. After you have entered all the necessary data, check the boxes next to “ Dynamic IP address ” and “ Connect automatically ” (This setting will keep your connection to the Internet constantly, so if you do NOT have an unlimited tariff, I recommend checking the box next to “ Connect on demand ”, that is, the Internet is connected only when you start using it, or “ Connect on a schedule ,” that is, the Internet works at a certain time specified by you). After all manipulations with the settings, click the “ Save ” button.
Setting up PPPOE with a static IP address
Let's look at setting up a PPPOE connection with a static IP address on the Tp-Link TL-WR842ND . Typically, a static IP address is provided to legal entities, or as an additional service to the basic tariff to individuals. So go to the menu, go to the “ Network ” tab, then “ WAN ”. In the “ WAN connection type: ” select “ PPPoE/PPPoE Russia ”, below you will be asked to indicate the user name (in the “ Username: ” line), password (in the “ Password: Confirm password:” line "). Since the connection uses a static IP address, you check the box next to “ Static IP address ”, then specify the IP address (in the “ IP address: ” line), subnet mask (in the “ Subnet mask: ” line). All of the above data is provided to you by the provider (the organization that provided you with the Internet). All this data is usually specified in the contract with the provider. If for some reason you could not find them, you need to call your provider's hotline and find out how you can get them. After you have entered all the necessary data, check the box next to “ Connect automatically ” (This setting will keep your connection to the Internet constantly, so if you do NOT have an unlimited tariff, I recommend checking the box next to “ Connect on demand ”, that is, the Internet is connected only when case when you start using it, or “ Connect on a schedule ”, that is, the Internet works at a certain time specified by you). After all manipulations with the settings, click the “ Save ” button.
Changing the web interface password
I bring to your attention Video instructions for changing the password on the web interface of the Tp-Link TL-WR842ND using the example of the Tp-Link TL-WR1043ND router.
Resetting the web interface password
If you set a password on the web interface of the router and forgot it, I invite you to watch the Video instructions for resetting the web interface password on the Tp-Link TL-WR842ND using the Tp-Link TL-WR1043ND router as an example.
Firmware update
I bring to your attention Video instructions for updating the firmware on the Tp-Link TL-WR842ND using the example of the Tp-Link TL-WR1043ND router.
Setting up an FTP server on the Tp-Link TL-WR842ND router
I bring to your attention Video instructions for setting up an FTP server on the Tp-Link TL-WR842ND using the Tp-Link TL-WR1043ND router as an example.
Setting up a media server on the Tp-Link TL-WR842ND router
I bring to your attention Video instructions for setting up a media server on the Tp-Link TL-WR842ND using the Tp-Link TL-WR1043ND router as an example.
Setting up a print server on the Tp-Link TL-WR842ND router
I bring to your attention Video instructions for setting up a print server on the Tp-Link TL-WR842ND using the example of the Tp-Link TL-WR1043ND router.
Connecting a computer to wi-fi
After connecting and setting up the router, you need to connect the computer to a wireless network (wi-fi), let's consider connecting to wi-fi in two operating systems, these are Windows 7 and Windows 10:
Windows 7
Video instruction
In the lower right corner of the desktop, find the wireless network (wi-fi) icon and click on it with the left mouse button.
A window pops up with a list of available wireless networks. We select a wireless network, in my case it is the “ Sultan ” network (You select the network whose name was given when setting up the router).
After selecting the network, check the box next to “ Connect automatically ” and click “ Connect ”.
Next, you need to specify the “ Security Key ” - this is the wireless network password that you specified when setting up the router. After you have specified the key, click “ OK ”.
We wait perhaps a couple of seconds and you are connected to your wireless network.
Windows 10
Video instruction
In the lower right corner of the desktop, find the wireless network (wi-fi) icon and click on it with the left mouse button.
A window pops up with a list of available wireless networks. We select a wireless network, in my case it is the “ Sultanova ” network (You select the network whose name was given when setting up the router).
After selecting the network, check the box next to “ Connect automatically ” and click “ Connect ”.
Next, you need to specify the “ Security Key ” - this is the wireless network password that you specified when setting up the router. After you have specified the key, click “ Next ”.
We wait perhaps a couple of seconds and you are connected to your wireless network.
Physical network creation
The procedure for connecting this router is practically no different from the standard one.
It starts with connecting the power adapter to the router and plugging it into the electrical network.
Next, you should connect the power cord that comes with it to one of the ports highlighted in yellow.
The second end of the cord must be connected to the device through which the adjustment is planned: to a PC or laptop (provided that it is through such a device that the network connection will be used).
At the next stage, you will need to connect the cable coming from the provider to the connector highlighted in blue.
You can also use an alternative connection method via Wi-Fi. In this case, you will need to find his network, which is usually not closed, i.e. the connection is made without a password.
If for some reason the manufacturer decided to secure the connection process, then on the bottom of the case there will be a sticker with all the necessary data, for example, a password.
It is also called PIN password.
Creating and setting up a local network in Windows 7
Creating and setting up a local network in Windows 7. Creating and setting up a local network in Windows 7 is most relevant because... The process of creating a network between computers is different in Windows 7 and XP.
Options and packaging
Everything here is classic and, as always, for devices from TP-Link: a small box with a photo of the router and its technical characteristics. Inside is everything you might need to get it started:
- The router itself.
- Power supply 12V/1A.
- User guide.
- RJ-45 cable for the initial connection of the computer and network setup of the device.
Characteristics:
- support PPPoE, PPTP, L2TP;
- two antennas;
- FTP, Samba support;
- 300 Mbit/s;
- there is a USB0 interface;
- protection via WPA, WPA2-PSK, WEP;
- filters by domain, MAC address, IP.
The TP-LINK TL-WR842ND router comes with a power supply, a patch cord, two antennas, instructions and a disk. The USB port, which the developers built into the device, can be used to work with an external printer. In addition, this interface makes it possible to view files on a flash drive. Interestingly, information from the drive will be available via FTP or on a media server.
The router has a high transmission speed, which is noticeable when you enable the IP television option via your PC.
Appearance
Appearance is distinguished by conservatism. The manufacturer did not change the design that was already loved by many users. As before, the body is made of practical light matte plastic, which does not leave stains after touching and does not show dust. The front panel, in addition to the name of the manufacturer, includes indicators of the operating mode of the device.
At the bottom in the middle is a sticker on which the user can read the name and access code to the equipment interface. The bottom cover has a lot of slots, which prevents the equipment from overheating under load. Wall mounts are also located here. 4 feet coated with polymer effectively prevent slipping when installing the router on a horizontal polished surface.
At the back, in addition to the aforementioned ports and antenna mounts, the “On/Off” keys have found their place. and "Reset". This is not a very convenient solution, since if handled carelessly, the owner of the device may accidentally click “Reset,” which will reset all settings to the factory state.
Traditionally, a power socket is also installed on the rear panel.
The USB port is installed in close proximity to the Internet socket, which does not allow some large modules to be connected to the connector without special adapters.
Brief overview and main technical parameters of the device
The inexpensive and multifunctional TL-WR842N attracts ordinary users primarily due to its ease of operation and convenient procedure for entering settings, and support for high data transfer speeds, the value of which reaches 300 Mbit/s, plays an important role in the popularity of the model.
This indicator ensures the reliability of the Wi-Fi network without periodic interruptions in communication. The five Internet ports on the back of the router include a standard WAN and four LAN jacks, which is usually enough for home modems.
The presence of a USB connector and support for modems from Russian cellular operators significantly expands the possibilities of using the router even in areas remote from cities.
It is also necessary to note the possibility of organizing shared access to a printer connected to the router via a USB port from all gadgets on the Wifi network. And if you connect an external USB drive, then all devices on your home network can use and run files stored on a shared hard drive or flash drive.
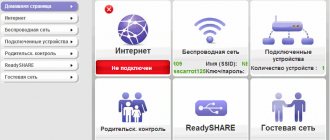
The Guest Networking feature allows you to secure information stored on computers on your home network and configure access rights to them by using different passwords for groups. If necessary, you can limit the data transfer speed and limit traffic for each group individually.
Separately, we should highlight the Wi-Fi protection “Protected Setup”, which will quickly ensure Wi-Fi security with a simple click on the WPS button. Just one click on it will enable automatic protection using WPA2 encryption. The convenience of the method lies not only in the speed of the operation, but also in the absence of the need to enter an access code.
Also among the entire list of technical characteristics, the following should be highlighted:
- Wi-Fi signal power reaches 20 dBm;
- Thanks to “IPSec”, up to five VPN channels are provided via the IKE protocol through different encryption technologies;
- External antennas are removable, thanks to which, if necessary, you can always purchase and install others - with a higher gain;
- The router operates in the popular 2.4 GHz frequency range;
- Dimensions: 192 x 130 x 33 mm;
- Parental control;
- Works with computers running Windows NT, 98SE, XP, 2000, Vista and 7, as well as Linux MAC OS, UNIX and NetWare.
Advanced Features
The steps described above will ensure that the router function works. We also mentioned that the TL-WR842ND router has additional features, so we’ll briefly introduce you to them.
Multifunctional USB port
The most interesting feature of the device in question is the USB port, the settings of which can be found in the web configurator section called “USB Settings”.
- You can connect a modem for 3G or 4G networks to this port, thus allowing you to do without a wired connection - subsection “3G/4G”. A wide range of countries with major providers is available, ensuring automatic connection setup. Of course, you can configure it manually - just select the country, data service provider and enter the necessary parameters.
- When connecting an external hard drive to the connector, the latter can be configured as an FTP storage for files or a media server can be created. In the first case, you can specify the address and connection port, and also create separate directories.
Thanks to the media server function, you can connect multimedia devices that support wireless networks to the router and view photos, listen to music or watch movies.
- The print server option allows you to connect a printer to the router’s USB connector and use the printing device as a wireless one – for example, to print documents from a tablet or smartphone.
- In addition, it is possible to control access to all types of servers - this is done through the “User Accounts” subsection. You can add or remove accounts, and also give them restrictions such as read-only rights to the contents of the file storage.
WPS
This router supports WPS technology, which greatly simplifies the process of connecting to the network. You can learn about what WPS is and how it should be configured in our other article.
Read more: What is WPS on a router
Access control
Using the “Access Control” section, you can fine-tune the router to allow certain connected devices to access certain resources on the Internet at certain times. This option is useful for system administrators in small organizations, as well as for parents who find the Parental Controls feature insufficient.
- In the “Rule” subsection, general control settings are performed: selecting a white or black list, setting up and managing rules, as well as disabling them. By clicking the “Configuration Wizard” button, you can create a control rule in automatic mode.
- In the “Node” item, you can select the devices to which the Internet access control rule will be applied.
- The “Target” subsection is intended for selecting resources to which access is subject to restrictions.
- The “Schedule” item allows you to configure the duration of the restriction.
The function is certainly useful, especially if Internet access is not unlimited.
VPN connections
Out of the box, the router in question supports the ability to connect to a VPN connection directly, bypassing the computer. Settings for this function are available in the same-named item in the main menu of the web interface. In fact, there are not many parameters - you can add a connection with an IKE or IPSec security policy, and also get access to a not very functional connection manager.
That, in fact, is all we wanted to tell you about setting up the TL-WR842ND router and its main features. As you can see, the device is quite functional for its affordable price, but this functionality may be redundant for use as a home router.
We are glad that we were able to help you solve the problem. Add the Lumpics.ru website to your bookmarks and we will be useful to you. Thank the author and share the article on social networks.
Describe what didn't work for you. Our specialists will try to answer as quickly as possible.
Connection setup (MAC substitution)
If the provider checks the MAC address (there is a “binding” to the MAC), then you can change the value of this address on the WAN port. Including “clone” (from the PC from which the setup is taking place).
To spoof the hardware MAC address, go to the “Network” tab. Open "Clone...":
Cloning a MAC address
You can simply change the value (in the top field) to the one you need. Or, copy the address from the computer (from its network card), for which there is a “Clone MAC address” button.
When you have finished setting the value, click on “Save”. The address will immediately be assigned to the WAN port. There is no “deception” in this: the user is not obliged to bother the provider just when changing equipment (and if such an opportunity exists, one should take advantage of it).