Author: Semyon Fedorov
Last updated September 23, 2019
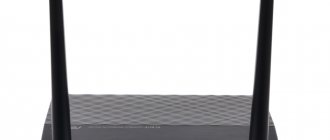
RT-AC5300 stands out with its interesting design
- 1 Asus router models
- 2 External interface of the Asus router
- 3 How to connect an Asus router
- 4 How to reset your Asus router
- 5 Login to the Asus router
- 6 How to set up an Asus router
- 8 Nuances of different models and how to enter the settings of Asus routers
Front end
Let's take a look at the front of the device. You will see 7 lights, which are indicators of the operation of a certain state of the router.
- Indicates power mode: Off – off;
- Flashing slowly – system startup;
- Flashing quickly – automation;
- Constantly lit - the system is ready for operation.
- Off – wireless network distribution mode is disabled;
- Lights up – there is internet.
- On – the port is connected, but there is no information exchange;
Setting up Wi-Fi on the ASUS RT-N12VP router
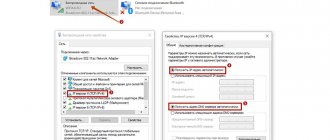
To set up Wi-Fi on the ASUS RT-N12VP router, click on the phrase Wireless network on the left side of the menu. In the main part of the window, in the General tab, in the SSID field, erase the factory name and enter the network name that you would like. The network name should not contain Russian letters. As network options, you can write, say, Home124, IvstarNET, Ko-Lokol, etc. Leave the Hide SSID option in the No position - in most cases there is no point in hiding the network, and this will make it easier to check whether your Wi-Fi network is working or not, and whether the router has reset its settings. The wireless network mode can be left as is for a start; if one of your devices sees the Wi-Fi network, but cannot connect even if the password is entered correctly, you can play with this option (uncheck b/g Protection or select A only, B oly and etc.) and at the same time change the channel width in the line below. We recommend changing the channel number from Auto to one of the values from 1 to 13. Why is this necessary? So that your Wi-Fi network works better and is not affected by routers from neighbors, otherwise you will complain to your provider that everything was fine with you before, and then the Internet began to slow down. Try to choose numbers at the beginning 1, 2, 3 or closer to the end 10, 11, 12, 13. To prevent your Wi-Fi from being a freebie, set a password for it. In the Authentication Method option, select an option, say WPA2-Personal, and in the WPA Pre-Shared Key field, enter the desired Wi-Fi password. Again, don’t forget to click the Apply button at the very bottom to save the router settings. Those who set up a router without a cable will at this moment lose connection to the Internet and the router. You will need to find a new Wi-Fi network for which you yourself set a name a minute ago and connect to it. This completes the main part of setting up the ASUS RT-N12VP router and you can already use the Internet.
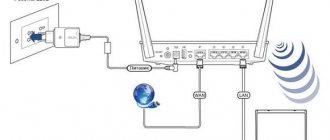
How to install
- We place the router on a flat, dry surface near a 220 Volt outlet and an Internet cable.
- We connect the twisted pair cable that your provider provided to you into the connector for the Internet cable;
- Next, take a network cable and insert one end into a PC or laptop, and the other into one of the connectors for a LAN connection. We designated them as number 3.
- Next, connect the power to the router - number 4.
- Now turn it on - number 5.
Now you need to wait a little while the system boots. Compared to older models, when you had to wait 2-3 minutes, this device loads almost at lightning speed.
How to setup
- We launch any browser: Chrome, Internet Explorer, Mozilla, etc.
- At the very top, enter the IP – 192.168.1.1 default router address to enter the settings (you can change it a little later).
- Next, a quick setup page will appear. If this does not happen and someone else has used the device before, then it needs to be reset to factory settings. To do this, take a paper clip or a needle and press the button that was previously number 6 in the picture of the back panel. Hold this for about 9 seconds until the router starts to overload. After that, go to the same address again.
- Click the “GO” button.
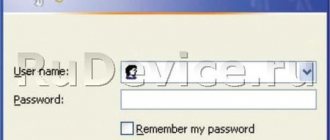
- Now you need to come up with a password that will be used to enter the router settings. We kindly ask you to come up with something original, but remember it. You can write the password down on a piece of paper or write it into notes on your phone.
- The next step involves automatic authentication on the Internet. All connection data is written there, but sometimes it happens that the data is entered incorrectly - in this case, you will have to configure it manually. You may also need a login and password to log in - it is located in the settings sheet from the provider.
NOTE! If the router failed to automatically configure the Internet, then proceed to the next chapter.
- If everything went well, then you need to enter the name of the WI-FI network in the SSID network name assignment field. In the “Network key” , enter the Wi-Fi password. Click “Apply”.
- At the final stage, the settings have been applied and you will see the connection data window.
- Click next and you will again be asked to enter your login (admin) and password (the one you specified in step 5).
Now the Internet is working, and you can safely use it while simultaneously connecting a personal computer, TV with Smart TV, tablets and smartphones. If there is no Internet, then most likely your provider uses PPPoE, L2TP, PPTP distribution technology; we just do manual configuration.
Choice: PPPoE, L2TP, PPTP
- During the automatic setup step, you will be asked to select the technology your ISP uses: PPPoE, L2TP, PPTP or Static IP. Information about connection is in the contract. But you can also call the hotline number and check this information there. Select the desired option.
- Next, you may need to enter your username and password. It is also included in the provider agreement.
- Afterwards you will be asked to enter your Wi-Fi access data (see the chapter above).
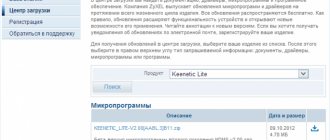
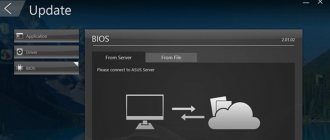
Firmware recovery in case of update failure
In this case, the official program, which was discussed in the previous paragraphs, will be useful. Next you will need to put the router into recovery mode . To do this, you will need to pull out the power supply, after which you will need to hold the reset button and plug it into the outlet. At the same time, the router should blink slowly, this will indicate that it is in recovery mode.
Next you need to use the Firmware Restoration . In it you will need to specify the path to the firmware that needs to be installed and click send after the router goes into recovery mode. When the router stops blinking and turns solid, the process is complete. If errors occur, you should try again.
This completes all the secrets of the router firmware and now the user knows what to do in a given situation. He also knows how to restore the router if something goes wrong.
Manual connection
If you made a mistake with the type of connection you selected, you can make the settings manually.
- To do this, go to 192.168.1.1 in the same way.
- Enter your password and login.
- In the left menu, click on the “Internet” tab.
- Look at the connection settings in your contract with your provider or check with technical support for this information. The picture below shows the Internet setup from Beeline.
No Internet
This happens when the MAC address specified in the router does not match the MAC address to which the provider is trying to connect. To change go to:
- On the main page, click on “Internet”.
- At the very bottom you will see the treasured field.
- First, try to specify the MAC address of your PC or laptop, sometimes this solves the problem. Just click “Clone MAC” and then “Apply” .
- Otherwise, we will find out this data from the contract or by calling technical support. support.
Virtual server and setting up FTP or HTTP port forwarding
- Go to the “Internet” .
- Next, go to the section “Port Forwarding” .
- In the line “List of favorite servers ” we indicate FTP or HTTP.
- Enter the local IP of your server and the port range.
- Click “Apply”.
If everything went well, then access to files from another computer to the server will be open.
How to flash
- First, we need to download the software from the official page - https://www.asus.com/ru/support/.
- We enter the name of our model without the brand name - RT N12 or RT N12 VP.
- We search and click on “Drivers and Utilities”.
- We indicate the operating system and download it to the computer.
- Unpack the archive.
- We log into our router - enter 192.168.1.1 in the address bar of the browser, and then enter the login information: login and password.
- Now click on the numbers that are to the right of “Firmware Version”.
- Click “Select file” , go to the unpacked folder and click on the only file.
- Click “Send”.
- We wait for a while.
- Once everything is completed, be sure to reset your router. And then configure it again.
How to reset your Asus router
There are two ways to reset all settings to factory settings: from the administrative panel and using the reset button on the device body. We will discuss software reset later.
The reset button is not always easy to find
And resetting the settings using the button is very simple - you need to find it on the back or bottom panel. It is often recessed in such a way that it could only be reached with something like a pen or paper clip. Pressing once will activate the reset process. Sometimes you will need to hold the button down for a while. In any case, it is better to clarify this point in the router manual.
How to set up IPTV television
- Let's go to the device settings.
- Go to the section "Local network" . Next, select the IPTV tab at the top.
- To begin, indicate your provider profile. Next, take the wire and connect it from the IPTV STB module to this router to the LAN port. Remember the port number.
- Specify the DHCP type routes to be used.
- You can enable IGMP or multicast routing. This also enables RTSP and RTP.
- Specify the IP TV application port. Click "Apply" . Next, enter the following address in the address bar:
IPTV: https://:[The port you specified]/[protocol]/:[channel port]
External interface of the Asus router
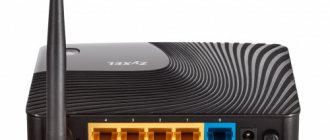
Externally, almost all routers from Asus look the same, with the exception of models with a unique design. In the simplest case, it is a box in a horizontal position with status indicators placed on it. Depending on the configuration, there may be from 1 to 6 antennas. Typically, the more antennas, the better the quality of the received signal, which means the higher the stability of the connection. The back contains LAN ports, WAN ports, power connector, USB and reset button. In general, this is what any classic router looks like now.
The rear panel usually contains a standard set of connectors and interfaces
Internet setup via 3G, 4G, USB modem
- We turn on the Asus RT N12HP router or a similar model;
- We insert the cable into the LAN input, and connect the other end to the computer;
- We insert our modem into a special connector.
- Launch any browser and enter www.asusnetwork.net in the address bar.
- You will be redirected to the automatic setup page.
- In the Location field we indicate the country.
- In the drop-down menu we indicate ISP.
- Click Connect.
- Next comes a similar setup of the WIFI network, where you need to specify the network name and password for it.
Flashing
In our ASUS configurator, go to the following tabs:
Administration - Firmware Update
And here we select our file and click the “Submit” button:
Restore or setup
Now is the time to restore all settings. Again we follow the old path “Administration - Manage Settings”, but this time we upload the saved configuration file and click the Send button:
We will talk about how to configure the ASUS RT-N12VP router - one of the most popular routers purchased by subscribers; This router model has been produced since 2012 and is relevant in 2020 -2016. Setting up the ASUS RT-N12VP router includes setting up an Internet connection and setting up Wi-Fi. It is worth noting that the ASUS RT-N12VP router is not suitable for viewing the IPTV provider on a computer; it cannot work correctly with IGMP Proxy; only an IPTV set-top box can be connected to this router.
Technical characteristics and components of Asus RT
| Operating modes | Wireless router |
| Repeater | |
| Access point | |
| Network data transmission standards | IPv6 |
| IEEE 802.11b | |
| IPv4 | |
| IEEE 802.3 | |
| IEEE 802.11g | |
| IEEE 802.3u | |
| IEEE 802.11n | |
| Network speed | Up to 300 Mbps |
| Two antennas | External 5 dBi |
| Special abilities | Parental control |
| Multiple WI-FI networks | |
| Frequency | 2.4 or 5 GHz |
| Equipment | 1 Power cable |
| 1 Router | |
| 1 Cable with RJ45 connector | |
| 1 Warranty card | |
| Nutrition standards | AC Input : 110V~240V(50~60Hz) |
| DC Output: 12 V with max. 0.5A current | |
| Weight | 0.275 KG |
| Size | Width: 128 cm |
| Height: 28 | |
| Length: 179 cm | |
| Working with operating systems | Windows XP |
| Windows 2000 | |
| Windows 7 | |
| Windows 8 | |
| Windows 10 | |
| Windows Vista | |
| Mac OS X | |
| Linux | |
| Similar models | Router: T-N12, RT-N12 (VER.D1), RT-N12 B1, RT-N12 C1, RT-N12_VP, RT-N12E, RT-N12HP, RT-N12LX, RN-NT-N12 |