ASUS RT-N11P router: appearance, characteristics
This router model has the following characteristics:
- General parameters: black color with carbon fiber stylized top panel, weight 180 g and dimensions 145 x 110 x 25 mm.
- Four green LEDs on the front panel (power indicator, wireless connection activity, network access and presence of wired clients).
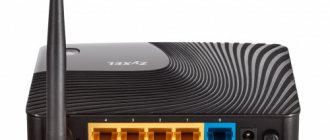
- Four sockets for creating a wired LAN on the rear panel and one Ethernet output for the provider’s network cable.
On the back panel of the router there are 4 LAN connectors and one for the Internet
- MediaTek processor with a frequency of 580 MHz and sufficient power for full operation of the device.
- The amount of RAM is 32 MB, and the ROM is only 8 MB for storing information.
- The maximum Internet speed is 300 MB/s at an operating frequency of 2.4 GHz.
Table: pros and cons of the router
| Advantages | Flaws |
| The device is considered a budget option - the average price is 1,500 rubles. | Reluctance to connect via Wi-Fi to the device. The software part of budget devices sometimes “forgets” to release dynamic IP addresses. The problem is resolved by rebooting the router. |
| Works using any protocol and with any network (including private virtual and proxy servers), supports all domestic providers. | Weak signal. You can’t do without knowledge of physics: the height of the router relative to the floor, the rotation of the antennas and the presence of reinforced concrete floors - everything affects the quality of the signal. |
| Serves as a repeater, which increases the signal coverage area. | |
| Supports WPS. | |
| Suitable for both home use and small office use. |
Unboxing and introduction
We have a colored box like this, which will eventually be stored somewhere in the bins of the apartment. But you shouldn’t throw it away, since the model comes with a 3-year warranty.
Further included with the N11 device is:
- The device itself is small in size; to be honest, I thought it would be larger.
- Power supply – 12 V 0.5 A.
- Network cable.
- Installation manual, in which everything is written in non-human language. But don’t worry, I’ll also write about the setup below.
- Warranty card, which must be kept for at least three years.
The 11N has only 4 indicators on top:
- Power – the RT device is turned on or off.
- Wi- Fi network – lights up, which means the network is working, if it doesn’t light up, then Wi-Fi is turned off. If it blinks, communication and information exchange are in progress.
- Internet - everything is the same as with a wireless network.
- Local connections – when connecting via cable.
The N11P has ports and buttons on the back:
- WPS/ Reset – if pressed once, the WPS connection will work. If you press for 10 seconds, the device will be reset to factory settings.
- 4-1 LAN ports – for local connection.
- Internet – here we plug in the cable from the provider.
- Port for power supply.
- On/off button.
Setting up IPTV
If you need to set up IPTV service on your router, follow these simple steps:
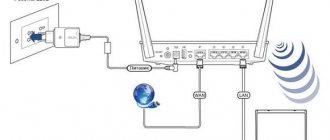
- Take the cord and use it to connect the TV set-top box and the router itself (use one of the free LAN connectors).
- Now in the personal account interface of the network device, go to the section for the local network in the second menu on the left and switch directly to the last IPTV section.
- In the “Select Port” drop-down menu, enter the number of the socket to which you just connected. Save the settings using the “Apply” button and start using the service.
To set up IPTV, specify the number of the LAN port to which you connected the wire
Security Settings
Since the router is budget, an extended set of security settings is not provided. In addition to filtering wireless network traffic, you can configure blocks by URL, keywords, and time of use. The latter is set according to the same principle as in the Wi-Fi settings.
You can set bans separately for each day of the week, accurate to the hour. Work on black (everything not specified is allowed) and white (everything else is prohibited) lists is supported.
Local LAN and DHCP
To set up a local connection, follow these steps:
- Go to the “Local Network” block - in the first tab “LAN IP address” or LAN IP, if you have an interface in English, enter the necessary data: local network IP address and subnet mask.
In LAN IP, enter the local network address
- In the second section, activate the DHCP server or, conversely, disable the server. If enabled, enter the domain name of your router if necessary, define the boundaries of IP addresses that can connect to the network using the items for the ending and starting addresses.
In the second section, disable or enable the DHCP server
- Indicate, if necessary, the time for renting the address.
Setting up a PPPoE connection
- WAN connection type: PPPoE
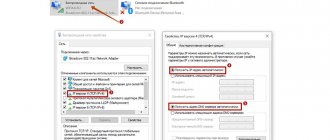
- Enable WAN, Enable NAT, Enable UPnP - set everything to YES
- Get an IP address and connect to DNS automatically - put an end to YES
- Username: Your login according to the contract
- Password: Your password according to the agreement
- MTU: 1472
- Enable VPN + DHCP Connection - No
- Save the settings with the Apply .
Factory reset
Resetting your settings may be necessary, for example, if you have problems with the Internet or if you have forgotten the password for your account that you previously set in the interface.
Press and hold the small Reset button on the back of the device next to one of the antennas for 30 seconds. On other models, 10–15 seconds is enough, but since on this router the Reset button is combined with the WPS key (it helps connect other users to the network without entering a password), a longer hold is required. The signal about the start of the reset will be the simultaneous flashing of the indicators on the panel.
Press the Reset button for 30 seconds
Another reset method is through the cabinet interface:
- Go to the “Administration” block, and in it to the section for managing settings.
- If you don't want to lose all your settings, first save them to a separate file on your PC using the "Save" button.
- Select a location for the file. After that, click on the first “Restore” button.
- When the reset occurs, load the settings from the saved file. Click on “Select file”, find and open it through “Windows Explorer” and click on “Submit”.
Click on “Restore” to reset the router settings
Setting up Wi-Fi on the router
Go to the menu item Additional settings - Wireless network. Please note that both radio blocks can be configured here. Name (SSID) - specify the name for the first and second networks, but they must be different.
In the router interface, you need to go to the tab on the left Additional settings , in the list that opens, select Wireless network .
We set the parameters as follows:
- SSID field : enter the name of the wireless network. The value in this field cannot be changed.
- Authentication Method: WPA2-Personal
- WPA encryption: TKIP or AES
- WPA Preshared Key: You must enter any set of numbers between 8 and 63. They also need to be remembered so that you can specify them when connecting to the network.
- Click the Apply
Firmware update for ASUS RT-N11P router
An update to the router's operating system may be necessary if, for example, it begins to work incorrectly. It's easy to do:
- Click on the "Administration" section in the advanced settings.
Go to the "Administration" section
- Go straight to the third block to update the firmware. Click on the link that is in the first paragraph of the instructions described in the interface.
- Find the updated firmware for the ASUS RT-N11P router on the official Asus website and download it.
- Extract the file with the bin extension from the downloaded archive. In the same update section, click on “Browse” and select the bin file. Click on “Submit”. The flashing process will take about 5 minutes. Do not disconnect the device from the electrical outlet until the process is completed.
Settings
- To proceed to the setup, you need to enter the router parameters in the browser line - 192.168.1.1.
After opening the input panel, in the “Username” and “Password” fields, enter admin and click OK. Open the browser, enter https://192.168.1.1 in the address bar - Next, you go to the quick settings panel. In the open window, you must enter a new password in a special field. It is recommended to come up with a small password. To complete the operation, click on the “Next” button.
- The router will automatically determine the nature of the connection. In most cases, the standard version is set to ppoe.
- In the account activation window, you must enter the login and password specified in the agreement with the provider.
After these steps, the asus rt n11p router will open the Wi-Fi network setup menu, in which you need to enter two parameters:
- Network name – login, which will be displayed in available connections.
- Network key – a password requested during authorization.
After clicking on the “Apply” position, you will be redirected to the settings page, which indicates that the router is ready for operation.
Rostelecom
In order to independently create an Internet connection from the Rostelecom provider on the asus rt n11p router, you need the following:
- Specify connection - PPPoE.
- Place a checkbox next to the parameters for enabling WAN, NAT and UPnP.
- Confirm the settings for obtaining an IP address and DNS automatically.
- Enter the information specified in the contract. If you lose it, you can contact Rostelecom support service.
- Specify the characteristics of MTU – 1472.
- Place a negative marker next to the Enable VPN + DHCP Connection position.
- Save the settings and click on the “Apply” position.
Beeline
Instructions for setting up a router within the framework of the Beeline Internet provider are as follows:
- WAN connection type – L2TP.
- Place a positive marker next to the positions with WAN, NAT and UPnP connections.
- Confirm automatic receipt of an IP address and DNS (If not specified in the contract).
- Enter the username and password that can be found in the agreement.
- Enter information on the VPN server - IP address or its name specified in the agreement with Beeline.
- Save settings.
Tip: Beeline does not require mandatory changes in other parameters. You can write any data in the Latin alphabet in the host name.
WiFi
To set up Wi-Fi on the asus rt n11p model, you need to go to the wireless network creation menu. The instructions for setting up the network in the window that opens are as follows:
- Fill in the information field with the network name, which will be displayed in the menu of available connections. You can specify any combination of words in English.
- To set, reset or replace a Wi-Fi password, you need to fill in the “Authentication” (install WPA2-Personal), “WPA Pre-Shared Key” (acts as a Wi-Fi network password).
- To create a Wi-Fi password, you must specify at least 8 characters.
- Finally, click on the “Confirm” option.
IPTV
IPTV in the asus rt n11p router is configured when setting the Internet connection characteristics. To do this, you need to select the “Select IPTV STB port” option and enter the number of the input to which the wire from the IPTV set-top box will be connected.
How to reboot the router
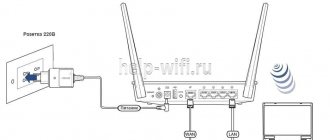
First, turn off the router (deprive it of its power source) - carefully remove the plug from the socket or press the power button located on the back panel of the device, where all the sockets are located. Wait at least 30 seconds, preferably 1 to 2 minutes. Then connect the device to power again.
Another way to reboot is through the button with the appropriate name, which is located at the top center in the router’s personal account to the right of the “Exit” button. Click on it and the network device will automatically reboot.
Click on “Reboot” in your router’s personal account
IPTV
It's standard here. We connect the set-top box to a free LAN input. Go to the RT-N11P user panel and repeat after me:
- In the additional settings menu, click on “Local network”;
- Open the “IPTV” tab at the top;
- In the “LAN port” item in the IPTV port selection line, indicate the number of the connector to which the digital TV set-top box is connected.
There is no need to touch the remaining points. Save your changes.
Testing
According to a good established tradition, we begin this section by establishing the device boot time, which refers to the time interval from the moment the device is turned on until the first echo response is received via the ICMP protocol. The ASUS RT-N11P wireless router boots in 26 seconds. We consider this a good result.
The second test was to check the device’s security using the Positive Technologies XSpider 7.7 (Demo build 3100) network security scanner. A total of six open ports were detected. The most interesting information discovered is presented below.
Before moving on to performance tests, we decided to fulfill the promise made in one of the previous sections and test the operation of the “Extend the TTL value” option. The diagram below shows an example of a typical connection between a subscriber and a provider. Let's assume that the client (client PC address 192.168.1.2) accessed one of the public web servers with the address 2.16.66.181. The client uses RT-N11P with the following addresses on LAN and WAN ports: 192.168.1.1 and 203.0.113.2. The diagram below shows the packets containing the DNS server responses. On the channel between the provider and the router, suppose the packet has TTL=100. When passing through the RT-N11P, the recipient's address is translated (NAT/PAT), and the value of the TTL field is also decremented. The actions described above are standard router behavior.
If the operator somehow specifically reduces the value of the TTL field when transmitting a packet to the subscriber to one, such a packet will be discarded by the client’s router, that is, it will not be transmitted to the PC. This is the basis for the “protection” from unscrupulous users implemented by some operators. Using the "Extend the TTL value" option allows you to change the behavior of the router. It is worth noting that this option does not affect in any way passing packets with a TTL field value greater than one. If the incoming packet has TTL=1, then instead of discarding the packet, the router assigns the TTL field the value 64, after which it performs a set of standard actions: NAT/PAT and TTL decrementation. The described sequence of actions is presented in the diagram below.
Unfortunately, we did not have such a “talented” provider, so to test the functionality of the “Extend the TTL value” option, we simply used two PCs connected to the LAN and WAN ports of the router. On one of the test PCs that was connected to the WAN port (hereinafter referred to as the “server”), we reduced the standard TTL value for all sent packets to one, as shown in the figure below.
Capturing packets using the Wireshark utility made it possible to verify that the packets sent from the “server” actually had a TTL field value of 1, while the same packets received by the “client” had a TTL=63. An example of such a package is presented below.
Let's now move on to performance tests of the ASUS RT-N11P wireless router. The main parameters of the test bench are presented in the table below.
| Component | PC | Laptop |
| Motherboard | ASUS Maximus VI Extreme | ASUS M60J |
| CPU | Intel Core i7 4790K 4 GHz | Intel Core i7 720QM 1.6 GHz |
| RAM | DDR3 PC3-10700 SEC 32 GB | DDR3 PC3-10700 SEC 16 GB |
| LAN card | Intel PRO/1000 PT ASUS PCE-AC68 | Atheros AR8131 |
| operating system | Windows 7 x64 SP1 Rus | Windows 7 x64 SP1 Rus |
The first thing we decided to start with was measuring user data transfer rates when the router performed NAT/PAT translations with hardware acceleration enabled and disabled.
We also decided to measure the device's performance with simple routing (without translations).
Since the ASUS RT-N11P wireless router supports not only the fourth version of the IP protocol, but also IPv6, we decided to find out at what speed user data can be transferred when using the sixth version of the IP protocol.
Of course, we couldn’t ignore the device’s support for connecting to an ISP using the PPTP protocol. It's worth noting that both encrypted and unencrypted tunnels are supported.
ASUS RT-N11P provides wireless users with the ability to connect in the 2.4 GHz band, the performance of which is shown in the diagram below.
This concludes the testing section and moves on to summing up the results.