Technical specifications
If we are talking about large cities where there are “fast” providers, then it is better to purchase an expensive and high-quality router once. In the provinces, local providers are not very fast, so to organize a more or less fast wireless WiFi network, it is enough to purchase a Trendnet router. It allows you to watch HD quality video streaming for relatively little money.
A distinctive characteristic of the manufacturer is the use of innovative GREENnet technology, which allows the device to consume a minimum amount of electricity. Savings are achieved by automatically adjusting the power level based on the current consumption of the switch. The manufacturer stated that in some cases it is possible to achieve savings of up to 70-75%.
The routers are equipped with a hundred-megabit wired interface. The equipment is delivered in a small cardboard box, on the surface of which the logos of such well-known providers as Akado, Corbina telecom and Beeline are imprinted. This is due to the fact that at the initial stage of operation the device is already ready to pair with them.
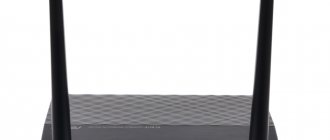
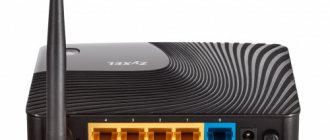
All Trendnet routers have a classic form factor. The only difference from analogs is that they are smaller in size. The body is made of black plastic, the bottom and top are matte, and the sides are varnished. The attractive appearance is preserved, unfortunately, not for long, since micro-scratches quickly form on the surface due to settling dust.
The front panel is equipped with 8 green LED indicators, which inform the consumer about the set operating mode, network connections and supply voltage. One of the side faces is equipped with a button designed to activate the WPS function.
Setting up Wi-Fi on the trendnet tew 691gr router
Our next step will be setting up a wireless connection. A distinctive feature of this router is the ability to configure multiple wireless (Wi-Fi) networks. I will write more about this function in future articles. Here we will look at the basic setup.
Let's go to the "Wireless" section and select "Basic". In the “Wireless Name (SSID)” item we indicate the main name of our network, i.e. the one you want to see in the list of network connections. Don’t forget to check that in the “Channel Bandwidth” item there is a dot opposite the inscription “Auto 20/40MHz”. And click “Apply”.
Now we need to protect our network. To do this, go to the “Security” section and check that the network name you specified is selected in the “SSID choice” field. Select WPA2-PSK in the “Security Mode” field. Afterwards, in the “WPA Cipher” field, put a dot opposite “AES”. In the “Pre-Shared Key” field, enter the authorization key, the one you want, but at least 8 characters and use the Latin alphabet. And click “Apply”.
That’s it, setting up the trendnet tew 691gr router can be considered complete. If you have done everything as described in this article, then your Internet and WiFi should work. If something doesn't work, go through the steps again and find where you went wrong. We will consider the remaining capabilities of this router in other articles.
Connecting cables
The router comes with a network cable, instruction manual and power supply. In short, this manufacturer has standard components.
Review and configuration of the D-Link Dir-320 modem
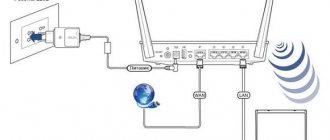
Setting up a Trendnet router begins with connecting the cables. The work algorithm is as follows:
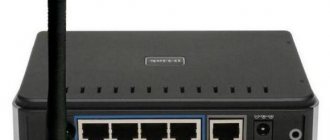
- A network cable connected to the output of the network card of a desktop computer or laptop is connected to the LAN port of the device.
- An Internet cable is connected to the WAN port of the device, which was installed in the living space by the selected provider. It is important to pay attention to the fact that after connecting the cable, the corresponding indicator lights on the device should light up.
Please note: the router usually comes with a short cable, so if its placement is non-standard, it is quite possible that you will need to buy a separate cable in the store.
After the device is connected to the computer via a network cable, you can proceed directly to setting up a remote access point. To do this you need to log in.
Stage 1: Connecting the TrendNet Router
First of all, the router must be connected correctly. Since the router itself does not have any mechanisms for configuration, the entire process of establishing Internet access will be carried out through a computer, which means that our first task is to connect the router correctly.
- First of all, you will need to provide your router with network access. This can be done by connecting the power supply included in the kit to the modem itself, and then to a power outlet.
- Next, the modem needs to provide access to the network. We assume that you have an agreement with your provider, which means that you have a Wi-Fi router at home, with which we will provide the router with access to the network. This wire must be connected to a specially designated socket on the router, which, as a rule, is marked in blue on TrendNet (if there is no color, make sure that the socket is located separately from the rest or labeled with the word “WAN”).
- Everything is almost ready. Now all you have to do is connect the router to your computer. For this we will use a special Internet cable included in the kit. You will need to connect this cable to one of the free sockets on the router, and connect the other end to the computer.
At this point, the connection to the router can be considered complete.
Authorization
What are the differences between 3G and 4G networks: features, advantages and disadvantages
Many people have a question about how to log into the Trendnet router. To do this, you need to open a browser on your computer and go to the standard address that is set by default for Trendnet routers. It looks like this: https://192.168.10.1.
A form will open where you need to enter your login and password. The factory settings are standard; the word admin is entered in both lines in small lowercase Latin letters. Quotes, dashes and spaces cannot be used.
If the described algorithm was performed correctly, the device settings window will open.
Connecting a computer to the Trendnet TEW-432BRP router
Before setting up, you need to connect the Trendnet router to your computer. To do this, you plug the router's power adapter into an electrical outlet, connect the provider's cable to the WAN interface, and connect one of the router's LAN ports directly to the network card of your computer using the white patch cord included in the kit. Then you need to change the TCP/IP settings of the network card to automatically receive values (DHCP client) from the router. You can do this as follows:
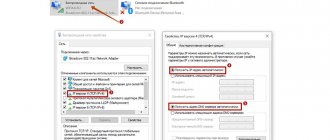
Connecting a router in Windows XP: Start - Control Panel - Network Connections - Local Area Connection - Properties - Internet Protocol (TCP/IP) - then see Fig. 1
rice. 1
***
Connecting a router in Windows 7 (seven): Start - type View network - select at the top in the search results - View network connections - Local area connection - Properties - Internet Protocol version 4 - then see fig. 2
rice. 2
***
By default, the Trendnet TEW-432BRP router produces IP address values from the range 192.168.10.0/24, so after some time your personal computer should itself receive the required address like: 192.168.10.101 or 192.168.10.102. You can track the receipt of an IP address from the router by opening the Local Area Connections status. (see Fig. 3)
rice. 3
The inscription assigned to DHCP indicates that the Trendnet TEW-432BRP router successfully issued an internal IP address via the LAN interface. If this does not happen, then problems with the operation of the DHCP client on your computer are possible. Most often this can be caused by the operation of firewalls (firewalls), but there are other reasons... In this case, we can advise you to enter the necessary IP addresses into the computer settings manually. To do this, it will be enough to specify the following IP parameters in the network card on your computer:
- IP - 192.168.10.101
- Subnet mask - 255.255.255.0
- Default gateway - 192.168.10.1
- DNS – 192.168.10.1
We will assume that we have successfully connected the Trendnet router to our computer. Now let's actually start setting up our router.
Changing the factory password
Online password generator
Today, changing the factory password can be considered a standard measure that allows you to make your network more secure. Otherwise, attackers may take over all/part of the traffic. The optimal number of characters in a password is 12.
To change the factory password, go to the Main tab and find the Password column. A new password is entered in the New Password field. Below is another field called Confirm Password, where the password is re-entered.
A similar operation must be performed with the user password. Finally, click the Apply button.
Choosing a router, preparing for work
To create a wireless network, the TRENDnet TEW-651BR model was chosen. Unlike devices operating according to the “g” standard, this model provides a threefold increase in coverage area.
The model has the following characteristics:
- Powered by IEEE 802.11n (compatible with "g")
- Has 4 ports for local network, and 1 Wan port for Internet connection
- Authenticates using PPPoE, PPTP, L2TP protocols
- The transfer speed of this model is up to 150 Mbit/s
- Provides connection at a distance of 100 (300) meters indoors (outdoors)
It is necessary to return the router to factory settings before further work. To do this, press and hold the “Reset” button on the rear panel for 15 seconds.
Next, using a UTP cable, the router is connected to the computer for configuration.
Login to the admin panel
Next, you need to use any browser to log into the control panel. In the address bar of any Internet browser you need to enter 192.168.10.1 and enter your login and password in the registration window (by default admin | admin). After authorization, the “Status” section opens.
Status submenu
Here you can see the initial settings of the device. Then you can proceed directly to setting up the router.
Lan and Wifi installation
First you need to edit the settings for the local network. You need to go to the Main\Lan & DHCP Server tab. In the window that opens, you need to specify the device’s IP address for the local network and the subnet mask. Enable the DHCP server by selecting “Enabled” and specify the ending and starting IP addresses of the range from which addresses will be assigned to connected devices.
Lan installation
After setting up the LAN, you can proceed to setting up WiFi. Editing is done in the Wireless tab. In the Basic tab you need to enable WiFi by selecting “Enabled”. It is also important to indicate the SSID (name of the wireless connection), select a universal protocol (b\g\n mixed mod), and display in the list of found wireless connections (SSID broadcast – Enabled).
In the “Security” tab, it is important to specify a password to limit access to the connection.
WiFi installation window
Wan installation
Installation is performed in the Main\Wan tab. Depending on the authorization protocol used, the following data may be required:
- Login and password
- IP address, subnet mask
- Gateway IP address
- DNS server addresses
All data must be specified in the agreement with the Internet provider. Most providers use PPPoE and PPTP protocols. The setup of these protocols has some differences, so the following changes should be made for your protocol type, otherwise the Internet will not work.
PPPoE protocol
Typically used for ADSL connections. It is necessary to indicate the login under the contract in the Username field, as well as the password in the “password” and “retype password” fields. Enter “1472” in the MTU line. Select automatic IP address assignment (Dinamic IP).
After entering all the data, you must apply it by clicking on “Apply”
PPPoE installations
PPTP protocol
This protocol is used by most providers. In the Wan window you need to specify the connection type PPTP. If the operator provides a static IP address, you must specify it, as well as enter the values for the subnet mask, IP address for the gateway and DNS server in the appropriate lines. All data must be indicated when concluding the contract.
PPTP installation
If the IP address is dynamic, you do not need to fill in anything. The login and password according to the agreement are also indicated in the PPTP Account and Password lines. The password is repeated. The MTU is set to "1372". When finished, select “Apply” to apply the changes.
Use as an access point
If there is already a device in front of the router that is undergoing authorization, for example, an ADSL modem, or authorization is not needed at all, then in the “Connection Type” line you need to select “DHCP Client or Fixed IP”. In this mode, the router will work like an access point or switch. If necessary, you can set the IP address and DNS server addresses (check with your Internet operator). After entering the data, you need to remember it using the “Apply” button.
Connecting a router as an access point
Saving settings
To ensure that the changes you make do not disappear when you turn off the router, you should save them. To do this, be sure to go to the Tools\Settings page and click on the “Save” button.
After saving, you can disconnect the UTP cable from the router and connect to WiFi.
Easy setup
To simply set up Internet access, in most cases it is necessary to enter data from the agreement concluded with the Internet provider. It is simply impossible to consider all connection types and features, but the principle is mostly the same everywhere.
First of all, you need to go to the basic settings. They look like this: Basic, then WAN. In this tab, if at least one mistake is made, there will be no access to the Internet and distribution.
In the Connection Type tab, you need to select the type of connection to use. Most domestic Internet providers use the PPPoE type (in this case, it will be enough to enter the password and login for access in the appropriate forms). Less common, but still found, are the DHCP CLIENT and L2TP types.
By going to the WAN IP tab, you need to first ask your provider whether you need to enter the IP address and subnet mask manually or whether this operation is performed automatically. If this needs to be done manually, then the data is entered in the DNS column.
It is important to know that each network adapter is assigned a unique MAC address. Some providers register these addresses.
After making all the above settings, you need to click on the Apply button to save the specified parameters. If all actions were performed correctly, the router will connect to the Internet and begin distributing traffic to all devices connected to it.
Setting up the Trendnet TEW-432BRP router (TEW-452BRP, TEW-632BRP, TEW-652BRP)
We will configure Trendnet TEW-432BRP through a web interface, which allows us to fine-tune all the main parameters of our WiFi router. To enter the Trendnet TEW-432BRP web interface, you need to go to the address: https://192.168.10.1 in any computer browser (Opera, Internet Explorer, Mozilla, Chrome) (the TEW-432BRP router has this address by default). You will see the Trendnet router authorization page on your computer screen (see Fig. 4)
rice. 4
To log into the Trendnet TEW-432BRP web interface, you will need to enter your Username and Password, and then click on Login. Default Username is admin, Password is admin. After successful authorization you will see the following dialog box (see Fig. 5)
rice. 5
You are taken to the web interface, where the router offers to configure its DHCP server. We will not configure the parameters of the internal DHCP server, but will immediately go to the firmware update menu for our TEW-432BRP.
Firmware update in Trendnet TEW-432BRP router
It is necessary to update the Trendnet TEW-432BRP firmware primarily for trouble-free operation of the router in PPTP VPN client mode. In addition, in new versions of firmware (software) for the router, the manufacturer introduces a number of improvements and optimizations that expand capabilities or eliminate found vulnerabilities and errors.
You can find out the current firmware version of the TEW-432BRP router in Status – Device Information (see Fig. 6)
Rice. 6
The TEW-432BRP firmware version will be reflected in the Firmware Version field. As can be seen from Fig. 6, we currently have firmware version 3.10.07 installed. Armed with this information, we head to the Trendnet support site to download the updated firmware (see Figure 7)
Rice. 7
As you can see, the Trendnet support site has the latest firmware for the TEW-432BRP (19th, versus 7th, which is currently installed). Therefore, we download the firmware to our computer and transfer it to the PC from which we are currently setting up the router.
You can update the firmware in the Trendnet router through the web interface in Tools - Firmware (see Fig. 
Rice. 8
To update the firmware, click on the Select file button and go to the file with the firmware in Explorer (it has a .bin extension), mark it and click on the Upgrade button.
After which your Trendnet router will begin the flashing procedure and display a countdown timer on the screen (see Fig. 9)
rice. 9
It tells your Trendnet router how much time is left until the firmware update is completed.
Attention!!! During these 3 minutes, do not under any circumstances turn off the power to the router or interrupt the flashing process with any other actions!
When updating the software, the Trendnet router will first upload the firmware to its flash, and then go to reboot. When the countdown timer reaches zero, the page in the browser will automatically refresh and you will see the menu you are familiar with. If after a reboot the router safely allows you to access its web interface, then you can accept our congratulations, the firmware update procedure was successful! If your router does not respond, then most likely you will have to contact a service center.
After uploading the new firmware version, we recommend doing a complete reset of the router! This can be done by pressing the Reset button, which is recessed into the rear panel of the case.
It's time to make sure that the firmware you uploaded has taken its rightful place in the Trendnet router. To do this, just log into your router via the web interface again and look at Status – Device Information (see Fig. 10)
Rice. 10
From Fig. 10, you can see that our TEW-432BRP has successfully updated the software to version 3.10.19.
The firmware update for the Trendnet router is complete. But on behalf of TRADE Telecom, we still recommend periodically checking for a new firmware version on the manufacturer’s website and updating it if necessary! True, it is worth noting that there are firmware updates that bring more problems than benefits, but in this case nothing prevents you from rolling back to the previous version.
Setting up Internet access on the Trendnet TEW-432BRP router
It's time to start setting up your ISP connection with Trendnet TEW-432BRP (TEW-452BRP, TEW-632BRP, TEW-652BRP). In this guide, we will look at setting up Trendnet using 2 protocols popular with Russian providers - DHCP and PPTP VPN. According to these protocols, various segments of the BIG Telecom provider’s network operate. If you have your own provider, we recommend that you first check with technical support for information about the type of connection used! It is not at all a fact that you will have everything exactly as will be discussed below in our instructions.
First, let's configure Trendnet TEW432BRP in DHCP mode
When setting up Trendnet TEW-432BRP (TEW-452BRP, TEW-652BRP) in DHCP mode (automatically obtaining an IP address from your provider), you should not encounter any special difficulties. The process begins in item Main - WAN (see Fig. 11)
Rice. eleven
To do this, in the Connection Type item, you must select the connection type DHCP Client or Fixed IP.
The WAN IP option must be switched to the Obtain IP Automatically position (automatically obtaining an IP address).
In the DNS 1 and DNS 2 fields, if desired, you can specify the addresses of domain name servers (in the case of BIG Telecom - Khimki, we will indicate here the values of the preferred and alternative DNS server, which can be found in the Agreement with the provider).
In the MTU field you can specify the maximum data block size of a network packet. This value can be left as default. In general, you can play around with MTU in the range from 1350 to 1450 if the Trendnet router suddenly works unstable.
Then, if necessary, you can change the MAC address (physical address of the equipment) of your TEW-432BRP router (TEW-452BRP, TEW-652BRP) in the special MAC Address menu.
This can be very useful when the provider has implemented the binding of the MAC address to the IP address of clients on the network. Since each network device has its own unique MAC address, this option allows you to avoid calls to your provider if you change network equipment at your home or office. The “native” MAC address can be found on a sticker located on the bottom of the router case (six pairs of numbers and letters). So, for example, you can set a MAC address in the router that is identical to the MAC address of the computer on which you worked before installing the TEW-432BRP. Below in the menu there is a Clone MAC Address button, with which the router itself will pick up the value of the MAC address of the network card of the computer from which you are configuring the TEW-432BRP. This will save you from having to find out and enter the MAC address of your computer manually. In addition, you can specify any MAC address value for your router (from the allowed values) in the field above. If you still want to use a router with a “non-native” MAC address, then use one of the proposed options. If you want to register the router’s native MAC address, you will have to call your provider and tell him the true value of the physical address.
After that, all you have to do is click the Apply button to save the router configuration.
***
The Trendnet router saves the settings and displays the following message (see Figure 12)
Rice. 12
In this message, Trendnet “says” that it is currently rebooting, and offers you to return to the menu by clicking on Back. We also note that the Trendnet TEW-432BRP router will often do similar things in the future, so we will no longer focus your attention on this message 
You can check the functionality of the settings made on the TEW-432BRP in the status menu: item Status – Device Information (see Fig. 13)
rice. 13
Here in the WAN field you can see information that the router successfully connected to the provider's DHCP server and received an IP address from it. In fact, you can already work on the Internet from a computer that is connected to the LAN interface of the router. Especially if you have paid Internet access
Port forwarding/forwarding
In the settings of Trendnet routers there is an option for forwarding and/or port forwarding. To activate this option, you must do the following:
- Enter the Access menu section, then Virtual Server.
- Opposite the Enable column you need to check the box.
- In the Name section, write any name of the group.
- In the Protocol column, you must select the required protocol.
- The Private Port/Public Port section specifies the range of ports.
- Opposite the LAN Server inscription, you must register the IP address of the device to which the port is forwarded.
Finally, be sure to click on the Add button.
Setting up an L2TP connection
- Connection type : L2TP
- We put a dot in front of Dynamic IP
- Server IP/Name: Enter the name or IP address of the server (specified in the contract)
- L2TP Account: Your login from the agreement
- L2TP Password: Your password from the agreement
- L2TP Retype password: Your password from the agreement
- Auto-reconnect: Always-on
- MTU : change the value to 1450 or less
- Save the settings with the “ Apply ” button.
Setting up a PPPoE connection
- Connection type: PPPoE ( or Russian PPPoE (Dual Access))
- User Name: Your login from the contract
- Password : Your password from the agreement
- Retype Password: repeat password
- Auto-reconnect – “ Always-on ” connection setup mode for permanent connection
- MTU: 1472
- Save the settings with the “ Apply ” button.
Saving/restoring router settings
After setting up, it is recommended to save them so that if problems arise, you can restore them. To do this, go to the Tools , Settings menu . — To save the current router settings, you must click the Save . The settings file will be saved to the specified location on your hard drive. — To restore settings settings from a file, you must click the file selection button, specify the path to the settings file, then click the Load . Attention! Pressing the Restore will restore the factory settings!