Any owner of a MacBook or other model sooner or later has a problem: where to dump the information accumulated on the hard drive, because it is not “rubber”. One way to solve this issue could be to use Time Capsule.
For example, you have a MacBook Air with an SSD capacity of only 64 GB and every megabyte is worth its weight in gold. Of course, in this case, a portable external drive is suitable, but its possibilities are not unlimited, and carrying a “suitcase with batteries” with you everywhere is not very convenient. What if you have more than one computer, or several people want to exchange files with you at the same time?
Anticipating this situation, three years ago engineers from Cupertino developed a universal device called Time Capsule. The name itself hints at one of the important features of Mac OS X - the use of Time Machine to backup data. Now this device is fighting for the “living space” on your Mac. And not only.
What is a Time Capsule? Essentially, this is an Apple Airport Extreme access point with support for Wi-Fi technology (by modern standards, in particular, 802.11n 2.0) and at the same time wireless data storage with a built-in hard drive from 0.5 to 2 terabytes.
In addition to regular Macs, Time Capsule allows you to connect to iPhone, iPod, Apple TV and other computers and devices equipped with Wi-Fi in the 2.4 GHz and 5 GHz bands. The price of a “time capsule” (in the USA) ranges from $300 to $500 depending on the size of the hard drive.
And it's worth the money. Using this device, dozens of users (including Windows users), without being “tied” to wires and moving freely within the coverage area of the Wi-Fi network (while their system files are unobtrusively backed up), can simultaneously exchange data, print documents via connected Time Capsule printers, watch movies, listen to music and even play online games.
It's decided. We buy
We take out from the packaging a small elegant box made of milky-white plastic weighing about one and a half kilograms with the treasured apple on the lid. The rubber tray is striking, allowing the new Time Capsule 2TB to be extremely quiet, avoiding vibrations. The rear panel of the device has a wide selection of ports: Gigabit Ethernet WAN, three Gigabit Ethernet LAN and one USB. This configuration allows you to configure the Time Capsule in router mode and connect various printers or external drives to it.
The station is reliably protected by encryption protocols - Wi-Fi Protected Access™ (WPA/WPA2), wireless access (WEP) with the ability to configure 40-bit and 128-bit encryption from outside interference and allows, among other things, to “bind” access to MAC addresses of each machine and with a time limit for each communication session. On board Time Capsule: NAT, DHCP, PPPoE, VPN passthrough (IPSec, PPTP and L2TP), DNS Proxy, SNMP, IPv6 support.
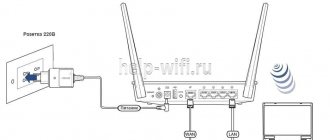
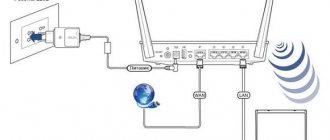
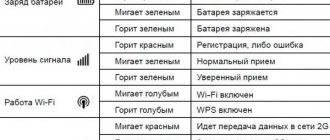
We connect the power cable through the Euro adapter. It's simple. A yellow light flashed on the front panel of the indicator - the station was preparing to launch, then green. This means the Time Capsule is ready for use. All that remains is to enter the settings for the access parameters of wireless network users. After this, the blue eye may light up for some time (standby mode). And again green. Now the Time Capsule was running at full capacity.
Setting up a Wi-Fi base station
According to Apple recommendations, we assign the Time Capsule as a wireless base station. Since this device has AirPort Extreme capabilities with Wi-Fi access, it can be immediately configured as a main base station rather than a network client. This allows you to achieve high performance and avoid sudden changes in speed during the backup process. Using an Ethernet cable, we connect the cable/ADSL modem (broadband) to the WAN port. We search for and launch from the section /Programs/Utilities/AirPort-Utility.
Select the device name, for example, “Time Capsule c3d536” and click “Continue”. Then o and again “Continue”. Follow the instructions that appear and wait for the Time Capsule to reboot. Now all settings will take effect.
Initial data
For experiments and writing instructions, I got hold of a “purebred American” - a brand new fifth-generation AirPort Extreme wireless access point (model MD031LL/A), which supports 802.11 a/b/g/n specifications, simultaneous operation of two Wi-Fi frequency bands (2, 4 GHz and 5 GHz), many protocols and encryption algorithms.
In addition, you must have a Mac computer with Internet access, updated AirPort Utility 6.0, and the latest firmware version (7.6.1) on the wireless gadget itself.
The external drive is connected to the AirPort Extreme USB connector.
Debugging PPPoE and VPN
Having launched the AirPort utility, select the Time Capsule name and say “Manual setup”. Go to the “Internet” tab. If the connection is made via the PPPoE protocol, then select “connect via PPPoE”. Now you just need to enter the username and password provided by the provider.
For a VPN connection, also open the AirPort (wireless network) tab. As in the first case, we create it following the recommendations. Here you can assign a name to your network and assign a password to it using the “Wireless Network Security” menu. Now this password can be used by owners of other devices on your network, for example, iPad or iPhone.
Setting up shared access to the Time Capsule disk
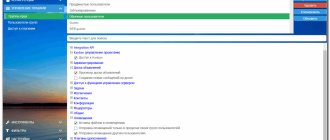
In the AirPort-Utility/Time Capsule menu, set the station name and password, and then on the “Disks” tab, set the access rights to Time Capsule disk files.
Click “Update” and wait for the device to reboot. (Windows users need to disable 128-bit encryption when setting up a connection). Now the Time Capsule image will appear on users’ monitors in the Finder and you can safely get rid of the excess of accumulated files by sending them to a new “mini-server”.
Erase data from the AirPort Time Capsule hard drive
To erase data from your AirPort Time Capsule's hard drive, use AirPort Utility. Before you delete your data, you can connect an external hard drive to the USB port on your AirPort Time Capsule and back up your data. You can also create additional backups of your Mac data to another drive using Time Machine.
After following these instructions, all data saved on your AirPort Time Capsule's hard drive will be deleted. You should only follow these instructions if you are sure that you will no longer need the data.
On a Mac
- Connect to a Wi-Fi network that your Time Capsule is connected to, or connect an Ethernet cable between your Mac and AirPort Time Capsule.
- Open AirPort Utility.
- Select your AirPort Time Capsule in the AirPort Utility window.
- Click the "Edit" button that appears.
- In the Edit window, go to the Disks tab.
- Select the AirPort Time Capsule drive from which you want to erase data.
- Click the Clean Disk button.
On an iPhone, iPad, or iPod touch
- Connect to the Wi-Fi network that your Time Capsule is connected to.
- Open AirPort Utility.
- Select your AirPort Time Capsule device.
- Click the Edit button.
- Go to the "Advanced" section.
- Click the "Sharing and Drives" button.
- Make sure the correct drive is selected in the Disk Name field and click Clean Disk.
- Choose a disk cleaning method.
If you are planning to sell or give away your AirPort Time Capsule
Select Quick Wipe to quickly mark the data saved on your AirPort Time Capsule's hard drive. If you store sensitive data on your hard drive, or if you plan to sell or give away your AirPort Time Capsule, choose one of the more secure methods for erasing data from the drive.
To restore your AirPort Time Capsule to factory settings, choose AirPort Utility > Restore Defaults and follow the on-screen instructions. This will delete any network passwords or other settings saved on your AirPort Time Capsule.
Launch Time Machine
We turn on Time Machine in the “Settings Panel”, and it automatically detects the Time Capsule on the network. By spending a few hours on the first copy, you will protect yourself and your colleagues or friends from all sorts of “crashes” and rush jobs associated with data loss. Then Time Capsule will automatically, in a matter of minutes, copy only the changed data.
Time Capsule has many possibilities. Let's give a few examples.
Watching movies online on iPad
Many people use Time Capsule as their home media library and stream videos directly to the big screen, but what about iPad? It turns out that he can also pick up files from the Time Capsule using the FileBrowser program. It costs only $3 on the App Store.
Before you can see the files on the remote Time Capsule drive, you'll need to make a few settings. First, you must have Wi-Fi turned on. When you first launch FileBrowser, you need to click on the “plus” icon that appears. In the connection settings window that appears, you need to enter any disk name, for example “TC”, its IP address, user name and password. Perhaps you will need additional settings/Advanced Settings, for example? Your iPad's MAC address. Read the tips (unfortunately, only in English).
If everything went well, you should see a directory on the Time Capsule with your favorite movies in formats “readable” by the iPad itself, for example, .mp4 with the H.264 codec. Now just “click” on your favorite name. You can also listen to music, say .mp3.
Instructions for setting up an Apple WiFi router
Today we’ll look at how to set up WiFi on an Apple router. It's always nice to talk about how to customize something from Apple. I remember when I first saw a router from Apple, I was absolutely delighted! The fact is that we don’t even need to go into the router settings; the Aplle router simply doesn’t have a web interface! This means that we don’t need to fill out a bunch of complex and incomprehensible parameters and get lost in a bunch of different tabs, set up connections from the router and modem by registering static IP addresses. Apple does everything according to the principle, the simpler the better, and even if in this concept some in-depth configuration options will be missing, and to hell with them, who needs to buy another router! All the problems that are present in most firmware of routers from other manufacturers are useful only to 5% of guru buyers, and 95% of ordinary people want to do this: buy it, press a button, everything works! Apple understands this very well.
So how do you set up an Apple router? Everything is done through a single AirPort utility.
Airport is a utility utility for installing and configuring a WiFi point for the entire series of Aplle AirPort routers:
- AirPort Extreme.
- Time Capsule.
- AirPort Express.
AirPort is installed by default on all MAC-Apple operating systems.
AirPort is also available for other operating systems: Windows, iOS, Snow Leopard, Leopard, Tiger, X Lion.
Let's move on to setting up routers, Extreme, Capsule and Express, using AirPort.
The first and last thing we need to configure the router is to launch the AirPort utility.
I will show the setting using the example of an Express router, but as I already said, it is also unique for Extreme.
AirPort is located at Programs, Utilities.
After launch, click the “Other AirPort base stations” button.
Select our AirPort from the list (depending on which Extreme, Capsule or Express you have connected).
Configuring settings for your router, you have Extreme or Express, respectively.
We set the parameters for the network so that no one on the left can connect, click the Next button.
Click the Next button.
We are waiting while the settings are applied... In your case, for example, Extreme will be indicated.
The setup was completed successfully. Click Finish.
Done, now if your provider has the necessary settings, then you will have the Internet automatically! More precisely, I wanted to say this is how it would be if you lived in the USA.
We are not looking for easy ways, and now let's figure out how to set up a PPPoE connection or a Static IP address.
The circle is yellow and indicates that there is no Internet connection.
Click on our access point and press the “Change” button.
Go to the Internet tab, in the first line select the type of connection that we need.
Next, fill in all the necessary details, depending on your connection type, I think you won’t have any difficulties here. If you do not know what type of connection your provider provides, then check with its technical support or look in the contract; as a rule, all access details and the type of connection are indicated there.
After the setup is completed, click the “Update” button and wait until the Internet connection is established.
Waiting for connection...
Connection successfully established!
PS I don’t understand why other network publishing manufacturers haven’t thought of such a concept, everything is simple and clear!
I hope the instructions for setting up a router from Aplle via Airport were useful for you, good luck surfing with Apple!
Found a typo? Select the text and press Ctrl + Enter
“Healing” the disk of the Time Capsule itself
According to Apple, some problems may occur with AirPort Extreme (pre-2009 model), AirPort Extreme (Base Station/802.11n), AirPort Extreme (Simultaneous Dual-Band II), Time Capsule (pre-2009 model).
To avoid possible errors, it is necessary to periodically update the versions of AirPort Utility and the firmware of Time Capsule devices via “Software Update”. However, you should absolutely not use Mac OS X Disk Utility to clean, check, or repair your Time Capsule drive. After updating the programs and firmware, restart the device.
During boot, Time Capsule will automatically check the file system structure of the internal drive and fix problems. If there is something wrong with the drive, the Time Capsule's LED will blink amber. Then, using the same AirPort Utility, you can check the SMART status of the disk.
But fortunately, our new model Time Capsule 2TB MC344 does not have these problems, and no one is stopping you from having a real wireless “disco” after completing the necessary settings.
Checking the hard drive of your AirPort Time Capsule
When your AirPort Time Capsule starts up, it automatically checks the file system of the internal drive. To check the drive, restart your AirPort Time Capsule using AirPort Utility.
On a Mac
- Open AirPort Utility.
- Select your device.
- If necessary, click Enter Password and enter your device password.
- Select Base Station > Restart.
On an iPhone, iPad, or iPod touch
- Open AirPort Utility
- Select your device.
- If necessary, click Enter Password and enter your device password.
- Click Edit > Advanced > Restart Base Station.
If your AirPort Time Capsule detects a problem that can be fixed automatically, the disk file system will be fixed. If the identified problem cannot be resolved, the light on your AirPort Time Capsule will blink amber. Select your AirPort Time Capsule in AirPort Utility for more information.