Connecting the printer to the router via USB
Setting up this method depends on the router model you are using. Basic parameters are set in the router’s web interface, but for greater convenience and the ability to fine-tune, there are special utilities. The most common routers that allow you to connect via USB: Asus and TP-Link.
Setting up on Asus routers
This manufacturer has developed a free program for finding a printer connected to a Wi-Fi router: “Printer Setup Utility”. It is available for download on the Asus website. There is also a list of models for which correct operation is guaranteed when connected in this way. It includes devices from three major companies:
- Canon
- Epson
- HP
To use the network printing setup application, run the downloaded file. Connect your computer to the router using Wi-Fi or via a LAN port. Plug the USB cable into a port on your router. Click “Next” in the program interface or press the “N” hotkey on your keyboard.
The files necessary for the utility to operate will be copied to the computer. After this, the search and identification of devices connected to the USB port of the Asus router will begin. The process takes no more than two minutes. At the search stage, a “Cancel” button will appear, which stops the scanning. Restart the operation if the program freezes.
At this point, the functions of the Printer Setup Utility may be blocked by the Windows Firewall. If a window appears on the screen warning you about access restrictions, select the checkboxes for the types of networks in which you want to allow the application to operate. For home use, it is recommended to check both private and public networks. After that, click the “Allow access” button.
When the setup is complete, the found IP address of the Asus router and its model will appear in the window. You can add the found device using a standard Windows installation. If errors occur, make sure that the Wi-Fi router and printer are plugged in and connected with a cable. It is also recommended to update the firmware using the manufacturer's instructions.
Note! If the router settings are set to “Access Point Isolation” mode, network devices will not have access to each other. These parameters can be changed through the router's web interface.
Installation for TP-Link router
The application is available in the TP-Link download center. Select your Wi-Fi router model from the list or enter it into the search bar located in the upper left corner of the page. Install the "Utilities" filter and download "TP-Link USB Printer Controller" for your operating system. Open the downloaded file and once the extraction is complete, click the “Next” button.
Specify the path in the computer file system where the program will be installed. By default, installation is performed in the “Program Files” directory. You can set a different location using the “Change” button. Then click "Next" to move to the next step.
During the installation process, your Internet connection may be lost. The utility requires the connection to be terminated to correctly configure the network parameters. Once the installation is complete, a final window will open in which the “Launch USB Printer Controller” option will be available. Check this box and click “Finish” to complete the installer.
The interface of the window that opens will display a tree structure of the found network equipment. Select the desired device from the list. Click "Auto-connect for printing" and select the printer that will start as the default.
Important! It is recommended to set the print controller to start automatically every time the operating system boots. To do this, go to the “Tools -> Settings” menu and activate the first item.
Method four - use a computer
In the settings of a personal computer or laptop, open the “ Network Neighborhood ” folder, then successively go to the “ Properties ” and “ Network Connection ” items. In the window that opens, go to the sub-item “ Local network ”, and then - “ Network adapter properties ”. After that, we find the “ General ” tab and select the TCP/IP protocol, after which in the “ Properties ” window you need to specify “ Use IP address ” - here you need to enter the IP address of the equipment (it can be found in the instructions included with the printing device).
As you can see, connecting a printer via Wi-Fi is not that difficult. Just follow our instructions and you will definitely succeed.
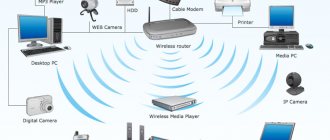
Connecting a printer via Wi-Fi
Devices from popular manufacturers have a similar setup system. As a rule, parameters are set on the printer itself, without connecting to a computer. If there is no control interface on the case, system utilities available on the driver disk and on the manufacturer’s website are used.
Canon
Most Canon PIXMA series models connect using the WPS button on the front of the body. Press and hold it until the corresponding indicator starts flashing. After that, activate the Wi-Fi Protected Setup mode on the router. The interval between clicks should not exceed two minutes, since it is during this period of time that you can connect without entering a password. Once connected, the LED will stop flashing and stay on continuously.
For Canon models with a built-in display, the connection is performed with authentication. You will need to enter the SSID (network name) and Wi-Fi password. The network connection setup information can be printed. For example, for the popular MG3540 model, this is done by pressing and holding the “Resume” button.
HP
A wireless connection to a Wi-Fi router is made using HP Auto Wireless Connect technology. Synchronization is carried out via WPS, without entering the router PIN code. The Network Setup Tool also launches on the HP touchscreen under the Wireless Network menu. A feature of HP MFPs is that it is not possible to access “HP Auto Wireless Connect” for computers with a static local IP.
Such devices connect only after changing the DHCP server settings. To avoid these difficulties, use a WPS connection. You can activate the WPS mode through the touch display, or if it is not there, by pressing a button.
Epson
Epson devices allow you to connect to networks with TKIP and AES encryption through the “Wireless LAN Setup” menu on the built-in screen. Connection via WPS is also available using a button or entering a PIN code on the screen. To make such a connection, click the “PIN Code Mode” menu section.
The network name is set automatically, in the format EPSON123456, where 123456 is the last 6 digits of the MAC address. Using it, you can find the device in the list of DHCP clients and determine the IP address assigned to it for further adding in the Windows interface.
Note! Most printers equipped with Wi-Fi only operate in the 2.4 GHz band. When using a dual-band router, connect them to the network that operates on that frequency. If the computers you want to print from are connected at 5 GHz, change the connection before printing.
Method two - use the SSID password
A fairly simple way to connect to Wi-Fi, but it only works in one case - if the printing device is equipped with an LCD screen. So, you need:
- enter the device settings;
- select “Wi-Fi Settings”;
- go to the “Set up Wi-Fi connection” menu;
- go to the sub-item “Wireless Network Installation Wizard”;
- find your network in the list that appears;
- enter the SSID password (be sure to be case sensitive!).
- If all steps are completed correctly, the Wi-Fi icon on the printer will turn green. Our congratulations! You connected Wi-Fi yourself using the SSID password.
Adding a Network Printer in Windows
Open the Windows Control Panel. If you select Icon view, go to Devices and Printers. When selecting category mode, use the path: “Hardware and Sound -> View devices and printers.”
In this section, all external equipment connected to your computer is available. By default, devices that were previously used are displayed. Click "Add a printer" to connect to the new device.
The system will search for available printers and MFPs. If it does not bring results, enter the required data manually. Since the connection is made through a Wi-Fi router, check the second box: “Add by TCP/IP address.” Click the “Next” button to specify the parameters.
Advice! This setup method is suitable for printers connected to the router via Ethernet or USB, as well as for devices connected to other computers on the local network.
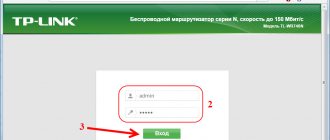
From the drop-down list, select the “TCP/IP” type. In the “Name or Address” field, enter the IP of the connected device. You can clarify this parameter in the router control panel. Log in to the web interface at the address indicated on the sticker at the bottom of the router. When logging in, use the standard username and password, which are located there.
Go to the “DHCP” menu section. It is usually found in the Local Area Network (LAN) settings. Open the DHCP section, which lists connected clients and their assigned IP addresses. At this stage, you can use one of two connection options:
Using a network name. To do this, check the host name in the DHCP client table, for example "CanonMG3540". Copy this name and paste it into the Add Print Device window in Windows.
Static local address binding. To use this method, go to the appropriate DHCP configuration section and add a new mapping. Find the printer, and in the “IP address” field enter the desired combination from the local range. For example, if the last connected computer has an address of 192.169.0.6, enter the following IP: 192.169.0.7.
Provide additional information about the port used. To do this, select “Special” and click “Options”. By default, the “Raw” protocol will be selected in the new window. However, most modern devices use "LPR". Check it in the settings and specify a custom queue name. Save the new settings by clicking OK.
Select your printer manufacturer and model from the list on the right. You can also use the installation CD if it was included with the purchase. To do this, click "Have from disk". When the driver installation is complete, click “Next”.
At the final step of the installation wizard, a notification indicating the successful completion of the process will open. It is recommended to check the “Use this printer as default” checkbox to avoid having to select a device every time you print. In the same window, you can check the connected device. To use it, click “Print Test Page”. Complete the installation by clicking the “Finish” button.
How to connect a printer
The procedure for connecting the printer is not very complicated, since most of the settings are carried out in automatic (semi-automatic) mode.
You should prepare for possible configuration nuances and download drivers from the manufacturer’s official website, as well as create bootable media with these drivers.
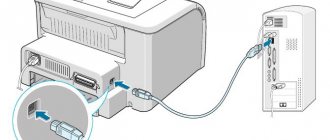
The rest of the procedure is as follows (using the example of using a USB cable):
- Disconnect your router and printer;
- Connect the printer to the router using the USB cable supplied;
- Turn on the router and wait for it to boot, then turn on the printer;
- Using a LAN cable or wireless network, access the router’s web interface;
- Open any browser (browser) and enter the address “192.168.0.1” or “192.168.1.1”, or another address indicated on the stickers on the router case;
- Enter the authorization data (login and password) by default it is admin/admin, the exact value can be found either in the documentation or on the same sticker;
- After opening the web interface, make sure that the router has successfully recognized the printer; it should not appear as an unknown device.
If the connection was successful, you can proceed to the second stage, “Setting up your computer.”
If the printer is not detected by the router, then several options are possible:
- The router simply does not support this connection;
- The printer does not support this connection (which is less likely);
- The port/cable used for connection is faulty.
As a possible way out of this situation, you can try updating the router software by downloading the firmware from the manufacturer’s official website.
Connecting a printer with a Wi-Fi module is even easier. Just press the “WPS” buttons on the router and printer and wait for the synchronization to complete.
Setting up a printer and router
- Turn off the printer and router, but they must remain plugged in.
- Connect the printer via the USB connector on the router and turn on the Wi-Fi device.
- In just 1-2 minutes, turn on the printer.
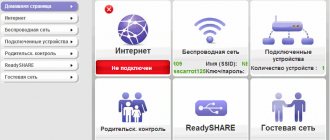
- Now you need to log into your router's control panel. If you don't know how to do this, refer to the device instructions. In most cases, this panel is located at https://192.168.1.1. Enter the appropriate login information (usually found on the back of the modem).
- Check that the network map shows your device correctly. The model and state (on) must be recognized.
- If everything is shown without any questions or errors, then you can proceed to printing on your computer. Otherwise, you need to check the compatibility of the printer and router. It may be that the modem simply does not support your printer model. You can try to flash the Wi-Fi router software.
How to set up printing on a printer from a smartphone and tablet on iOS, Android
Nowadays, more and more users are using tablets for work; it is convenient and practical. And of course, you also need to print out certain documents. But we will now show you how to do this.
How to print on Android OS
Perhaps the most convenient way is to use Google Cloud Print. This service is free, you just need to link the printer to a Google account, which almost everyone on Android has. After you link, you can make a printout from any gadget that is authorized in your account and connected to the network.
How to print on iOS
Third-party programs will help you print files in Apple, such as:
- PrintCentral Pro for iPhone
- Print n Share Pro for iPhone
- Print to ALL Printers
These applications are paid, but they are not very expensive, so you can spend money once. Or you can use the AirPrint function, but, unfortunately, few devices support this function.
What to do if the printer cannot be connected to the router
In situations where the printing device cannot be connected to the router due to the lack of common interfaces or support, as I already said, an intermediary will be needed. Its role can be played by one of the computers (it will be connected to the printer via USB, and to the router via the LAN port) or a device such as an external print server. For example this one:
The purpose of such a box is not only to physically unite incompatible devices, but to expand functionality (alas, many routers limit printing support only to the printing itself). When you connect a print server, you will have access to the functions of scanning (if the device includes a scanner), monitoring ink levels, cleaning heads, double-sided printing, and much more. It will also help out in situations where mobile gadgets do not see the printer.
As you can see, there are many options. Choose any one and free your living space from unnecessary wires.
A little theory
There are several ways to organize wireless printing on a printer:
- Wi-Fi direct connection – if the printer has built-in Wi-Fi. Our article is not about this, because... We have already written about this, and even here a lot depends on the specific model of the device.
- Connecting the printer via USB to a computer and organizing network access via a router.
- Connecting the printer to the router via USB - and all devices, when accessing their router, will be able to print. This is the main theme. Let's dwell on it in more detail.
We wrote about all the ways to connect a printer in THIS ARTICLE.
In my practice, for many years the printer was connected to a computer, and printing was done through a regular network printer. Printing is convenient. But I encountered the fact that the computer was no longer constantly turned off. Total: if you want to print, turn on the computer. It started to get a little tense.
As a solution, the idea of organizing work through a router came up. Fortunately, it had a USB port and print server capabilities. As a result, I connected it, went through tons of manuals (not everything is so simple), installed utilities everywhere - and everything works 24/7 without unnecessary movements, because the router in the house is always on.
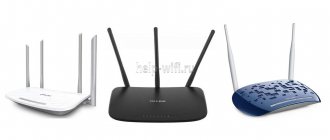
Not all routers with a USB port support printers. Be sure to check the specifications of your printer before you start - you can't get your time back.
The basic connection to the router is made via a USB port. In the router customizer, you need to activate the USB print server. Connecting to the router for printing is done through special utilities. The most common routers for this are ASUS and TP-Link (not all models are suitable).
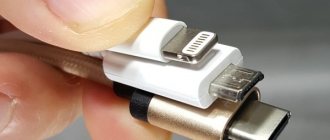
USB connection
The most obvious option. Even if your printer is quite old, it probably has a USB connection!
Before setting up the printer via a wifi router, you need to connect them physically. To do this, turn off both devices, connect them with a USB cable, turn on the router, then after a few minutes turn on the printer.
Your router is probably already connected to your computer, so log into its interface to configure it (read the instructions for your specific model for how to do this). Open the “Network Map” or “Network Neighborhood” section (it may be called differently in routers from different manufacturers, but the essence is approximately the same).
Make sure your printer is listed in the list of devices. If suddenly not, try repeating the procedure, replacing the cable and making sure that all devices are working properly.
How to connect a printer via Wi-Fi that does not have a Wi-Fi module
Unfortunately, older and budget models often do not have a built-in Wi-Fi adapter. Therefore, you will have to use another option to connect the printer via wifi. Now we will show it.
Let's find out how you can connect a printer to a computer using the USB port in the router. For this method you need to have: a printer, a USB cable, a router with a USB port. You should also know the name of the printer and the IP address of your router.
Finding out the router’s IP is not difficult, just launch the command line by entering the cmd ” command Search ”. In the command line that appears, enter the command “ ipconfig ”. The line “ Default gateway ” is of interest; opposite it will be written the IP address of the router.
You now know how to find out the IP address of your router, but read our previous article on how to change the external and internal IP addresses of your computer.
Step-by-step connection:
- Connect the USB cable to the device sockets. Turn on the router first, and after 2-3 minutes, start the printer. You cannot turn it on at the same time; you must do everything as described above.
- Connect your PC to the router using a patch cord or via Wi-Fi.
- Enter the main router settings menu in the “ Network Map ” section. Look there whether the printing device has appeared or not. If it appears, then proceed with further settings on the computers that will use this printer for printing.
Other WiFi connection options
- Print server. This is a special device that was created specifically for organizing printing over a network on one printer from several computers. You can use USB Direct or WPS to connect the printer to this device, if available. The setup is carried out by analogy with a router, but it is better to “arm yourself” with the instructions for your print server model.
Does your device support WPS technology?
- Yes 71%, 15 votes
15 votes 71%15 votes - 71% of all votes
- No, I have an old model 29%, 6 votes
6 votes 29%
6 votes - 29% of all votes
Total votes: 21
21.03.2019
×
You or from your IP have already voted.