(formerly Bee Line GSM) is a well-known telecommunications brand, which is the third largest wireless operator in Russia and the second largest in the provision of general telecommunications services. For more than 20 years, the company has been successfully operating not only in Russia, but also far beyond its borders: Armenia, Georgia, Ukraine, Kazakhstan, Kyrgyzstan, Vietnam, Laos and Australia - these countries also have numerous Beeline subscribers.
Beeline is not only a provider of high-quality cellular communications, but also high-speed Internet for smartphones, tablets, computers and other smart gadgets. Internet speed is constantly increasing and since 2013 it has reached a completely new level. Such services now require more powerful equipment.
Beeline Smartbox is a branded device that will allow you to connect several computers, mobile devices and even SMART TVs into a single local network and provide them with Internet access. In this article we will get acquainted with setting up a Smart Box router from TM Beeline.
Smart Box Beeline is a router with Wi-Fi support, which is manufactured in Taiwan by Sercomm for Beeline. This device has support for wired multicast IPTV and network storage option. Having such a device at home, you can use the Internet on 10 devices simultaneously, without losing the quality and speed of the signal. You can create a closed network and organize a reliably secure Internet connection.
The technical characteristics of the Beeline Smart Box model are quite impressive:
- This is a Wi-Fi router operating according to the 802.11b/g/n standard;
- Signal transmission speed – up to 300 Mbit/s;
- Reference board – Realtek 8197D;
- Operating modes – DHCP client, static IP, L2TP, IPoE;
- 1 USB port – version 2.0;
- LAN connectors – 4 pieces;
- Current software version: 2.0.19 (14MB).
Smart Box Beeline routers have a USB port, which means that you can connect external drives to it and share them over your local network.
Today Beeline offers its users four models of Smart Box wireless routers:
- Dual-band SmartBox TURBO+ (3.6 thousand rubles);
- Dual-band SmartBox ONE (2.5 thousand rubles);
- 5GHz SmartBox PRO (5.9 thousand rubles);
- 2.4GHz Beeline SmartBox (2.5 thousand rubles).
Connecting the device
To connect the Beeline Smart Box Wi-Fi router you need to decide what kind of connection you want to establish:
- Wired;
- Via Wi-Fi.
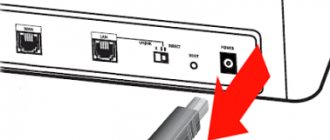
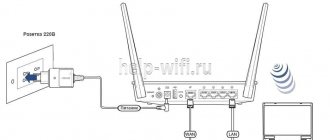
The first option is more convenient to use for the initial connection. To do this, install the cable that the Beeline operator brought into your apartment into the outermost socket of the router marked “WAN”. After this, use a fiber optic cable (patch cord) to connect the router to your computer: one end of the cord must be installed in one of the four connectors of the router marked LAN, the other end - into the PC’s network card.
To configure the router to work via Wi-Fi, you will only need to connect the router to the provider’s cable (via the WAN connector) and start searching for new equipment on your computer.
Specifications
Recommended routers for home Internet Beeline
“Beeline” Smart Box Pro and its other models have the following features:
- There is a USB 2.0 connector used to connect external devices.
- Characteristics of the used wireless communication parameters: frequency range 2.4 GHz, 802.11b/g/n standards, access speed 300 Mbps.
- The router supports the IPTV standard. It has a dedicated LAN port for this purpose. An IGMP proxy is used.
- There are network connectors for connection: 1 WAN and 4 LAN, using the Fast Internet standard.
Note! The Smart Box router supports tariffs that provide communication speeds of over 60 Mbit per second.
Setup process
We will configure Smart Box through a web browser on a computer. After connecting all the cables, turn on the computer, launch the browser and enter the combination “192.168.1.1” in its address bar. This is the IP address of your device on the local network. You can see this data on the back wall of your Wi-Fi router. It also contains the username and password, which we will also need for further setup.
When you log into the configurator for the first time, you will see a welcome window. Click the "Continue"
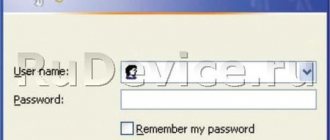
and a new window will open in front of you, in which you will need to enter your username and password. By default, all Beeline subscribers have admin/admin.
Now you need to activate the “Quick Setup”
. The setup form is quite simple; each section has its own tips, but even without them everything is intuitive. Here you will need to enter the following data:
for home internet:
- Login is the number of your agreement with the provider;
- Password is a combination for Internet access determined by the provider.
for the router's Wi-Fi network:
- Network name – come up with a name for your Wi-Fi connection (SSID);
- Password – create a secret code for logging into the Wi-Fi network (from 8 characters).
for a guest Wi-Fi network (optional):
- Set the same parameters for your router's guest wireless network.
for (optional):
- These are the television settings (here you will indicate the number of the LAN connector into which you will connect the TV receiver).
Save the entered data and wait for the equipment to apply the new settings to its operation. That's the whole process of setting up a router, now you have Internet in your home.
If you don’t want wires to spoil the appearance of your home, you can establish a wireless connection, but for this, your PC or laptop must have a built-in or separately purchased Wi-Fi adapter:
- Turn on the Wi-Fi function on your laptop (or PC).
- Open the Control Panel
. - In it, find the item “Network connections”
. - Go to the “Wireless Network Connection”
and select the network you want to connect to.
Today, all new routers can operate in two frequency modes:
- At 2.4 GHz;
- At 5 GHz.
The first option is more common, but many devices operate at this frequency, so there may be interference in the network. Almost no one uses the 5 GHz frequency; it has a slightly shorter range, but the signal purity and speed are higher .
After you have selected the desired channel, you will only need to enter your username and password for the secure Wi-Fi network and save all changes made.
The operator’s website has three special detailed instructions for connecting a computer, mobile devices or SmartTV to the router’s Wi-Fi network - https://moskva.beeline.ru/customers/help/home/domashniy-internet/instrukcii-dlya-mob- ustroistv/
Now let's get acquainted with the instructions for setting up a Wi-Fi network on the Beeline Smart Box router:
- In the address bar of your browser, enter the IP address of your device – “192.168.1.1”.
- In the menu that opens, select “Advanced settings”
. - At the top of the window, find the “Wi-Fi”
and go to this menu. - In the navigation list, select "Basic settings"
. - next to the line “Enable wireless network (Wi-Fi)”
. - Below you can make any changes to the main parameters of the router’s wireless network (operating mode, select a separate channel number, disable the guest Wi-Fi network).
Save all changes made and go to the next section of the “Wi-Fi” tab – “Security”
. At this stage, you can set the most secure encryption type: set the authentication value to WPA2-PSK. Save these changes and restart the program.
Please note that if your apartment has devices that do not support the WPA2 wireless device certification program, then it is better to leave the authentication value at the default - WPA-PSK.
WPA is the 802.1X standard, and WPA2 technology is referred to as the IEEE 802.11i standard. Since 2006, all Wi-Fi devices have been released with WPA2 support.
Setting up WiFi on a Beeline Smart Box router.
Go to the Beeline Smart Box web interface:
expert router options
. In the menu at the top of the page, select the Wi-Fi section and in the menu on the left, select Main characteristics:
Here you can change the main characteristics of the router’s wireless network. For example, you can set the mixed operating mode b/g or b/g/n mixed, or you can limit only one g or n. Also, if you also have wireless networks in your house, then I would recommend instead of the default channel 6 or automatic mode (auto) or some other, for example 2,3, 9 or 11. Also, in In this section you can completely disable the guest WiFi network
.
Let's go to the Security section:
Here I would recommend changing the encryption type of the WiFi wireless network to a very secure one. To do this, you need to set the Authentication parameter to WPA2-PSK. You should leave the WPA-PSK authentication mode only if you have wireless devices that do not support WPA2. Click the Save button, and then click on the Reload link at the top of the page.
Firmware for Smart Box
Smart Box is a device that runs on its own software, so it is very important that its firmware is always up to date. You can find out the latest firmware version and download it from this official website of the operator.
To download the update, you will need to complete just five steps:
- In the address bar of your web browser, type the IP address of your router - “192.168.1.1”.
- Go to the "Advanced Settings"
. - At the top of the window, find the “Others”
, and in the navigation menu on the left - the
“Update”
. - Specify the path where the file with the new firmware is located and click the “Update”
. - Wait until the download procedure completes and the equipment automatically reboots.
Starting with firmware version “2.0.25”, smartboxes have the ability to work with 3G modems in Wi-Fi mode.
The Smart Box Beeline router can also work with other Internet providers. If the new operator provides Internet network services using the DHCP dynamic configuration protocol or uses the PPPoE link layer network protocol, the equipment settings can be easily changed in the user account.
Note.
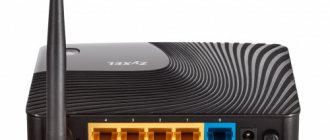
The Beeline provider, in order to keep up with others, decided to release its own router, the connection to the networks of this operator can be configured in a couple of clicks. The router offered under the name Smart Box is built on a unified Realtek 8197D processor and is equipped with 64 MB of memory.
In fact, all the complaints that there may be about the operation of this device relate rather to the firmware. We hope it will be fixed soon. Let's look at how to configure it, and also how to update the firmware in it.
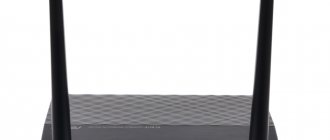
Router "Beeline Smart Box"
On the rear panel, in addition to the standard set of ports and the power button, you see an operating mode switch. The “router” mode is activated when the toggle switch knob is in the up position. The second mode is “switch”.
We will look at how to set up a connection with the Beeline provider. To do this, you can connect a computer to the router via a patch cord or via a wireless network (which operates in mixed mode b/g/n, it is named “Smart_box-…”). Finally, we will look at how to update the firmware. The firmware version current at the time of creation of the review is 2.0.19.
Resetting settings and flashing Beeline router firmware
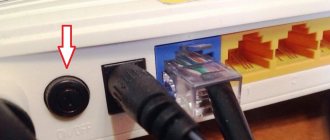
Sometimes users need to reset the settings to factory settings. We turn on the device and wait until it boots up completely and is ready for use. After this, we find a button on the device body called RESET. Now you need to press this button and hold it in this position for about forty seconds. After such manipulations, the settings will be reset.
For high-quality operation of the router, you need to ensure that the version of the firmware you are using is up-to-date and change it if necessary. The firmware change should be carried out step by step, according to the instructions.
Let's look at how to flash the Smart Box model below:
- Open any browser on your computer and go to the official Beeline website.
- In the appropriate section we find the current firmware version for your device.
- In the address bar we write the router address 192.168.1.1.
- If you have not changed your password and login, then enter admin in both fields. If this data has been changed, enter the current values.
- In the main menu, select a block with advanced configuration settings.
- Next, select the “Others” subsection.
- Here you will be interested in the “Software Update” item.
- Using the prompts, select the file with firmware previously downloaded to the computer.
- Click on “Perform update”.
- Finally, you need to reboot the router.
When the flashing procedure is completed, the device will reboot again and you will have access to the network.
Connection setup
As is easy to understand, you need to connect the Beeline cord connector to the WAN port. You can access the router’s web interface from a wired or Wi-Fi network (the latter works without a password).
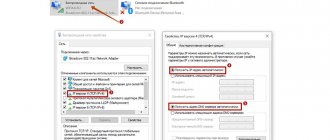
The actions should be as follows: having connected all the cables, supply power to the router, wait 1 minute, open the web interface. The requirement for setting up a network card is to set the “automatic” mode:
Setting up a wired connection on your computer
On wireless cards, they also enable a similar mode (“auto” DNS and IP). The parameter values needed to open the web interface are given below.
How to open the GUI?
If a wired network is used to configure the router, the patch cord is connected to one of the LAN ports. In order for the network card to receive IP and DNS from the router, you need to right-click on the connection icon and click “Fix”. You can connect to a wireless network without a password; its name is “Smart_box-XXXXXX”.
Let us remind you that the router takes at least a minute to load. The graphical interface address of Smart Box is standard and equal to 192.168.1.1. The default password is the same as the login, this is the word admin:
Login to GUI
Setting up a connection with Beeline
While on the start tab of the interface, click the “Quick setup” button. The following page will open:
Connection setup
Here you need to set the parameters:
- Subscriber login of the form “089XXXXXX” (read the contract)
- The subscriber's password is what is specified in the contract
- “Network name” – you can leave it as is
- “Password” – the value of the Wi-Fi password (you don’t have to use it at first)
- We will not enable the guest Wi-Fi network
- Select one LAN port for the TV set-top box, if required (just not the one that is currently in use)
- Click “Save”
Login to the configurator interface
Setting up free channels on your TV via the Internet
To enter WiFi settings, you need to do the following:
- After launching the browser, enter “192.168.1.1” into the address bar and press the Enter key.
- Next, a page will open with text that tells about the device.
- To log in on the next screen, enter the word “admin” as login and password. If you need to use other values, the necessary information can be read on the device.
- After the user has logged in, a menu can be seen on the main page. In it, select the desired item to enter parameters.
Further actions are determined by which section the user will work with next. Setting up the Beeline Smart Box router requires entering parameters to ensure the Internet is operational.
Firmware update
The built-in program for the router, that is, the firmware, can be downloaded from the official Beeline website. The firmware file takes 16 or 17 megabytes. Save it to your “desktop”. Next, we will look at how to reinstall the firmware in a Smart Box router, and most importantly, how not to make things worse.
Preliminary actions
It is best to perform a factory reset before updating the firmware. Turn on the router, wait 2 minutes, press reset with a paper clip (the button must be held for 10-15 seconds). The LEDs should blink, then the router will boot again (but with the default settings).
We will install the firmware by connecting the router to the PC via a wired network. It is necessary. Reinstalling the software is carried out for the sole purpose: to rid the router of the “bugs” of the previous firmware. If everything works well, there is no need to reinstall anything.
It is important to know that while transferring the firmware file, you cannot turn off the power or break the connection between the devices. After the installation is complete, it is better to wait another 5 minutes, and only then briefly press reset.
We update the firmware via the web interface
Go to the configuration GUI as discussed above. On the start tab, click the “Advanced settings” button. Then, select the “Others” tab -> “Software Update”:
Reinstalling the firmware
Sequencing:
- Click “Select file”, find the file on the “desktop” and click “Open”
- Check the connection again and click “Update”
- Wait for the reinstallation to complete
- Wait 5-6 minutes
- Briefly press the reset button on the router
Happy setup!
By joining the “House of the 21st Century+”
a Smart Box Wi-Fi router
was brought to your apartment on the day of connection . As a rule, all equipment configuration is carried out by the installer during connection. There are situations when, for some reason, the settings of your router are lost and you need to reconfigure your Smart Box. Instructions for this are provided below.
Basic parameters of the Smart Box router:
- Router address - 192.168.1.1
- Latest firmware - 2.0.11
- Username to access the device - admin
- The password to access the device is admin
- Network name (SSID) - Smart_box-XXXXXX (where X are characters unique to each device)
- The default wireless network (Wi-Fi) key is no key
Connecting a Smart Box router
1.
Insert the cable laid into the apartment by our installers into the WAN port, and connect the computer with the patch cord (cable) from the router kit to any of the LAN ports. You can also connect your computer to the router via Wi-Fi, but at the first stage it is still better to use a cable connection.
Connection setup
2.
So, you have connected the router to the computer and to the cable from the entrance.
Next, open your browser and enter 192.168.1.1 in the address bar. You should be taken to a welcome page. Click on the Continue button.
3.
The setup program will prompt you to enter a username and password.
Enter admin
and
admin
.
Click Continue
.
4.
You will now be taken to the main menu Click on the
Quick Setup button.
"Home Internet"
— in this section you set up a connection to the Internet, all the data necessary for connection is contained in the device’s memory, you just need to enter your login and password from the contract in the appropriate fields.
“Wi-Fi network of the router”
— in this section you have the opportunity to set up a wireless home Wi-Fi network.
In the Network name
, you need to come up with and enter the name of your network, for example free_wifi, and in the password column, enter the network key in order to protect your connection from unauthorized access. Please note that the network key must be at least 8 characters including numbers and letters of the Latin alphabet.
"Guest Wi-Fi network"
— it is possible to set up a guest Wi-Fi network.
"Beeline" TV
— if you are also a television subscriber, you need to select the port (LAN1, LAN2, LAN3, LAN4) to which you will connect the set-top box. If you watch channels on a PC or using an Xbox 360, you do not need to configure port forwarding.
To save the settings, click the Save
.
6.
It will take about 1 minute to save the settings and connect to the Internet router.
As soon as the connection is established, opposite the Status
The message
“Internet connected”
.
Congratulations! The Smart Box router
is fully configured to work on the
Beeline
.
Connection
After purchasing a router, you need to configure it. First you need to go to the official Beeline website and activate the device in your personal account. You will need to enter the equipment number and indicate its IP address. After this, you can connect and configure the equipment. You can connect the router in several ways: using a cable or via a Wi-Fi wireless network. Please note: if the provider’s client prefers the first connection method, then the installed Internet cable is routed into the apartment and connected to the port, which is marked in yellow on the router panel. The adapted cable for connecting to a PC can be installed in any light-colored connector on the router. Before connecting your router to a device via a wireless network, you must first determine the type of device: laptop, smartphone or TV. Typically, subscribers connect to a PC.
Below we will consider the sequence of actions for connecting to Windows OS version seven:
- go to the Start menu;
- Next we need to get to the “Control Panel”;
- then we enter the section called “Network and Internet”;
- find the subsection “View network status and tasks”;
- click “Change adapter settings”;
- select a wireless network, then “Connection”;
- enter the password in the window that opens;
- Confirm the completed actions by clicking Ok.
If you want to connect a router to a Smart TV, the sequence of actions will be as follows (we consider the example of LG TV):
- select the “Network” function;
- Now select “Wireless network setup”;
- then press “AR”;
- After searching for a network, select yours and connect to it.
To complete the connection, you will need to enter a password using the remote control and confirm the completed actions by clicking OK. The principle of connecting a Beeline router will be the same for almost all devices.
Other settings
To continue setting up the Beeline SmartBox router, you need to do the following. On the WAN tab, you need to select the type of connection to use. Here is a table consisting of four lines. You need to make a note in the one where “Internet-L2TP” is indicated. If you need to adjust this parameter in the future, you will need to click on the “Change” button. After clicking the “Save” button, the changes made will be recorded.
A form for entering connection parameters will appear on the next page. You must specify PPPoE as the connection type. The login and password are entered as specified in the connection agreement. Also indicate the following information:
- The data type is DATA.
- Connection type – Routing.
- Trigger – Keep Alive.
- Provider address – tp.internet.beeline.ru
- MTU – 1500.
- DNS Substitution – Enable.
- Put o.
After entering, click “Save”, then in the upper right corner of the form click “Apply”.