Home / Phones / Tips
Back
Published: 10/02/2020
Reading time: 7 min
0
9405
A mobile device that runs on the Android OS, unlike other portable gadgets, can be connected to a computer as a flash drive. Many Android smartphones and tablets are initially equipped by manufacturers with functions that allow them to be used as flash drives.
This allows the user to record the necessary information and delete files from the product that are not used, but at the same time take up a lot of space.
Using an Android mobile device in the form of a flash drive, there is no need to constantly carry a drive with you. Now you don’t need to carry out a lot of manipulations with connecting to a laptop or computer, spending a lot of time on it.
- Options for connecting a mobile gadget as a flash drive
- Connecting the product with different versions of Android OS Android 2.1 – 2.3.7
- Android OS version 4 and higher
How to connect Android to computer
How to connect Android to a computer . Many users of mobile devices running the Android operating system complain that they cannot connect their gadgets to a personal computer in storage mode (external USB drive).
Unfortunately, it is not possible to give the only correct solution to this problem. The thing is that smartphone and tablet manufacturers not only use the Android system as the main platform for their own applications, but also significantly modify the initial set of “green robot” options.
In any case, there are no hopeless situations. So, let's start dealing with the problem from the very beginning. The ideal situation is when, when you connect your Android gadget to your computer, you see something like this:
This means that your mobile device is recognized by the computer as a virtual flash drive and is ready to connect. In the additional connection menu you should expect a similar picture:
Click the “ Enable USB storage ” button. And after that, “big brother” is simply obliged to give you a pop-up window describing options for working with an external drive (device memory):
If this does not happen, then:
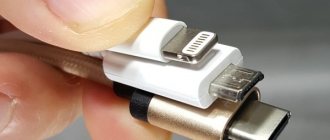
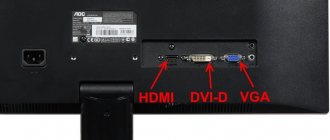
1. Paradoxical as it may seem, the first thing you should do is check the cable with which you are trying to connect your smartphone (tablet) to a personal computer. Don't ignore this step! Carefully inspect the connecting cord for breaks and abrasions. If there is such a possibility, then try to establish a connection with the computer using a different, but definitely similar, cable.
Are there any visible problems with the physical state of the elements of the future connection? Then move on to the next step.
2. Try changing the device’s operating mode in the device connections menu. In this case, the mobile device must be connected to the computer! For example, as indicated in this screenshot:
It often happens that mobile device manufacturers save on developing their own drivers, using universal drivers by default. Therefore, it is possible that after connecting several gadgets to the same computer, the desktop operating system does not perceive the new smartphone or tablet correctly.
If at this step Windows begins searching for and installing the missing drivers, then you are moving in the right direction:
Once the device initialization process is complete, a similar message should appear:
Did not work out? A similar process has not started on your computer? Then we advise you to complete the next step.
3. Without disconnecting your mobile device from your personal computer, turn USB debugging on and off several times. This will help the Windows operating system identify the gadget's internal storage as a new (recently connected) device.
In this case, a pop-up message with approximately the following content will most likely appear on the desktop of your desktop computer:
If, after performing the steps described above, the virtual USB device is not recognized, then it’s time to move on to “street magic”.
4. At this step, you will have to check the drivers installed on the desktop system and the items that appear in the device manager after connecting the gadget.
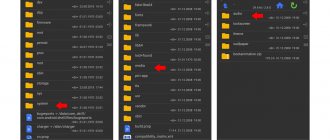
So, open this same device manager:
We carefully review the list that appears. What you should be primarily interested in is not the auxiliary modes of operation of the mobile device,
and sub-items “ Disk devices ”
or “ Portable Devices ”:
If new lines appear in the device manager, but do not correspond to the type of connected gadget (differences in name, model, etc.), then using the context menu
We advise you to disable these sub-items
and reinstall existing drivers:
The files you need can be easily found in the appropriate section of the website of the smartphone or tablet manufacturer.
Well, that's the last resort. It’s worth going to it only if, after completing the previous steps, you still weren’t able to switch your gadget to USB storage mode.
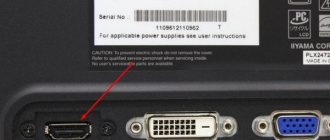
5. At this stage, we advise you to check if there are any errors in mounting the external drive on the part of the desktop operating system. Open the control panel and go to the “ Administration ” snap-in:
In the main window, carefully analyze the “ Disk Management ” item. Has a virtual flash drive appeared there? Is its size determined correctly? Has Windows assigned the correct volume letter?
In most cases, this is the root of all troubles. If in the disk tree you see the internal memory of your gadget, but its mount point is incorrectly set, then using the context menu, simply replace it with the one you like best:
We hope that after strictly following the paragraphs of this instruction, you will be able to easily work with the files of such a dear gadget to you
and a similar message will greet you every time after connecting your smartphone (tablet) to a personal computer.
Instructions for owners of gadgets on Windows phone
Unfortunately, if the smartphone is equipped with the Windows background operating system, connection to a PC via a USB cable is not supported.
Therefore, the connection can only be made via a wireless connection. Almost all modern laptops already have built-in wireless adapters, but in order not to waste time, it is recommended to clarify this point in advance from the documentation supplied with the PC.
Connecting to the global network using a smartphone is easy. For this purpose, it is necessary to perform several successive steps:
- Enter “Settings” by clicking on the cell with the image of a “gear”;
- After that, go to the “General Internet” section;
- Set the slider to the “On” position;
- Ready. Now a smartphone running Windows OS already distributes the Internet via WiFi. The network name and connection code are indicated in the same menu just below the wireless network activation slider.
It is recommended to change the default Wi-Fi name and password to ones created independently by the user.
How to set up access to the global network on a PC via an iOS phone?
If the question arises of how to connect the Internet to one or more PCs via mobile Internet from an iPhone, then you will need to perform the following steps in order:
- Enter “Menu”;
- Open “Settings”;
- Go to the “Cellular Communications” subsection;
- Activate the “Enable 3G” and “Cellular Data” items;
- Next, you definitely need to install o. This simple action will create an access point. If you need to provide only one computer with Internet access, it is recommended to use a USB cable.
If you need to set up a network connection for several PCs at the same time, activate the wireless access point.
Note: Using a USB cable is preferable because this method is more reliable from a security point of view and at the same time simpler, because you don’t even need to log in and configure settings in iTunes.
It should be noted that if the user has chosen the option with a wireless connection, then he will need to independently come up with a complex access code to the point, otherwise there is a risk of using expensive mobile Internet by strangers.
- Next, in the iPhone, open the “Menu” again;
- Go to the “Settings” tab;
- Then – to the “Mobile network” section;
- After that, click “Access Point” or “Personal Access Point” and set the switch to the “On” position or do o (in different versions of Apple smartphones the menu is not significant, but it differs);
- Now you need to decide on the connection method. If you only need to connect one computer and you have the USB cable included with your iPhone, then you don’t have to touch anything in the settings. If the user needs to change the connection method, connection options via Wi-Fi or Bluetooth are available;
- By activating the required connection, you can immediately access the global network from a desktop PC, laptop or tablet. For example, if the user preferred the WiFi option, then in the device, by turning on the WiFi adapter and selecting the created network, you will simply need to print the access code. In the future, you will not need to enter a password, since the connection occurs automatically.
Usually, users do not have problems with connecting via a wireless network, but if the wired option is selected, then the following steps should be followed:
- Connect the iPhone to the PC with a USB cable;
- On your laptop or computer, go to the “Control Panel”;
- Then go to the “Network and Internet” tab;
- In the “View network status and tasks” section, make sure the connection is successful;
- If there is no result, restart the PC and try again to connect the iPhone via USB cable.
Note: Sometimes an iTunes update is required to fix connection problems.
How to share the Internet using Bluetooth?
The basic principle is the same, and previously, this method was quite popular (as well as the one that will be described third) when distributing Internet connections to laptops.
As part of the example (and this is Android on Xiaomi Redmi 5A), you need to do the following:
- Open “Settings” and go to the “Bluetooth” section;
- Turn on the contactless data transfer module;
- Return to the main section and open the “Additional functions” (or “More”) line;
- Activate the Bluetooth modem mode.
On previous versions of Android, the above manipulations were solved by checking the box in the “Internet via Bluetooth” line in the same section as the Wi-Fi hotspot being created.