Virtualization or Virtualization Technology (abbreviated as VT) is a special computer technology used for many purposes. But we are only interested in the fact that it will help increase productivity for Knox. In some cases, it is initially deactivated, and the emulator displays a corresponding warning. If the user is faced with such a situation, he will probably be interested in how to enable VT in Nox .
What is virtualization?
The term “virtualization” is definitely in fashion today - it is constantly used by people who are at least somewhat familiar with the computer environment.
But not everyone knows its significance, and not everyone realizes the true potential of this advanced technology. Virtualization, in the simplest terms, is a computer within a computer. Using it allows you to create a virtual work environment - a kind of isolated “sandbox”, the processes in which will not affect the resources of your own work machine. Using virtualization, you can, for example, run several versions of one operating system at once - convenient for those who appreciate retro games or often use outdated, but useful and functional applications that are incompatible with the current version of Windows.
An additional plus is that processes, as we noted a little earlier, in this “sandbox” proceed separately, which means that the likelihood of introducing a virus or other malware onto the computer tends to zero.
It is worth noting, however, that almost any modern technology has its own nuances and pitfalls. In our case, these include the capabilities of processors - not all of them are capable of working with virtualization.
Questions and answers can be read at the link.
Question 1: Does my computer support virtualization?
In order to find out the answer to this question, you need to find out what kind of processor your computer “carries on board”. You can do this in two ways: through the task manager or through the control panel. In terms of the degree of effort applied, they are practically no different from each other - just in the first case you need to press the well-known key combination Ctrl+Alt+Delete, and in the second you need to open the control panel through the virtual “Start” button. In the manager, you can view the processor model by sequentially opening the “System” tabs.
After all these steps, download a program to determine the capabilities of the processor. For Intel processors this is Intel Processor Identification Utility, for AMD it is AMD-V. Run the utility, find your processor model and see if virtualization is one of the supported technologies.
How can I tell if my processor supports virtualization?
It is impossible to do this using the operating system’s own tools; the only option is to install third-party utilities. But first you need to decide what kind of processor is installed in your computer or laptop.
Step 1
Launch Task Manager. The “classic” way is to simultaneously hold down the Ctrl + Alt + Delete keys. Also, in the tenth version of Windows, the manager can be opened through the control panel - to do this, right-click on the “Start” icon and select the appropriate item in the menu that appears.
Step 2
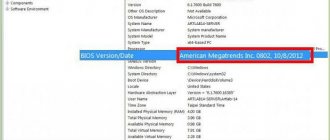
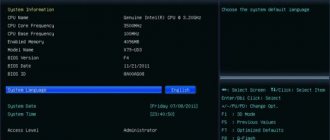
In the task manager, go to the “Performance” tab and click on the line “CPU (central processing unit”). The model of your processor will be indicated in the upper right part of the window that opens.
Step 3
For Intel model processors: download a utility called Intel Processor Identification Utility from the official website of the manufacturer. Install it and run it. In the window that opens, find the CPU Technologies tab. If your processor model says “yes” or just the name of a specific technology, congratulations—your computer supports visualization.
For AMD model processors, the entire procedure is similar - with the only exception that the configuration program is called AMD-V. Of course, you also need to download it from the manufacturer’s website - AMD.
Enable hardware virtualization
If hardware virtualization is not enabled in your UEFI or BIOS, you may see one or more of the following errors:
- VT-x/AMD-V is not enabled on this computer
- VT-x/AMD-V hardware acceleration is not available on your system
If you are facing this issue, read on to enable hardware acceleration in BIOS or UEFI.
Step 1a. Boot BIOS settings on a non-UEFI computer
First, if you have a BIOS flashed, you will see boot options in the BIOS displayed during boot. This will usually show up within the first few seconds of loading. Esc, Del, F2, F11, etc. are some of the typical keys that will take you to the BIOS settings. The actual key depends on your motherboard. If this applies to you, then you can get your BIOS settings much easier than if you had UEFI firmware. Load into BIOS settings and go to step 2 to enable Intel VT-x for virtualization. If this doesn't apply to you (you have a UEFI computer), try step 1b instead.
Step 1b. Boot into BIOS settings on your computer to UEFI
Most modern Windows computers (Windows 8 and 10) come with UEFI, which has several advanced features. But it boots your computer so quickly and there are no options to intervene and force your computer to boot into BIOS. But fear not, the process is still simple.
First, hold down the Shift key and click Restart from the menu as shown in the image below.
Shift key + restart – boots Windows with UEFI settings
During the reboot, you will see several boot options as shown in the screenshot below. Select Troubleshoot.
Troubleshooting Windows UEFI
On the next screen, select Advanced Options as shown below.
Advanced Windows UEFI Settings
In the Advanced Options list, find and select UEFI Firmware Settings as shown in the image below.
UEFI Firmware Settings
When prompted, click the reboot button to go to the UEFI firmware settings.
Restart in UEFI Fimware settings
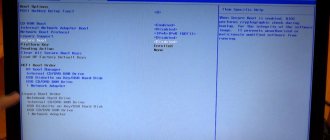
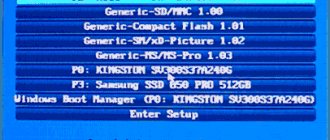
You should now see the BIOS boot options as shown below. In this tutorial, pressing F10 will take me to the BIOS setup.
Enter BIOS Setup on a UEFI computer
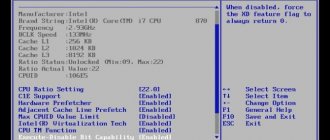
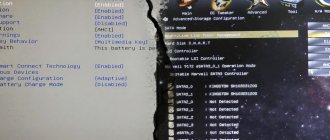
Step 2: Enable Intel VT-x Hardware Virtualization in BIOS/UEFI Firmware
The location at which you can enable the VT-x/AMD-v options will depend on the brand of motherboard. Browse all to find your virtualization options. In my case it was in the "System Configuration" section. Once found, select and enable hardware virtualization as shown below.
Find and enable VT-x/AMD-V hardware virtualization in BIOS
Finally, save and exit BIOS/UEFI settings as shown below.
Save BIOS UEFI settings and reboot
Step 3a. Make sure hardware virtualization is enabled in Windows
If everything goes well, your VirtualBox or Docker Engine should start without errors. You can also manually check if hardware acceleration is enabled on your Windows PC as described below. Press "Ctrl + Alt + Del" and select "Task Manager". In Task Manager, find and select the Performance tab to see the virtualization status.
Check if hardware virtualization is enabled
Note that in my case, virtualization is set to Enabled in the picture above.
Step 3b. Make sure hardware virtualization is enabled in Ubuntu
On Ubuntu, you can check if Intel VT-x is enabled using the cpu-checker package. First install it using the following commands:
sudo apt-get update sudo apt-get install cpu-checker
Then check the status of hardware acceleration in Ubuntu using the following command:
kvm-ok
If hardware virtualization is enabled, you should see output like this:
INFO: /dev/kvm exists KVM acceleration can be used
How to enter BIOS system settings?
To do this, you will have to dig a little into the system settings. However, this procedure is not at all as complicated as it might seem at first. Difficulties can arise only at the stage of entering the BIOS. The thing is that different models of personal computers and laptops have their own “keys” - “hot keys” that you need to press to enter the desired section. But in general terms, the procedure is similar: to get into the BIOS, you need to restart the computer, and at the moment when the corporate logo appears on the screen, press the desired button. For Acer products it is F8, for Asus it is F12 and so on.
An alternative option is to open PC settings, select Update & Security, and then go to the Recovery tab. On this tab you will need to click on the line “Special download options”. The computer will restart, after which a blue screen will appear, where you will need to select “Diagnostics” + “Advanced Settings” - “UEFI Firmware Settings”. This will be followed by another reboot, after which you will finally get to the desired settings section.
So, we have successfully entered the BIOS. What's next?
Switch to DirectX and change RAM capacity
In the Bluestacks engine settings there is an option to select OpenGL or DirectX technology for stable operation of the emulator (by default the emulator uses OpenGL). Switching to DirectX and rebooting the emulator will help get rid of the “Virtualization engine does not start” error on Bluestacks.
Do the following:
- Open the Bluestacks emulator;
- Click on the emulator settings button in the upper right corner (down arrow);
- In the menu that appears, select “Settings”;
Select emulator settings
- Select the “Engine” section on the right;
- Activate the “DirectX” option;
Select the "DirectX" option
- Below, click on the “Reboot” button.
After restarting the emulator, check for the problem. If there is one left, then follow all the steps listed above, while on the DirectX or OpenGL selection screen, change the number of cores and the amount of memory. Try different options (for example, increase the number of cores and reduce the amount of memory). Then click on the “Reboot” button at the bottom. There have been cases where selecting the “DirectX” option and changing the RAM volume indicator helped fix the virtualization error in Bluestacks 3.
Setting up virtualization on an Intel processor
Step 1
Go to the Advanced tab. There we find a section called CPU Configuration, and in it there is a separate line called Intel Virtualization Technology.
Step 2
By default, the parameter “Disabled” should appear opposite the specified line. If the parameter status is displayed as “Enable”, it means that virtualization is already working, and you can safely use it without restrictions. If not, the parameter value should be changed manually, and then restart the computer.
Setting up virtualization for popular processors
The BIOS device depends on the manufacturer of your processor and computer. It is important to know where to look for the item you need. The given algorithms can also be used to solve the problem of how to check if Windows virtualization is enabled.
Intel
With this processor in the BIOS you need to work according to the following algorithm:
- find the Advanced tab;
- in it go to CPU Configuration;
- You will see a list in which you need to find the line Intel Virtualization Technology;
- change the parameter opposite this line from Disable to Enable;
- confirm your actions.
After this, the computer will restart and you will be able to use virtualization without restrictions. If the line opposite Intel Virtualization Technology was Enable, then you don’t need to change anything - everything is already configured at this level.
Enable virtualization in the Windows 10 operating system
The tenth version of the most popular operating system has an option that allows you to enable virtualization without much manipulation of the BIOS settings.
Step 1
Call the command line by simultaneously pressing the WIN and R keys. In the window that appears, write the word control and press Enter.
Step 2
If everything was done correctly, immediately after pressing the input key, the OS control panel will open in front of us. In it you need to sequentially find the items “Programs and Features” and “Turn Windows components on or off.”
In the very first lines of the list that appears, you will see the Hyper-V item - this is the utility we need. “Expand” it by clicking on the plus icon and check all the empty boxes.
After that, save your changes and exit the control panel.
If everything was done correctly, Hyper-V will be available in the program menu immediately after the manipulations are completed.
Preparing for work
Windows 8 Guide
- Open the toolbar on the right side of the screen and go to Settings .
- Next, go to the Change your PC settings .
- In the window that opens, select the General . Scroll down the page, find the Special download options and click on the Restart now .
Windows 8.1 Guide
- Open the start menu and click on the arrow located in the lower left corner.
- You will see a list of applications installed on your computer. Pay attention to the right side of the window and find the dialog box.
- Type the word Settings , open them and go to PC Settings .
- Next, open the Update and Recovery .
- Go to the Recovery and under the Special boot options , click on the Restart now .
Windows 10 Guide
- Open Windows Settings . The easiest way to do this is with the Windows key combination + I.
- Go to Update and Security .
- Next, open the Recovery .
- Find the Special boot options and click on the Restart now .
Problem solution
Depending on the cause of the error “it is impossible to start the virtualization engine,” the solution options will also change. It should be noted that some of them will also be reciprocal (for example, Hyper-V) and doing the action several times with different target results (disabling or enabling) will produce different consequences .
System failure
There may be a problem with enabling hardware virtualization in the emulator itself or its interaction with the operating system (OS). In this case, just restart the emulator . When reinitialized, the parameter file will be read correctly. You can also restart your computer to get rid of unnecessary processes that use files needed to run.
Most often, the failure occurs after installing the program before the first shutdown of the OS.
Outdated version
This kind of failure is less common. All versions of the emulator are considered stable. But there is a nuance that appears when the old version does not match the installed operating system. For example, you should not run Bluestacks under Windows 10 if the program version is lower than 2. In this case, it is better to reinstall the emulator and use the new version.
System requirements
It should be remembered that the program has system requirements for a reason. If they do not comply, malfunctions will constantly occur. Moreover, there will be not only a blocking of the engine starting, but also periodic crashes .
Online services and programs for combining photos into one
The computer must meet these requirements. In addition, a special program is used to check the video card: OpenGL Extension Viewer 2.
Hyper-V enabled
Hyper-V is a virtual machine that is built into Windows 10 and modern server operating systems. Sometimes enabling or disabling the technology can allow the emulator to run without problems. To check this component you need to open “Windows Components”. This is done as follows:
- Open the Start and enter the word “ Components ”.
- Go to the appropriate utility .
- Hyper- V ” in the list
- Uncheck the box next to this item. If there is no checkmark, you can try to install it.
Source of the problem: antivirus
Sometimes a running antivirus can have an impact. When starting, you need to turn off the antivirus screens and look at the result. If the problem is solved, an exception for Bluestax is added. If not, the problem is not related to the antivirus.
Reinstallation
The last option to fix the error with the virtualization engine is to reinstall the application . To do this, it is completely removed , downloaded (the best option from the official website) and installed again. It is important to restart your computer after installation.