Section: Other articles | 253
A fairly large number of computer equipment owners use their equipment to communicate with other users. And for this purpose, it is important to know how to turn on the microphone on a laptop, since it is this device that allows you to talk to people by voice, or record voice messages.
Indeed, sometimes a situation arises when this component is not available. Therefore, this material will discuss the question of how to turn on the microphone on a laptop with Windows, given the fact that the Microsoft operating system is considered the most popular in the world today.
Instructions for solving this problem
So, how to enable the built-in microphone on a laptop? Most often, to achieve this goal you do not need anything super complex - just follow the following recommendations:
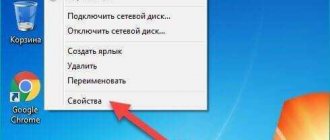
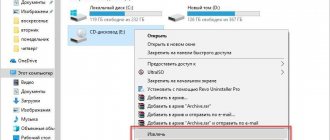
- Pay attention to the right side of the tray (the panel where the clock with the date and other important system icons are usually located).
- Right-click on the icon with the image of the sound device.
- A small additional menu is activated, where you should select the item responsible for recording devices.
- In the new window, make sure that the “record” section is activated. It should display the required device.
- Using the same right mouse button, activate it. Click on “OK” when finished.
This method almost always helps when searching for an answer to the question: if you turned off the microphone on your laptop, how do you turn it on? That is, in a situation where everything was initially configured correctly, and the user simply accidentally deactivated it.
How to manually enable the built-in microphone in a laptop
To manually turn on (set up) the laptop microphone, right-click the tray button on the “speaker” icon and click on the “recording devices” line.
A window will open where you can enable and configure your laptop's audio recorder.
If you have it, as shown in the figure below, then everything should work correctly - if not, correct it.
Of course, do not forget about drivers, as I wrote about above - without them, nothing will work on the computer. To download (if not available), it is best to choose the official website.
Now that you have done everything according to the instructions (as described above), you need to check the functionality of the microphone.
ATTENTION: if you made a recording from a microphone, but it turned out to be of poor quality, then various noises and other things can be easily removed - here are instructions on how to do this.
Switching to external devices
Indeed, sometimes the user may not be satisfied with the quality of the recording equipment that is included in the standard equipment. Or it’s simply inconvenient for a person to use them. In this case, people often connect additional communication devices to the computer. And they have a problem - how to enable an external microphone on a laptop? In fact, you need to act the same way as in the previous version, only with minor nuances:
- After going to the “records” section, the user can find several options allowed for use in the list at once. That is, the one that was originally present on the computer, and the one that was recently connected. Naturally, the system initially gives priority to the first.
- To achieve the desired result, you just need to deactivate the first and turn on the second device - by clicking on them with the same right mouse button and selecting the required option.
Naturally, at the end of this operation you should remember to click on “OK” so that the changes take full effect.
Automatic correction
In some situations, the above instructions are not effective due to the fact that some kind of failure has occurred in the system. Fortunately, the developers have implemented a tool in Windows to automatically fix it:
- Through the “Control Panel”, go to the “hardware and sound” section.
- In it, select the “Troubleshoot audio recording” item.
- In the list provided, mark the option that requires automatic adjustment. Don’t forget to use the “next” button afterwards.
- The operating system will automatically analyze the situation and offer a solution - a new window will open on the screen, where you should click on “Apply this fix.”
After the automatic correction is completed, all that remains is to check the result.
A few important nuances
It is important to understand that for the operation of all components of computer hardware, special files are required - so-called drivers.
That is, when answering the question - how to turn on the camera and microphone on a laptop, you should initially make sure that they are present and have been installed. This requires:
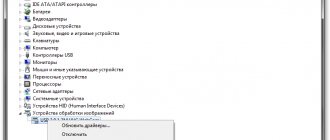
- Through the "Control Panel" go to the "Device Manager". In the tenth version of Windows, to do this you need to click on start and simply enter the name of the desired section on the keyboard, then use the link provided.
- In the list of equipment, pay attention to two sections - “Cameras” and “Sound, gaming and video devices.”
- Make sure they are fully functional. That is, next to all names there should not be a warning icon in the form of an exclamation mark.
- If the icon is there, then you should right-click on the name of the problematic component, go to its properties and select the driver update procedure.
Usually everything happens automatically, but sometimes you may need to manually install drivers.
In such a situation, you will need to find them on the Internet (by name/model of equipment), transfer them to your hard drive and initiate installation of the files. Most often, after this, it is recommended not to forget about rebooting the system. Well, the last point - how to turn on the microphone in headphones on a laptop? Repeat one of the options suggested above. At this point, some users report that they are trying to check the gadget by recording a short message and trying to listen to it, but there is silence in the headphones. The reason for this trouble is most often the simple forgetfulness of the user, who made sure that the volume control in the system was set to maximum, but on the device itself forgot to turn the special wheel responsible for the same function.
Why the microphone does not work on a laptop: from software to hardware problems
The cause of the malfunction can be a large number of factors - this is especially true for older laptops, for which only an external microphone is provided that is not included in the package. Let's talk about everything in order.
The operation of the device must be correct, then there will be no hardware failures or problems with drivers.
The built-in microphone does not work: what affects it?
There are many reasons that can interfere with the performance of a stationary microphone on a laptop. First of all, the malfunction can be caused by drivers or their absence (especially if the device is new) and only then by failures in the mechanism itself. It is also worth highlighting several more probable reasons causing the defect:
- Microphone malfunction due to update;
- the specific program does not provide for microphone operation;
- microphone work is currently concentrated in other applications;
- failure of the correct device settings.
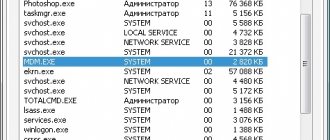
A very common problem occurs at the software level - incorrect installation of drivers. In this case, you can check the status of the microphone through the device manager. To do this, go to “Properties” of your computer, open the manager there and find the required device. If there is a yellow triangle with an exclamation mark opposite it, the driver is not working properly.
If your laptop has unlimited Internet access and receives the necessary updates, it will work properly.
External laptop microphone not working
Many users are forced to use external devices due to the inoperability of the built-in microphone. However, this type of equipment does not always work. The device may be connected incorrectly: make sure that the plug is inserted correctly into the laptop socket (usually it is red or pink).
External microphones are often versatile, so it's convenient to have them on hand.
In this case, it is advisable to check the integrity of all wiring, and then, if possible, try to connect it to other similar equipment. It is also possible that you simply did not connect the microphone in the settings. To check this, on the taskbar, click on the button that looks like a small microphone. In the menu that appears, press the power button.
The microphone on the headphones does not work on the laptop
If such a problem arises, you should not immediately blame the gadget itself for the inability to record sound through headphones. First, check how correctly the equipment is configured: perhaps the microphone itself in the headset is faulty, or perhaps it is not a headset at all, but ordinary headphones.
There is one simple difference between a headset and a microphone - the presence of a microphone
If, when you try to start the headset through another device, voice recording works, let's look for the problem that caused the trouble.
Let's start with the settings on the laptop. Let's go into the mixer and explore all the available connections. From the Start menu, go to Control Panel, then the Sound menu (or Hardware and Sound, and then Sound). Go to the Recording tab and check if the microphones are connected.
A properly configured microphone means success in important video conferences.
If there is a message that the device is not connected, there is most likely a problem with the drivers. It is recommended to update them on the official Microsoft website or through the installation media that comes with your OS.
GOOD TO KNOW!
Each PC has a different operating system, so you can get to the audio listening and recording options menu in different ways.