Recording a voice on a computer in today's conditions is as easy as shelling pears. It is enough to connect the microphone to a stationary terminal or use the built-in device on a laptop. But if you don’t know how to set up a microphone on Windows 10 or any other system, you may not be able to achieve normal quality. Next, we will discuss some issues related to setting the optimal parameters and applications used. But first, it’s worth focusing on the general principles of sound recording.
General principles for setting up a microphone on a computer
The very first and most important thing that needs to be clearly understood is that absolutely all applications related to sound recording are completely dependent on the operating system settings (installed devices, drivers, volume level, etc.)
Regardless of the acoustic system used (passive or active), so-called interference (whistle in the speakers) may occur from the microphone during the recording process. The general rule is to turn off the speakers while recording. You will not hear the voice being played back at the time of recording. But that doesn't matter.
The second point is related to setting the recording level. Half the volume is considered the best option. But for sensitive professional-grade microphones, you can install less.
The third question relates to the soundproofing system. It is clear that at home, you can achieve professional sound only with the help of a whole range of applications that allow you to remove extraneous noise after speech or vocals are recorded. Here you will need programs for setting up the microphone, called audio editors. Naturally, to set up devices that combine both headphones and microphones, which are mostly used in team games, special quality of signal transmission and reception may not be required. But there are some nuances here too.
Setting up the built-in microphone
To configure the built-in microphone on a laptop running Windows XP, first check whether the drivers are installed on the sound card. If the system was recently installed, then it is quite possible that the sound drivers simply have not yet been installed. They can be installed from the disk that comes with the laptop, or simply downloaded from the Internet.
If the drivers are installed, but the microphone still does not work, try updating it. Click the “Start” button, and then “Control Panel”, where you will need to open the tabs in the following order: sounds - audio devices - sound recording. Now you will need to set the device to be used as the default. Then decide on the volume and click the "Advanced" button.
Next, a window will appear where you will first need to select “Options” and then “Properties”. Place a checkmark next to the “Microphone” line and confirm your actions with the “OK” button. After this, a regulator should appear that can be adjusted to any volume level. On laptops with other operating systems (Windows7, Windows8 or Windows Vista), the setup procedure is almost the same. The only difference is that after you go to the “Control Panel”, the tabs need to be opened in the following sequence: sound - recording - microphone - properties: microphone - levels.
Connecting a microphone
As for connecting microphones, any computer's sound card has a special input for a 3.5 mm plug. If the microphone model is equipped with a regular jack, you will have to purchase a special adapter separately.
On laptops, there may be no Line-In or Mic input. Therefore, you will have to be content exclusively with the device that is integrated into the device. You won’t get much quality, since such a microphone can only be used for communicating in instant messengers like Skype, although in this case you will also need to make adjustments.
How to set up a microphone
Hello, dear visitors of smartronix.ru! Many owners of laptops and home computers, having purchased a microphone for communication or gaming, do not know how to set it up correctly. Our instructions for setting up a microphone are designed to correct this annoying misunderstanding. What is this communication device typically used for? Yes, for a lot of reasons. For example, for conversations with family and friends on Skype (by the way, we have a separate article on how to set up a microphone on Skype), or for communication in online games such as Dota, World of Tanks (WoT) and Counter Strike.
In our publication, we will tell you not only how to set up a microphone on a laptop and computer, but also how to connect it, and also how to check that all drivers for the audio card are installed. The fact is that the microphone settings depend on the installed driver in your Windows operating system. In one case, the driver may be standard and all settings are made through the software built into the system. And in the second case, Realtek High Definition Audio software may be installed on your laptop and you need to connect the microphone through it. We will look at both options for connecting and setting up a microphone.
How to set up a microphone on a computer or laptop
So, we’ll start with the simplest thing - by connecting a microphone to a laptop or computer. In fact, we already have an article on how to connect headphones to a computer and laptop, and everything is already pretty well explained where to connect the microphone to the computer. But we’d better repeat this information. After all, not all of you, dear readers, know how to connect a device to a computer or laptop. For a microphone, the audio card has a special connector - 3.5 jack, like regular headphones. The connector on the computer sound card should be pink:
If your computer does not have an external audio card, then the microphone connector will also not be difficult to find. It is located on the built-in audio module of the motherboard:
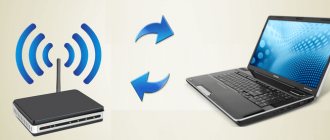
The same goes for laptops, netbooks and ultrabooks. The connector is usually located on the right or left side of the laptop and is marked with a special graphic icon.
As you can see, nothing complicated. We will assume that we have physically connected everything. It's time to set up windows. The next setup step is to search for a microphone in the Windows operating system. As we already said, everyone's system and drivers are different. Therefore, we will divide this chapter into two parts - standard setup in Windows and setup through Realtek HD Audio software. Depending on which driver you have installed, select the desired setting option.
Checking the audio driver of a laptop or computer
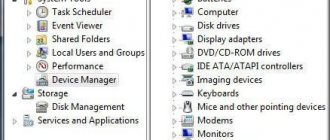
Before setting up the microphone on your computer correctly, let’s deal with one popular mistake made by novice computer users. Often, in addition to the setup itself, problems arise with the audio driver. Of course, if there is sound coming from the speakers, then everything is fine, but it often happens the other way around. Therefore, we advise you to check its presence in the system. Making sure that an audio driver is installed on your laptop or computer is not at all difficult. To do this, we need to get into the windows device manager. There are several ways to do this. The first way is to click on the computer icon on the desktop and select the desired menu item.
Or find the device manager in the command line through the Start menu:
The third way is to find the Device Manager through the Control Panel. To do this, you need to open it through “Start” > “Control Panel”, in the control panel find the “System” item and there will be a link to the device manager. Which method you use is not so important. The main thing is that in the “Sound, video and gaming devices” section you have installed drivers for the sound card and there are no unknown devices, as shown in the following screenshot.
If there are unknown devices, then in order not to suffer later with a non-working microphone, it is better to go to the website of the manufacturer of the laptop or computer motherboard and download drivers for the sound card of your PC. So, we made sure that the driver for the sound card is installed. Let's start setting up the microphone.
Microphone settings in Realtek High Definition Audio
Realtek HD Audio Manager is a microphone configuration program that is very popular and can be found on most modern laptops (if this software is not installed specifically on your PC, then read the next chapter of our article). But many of you probably don’t know if Realtek HD Audio is installed on your laptop or computer. The Realtek High Definition Audio driver can be found in Device Manager. Or find a column icon in the windows tray, as shown in the following picture.
You can also find the Realtek audio driver through the “Control Panel” by going to “Hardware and Sound”:
Having opened the manager, go to the “Microphone” tab. Here you can adjust the main microphone volume. If it works quietly, then it is best to set the volume to maximum. Here's a screenshot:
You can also configure the gain in the manager. If the microphone is noisy or humming, then it is better to set the gain to the minimum. It’s better to check the operation with several gain levels:
If your laptop has a built-in microphone, and you decide to connect another additional external microphone, then in the Realtek HD manager you need to set the device that you want to use by default. In the screenshot below, the “Set standard device” option is responsible for this.
As you probably noticed in the same picture (located above), on the tab you can adjust the microphone sensitivity. In principle, this is where you can finish setting up Realtek HD Audio. We are waiting for the final chapter of the article, in which we will look at how to configure the device in Windows. Below we will discuss the detailed setup of the microphone on Windows 7, but these instructions will also be relevant for Windows 8 and Windows Vista. If you are a Windows XP user, then there is nothing wrong with this. Our tips on how to set up a microphone on a laptop or computer are universal and will definitely come in handy.
How to set up a microphone in windows
So, as we saw above, the driver for the sound card is installed and there is sound in the computer. It's time to figure out the microphone settings in Windows. Open the “Control Panel” via “Start”, go to “Hardware and Sound” and select the “Sound” menu item.
Or you can do it even simpler and find the sound settings through the Windows command line:
You can also find the settings in the system tray by clicking on the column icon. Again, it doesn’t matter how you get there. Having opened the sound settings, go to the “Recording” tab. This is where our recording device should be displayed. If there are no other microphones in your system, then there will be one. If your laptop has a built-in microphone and you connect an additional headset or webcam with a built-in microphone, then there will be two devices. Select the desired device and click on the “Properties” button.
After clicking on the “Properties” button, the settings of the device you have selected will open, to which you can configure the microphone. You don't need to configure anything special on the General tab. Just make sure your device is turned on.
On the next tab, which is called “Listen,” we recommend checking the “Listen from this device” checkbox. This option will allow you to output sound from the microphone to speakers or connected headphones. It is worth noting that when using this option and the microphone and speakers are close together, unwanted whistling may appear in the speakers, which, however, does not always happen. Therefore, if you do not need this option, you don’t have to check the box.
On the “Levels” tab, you can adjust the microphone volume (adjust the volume level) and set the sensitivity. The volume option is especially useful if the sound is poor in an online game or when talking on Skype. And amplification can be useful if the microphone hisses when communicating. In general, if the device is not working well, then the “Levels” tab is just right for correcting various distortions. Just don't get too carried away. The volume can be turned up to 100%, and the gain is better set to 10-20 decibels. Otherwise, wheezing and clicking may appear, and extraneous noise may appear.
Next we have the “Improvements” tab. The “Disable all sound effects” option is responsible for distorting the sound in the device. but if you are using a cheap microphone and you hear a lot of noise when broadcasting audio, you can disable this option and enable noise suppression options. Removing a constant component - helps with unintelligible and choking sound. It turns down the microphone sensitivity.
The next tab, “Advanced,” is more for setting up studio microphones. On it you can set the sampling frequency and the number of channels used in the microphone.
So, we figured out the settings in Windows. We hope that our instructions for setting up a microphone on a computer or laptop were useful to you. If you have any questions or difficulties connecting, please ask in the comments. Finally, I would like to answer another fairly popular question from our visitors - how to set up a microphone on headphones. Everything is absolutely the same as described in the above instructions. Whether a regular microphone or a headset with headphones, both gadgets are configured in the same way.
smartronix.ru
Windows sounds and audio devices
The standard setting of any Windows system is called up through the corresponding section of the “Control Panel” or through the RMB menu (right mouse button) on the image of the volume icon in the system tray. Here you simply select the recording device.
If your sound card has additional software (for example, Realtek HD Audio Manager for motherboard-integrated devices), you can use that too. At least, there are somewhat more possibilities in terms of set parameters here than in the “native” Windows options.
The most popular programs for setting up a microphone
In the world of computer audio, it is generally accepted that all applications of this kind can be divided into two separate groups: simple recorders (primitive programs for recording sound) and professional and semi-professional audio editors.
Both allow you to record audio. The only question is how to edit it later. As you can already imagine, recorders only record sound, and programs for setting up a microphone in the form of audio editors allow you to change the recorded track, even adjusting the pitch.
Audio editors
Any program for setting up a microphone in the form of an audio editor and sound recording tool has at its disposal many more tools than simple recorders or the Skype application. This is understandable, because they were created specifically for this purpose.
When recording voice, you can set your own parameters by selecting the desired scheme from preset templates. In this case, you can even use the automatic setting of the normalization mode, when the sound volume will be equalized in real time. In the same way, additional effects such as an equalizer or reverb are simply installed immediately, so that you can immediately feel like you are, for example, in a concert hall. In general, there are so many instruments that it is impossible to describe them all simply physically.
Recorders
Among the usual audio recording tools today you can find quite a lot of simple programs that you don’t need to understand much about.
For users who are not looking for professional quality, we can recommend the following applications:
- Free MP3 Sound Recorder;
- MooO VoiceRecoder;
- Sonarca Sound Recorder Free and the like.
Audio editors
With audio editors the situation is somewhat more complicated. Programs for setting up a microphone of this level look much more complex and, so to speak, sophisticated. They take a different approach to the concept of audio recording than conventional recording applications.
Despite the fact that today there are many audio formats (compressed and uncompressed) with quite high bit rates and sampling rates, programs for adjusting microphone sound of this type by default save material in the old WAV format, which is considered the most suitable for creating a source audio file for the purpose of further transformation.
Among the most popular and widespread applications are Sony Sound Forge, Adobe Audition (formerly Cool Edit Pro), ACID Pro, etc. And this is not about professional studio sequencers like Pro Tools, which have even more tools.
But there is one more point. Some applications can not only record audio in any format or open it for editing, but also change the pitch of the recorded track if the vocalist, to put it mildly, at a certain moment did not reach the desired note. The most popular application is considered to be a program for setting up a microphone on Windows 8 or other versions of the system called Melodyne. It is available both as a desktop application and as plug-ins for DAW studios (VST, DX, AAX, AU, etc.).
The application opens any audio file as a wave. The editor itself has a piano keyboard or a note panel, which corresponds to the pitch of the track fragments. It is enough to set automatic analysis of the material, and the program itself will adjust inappropriate frequencies to standard ones. Along the way, you can do what is called the English term Quantize. This is the equalization of sound across beats at a given tempo.
Finally, when considering how to set up a microphone on Windows 10 or another OS, you can't ignore applications like AAMS, which are automated mastering systems based on a selected template.
Let's say you recorded a music track with vocals. Want it to sound like the classic Metallica albums? No problem! Select any track of the group as the source material from which the template will be created, and after that add your composition indicating processing based on the analyzed track. This, of course, takes a fair amount of time, but you won’t have to mess with the microphone settings. The program will still do everything on its own.
And one more “trick” that some audio editors have is that you can change your own voice, making it an exact copy of famous vocalists. While we're on the topic of Metallica, you can use the same Adobe Audition application to set a template for James Hetfield's vocals, and then change your voice to his. But that's not all. There is also an interesting function of influencing the subconscious, when noise in the ultra- or infrasound range is added to the edited audio. But they can evoke completely different emotions, which, alas, do not depend at all on our consciousness.
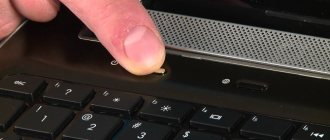
How to test a microphone on a laptop
If you have already adjusted all the microphone settings, you can make a recording to check the results. To do this, go to “Start”, select “All Programs”, then among “Accessories” find “Sound Recorder”. Any recorded message will be saved to the folder you specify. Listen to it and make sure the sound quality meets your requirements. If this is still not the case, go back to the settings menu and try changing them. You can also check the quality of the connection via Skype.
With the help of our step-by-step tips, you learned how to set up the built-in microphone in a laptop, but if you still have difficulties, it is better to contact a specialist. They will help you get your laptop working properly.
As part of the functionality of Windows 10, setting up a microphone (both external and built-in) is easy. Just read the instructions carefully and you can get a fully functioning microphone.
What's better?
In general, any program for setting up headphones with a microphone or just a microphone allows you to perform certain actions in terms of recording and setting input signal parameters. But professional packages have the advantage that with their help the recorded material can be subjected to any processing you like. They look quite complicated, and the average user without special knowledge will take a long time to figure them out. But if he masters it, he will immediately appreciate all the opportunities they offer.
Important information about setting up your microphone
You can also determine the identity of a particular socket by figures, icons and English abbreviated letter designations: “Mic”, “Headphones”, etc.
Having found the suitable wires in the headphones with a microphone, you should not have a single question or doubt about the correct connection. In addition to standard computer headphones with a microphone, there are separate studio microphones of the electrodynamic type, which in most cases are connected through a special preamplifier with a built-in equalizer.
Therefore, before purchasing and setting up Windows 7, consult with a specialist exactly how the microphone should be connected to the computer: through a preamplifier with Krona or directly. This will save you a lot of setup problems. So, after setting up the hardware, we suggest you learn how to set up headphones with a microphone on Windows 7 using the operating system itself.