Correct connection to the computer
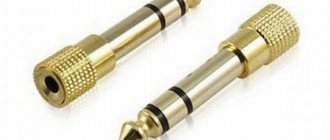
If we are talking about a desktop computer, then you must connect an external device to the appropriate connector. You can use headphones with a microphone, a webcam with a microphone, or a separate device, for example, for karaoke or recording podcasts. Also, all microphones are divided into connection methods: via a 3.5 mm jack or via a USB port.
If a USB microphone can be plugged into any corresponding connector, then it should not be confused with 3.5 mm, otherwise the device will not be detected in Windows. To do this, find the connector marked as a microphone. Most often, these ports are marked in pink, as shown in the picture below. Also, desktop computers have a similar connector not only on the motherboard, but also on the front panel.
Now you need to configure it on your computer using the standard tools of the Windows 7 operating system.
Driver check
First you need to make sure that the microphone is working properly and is detected by the system. The first sign that the device is recognized by the computer is the corresponding sound when plugged into the connector. However, this is not a guarantee that the system was able to correctly install the driver and configure it. To check this, do this:
- Right-click on the “Computer” icon and select “Properties” from the menu.
- Now go to the “Device Manager” section.
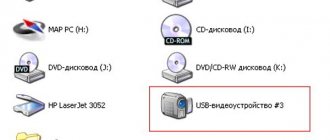
- We expand the subsection “Sound, video and gaming devices”. A list of sound devices that are detected by the system is displayed here. In most cases, these are High Definition Audio, Realtek and similar solutions. There should be no yellow exclamation marks near the icons.
We also advise you to pay attention to whether the Device Manager sees unidentified devices. It is quite possible that one of these is an external microphone with a built-in audio card, especially if we are talking about a USB connection.
If you have lost the “Computer” shortcut from your desktop, then you can open “Device Manager” in a different way. To do this, go to the Start menu and write the name of the application in the search bar:
To check whether the driver is installed correctly on your audio device, you need to follow these steps:
- In the same window, right-click on the device to open an additional window. The “General” tab displays the current state of Windows 7. If you see the inscription from the screenshot, then everything is fine with the driver.
- In the “Driver” tab, if you click on the “Update” button, a utility will launch to search for new driver versions.
- You can trust the search to your computer or specify the path to the file manually if you downloaded it in advance.
- After completing the procedure, close the window with the marked button.
After any actions with drivers, you must constantly restart your computer - remember this rule!
If we are talking about the built-in microphone in a laptop with a licensed OS, then the driver must be installed by default before purchasing the device. Otherwise, you will have to download proprietary programs from the laptop manufacturer's website. The microphone is connected, the driver is installed, the device is detected by the computer correctly - now we move on to configuration using standard Windows 7 tools.
Configuration via standard tools
To configure microphone quality settings, you can use the basic options in the operating system. They allow you to increase/decrease the volume level, adjust the gain, enable noise reduction, and so on. You can open the settings window in the following ways.
The first option is through the icon on the taskbar. To do this, right-click on the speaker icon and select “Recording Devices” from the menu:
The second option is to open the Start menu and enter the name of the Sound application in the search bar:
And the complete method looks like this:
- Open the Start menu and select Control Panel.
- Go to the “Sound” subsection, first selecting the “Small icons” view type.
Now let's move on to the settings. In the “Recording” tab you see a list of all connected devices for audio recording. To open the properties of any one, you must either double-right-click on it, or select the device and click on the “Properties” button:
Open the microphone properties and get acquainted with all the possibilities. In the “General” tab you need to check the connection. In the marked item you need to select the “Use this device (on)” item. Because of this, this particular microphone will serve as the main one every time you turn on the computer.
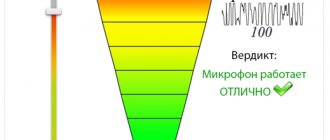
Open the “Listen” tab. There is a useful option here that allows you to test the sound yourself and without recording. The check is carried out when the “Listen from this device” setting is enabled. After using the feature, you will hear your voice in the headphones. This way you can determine whether it is worth increasing or decreasing the volume, what distortion and interference occurs during a conversation.
The Levels tab allows you to adjust microphone sensitivity and gain. Use the top slider to change the overall volume. It is not recommended to set it to maximum if you are using a cheap or low-quality microphone - strong distortion and noise are possible.
Since we already have listening enabled, we can adjust the appropriate sensitivity in real time. The lower slider allows you to amplify the incoming signal. We recommend increasing this parameter if, even at 100%, your microphone is very quiet.
It is not recommended to raise the microphone gain more than 20 dB - this may spoil the quality. The background will also be captured - keyboard sounds, extraneous conversations, and so on, which will greatly interfere with the conversation during the game or normal communication.
In the "Enhancements" section, all options are disabled by default. With a good microphone and the correct volume level, noise reduction, echo suppression, and removal of extraneous sounds will not be required. But if, while listening, you notice that the microphone is humming and generally does not respond correctly to incoming sounds, then you can enable several improvements.
If the microphone hisses and produces constant background echoes, then try turning on the Noise Cancellation and Echo Cancellation options. However, you will have to turn up the microphone level, as these improvements muffle the voice and distort it slightly. But extraneous noise will definitely disappear!
To reset the settings to default, simply check the “Disable all sound effects” checkbox and apply the changes.
The last tab, “Advanced,” allows you to increase or decrease the sampling rate. Basically, this parameter has a greater impact on voice recording. The higher the bit depth and frequency, the larger the recorded file size and the higher the sound quality. However, this parameter does not have any effect on conversations over the Internet.
To complete the setup, you need to open the “Listen” tab again and turn off listening from the device so as not to constantly listen to your voice in the background.
If you want to know how your voice will sound not in parallel with you, but on a recording, you can check this with a standard application:
- In the search bar of the Start menu, write the name “sound recording”.
- Click the record button.
- Give your speech and stop recording from the microphone.
- Select a folder to save the sound file.
- After that, run the file with any player and listen to the result!
Method one. "Control Panel"
Instructions on how to set up a microphone on a computer:
- Open the Start menu. Here, type the query “Control Panel” - and click on the first heading in the output.
- Switch to the Icon view (small or large), then go to the Sound section.
- Switch to the "Recording" tab. In the list below you will see which devices are connected. There will also be a sound recording device here.
- Right-click on the title, and then select “Properties” from the menu.
- On the “General” tab, check in the lower drop-down list that the connected microphone should be used by default.
- Apply the changes, then go to the Level tab. On it you can adjust the microphone sound by turning it on 50%, 70%, 100% or choosing a different level. The lower slider is responsible for additional gain - set the appropriate value by ear.
Apply the changes and close the window. You can return to adjusting the volume level if you wish.
Configuration via driver
An external or built-in microphone in Windows 7 can also be configured using a utility from the sound card manufacturer. Let's figure out how to do this and where to find this software.
We'll focus on the Realtek HD utility because these are the most common integrated sound cards on all motherboards these days.
You can launch it either through the “Control Panel” or by double-clicking on the corresponding icon. The interface and button layout may vary depending on the motherboard manufacturer:
- On the top panel, select the connected device.
- Below we see a slider for volume. If you click on the microphone icon, a menu with gain settings will open.
- Even lower are buttons for turning on noise and echo suppression, as well as conference mode. All this is in the “Microphone Effect” tab.
- In the “Standard format” tab, you can select the sampling frequency and bit depth.
Realtek HD audio codec in Windows 7/10
Depending on the driver, when you connect a microphone (pink jack by default), the realtek manager will ask which device is connected to it:
Select “Microphone input”, now it is available for use. You can go to the microphone settings through the Windows volume mixer or through the Realtek HD audio manager.
Watch the video or read the article:
To open the volume mixer, right-click on the sound icon and select “Recording devices”, and to launch the Realtek manager, click on its icon in the system tray (near the clock):
Sometimes the Realtek Manager icon is not in the taskbar, then you can open it from the “Start -> Control Panel -> Hardware and Sound -> Realtek HD Manager” menu
Let's set up the microphone through the Windows 7/10 mixer:
First we need to find the microphone input. Depending on the socket (rear or front panel of the system unit) into which the microphone is connected, and on the settings of the Realtek HD manager (to combine input jacks or not), it is called a little differently. Usually this is “Mic in at jack name (color)” or other names with the word “Mic” or “Microphone”. The current input is marked with a green checkmark.
If the microphone is not connected to any jack, the input will not be displayed in this window. To display all inputs, including disabled ones, right-click on any free space in the window and check the “Show disabled devices” and “Show disconnected devices” checkboxes.
So, the microphone is connected, go into it and go to the “Levels” tab
Here we can adjust the input signal level from 0 to 100 and the microphone gain level from 0 to 20-30 dB. Here lies the main reason why the microphone works quietly - it is insufficient amplification level. For most microphones, setting the level to +20 dB . When increased to +30 dB, the volume will increase even more, but the noise will also increase. To combat noise, let’s go to the “Improvements” tab.
To suppress unnecessary noise, the “Mute all sound effects” checkbox should be unchecked and “Noise Suppression” should be enabled. If there is an echo effect, you can set “Echo Suppression”. When noise reduction is turned on, the voice will noticeably change and may take on a metallic tint - this is the price for a cheap microphone or built-in audio codec. By the way, it’s not a fact that installing any external sound card will improve the situation much.
On the last tab “Communication” there is a useful setting with which the volume of system sounds and music will be reduced when talking on Skype.
Realtek HD Audio Manager
Launch Realtek HD Sound Manager and go to the tab with the name of the microphone
Here we can also adjust the recording level, microphone gain, and noise and echo reduction. In general, everything is clear in the picture. This setup method is the same for Windows 7/10 and Windows XP.
Notice the "Advanced device settings" button in the upper right corner. You can choose from two modes: classic and multi-threaded:
In multi-streaming mode, the microphone built into the laptop and the one connected to the jack are displayed as two separate microphones, and they can be used simultaneously. In classic mode they are combined into one. In this case, if an external microphone is connected, then it is used, and if not, then the built-in microphone is used.
Settings in communication programs
Most applications for communicating over the Internet have a separate section with settings that does not depend on system parameters. For example, we will look at the setup procedure in Skype and Discord.
Skype
We will talk about the most recent version of Skype. If this update is not available to you, you can still use the instructions - the approximate location of the sections and names remains the same:
- We go to settings through the additional menu.
- Here we open “Sound and Video”, select the device to record and adjust the volume level.
- To test the sound, click on “Make a free test call” at the bottom of the window.
During the call, you will be connected to an answering machine that will record up to 10 seconds of your speech. It will then play the recording so you can listen to it. This will allow you to understand how your voice will sound when talking online.
Discord
This application is newer than Skype, but is already very popular among gamers due to its functionality. For the microphone to work properly with it, do the following:
- Open the section using the gear.
- Go to the “Voice and Video” tab. Here you can select I/O devices (1). Below you can adjust the volume sliders (2). To listen to your voice, you need to click on the “Let's Check” button (3). You will hear a slight delay - this is normal. After listening to the voice, make adjustments to the volume level.
- If the voice sounds too quiet, try turning off automatic sensitivity detection and setting the slider to maximum.
Additionally, you can assign a hotkey and mute the microphone if necessary.
We reviewed only two current programs. If you use another application, then most likely its settings are very similar to these instructions.
Third party software
Depending on what you use the microphone for in Windows 7, you can choose a special program for setting it up. For example, for live broadcasts or recording video from the screen (desktop, games, etc.), you can use the free OBS. In the program you can add filters similar to those we described for standard Windows 7 tools:
- Near the microphone mixer, click on the menu button and select the “Filters” item.
- Here we right-click on the plus icon. Select the required improvement from the menu.
- Write the name of the new filter.
- On the right side of the window we adjust the noise reduction level or set up any other filter.
Similar functionality is available in almost every advanced program for working with video or sound. But remember that the described option only works within the application and does not apply to other features of Windows 7!
Microphone settings
In earlier articles we already looked at how to set up Skype on a computer. But many users still often talked about the quiet sound. Some even had to shout loudly into the microphone so that the interlocutor could at least hear something. To correct this situation, you should configure the microphone not in the IP telephony program, but in the sound parameters of the operating system itself.
We will take a step-by-step look at setting up a microphone on the Windows 7 operating system using the fairly common Realtek HD codec and setting it up on Windows XP with an AC'97 compatible codec. Having seen how the settings are done in these codecs, you can do this in others, all by analogy.
Increase microphone volume in Windows 7 via Realtek HD
Before you begin making all the settings, make sure that the microphone is connected to the computer. After connecting the microphone (usually it is connected to the pink jack), the codec manager will make a request to determine the connected device.
It’s clear that we need to select “Microphone input”. After this, the microphone will be available for use, and we can begin setting it up.
Now open the sound manager for Realtek HD, or launch the standard volume mixer. To open the dispatcher, click on its icon in the notification area. And if you decide to do everything through the volume mixer, then right-click on the sound icon and select the volume mixer. Then open the Recording tab or go to Recording Devices.
We can do the same through the parameters in the control panel. Open the “Start” menu and click on the “Control Panel” button. After that, in a new window we find the necessary sections.
Let's try to configure the microphone using standard system tools. And so, launch the volume mixer using any of the already known methods.
Find the input to which the microphone is connected. Typically these inputs are identified by color and the computer panel they are on. At the same time, at the beginning there is the word “Microphone” “Mic” and other variations with the same meaning. If you do not connect the microphone anywhere, it will not be displayed. To enable output even of inactive inputs, right-click on an empty space in the window and check the box next to “Show disconnected devices”.
In general, select the input to which the microphone is connected and click on the properties button. Then, in the next window, open the “Levels” tab.
On this tab you can adjust the input signal strength and gain level. The amplification level is usually the reason for the quiet sound. To amplify the sound, you simply need to increase the gain level. Often it is enough to set it at +20 dB. You can specify more (if there is such a possibility at all), but then the noise level will increase too much. To get rid of them, or at least reduce them, open the “Improvements” section.
First, uncheck the “Mute sound effects” checkbox, and then check it next to “Noise reduction.” If, in addition to noise, there is also an echo, then suppression of such a phenomenon as echo can be activated. Unfortunately, when such filters are activated, the voice will sometimes significantly change its sound, in some cases it even sounds with a “metallic” coloration. This is the price of inexpensive microphones.
Now open the “Communication” tab. Here you can activate the convenient function of reducing the volume of playing music and other system sounds while using voice communication.
Possible problems
Let's look at the main difficulties and errors that may arise when connecting and setting up a microphone on Windows 7.
Troubleshooting
If you encounter any problems, try running the standard troubleshooter. Perhaps a scan will help determine the cause:
- First, go to the “Control Panel”.
- Here we select the “Large Icons” view type and open the “Troubleshooting” section.
- We find “Hardware and Sound”, where you need to click on “Troubleshoot audio problems” to launch the diagnostic tool. Note that there is also a button to run audio playback diagnostics here.
- Information about the procedure will appear on the initial screen. Click Next.
- The application will begin troubleshooting. Wait 1-2 minutes.
- At the end, either a notification will appear stating that everything is fine, as in the screenshot. Or a window with the cause of the malfunction. Depending on what the diagnostics “says,” choose a further course of action.
The microphone is no longer detected by the computer
If everything was fine with your recording device, but at some point it disappeared from the system and does not want to work, then you need to install the correct driver.
Before installing a new driver version, be sure to remove the old one to avoid a software conflict.
It is worth adding that such a problem can also arise with the hardware. For example, if a microphone is constantly being connected and disconnected in the system, then the fault may be in the cable or connector. We recommend checking the wire for damage and also trying to switch the microphone to the front or rear panel (depending on where it was originally connected).
The front panel does not see the device
This problem can have two reasons: a malfunction of the port on the case or problems with the connection to the motherboard, as well as driver settings.
To do this, in the Realtek HD manager you need to select the type of device connected to the front connector. Click on the connector icon and select “Microphone input”.
External sound card does not work
If we are talking about connecting a microphone not directly to the motherboard or the front panel of the PC case, but using additional equipment, then you definitely need to install the software and driver for this card.
Install the necessary programs from the disk that comes with the purchase of the sound card. If there is no disk, then visit the manufacturer’s official website and download a driver designed for Windows 7. Don’t forget to check the bitness of the operating system.
The same advice applies not only to sound cards. Be sure to install a proprietary driver for a webcam with a built-in microphone, for USB devices, etc.
No Enhancements tab
Many users do not have a special “Improvements” tab, which was mentioned a little above. Do not despair - this only indicates that you have the wrong driver installed.
To solve the problem, you need to visit the official website of Realtek (or another software manufacturer) and download the appropriate driver version manually.
It is worth noting that this tab may simply have a different name - it all depends on the driver. In some it has an English name, and in some it can generally be divided into two separate categories.
No Realtek HD utility
The same applies to the proprietary Realtek utility. For some users, this section is simply missing in the Control Panel. For the application to appear, reinstall the driver.
Sound from microphone is delayed in headphones
This problem most often occurs when using many enhancing effects, especially when it comes to third-party programs. We recommend disabling the improvements in the default system settings described above. If the situation does not change, then try reinstalling the driver.
Microphone in Windows XP
If XP is installed on your PC, you can configure the equipment in this way:
- Click on the speaker icon in the tray. Didn't find a similar icon? Then open “Sounds and audio devices” in the control panel, and then check the box next to “Display icon”;
- In the volume menu, find "Options" and turn on advanced options. It’s simply not possible to activate device amplification without this option;
- Select "Options" - "Properties", and then "Volume settings" - "Recording". The flag opposite “Microphone” should be displayed here;
- the signal's features will now appear in the mixer. Here the gain of 20 dB and the adjustment for specific frequencies are displayed.