general information
In this article we want to tell you how to install Windows 7 from a flash drive. This installation option is now very popular among users, since it has a number of undeniable advantages compared to using a boot disk.
Advantages of installing Windows 7 from a USB flash drive:
- Easy to create bootable USB flash drive
- High speed of writing an OS image to a flash drive
- High OS installation speed
- Ability to install Windows 7 on a netbook (it usually does not have a disk drive)
- Compact size bootable flash drive (convenient to carry)
Next, we will look in detail at the entire process of installing Seven on your computer with detailed explanations and illustrations.
Scheme for installing Windows 7 using a flash drive
In order to quickly and efficiently install the seven on your computer, we will need to follow a certain scheme. We will carefully analyze each point of this diagram so that you do not encounter any difficulties during the installation process, and you quickly cope with this task yourself, without calling a technician or contacting a service center.
In general, the OS installation scheme from a flash drive looks like this:
- Downloading a suitable Windows 7 ISO image to your computer
- Creating a bootable USB flash drive based on this image
- Setting up the computer BIOS to boot from a flash drive
- Direct installation of Windows 7 from a USB flash drive
- Activating the operating system using the activator
- Installing the required driver package
- Optimizing Windows 7 performance
Don't be intimidated by the large number of steps in our guide. Believe me. All these operations can be carried out very quickly if you know what you are doing and why.
Purchasing or creating bootable media
To install, we need media : a boot disk or flash drive. Several options for where to get the media:
Buy an official licensed disc of the seven
This option is suitable for those who want to install a licensed Microsoft Windows 7, a completely official version without viruses or other interference. This option is suitable for organizations and companies to avoid problems before the law. To reduce the cost of a licensed disk, you can buy an OEM license in person or at service centers. Mostly they post it on Avito or call stores, maybe they have unsold licenses. only buy a licensed , since bootable flash drives for installing Seven were not sold in principle.
Find a ready-made boot disk or flash drive
Ask your friends or look around yourself, maybe there is some left over from buying a computer. If you can’t find it, then the last option is to create a boot device yourself.
Creating a boot device yourself
The process of creating a bootable USB flash drive or disk is a little more complicated, but free and more interesting. The process of creating a disk and a flash drive is slightly different from each other, so choose the instructions below that suit you.
To install Windows 7 from a flash drive, you will need a USB flash drive capacity of 4 GB . Any manufacturer.
- Instructions for creating a bootable USB flash drive
To install Windows 7 from a disc, you will need a blank DVD from any manufacturer. You can use both DVD-KB and DVD+R.
- Instructions for creating a boot disk
Download ISO image of Windows 7 to your computer
First of all, before creating a bootable disk with the Windows 7 operating system on board based on a flash drive, you need to find a high-quality ISO image of the system. The network contains a large number of various OS assemblies, to which many new programs, functions and applications have been added. In such assemblies, standard themes and standard sounds are changed, but not everyone likes such changes. That is why we offer users original images of Windows 7 for download. Those who need specific builds can easily find them on the Internet.
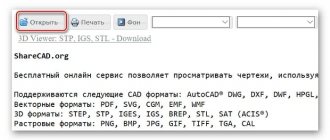
You can find a suitable image of the seven in the article “Original images of Windows 7”. There you can download both English and Russian versions of this popular OS.
After downloading the system image, you can proceed to the second step - creating a bootable USB flash drive based on it.
Installing Windows 7 from a flash drive - writing an image to a flash drive
The next step in our guide will be to write the image you downloaded to a USB flash drive. This can be done using special programs: UltraISO, Windows 7 USB/DVD Download Tool or WinSetupFromUSB. Each of these programs has been repeatedly tested for functionality by many users and you can be sure of their effectiveness. Which of these products to use is up to you. We have already described step by step how to use the listed programs in the article “How to burn Windows 7 to a USB flash drive.”
Read the article carefully and decide for yourself which recording method is the easiest for you. Distributions of the program you have chosen can be downloaded from the article mentioned above. You don't have to worry about this.
Preparing the installation flash drive
To install the OS, you need to write the image to an external drive that can be made bootable. To do this, you will need to use third-party programs.
Rufus
Rufus is one of the most popular programs for creating a bootable disk, which is distributed free of charge. One of the advantages is that it works without installation. The process of creating a flash drive:
- Run the program.
- Select the drive letter to burn.
- Determine the type of system interface (MBR+BIOS, MBR+UEFI, GPT+UEFI).
- Check the “Create bootable disk” box.
- Specify the path to the system image.
- Click Start.
- Agree to format the USB device.
- Wait until the ISO file is unpacked.
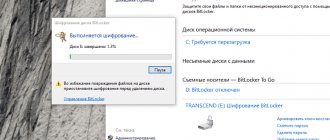
Ultra ISO
UltraISO is a multifunctional program for working with disks, distributed on a paid basis. It is possible to work with the program during the trial period - the functionality is not reduced. After installing the application, to obtain the installation flash drive you will need:
- Through the “File” item, open the downloaded image.
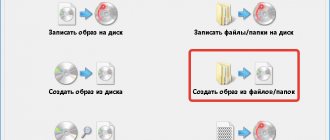
- Go to “Boot” and select the option “Burn Hard Disk Image...”.
- Format the selected media.
- When formatting is complete, click Save and wait for the data transfer to complete. The duration of the process depends on the OS version and the speed of the media.
Important! This process will lead to the complete destruction of all information on the flash drive.
UNetBootin
A small free utility that works without installation. It will help you create a bootable USB flash drive and, if necessary, reinstall or install a new system on your PC. Instructions for using the application:
- Run the program.
- O and through “Explorer” indicate the path to the downloaded distribution.
- In the drop-down list, select the type of external device and the letter under which the flash drive is designated.
- Click OK and wait for the recording process to complete.
Note! Before you start transferring the image to an external drive, a warning will appear that all information will be deleted. The user has the ability to selectively overwrite files on a flash drive.
WinSetupFromUSB
WinSetupFromUSB is a small utility that is specifically designed for transferring operating system files to an external drive. The program can be downloaded from the developer’s official website or found on third-party resources. Distributed free of charge. The operating algorithm is as follows:
- Launch the application.
- Selecting a removable disk.
- Specifying the path to the image.
- Pressing the Go button.
- Waiting for the process to complete.
WinToBootic
WinToBootic is one of the simplest applications for creating bootable flash drives, it is distributed free of charge, does not require administrator rights and works without installation. The utility is equipped with a simple and clear interface that clearly illustrates each step. You can record an image using this program as follows:
- Launch the utility.
- Connect removable storage.
- Through Explorer, select the image file.
- Click the Do It! and wait for completion.
Note! You can pre-format the flash drive by checking the Quick Format box.
WinToFlash
WinToFlash is an application that is distributed free of charge. Portable version available. An important advantage of the tool is the presence of a “Wizard” that guides you through all the steps to create installation media. Algorithm for working with the program:
- Launch the utility.
- Click on the large button with a green checkmark.
- Mark the presence of the downloaded image.
- Select the desired drive and specify the path to the distribution.
- Accept the terms of the license agreement.
- Wait until the bootable flash drive is created.
Important! While running, the utility disables the anti-virus program to speed up the recording process.
Windows 7 USB/DVD Download Tool
Windows 7 USB/DVD Download Tool is an official application from Microsoft, which is designed to transfer OS installation files to external media. You can download the program on the developer's website. Step-by-step instructions for using the application:
- Click on the icon to launch the utility.
- Select ISO image.
- Specify the required media type. This could be a USB or DVD.
- Check if the selected device is displayed correctly.
- Click the Begin copying button.
- Get a ready-made device to install the OS.
Note! For the application to work correctly, the .Net Framework 2.0 library is required, which is downloaded from the company’s official website.
"Command line"
To record the distribution on an external drive, it is not necessary to download a third-party program. This can be done using the OS via the Command Line. Algorithm of actions:
- Launch Command Prompt with administrator rights. This can be done by typing the command cmd /i through the window called up with the Win + R key combination.
- Open a special shell by writing diskpart.
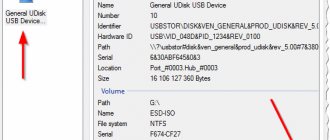
- Select the correct drive. You can view the currently connected media using several commands: list disk, list volume, list partition. In order for the external media to appear in the listing, you must first connect the device to the PC.
- Select the correct drive. This is done by typing the select disk command. Separated by a space, the number of the required media is indicated.
- Before initializing the recording process, you must clean the flash drive with the clean command. This will completely delete all existing information.
- Create a partition for the boot area. This is done with the create partition primary command.
- Assign drive letters. This is done with the command assign letter = <the desired volume letter>.
- If necessary, the user specifies the size of the partition to be created. If this action is not taken, the image being written will occupy the entire storage capacity. You can make the partition using the command create partition primary size = <size in megabytes>;.
- Designate the created partition as active. The active operand is used for this.
- Format the media using the format fs=fat32 quick command.
- Exit Command Line.
The final step will be to unpack the files from the image onto removable media. This can be done using any archiver program. Upon completion of all these manipulations, the flash drive will be ready for installing the operating system.
Setting up the BIOS to boot from a flash drive
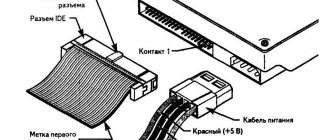
Once we have a bootable USB flash drive with the operating system recorded on it, we can begin installing Windows 7 on the computer. To do this, turn off our computer and connect a flash drive to it. This step is very important. You should not connect the flash drive to the computer after it is turned on, as in this case it may not be readable.
We also draw your attention to the fact that some laptops and computers cannot boot from memory cards connected using the built-in card reader (this only applies to you if you use an SD memory card or some other card instead of a flash drive). If you still use a card reader and the computer does not boot from the memory card, look for a flash drive and use it to install the seven.
Turn on the computer and go into the BIOS. We have already discussed how to enter the BIOS on any computer. Find your laptop model or a suitable BIOS manufacturer and look at the hot keys for going to the BIOS (the article contains a whole list of such keys for different device models).
After you have successfully entered the BIOS, you need to go to the boot settings section. For different manufacturers, this section may have slightly different names, but the general meaning remains the same. Go to the “Boot” -> “Boot Device Priority” section.
Select a USB drive as the first boot device.
After this, press the “F10” key to exit the BIOS and save the changes. In this case, the computer will reboot and start from the flash drive on which we recorded the seven.
BIOS setup
After writing data to the drive, you need to properly configure the BIOS to install Windows 7 from a flash drive. The order in which you enter the input and output utility may vary depending on the board manufacturer. The user needs to press a specific key or key combination at the moment of switching on.
Below is a table for different computers:
To obtain information about a specific computer or laptop model, you can use data from the Internet.
It is more convenient for owners of desktop computers with individual assemblies to use the table for motherboard manufacturers:
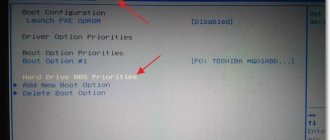
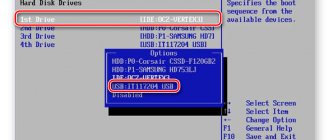
After the main BIOS window appears, you need to configure the boot order so that when you turn on the computer, it can boot from an external drive. The tab called BOOT is responsible for this function.
Next, a window opens with a choice of download priority. Using the arrows on the keyboard, the external drive is brought to first place. You can identify a flash drive by its name USB-HDD.
Attention! If problems arise during the BIOS setup stage, you can use the help provided in a separate paragraph.
The process ends by saving the settings and exiting the BIOS. The Save and Exit Setup item is responsible for this. The computer will be turned off, after which you can begin installing the system.
Direct installation of Windows 7 from a flash drive
If you have successfully completed all the steps described earlier, then at this stage you should have a running computer, on the screen of which the Windows installation start window is displayed. Select “Russian language” in all fields and click “Next”.
In the next window you need to click on the “Install” button.
At this step, we agree to the terms of the license agreement, check the appropriate box and click “Next”.
Select the full installation option.
Next, we need to decide on which disk we will install the OS. Using the mouse, select the disk partition and click on the “Disk Setup” button.
Before installing Windows 7 on your computer, it is recommended to format the disk. Please note that in this case, all recorded information from the disk will be deleted, so for example, if you are installing an OS on drive C, then it is better to first rewrite important information from it to drive D (the drive letters may not match). To format the disk, click “Format”.
Confirm the launch of the formatting procedure in the warning window and click “Ok”.
After formatting the disk is complete, click “Next”.
Copying system files will begin.
After completing the first stage of Windows 7 installation, the computer will restart. When rebooting, don’t forget to go into the BIOS and set the priority boot device to the hard drive (starting from a flash drive is of no use to us).
After the reboot, the system installation will continue.
In the next window you must enter your username and computer name. To continue, click “Next”.
If you wish, you can set a password to log into your account. This is not necessary. If you don’t need a password, just click “Next”.
In this window you need to enter your product key (in some cases you can skip this step by clicking on the “Activate later” button or something similar). Click “Next”.
In the security settings, select the first option (these settings can be changed in the future).
Set the date and time and click “Next”.
If your computer is connected to a network, you will be prompted to select a network. We choose the first option.
At this point, the installation of Windows 7 from a flash drive is completed and you should see the standard desktop of the seven.
Installing drivers
For normal operation of the operating system, it is recommended to install up-to-date drivers for all system devices. It’s very good if you still have a disk from your computer on which all the drivers are collected. In this case, you simply insert the disk into the drive and install all the drivers in order. If you don’t have such a disk, then all the drivers can be found on the network. It will take more time, but the method works.
For those users who do not want to manually search for all the drivers themselves, we can recommend programs for automatically searching and installing suitable drivers. We have a separate article on our website about programs for installing drivers.
How to install Windows 7 flash drive
Everything about installing the OS is quite clear: the interface is in Russian, there are pop-up tips. Next, we’ll take a closer look at the most important installation steps.
What to choose: x64 or x86 bit system
There are 2 types of operating systems: x64 and x86 bit. They are practically the same in appearance, but quite different in functionality. For example, there are games that can only run on an x64 system (Grand Theft Auto V, The Witcher 3, etc.).
The x86 system supports programs that were written for it (at the moment they are the majority), and x64 supports all programs for x86 and additional applications that are made specifically for it (that is, all existing programs for PCs).
It would seem that the choice is obvious! But don’t rush to quickly install a 64-bit system on your device, as it also has its drawbacks. The most important of them is performance degradation. To implement the x64 system, more computing power is required from the computer. Accordingly, a better processor and more RAM.
The bottom line is this: installing the x64 version of the operating system is recommended for more powerful PCs, and x86 for weaker ones.
Optimizing Windows 7 performance
Optimization of the operating system is often carried out after several months of its operation, when the speed of the computer noticeably decreases. Usually, immediately after installing the OS on the computer, there are no problems with the operating speed, so users do not ask optimization questions and calmly enjoy the fast operation of the PC. But for the future, we recommend that you familiarize yourself with the issues of optimizing Windows 7, since sooner or later problems with the speed of the computer overtake all 7 users.