Review of the best software for changing screen resolution in Windows
Setting the screen resolution in Windows is a simple matter.
Moreover, most users are not even aware of where such settings are located, since modern systems independently download video card drivers and adjust the image. But what if you need to change the resolution frequently (for example, if you have several monitors in use) or set automatic parameters for changing the image on the screen? Special programs for changing screen resolution come to the rescue. TOP programs for changing screen resolution.
Troubleshooting problems when changing resolution
Users are faced with the problem that the screen resolution in Windows does not change or changes but before the first reboot or exit from sleep mode. It is recommended to restart the system first; if the problem persists, try these tips:
- Recently installed programs may well have a negative impact on the resolution settings in Windows. You will need to remove programs from your computer.
- Make sure there are no problems with your graphics drivers. Check whether the drivers are installed at all, and also make sure that the latest versions are installed.
- Disable the screen saver, see if it helps or not.
- Press Win + R, type msconfig, press enter. In System Configuration Options, go to the "boot" tab. Make sure the "base video" option is unchecked. If you unchecked the box, click OK and restart your PC.
As you can see, changing the screen resolution in Windows 10, 7, 8 is quite simple, especially in most situations it’s not worth it, because by default the OS itself selects the optimal settings. By following the recommendations, you can easily identify and eliminate any problems with the display of the monitor (display).
Display Tuner
is a universal utility that is designed to manage monitor settings (sound, image). In the program, you can create special profiles in which all applied settings will be saved. You can create an unlimited number of profiles for all occasions (playing a game, watching a movie, surfing the Internet). Convenient sliders for quickly changing brightness, contrast, and so on. A user-friendly interface will allow even a beginner to quickly get used to it. You can download Display Tuner for Windows for free on our website.
Carroll
Carol is a small and fairly easy-to-use program, the main function of which is the ability to set a specific screen resolution for each Windows user account. Carroll is an ideal solution when multiple users share the same computer and each of them prefers to work at a different resolution (to reduce or enlarge).
Windows OS has the ability to store several basic user settings in an account, but it does not provide the ability to set one screen resolution. The problem arises when users prefer to work with different display parameters, among which their resolution is the main setting. Therefore, every time they launch their account, they must change it manually.
The solution to this Windows flaw is the Carroll tool for switching extensions in Windows 7 and others. The program allows each user to define their preferred screen resolution and, in addition, when logging into their account, the tool will automatically apply the specified resolution.
How to change the game resolution without going into it through “Properties”
If the game does not start correctly (black screen) and you cannot enter its menu, then we will try to fix the error with a simple manipulation:
- Find the shortcut to the desired software on the desktop and right-click on it. A list of actions appears, we need the option - “Properties” (it’s at the very bottom);
- A window will open with several tabs, go to “Compatibility” and check the “Use 640x480” option:
- Be sure to save the settings by clicking OK. We launch the game and see a not very beautiful image. But the point here is to somehow get into the game menu, where you can actually change the resolution to a suitable one (in accordance with the characteristics of the monitor);
- When you fix the problem, open the shortcut properties again and uncheck the previously checked box.
PowerStrip
PowerStrip is the most popular software for Windows 7 for managing video card and monitor parameters. The program allows you to achieve higher resolutions and higher refresh rates than required by device specifications. The new version has expanded support for graphics chipsets, improved resolution, refresh, gamma colors, color calibration, increased and decreased the visibility area on the monitor and the ability to overclock the video card. The database contains data on more than 1,500 monitor models.
MultiRes
A free program for easily changing video card modes, created by EnTech Taiwan, known for its excellent PowerStrip program. It is especially useful in situations where we often need to change the refresh rate of the video card and the resolution of both one and several monitors.
All parameters of the MultiRes program are available from the program icon placed in the system tray (the so-called tray). Selecting the appropriate mode is possible with one click. Unlike PowerStrip, the program doesn't allow you to define your own graphics modes. MultiRes can also be launched from the command line with the appropriate options, allowing all modes to be set automatically (also for multiple monitors).
Dexpot
Dexpot is an easy-to-use tool for screen resolution on Windows 10 and earlier and for creating virtual desktops that are independent of each other. There can be up to 20 of them, and for each of them the user has the opportunity to place different wallpapers, display icons, screensavers or even resolutions. Switching between individual desktops can occur from the tray icon and keyboard shortcuts specified during setup. Dexpot also gives you the option to secure access to selected screens using a password.
In addition, several interesting plugins are available at the software level. They allow, among other things, integration of the tool with the taskbar in Windows 7 and efficient switching between desktops (cube effect).
A portable version is also available for download, which does not require installation on the system and is ready to use immediately after downloading. The program installer offers an additional component called “Speed up your computer.” However, this add feature is not implemented and removing it is problematic. Therefore, installing Add Computer Acceleration is not recommended!
Manually changing screen resolution
To change the screen resolution on Windows 7, 8, right-click on a free space on the desktop. In the menu that pops up, select “screen resolution” to open display settings (in the previous article they helped to rotate the screen on a laptop or computer).
There is another way to get to the resolution change settings. Open the Windows Control Panel. In the “view” area, set small or large icons. From the list of options, find “screen”, click it.
Note: if all screens are not displayed, click “find”, if you are not sure which display needs to change the resolution, click “determine”. This will briefly show a large screen sequence number to uniquely identify it.
In the screen settings you will find out the current resolution; by clicking on it, a vertical slider will become available. To decrease or increase screen resolution in Windows, drag the slider. The native resolution is marked as “recommended” and is the highest, which is optimal.
Click OK, then you will see a preview of the selected resolution and a message if you are sure click “save change”.
You can change the screen resolution in Windows 7, 8 from the list of ready-made options. In the screen settings, click “advanced options”. Next, on the “adapter” tab, click “list of all modes”. Modes consist of 3 elements: resolution, color depth, refresh rate (in Hz). Select a mode, press OK, OK, confirm changes.
In Windows 10, screen resolution changes slightly differently. When you call up the menu, by right-clicking (on an empty space on the desktop), you need to select “screen settings”.
Click on the current resolution, then set yours. Don’t forget, the optimal one is the one next to which there is a “recommended” mark. Click "Apply" and then "Save Changes". This way, you can change the screen resolution in Windows 10. If you encounter problems, read on.
I present a program for changing screen resolution - Carroll. It also allows you to set each account its own permission. Download the zip file here and unzip it. Install Carroll on your computer.
After launching the program, many resolution options (other parameters) will be available in its interface; select the optimal one. To change the screen resolution on Windows and save it every time you start your PC, click on the first link and “yes” in the message.
HotKey Resolution Changer
Owners of two or more monitors often find themselves having to manually set resolution and other screen settings for each display separately, which becomes especially difficult when these changes need to be made frequently. With the free HotKey Resolution Changer utility, you can change the resolution and create a set of predefined settings for all monitors and keyboard shortcuts to help you switch between them. In addition to the screen resolution (from the lowest supported resolution of 640 x 480 to Full HD), you can customize settings such as the desired number of colors (8-bit, 16-bit, and standard 32-bit) and screen refresh rate (60 or 75 Hz).
Programs for changing screen resolution
You can also change the screen resolution on Windows using the tools built into the system. However, in some cases their capabilities are not enough or the process itself can be difficult.
In this case, it is recommended to use special applications designed for more detailed adjustment of the image display on the screen. You can find a program that does the same standard settings as a Windows utility, or a more complex application where you can change advanced settings. For example, the screen refresh rate. Some of the presented solutions allow you to change the screen characteristics using only hot keys, without the need to launch the program, which is convenient. There are also programs that allow you to configure several screens connected to one computer at the same time.
Carroll
Quite an old program. Which allows you to change the screen resolution for all accounts on the computer, and set separate settings for each of them. The specified parameters are remembered by the system, which eliminates the need to enter them each time. The program interface is presented in a single window and has a set of elements that correspond to their specialization. Among the general list there are several settings templates for you to choose from. The program has a Russian version, however, there is no particular need for it, since the number of control elements is minimal.
HotKey Resolution Changer
The main purpose of this program is to change the resolution of monitors connected to the computer. In addition to setting the resolution itself, you can specify its bit depth and hertz. This program is very convenient if two or more monitors are connected to the computer. Some parameters can be set using special hotkeys. The latter can be configured if necessary.
To avoid entering the same settings, you can save them in special profiles. In total, you can open up to 9 profiles. When you launch an application, it opens in the system tray and consumes minimal system resources. Unfortunately, the official version of the program does not support the Russian language, but this problem can be solved by downloading the Russian language.
Carroll 1.24
|
Winaero Tweaker is a portable system utility for customizing the appearance and additional functionality of operating systems of the Windows family, including
Carroll 1.24
Carroll – a simple tool for controlling monitor screen resolution
Taskbar Hide 3.0
Taskbar Hide is a small utility that allows you to instantly (with one click) hide any open application on your computer
Fences 3.09
Fences – a program with which the user can organize and tidy up their desktop by grouping icons depending on their category
DisplayFusion 9.5
DisplayFusion is an application that is designed to significantly simplify the lives of owners of multi-monitor systems. In addition, there is the ability to manage
AquaSnap 1.23.8
AquaSnap is a convenient utility that allows you to more effectively manage windows on your monitor desktop, providing the user with the following functions:
Reviews about the Carroll program
Arthur about Carroll 1.23 [06-08-2017]
Ahhhh, I almost couldn’t help myself, origatos)))) 2 | 11 | Answer
Valery about Carroll 1.23 [27-07-2017]
Author, thank you! I finally found a normal program, because Windows won’t let me change the screen extension AT ALL, but with this program I was able to do it) Thank you very much again! The program is cool and easy to use! I advise everyone! 2 | 3 | Answer
We advise you to pay attention
Built-in search helps you find any file. The built-in player will show you the video without waiting for it to load. The catalog will help you choose from a million programs, games, films exactly what you need.
Categories
| ||||||||||||
CF.Lumen
If there's one thing that puts CF.Lumen ahead of all other screen brightness and temperature apps, it's this: CF.Lumen adjusts colors by directly manipulating gamma values rather than using a tinted transparent overlay (although an overlay option is available in Settings).
All automatic brightness adjustments are based on your location and time of day. You can customize the adjustment amounts, as well as toggle some nifty options like Force Sleep in Dark or Force Day in Bright Ambient Light. Useful, for example, when you are in a bright room at midnight.
And here's what's really cool as a developer: The Pro version of CF.Lumen adds new features like quick toggle buttons, notification options, and removing a few updates, but if you want, you can just toggle the "Freeload" setting to get all the Pro features without payment. Buy it if you can, but if you're short on cash, it's good to know this option is there.
Download: CF.Lumen (Free with in-app purchase for Pro upgrade)
Overclocking the monitor - download Custom Resolution Utility
I want to tell you about one interesting program that allows you to overclock your monitor, or rather, increase the screen refresh rate. The program is called Custom Resolution Utility and you can download it by clicking on the button above. Custom Resolution Utility can not only increase the refresh rate but also set any resolution that your monitor can support. The utility will work on computers and laptops with ATI/AMD, NVIDIA video cards, as well as on some Intel cards. Windows XP is not supported, but everything else since Vista (7, 8.1 and 10) works fine. The program was updated on 02/07/2019 to version 1.4.1
Overclocking with AMD
Overclocking with AMD is the same as overclocking with NVIDIA, but it must be done using a different platform. For AMD graphics cards, many users have had success using the ToastyX custom resolution utility, but it is recommended to use AMD Radeon settings instead.
To begin, open AMD Radeon Settings and go to the Display tab. Then click New next to Custom Permissions. To overclock your monitor, change the refresh rate in small increments as described earlier. When you find the settings you want, click Save.
Instructions for using Custom Resolution Utility
Before using this program, I recommend installing and running any remote access program (for example TeamViewer), in case something goes wrong. You can also boot into safe mode or recovery mode and fix the problem. The program cannot damage your equipment in any way, but everything you do is done at your own peril and risk. I am not responsible for what you do!
So we set up the program:
- Unpack the archive with the program and components.
- Run the CRU.exe file as administrator
- Select the name of your monitor from the drop-down list
- Click on the first Add button
- In the Timing line, select the appropriate value (I’ll tell you what exactly to choose next)
- Enter the resolution values supported by your monitor
- Enter the Refresh rate value below (watch the video!)
- Click OK and next time OK too.
- In the folder with the program, run the file restart.exe or restart64.exe based on the bit depth of your OS
- The screen will blink and switch or not switch to the mode you set.
If the screen does not switch, it means it does not support the mode you set and you can restore the standard resolution through remote control, safe mode or recovery mode!
Use GeForce Experience
A special program for GeForce Experience video cards allows you to change the settings of each game, including screen resolutions. Download the program from nvidia.ru, install and run. Select a specific game from the list provided in the program, and set the required resolution for this game.
The program allows you to select the screen resolution for a specific game
Learn more about the Custom Resolution Utility settings
As I wrote above in the settings there are a couple of points you need to know about:
- What to select in the Timing line
- How to find out the Refresh rate value
In the timing line you need to select a value suitable for your monitor type, there are several values there:
- “Manual” – allows you to manually set synchronization parameters. This is the default mode.
- "Automatic - LCD standard" uses standard timing parameters commonly used with LCD monitors and HDTVs.
- "Automatic - LCD native" uses standard timing parameters for the native refresh rate. This may help when trying to increase the refresh rate.
- "Automatic - LCD reduced" adjusts the timing parameters for some resolutions to reduce the pixel frequency. This may help when trying to increase the refresh rate.
- "Automatic - CRT standard" uses timing parameters compatible with CRT monitors.
In the Refresh rate line, you need to select a value that exceeds the capabilities of your monitor in steps of 3 Hertz. For example, if your monitor outputs a maximum of 75 Hertz, then you can try increasing the frequency to 78 Hertz. So step by step you can increase the value until you reach the limit of your monitor's capabilities.
Changing the monitor screen resolution
To make your computer screen settings as comfortable as possible for your eyes, you need to know how to change the screen resolution of your personal computer or laptop monitor.
Screen resolution is an indicator that determines the clarity of the display of all icons, pictures, that is, graphics in general. It is important to determine what will be best for the monitor.
The recommended one is always indicated in the device instructions. You can also view it on the Internet; to do this, you only need to determine the screen size (number of inches diagonally).
How to increase screen resolution?
As a rule, on a computer or laptop, all indicators are not set at the maximum permissible level. You can increase it as follows:
- Through Start, open the Control Panel.
- Select the "View: Small Icons" display mode.
- Find the “Screen” icon among them and click on it.
- Select the mode that is most suitable for reading (this can be “Fine -100%” or “Medium - 125%”).
- Click “Apply”.
- In the “Resolution” menu, drag the slider and set the maximum value..
- “Apply” again.
- If you are satisfied with the result, do not forget to “Save”.
Changing an extension using built-in OS features
The higher the resolution, the better the clarity of the display. For example, a 22-inch display will have a standard resolution of 1680*1050, which is optimal and maximum for this screen.
All available sizes are available in the settings; it is advisable to choose the largest one offered.
Follow the instructions to change the image resolution of your display:
- Go to the operating system desktop. Right-click on it and select screen options, as shown in the figure below;
Windows desktop settings
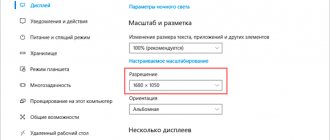
- In the window that opens, you can adjust the size of text, icons and other system elements in real time. You can also adjust the screen orientation. To go to the selection tab, enter the word “resolution” at the top in the search bar;
- Select “change screen resolution”;
Opening the Resolution Change Window
- Click on the drop-down list as shown in the figure and select the standard recommended one. Save the new settings.
Applying the recommended resolution
Important! It happens that the recommended resolution is higher than the display. That is, the size of the final image does not correspond to the screen size, so some elements of the desktop may disappear from the user's field of view. Adjusting your monitor will resolve this issue. In the selection options, choose not the recommended one, but the one that fully displays all the elements of the desktop. At the same time, all graphics must be clear.
Several common types of expansion and corresponding display sizes:
- 1024*768 – perfect for screens of 15 or 17 inches. In a display with a resolution of 1024*768 pixels, the color depth is 16 bits;
- 1280*1024 – intended for displays whose size is 19 inches;
- Types of monitors measuring 24 inches most accurately convey the image at a resolution of 1920*1080. All displays with these parameters are FullHD.
Overclocking with NVIDIA
To begin, open the NVIDIA Control Panel on your computer. You can do this by right-clicking on your desktop and selecting it from the menu. Go to "Change Resolution" in the side menu, then click "Customize."
From here a menu window will appear that will allow you to change the refresh rate (Hz) of the monitor. It is recommended to adjust the refresh rate only in small steps, for example 5-10 Hz. The NVIDIA Control Panel allows you to check these results to make sure you like them before restarting your computer.
Adjusting the screen refresh rate
The higher the display refresh rate, the correspondingly better the image quality. That is why, in addition to size, it is necessary to pay attention to this parameter.
To change the refresh rate follow the instructions:
- Go to the control panel. In the search bar, enter “Screen” (without quotes);
- In the proposed search result, select the item that is responsible for the screen refresh rate, as shown in the figure;
Eliminate flicker
- Set the refresh rate to the highest possible. This will eliminate possible periodic flickering of the monitor.
Adjust the image without going into the game
When starting games, sometimes the message “Out of range” or “Non-optimal mode” is displayed. This can be corrected by selecting the optimal monitor resolution, without even entering the game. If your PC uses an nVidia video card, you can make adjustments through the control panel. This is done very simply:
- Right-click on the desktop.
- Go to the nVidia control panel.
- In the window that opens, set the necessary image parameters.
NVIDIA Software
How to find out the right resolution for your display? This can be done on the official website of the manufacturer or in the instructions that come with the device.
On the boxes of monitors and laptops from Samsung there is information on how to set the correct resolution and what to do if the real one does not match the declared one.
Using a special program that is preinstalled on all computers equipped with an Nvidia family video card, you can also adjust the resolution of the user's monitor.
- Open the main Nvidia graphics settings window by right-clicking on the desktop, as shown in the figure;
Opening the video card graphics control panel
- In the window that opens, adjust all the necessary settings;
Main window of the utility
How to change screen resolution on Windows 10?
The setup procedure in this operating system is slightly different from the previous one.
- Right-click on the desktop.
- In the panel that appears, select “Display Options”.
- In the window that opens, select “Screen” or “Display” from all the options (sometimes there are different versions).
- Several options will be highlighted: “Night light mode”, “Scale and layout”, “Multiple displays”. Select "Scale and Layout".
- In the “Resolution” parameters, select the value marked “Recommended”.
- Next “Apply” and “Save”.
Changing resolution and other monitor parameters using third-party software
Third-party programs allow you to find out what sizes are available and what displays they fit.
The Carroll program is software that is designed to change absolutely all monitor parameters in one single window.
This utility is perfect for Samsung Syncmaster family monitors.
You can download the program here.
You can also use this application to find out the recommended resolution and the required update frequency.
Appearance of the main window of the Carroll program
F.lux
A free program for Windows that changes the monitor's color profile depending on the time of day. At night it sets warm color tones (corresponding to artificial lighting), and during the day - cold ones. Eyes are less tired because the monitor's glow matches the surrounding environment.
An updated version was recently released in which the color temperature can be reduced to 2700°K or even less. There is now support for hot keys for quickly changing the monitor brightness (Alt+PgDn, Alt+PgUp) and disabling the program (Alt+End). There is a “turn off until morning” mode.
In the "Cinema" mode, although the color temperature is reduced, shadow detail and natural colors are preserved. The “dark room” mode is designed to work in absolute darkness: the color temperature is reduced as much as possible. Supports laptop mode with external lighting and collaboration with programmable Philips Hue lamps.
In the program, you can specify your location to determine the time of sunrise and sunset.