Many users often have problems related to some important actions that needed to be performed with the hard drive and flash drive. You have to, as they say, “shovel” the entire Internet in search of the optimal application, which would perform the required operations as quickly (and safely), and would be easy to use, and free. As a result, the choice often falls on a software product called AOMEI Partition Assistant Standard Edition, despite the fact that Home, Pro and Server versions are offered for download and installation (there is even a portable version).
Let's try to figure out why preference was given to this particular modification of the package. At the same time, we’ll use some examples to explain why this program is needed and how to use AOMEI Partition Assistant. We can immediately add that ordinary users will really like this application, since even operating system tools designed for working with hard drives may seem quite complicated to many.
Adherents of Acronis software products may object to the choice of tools from AOMEI. But they look somewhat more difficult for ordinary users to master, and besides, their use is not always justified.
AOMEI Partition Assistant program in Russian: brief announcement
Initially, as you might have guessed from the general name of the application, it was developed precisely as a tool for performing operations to split, merge or delete existing hard disk partitions, which was very often required when installing operating systems for which similar utilities that could even be used when starting from regular optical disks and flash drives, it could only be found in custom builds. The official installation distributions from Microsoft did not provide such tools at all.
Even though many users quite often use the command line tool, which is considered the most effective and most efficient of all that is available in Windows (not to mention, however, the PowerShell console), using the DISKPART applet still looks much more complicated . Without special knowledge, the average user will not understand it. And if, in addition to everything, you perform some actions incorrectly, then it will be quite difficult to correct the situation. It is for this reason that it is recommended to install the AOMEI Partition Assistant Standard Edition, since it is free and supports a Russian-language interface, and in terms of functionality it is practically no different from the professional or server modifications. Of course, you don’t need to activate it either (actions with other versions will be discussed a little later).
How to download AOMEI partition assistant, install and use?
With AOMEI Partition Assistant we can:
- Resize partitions1 and move them.
- Combine several sections into one.
- Copy entire partitions and disks.
- Create, format and delete partitions.
- Create bootable media.
In addition, we can move the OS to another drive. This other drive can be either an SSD or an HDD. This is not a complete list of what the AOMEI Participation Assistant program can do.
After installing the program, launch it.
How to enlarge a disk (partition) and reduce it?
Before you launch the AOMEI program, I want to say that the manufacturer strongly recommends closing all other programs if you have them currently running.
Let's launch. We see the entire disk partition structure. There are hidden sections here, we won’t touch them. But these two sections are visible in Explorer.
Let's try to increase partition C at the expense of the second partition. This is a fairly common and popular task.
First you need to reduce or compress section D. I have the letter D, you may have a different letter for this section. To change the size, you need to select the desired section by simply clicking on it. The operations that we can apply to the selected section are visible in the left column of the program. You can click on the desired operation in this menu.
If you prefer to work with the context menu, then right-click on the desired section. Operations on the partition are also available here. First, let's use the left column. I highlighted section D and clicked on this item - Resize/Move.
A window has opened in which we see only our experimental section. Here you can change the partition size using these convenient sliders. When you hover your mouse over the circle, arrows appear. Simply press the circle with the left mouse button and drag it in the desired direction. In this case, to the right.
At the top we see how the section size changes as you drag it. If you click on the arrows to the right, you can see how much unallocated space there will be before and after the section when we complete this operation.
In the same way, you can move the right border. Inside a partition, the green bar shows us how much space is occupied on the partition. Then they simply won’t let us drag the section border. I don’t recommend reducing it all the way. Always leave some free space on the partition. It’s good if there is 25 percent free space.
If you hover your mouse over a section, the cursor will look like this. Now, by dragging, we move the entire section, within the free space that is next to it.
So, I will reduce this partition by, for example, 4 GB. I click OK. As you can see, allocated free space has appeared in the overall disk structure. But the actual size change has not happened yet. We simply showed the program what to do. The change will only happen when we click this Apply button.
The button has a red mark with the number 1, which means that we have one operation planned. I'll click on the Apply button. A window like this opened, showing what kind of operation we have planned. Here you can see detailed information about the operation. At the bottom there is a checkmark, Check partitions before execution. That is, check the partitions for errors before performing the operation. Do not uncheck this box.
If you click the Go button, the operation will start. I press. We are asked again if we are sure that we want to start, I click Yes.
We see the whole process. First, the program checked the partitions for errors and began resizing the partition. Here AOMEI congratulates us and writes that all operations have been successfully completed. We close the window.
Now we have the real picture. We shrunk the partition and freed up space in front of it. The fact that this is a real picture can be judged by the fact that (in the upper left part of the menu) we do not have active buttons. That is, there are no planned operations, all operations have been completed.
Now you can expand the system partition. I'll do it in the context menu. I right-click on the partition to be expanded and select: Resize partition. Everything here is already familiar. I just drag the border all the way to the right. Here you can check if there is any unallocated space left before or after the partition. You can click OK.
Now I click Apply. We see that the AOMEI partition assistant wrote that a reboot is required. I will explain further about in what cases AOMEI requires a reboot, but now I click on the Yes button. Here we leave the default option, WinPE mode, and click.
So the computer rebooted. We have successfully enlarged the C disk at the expense of the D disk.
Please note that AOMEI highly recommends defragmenting partitions before changing them. This is especially true if there is very little free space on the partitions.
How to merge sections?
Let's say you have two adjacent radelas on a disk and you want to merge them. AOMEI allows you to do this without losing data. That is, all the files and folders that you have on the partitions being merged will be saved on the one partition that will appear as a result of the merger.
I have two logical partitions on a disk. They are designated by the letters D and F. On the first section there are four such folders with files. The second one has one folder.
To merge sections, right-click on one of them and select Merge Sections from the context menu. You can also use the menu in the left column Merge sections.
A window opened in which the one I selected first is already ticked. We need to mark the section with which we want to merge it. We will be able to merge it only with one of the neighboring or adjacent sections. Either section F or section C.
I select section F. In this drop-down list, you can choose what the future section will be called. I'll leave the section with the letter D. I click OK. I click Apply. A familiar window appeared, detailing the operation we had planned. I leave the checkbox for checking for errors and click Go. (not connected to the network). Last warning, click Yes.
A unification is taking place. Done, AOMEI congratulates you on your successful completion.
As you can see, merging non-system partitions took very little time. Let's look at the result. I open Explorer. We see 5 folders here. However, the folder that was on partition F is not visible.
Here there is a new folder called F-drive and then there is a number. Let's open it. Inside is the folder that was on drive F. And inside it are my files and folders.
This is how you can quickly merge, or merge adjacent sections.
Key for free activation of AOMEI Partition Assistant PRO.
What we have done in the program so far is very useful. But very often it is necessary to edit partitions on a computer where Windows does not load. The AOMEI boot disk will help us with this.
The free version of the program today does not allow you to create bootable media.
I'll connect a flash drive to the computer. Now I’ll click on the Tools button, click on the Make bootable CD master button, now click Next, select the flash drive
One of the Russian-language sites gives out the key for free. This is the site comss.ru
If you write something like this on Google:
You can easily find a page where they give out this key. However, this is not necessary. The key is below on this page.
Let's try to activate the installed free program with this key2.
AOPR-21ROI-6Y7PL-Q4118
To activate, I press this button and insert the key.
How to create AOMEI partition assistant bootable media?
Here we are asked to add the wireless adapter driver to the flash drive image. This is not very critical, you don’t have to react to this window, it will close on a timer. Or you can click OK.
How to boot from AOMEI flash drive?
Bootable media has been created. Now let's boot from it. My laptop is turned off, the flash drive with AOMEI is connected. To boot I will use the BOOT menu. The Escape key is responsible for entering the boot menu on this laptop.
I turn on the laptop with the button and click on Escape until this menu appears. The BOOT menu has opened. Here we see all the boot devices of this laptop. We need to find a flash drive here. I have a branded flash drive called Sandisk. And here you see a line with this name. This is my flash drive.
If you have a computer with a hybrid BIOS that supports UEFI, then most likely you will have another line like this here. You can choose any of them. Most likely, the flash drive will boot successfully in both cases.
In addition to the manufacturer's name, there may be text that contains the letters USB.
I move to the first option with the down arrow key. And I press Enter. The laptop boots from a flash drive, that is, the AOMEI program that I wrote there is loaded.
The program has loaded. As you can see, at first glance, it is no different from the one we just used under Windows.
Now we have access to full editing of partitions, copying and cloning of disks and computer partitions. Even when Windows doesn't boot. Or maybe you haven’t installed it at all yet.
We can also resize partitions. Let's, for example, shrink the system partition C.
…
I reduced the system partition. If we did this under Windows, then most likely the computer would require a reboot. Usually, when changing section C, this is exactly what happens. Here, Windows is not loaded. Therefore, the running operating system does not prevent us from working with partitions.
How to copy (clone) an entire partition?
Copying, or in other words cloning a partition, is a very convenient function that can be used in different cases. For example, if your computer or laptop stops booting, copying an entire partition allows you to save your important files and folders quickly and easily.
I have already discussed in my videos how to save files and folders if Windows refuses to boot. (link in description) There we did it with improvised means, simply copying folders and files in Explorer. If there are a lot of files, this can take a lot of time and effort.
Copying a partition using AOMEI will allow you to do this much faster.
Let's assume I have the files and folders I need on this partition. I can copy the entire partition to an external drive. I connect the disk.
To do this, it is enough that the external disk has free space larger than the size of the copied partition.
A partition can only be copied to unallocated space. I don't have that kind of space on this drive. All the space is taken up by the section with my backups.
But there is plenty of free space here. And I can just shrink this section. We compress.
Once compressed, I can copy the entire section.
Now you are ready to copy the partition. I single him out. I click the Copy section button in the menu. In this window you need to choose between quick and sector-by-sector copying. Quick copy only transfers the files and folders themselves and does not copy free space. This saves space and time. This is the most suitable mode for copying data.
Sector-by-sector copying makes a complete clone of the partition. This can be relevant when copying, for example, boot and other hidden partitions.
If there is not too much space on the disk, then you can try to compress this partition, which we will copy. We already know how to do this. (Squeeze)
And inside we see copies of my folders and files that are stored on my partition D, labeled New Volume. Let's look at the Drivers folder as an example. We see that everything was copied successfully.
Deleting and creating partitions in AOMEI Partition Assistant.
I booted again from the AOMEI flash drive and let's see how to delete and create partitions.
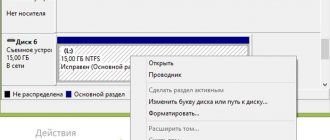
First, I'll delete the partition from the external drive. Here is the section I copied. If I decide to delete it, I simply select it and click Delete Partition. In this window you need to select the type of deletion.
You can leave the top option. In this case, the partition will leave a trace on the disk. If you want a more reliable deletion of your data, then you can choose the second option: Delete partition and wipe data on it. Below you can leave the first method, by default, it is the fastest. In this case, instead of data, zeros will be written to the disk. I click OK. Apply. The section has been deleted.
When you boot from a flash drive, we can easily delete any partition, including the bootloader system partition, recovery partition, or the partition on which Windows is installed. Therefore, work in this mode carefully and carefully so as not to delete the necessary partitions.
To create a new partition, I press the right key on the unallocated space and select the appropriate item in the context menu. In the window that appears, you can select the partition size; you can use familiar engines. If you are not happy with the default drive letter, you can select another available drive letter from this list. In addition, by default, the disk will have an NTFS file system. If desired, you can change it to another file system from this list.
We have made the basic settings, click OK. Apply. Go. Confirm - the section has been created.
When AOMEI assistant requires a reboot to complete the operation.
Usually, the program restarts the computer in such cases. If we compress the system partition. If we compress or expand a partition containing a folder with the AOMEI program, in most cases this is the system partition, that is, drive C with the Program Files folder. If we resize the partition containing the page file. Usually, by default this is also the system partition. And in case we resize a partition containing other running programs.
That is, in almost all cases, we are talking about the drive (C:). It turns out that if we change the size of the partition on which Windows is installed, then most likely this will lead to a reboot of the computer.
Why does the computer restart? This is done in order to shut down all programs and the Windows OS itself; during the reboot, the AOMEI program is launched in the WinPE environment and resizes the partition on an unloaded system. This happens in the same way as if we booted from an AOMEI flash drive and compressed or expanded the partition without loading Windows.
1 Many users confuse partition and disk. Most laptops and computers have one physical drive. If you open Explorer on such a computer, you can often see a Local drive (C:) and another local drive, for example D, E or another letter.
Since the computer itself calls them disks, then most users call them the same. It is more correct to call them partitions or logical drives. They are also called volume. A partition is a part of a physical disk allocated for ease of use.
2 Activation is working at the time of writing this text and the release of the video published on this page. Whether this will continue to work, I don't know. I don't give any guarantees.
Main features of AOMEI Partition Assistant
Despite its initial purpose, as the package developed and improved, it acquired many additional functions. But the most important advantage is that in any situation, the selected action is performed only after several confirmation steps, and at the very end of setting the necessary options for each specific operation, the “Apply” button is pressed. This allows you to avoid accidental actions that could lead to undesirable consequences.
In addition, some basic operations, for example, when selecting some action with partitions (splitting, merging, deleting, resizing, etc.) are carried out exclusively on reboot. Some see this as a disadvantage, because Windows tools do not require rebooting the system to create a partition. But many experts note that this is rather a plus.
As for the most interesting tools of any version of the AOMEI Partition Assistant package in Russian, among them the following can be highlighted:
- the presence of special “Masters” to perform any operations;
- simplified tools for basic partition operations;
- the ability to clone and restore disks and partitions;
- converting section styles;
- converting disks into logical partitions and vice versa;
- creating active boot partitions from regular partitions;
- checking any disks;
- quickly change the file system without the need for formatting;
- complete erasure of partitions without the possibility of information recovery;
- transfer of working systems to other media;
- creating bootable media based on the program and integrating its tools into the Windows recovery environment;
- creating backups, etc.
Of course, many of the presented features will never be particularly useful to ordinary users, and AOMEI Partition Assistant Home does not exist at all. However, it doesn't hurt to have them on hand.
AOMEI Partition Assistant Pro download torrent
AOMEI Partition Assistant is a unique application ready to help optimize your software and allocate the amount of memory used on your PC. The program is perfect for both home use and commercial organizations. In addition, it is very simple and accessible, so absolutely any user can understand the basics of its operation. Built-in algorithms can configure the operation of partitions of your hard drive, including copying partitions, allocating memory between them, formatting, deleting, moving, merging and dividing. To improve the performance of one of the partitions, the program frees up as much disk space as possible and considers unnecessary files and their copies for deletion.
AOMEI Partition Assistant Professional Edition is a reliable and professional disk partition software for computer. It provides you with the most popular disk partition technology, which is equipped with the Basic Disk Partition Manager algorithm. To convert a dynamic disk, the Dynmiac Disk Partition Manager algorithm is presented. This professional tool can help you manage primary partition, logical partition, simple partition, striped partition (Raid0), mirror partition (Raid) and RAID-5. To take full advantage of the application, all you have to do is download the AOMEI Partition Assistant torrent.
As an alternative to Partition Magic, AOMEI Partition Assistant Professional offers you a wide range of tools designed with a user-friendly interface, making PC disk partition management easier and more secure than ever before. It allows you to create, modify, move, merge and split partitions without losing data to maximize disk space utilization. AOMEI PA Pro also released new features such as disk conversion between MBR and GPT, OS migration, Windows 10/8 To Go, added random data fill sectors and wipe methods. The program has a huge number of different algorithms built in that can cope with any task. In addition, the extended version of the utility can work either after your request or automatically, which you can select in the settings.
On this page, using the button below, you can download AOMEI Partition Assistant Pro via torrent for free.
Downloading the installer and installing the application
As for downloading the installer and installing the program on your computer, it is initially best to go directly to the developer’s official resource, where you can immediately download the required free package.
The installation is also not particularly difficult and looks standard. The installer itself, if you do not have the super administrator and UAC control disabled on your system, must be run as administrator, after which you just need to follow the installer’s instructions.
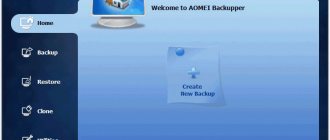
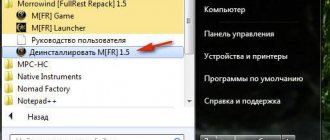
How to completely remove AOMEI Backupper Standard from your computer?
There is nothing difficult in removing it, I only advise you to remove it so that no traces remain of this program. For this it is good to use a tool such as Revo Uninstaller, if you have time, take a look, I think you will be interested.
AOMEI Backupper Standard is located in this folder:
C:\Program Files (x86)\AOMEI Backupper
And there, as you can see, there is a file unins000.exe, which is what you need to delete. If you run it, the uninstallation process will begin.
But I will show you how to remove it more correctly. First, click Start and select Control Panel there (if you have Windows 10, this item can be found in the menu that is called up using Win + X):
And there we find the Programs and Features icon, launch it:
In the list of installed software, find AOMEI Backupper Standard, right-click and select Uninstall:
The following message will appear, click Yes:
Removal will take place quite quickly:
Then there will be a message saying that you need to reboot:
Now see for yourself, you can do it now, or you can do it later. But it’s better to do this right away; a reboot is needed to remove some components that cannot be removed in a loaded Windows.
Professional version activation issues
If you need the professional version, you can download it initially or upgrade the existing free modification. Naturally, you will have to pay for the AOMEI Partition Assistant Pro license key.
It costs just under $50. But if you look at it, most of the functions will be completely unnecessary for ordinary users, and similar hacked modifications with the AOMEI Partition Assistant activation code can be quite easily found on the RuNet, although such installation and use will be considered illegal actions. However, when has our people ever been embarrassed by this?
First acquaintance with the interface
So, the program is installed. Now let's look at how to use AOMEI Partition Assistant.
When you first look at the interface, you will notice that the main window is divided into three main areas. At the top left are all the sections with “Wizards”, and just below is a list of basic actions that can be applied to hard drives or removable media. All commands are duplicated in the menu of the top horizontal panel. The main space is reserved for displaying disks and partitions.
If you select one of them, the menu at the bottom left will change, and only operations for sections will be presented in it. As mentioned above, these menus are intended for quick access only, and all commands can be selected from the top bar.
AOMEI Partition Assistant Technician 8.7 PC | RePack & Portable by elchupacabra [Multi/Ru]
Name: AOMEI Partition Assistant
Year of release: 2020 OS: Windows Official website: AOMEI Partition Assistant Interface language:
Russian, English, and others
Medicine:
not required (the installer has already been treated)
Aomei Partition Assistant
– a powerful program for working with a hard drive, administering partitions for PCs and workstations. The program will answer questions such as: “How to resize a partition or merge partitions without losing data? How to increase computer performance?”
System requirements:
Windows 10 | 8.1 | 8 | 7 | Vista | XP Windows SBS 2003 | 2008 | 2011 Windows Server 2012 and 2012 R2 | Server 2008 and 2008 R2 | Server 2003 and 2003 R2
Main features:
Ability to expand the NTFS system partition without rebooting the computer to maximize computer performance and minimize downtime; Merging adjacent partitions into one large one without losing data, or merging unallocated space into a partition; Splitting one large partition into two or more partitions; Create as many partitions as you need without using free disk space; Copying partitions for Windows system migration or when backing up important data; Cloning a hard drive helps with upgrading it; Quickly distribute free space from one partition to another to fully utilize disk space.
New opportunities:
OS Migration to SSD/HDD: For many SSD users, this simple technology can help migrate their OS to SSD and keep the original system. Partition Recovery: Recover lost or deleted partitions in a few steps. Partition Alignment: Speeds up drive performance when reading and writing data, especially SSD drives. Creating bootable CDs: securely manages disk partitions in WinPE mode and boots from CD/DVD, USB flash memory. MBR Rewrite: Rewrite from master boot disk to damaged MBR hard drive for easy recovery. Convert between GPT and MBR: Convert from GPT disk to MBR without data loss and vice versa. Linux partition management: creating, deleting, formatting, copying, destroying, restoring Ext2/Ext3 partitions. Changing the partition type (ID) and changing the serial number.
Changes in version:
Version 8.7 (March 25, 2020) Fixed an issue where the program crashes when updating system information during cloning. Fixed issue: EntryPoint GetTickCount64 not found in kernel32.dll when launched on Windows XP. Optimized help text during registration; The process of entering “Reboot Mode” has been optimized.
Repackaging Features:
1. Installation of the program or unpacking of the portable (PortableApps format) version combined in one distribution 2. Does not require registration (key /keygen team URET/) 3. Multilingual interface (including Russian / modified by VictorMan + edits for the current build of lrepacks.ru) 4. Optional installation of AOMEI Dynamic Disk Manager 5. Optional installation of components for creating WinPE disks 6. Optional installation of MS Visual C++ 2005/2008 libraries required by the program (for installation) 7. Google statistics collection removed 8. Picks up external settings file cfg.ini (if present next to the installer) ISO image of the boot disk AOMEI Partition Assistant Technician 8.6 + Rufus for writing to USB flash/hdd
“Silent” installation with the keys /SILENT or /VERYSILENT (or the file “Silent installation.cmd”) For the “Silent” installation of the portable version, the additional key /PORTABLE=1 (or the file “Unpacking portable.cmd”)
Note!!! During installation, you will be prompted to visit the website of the author of the repack. Uncheck the box if desired.
Using automated “Wizards”
Now let’s briefly look at how to use AOMEI Partition Assistant in terms of simplifying the performance of certain actions using special “Wizards”. You just need to call the necessary tools, and then follow the instructions, at certain stages agreeing with the proposed parameters or setting your own. For example, you need to change the file system of a disk or partition.
When you select the appropriate item in the upper left menu, the “Wizard” starts, and you need to select the direction of the transformation, and then just press the continue buttons.
Compatibility
Aomei Backupper creates backup copies of operating systems, disks or individual folders. Its advantage is that it works with Windows 10 and earlier versions: 8, 8.1, 7 and XP, regardless of edition (Pro, Home, Enterprise or Education). In addition, Aomei Backupper supports a large number of file systems:
- NTFS, FAT32, FAT, Ext2, Ext3;
- disk MBR;
- GPT Disk;
- EFI/UEFI boot mode;
- Dynamic Disk (Software RAID) and other less popular types.
Actions with partitions
But most users usually have questions about how to use AOMEI Partition Assistant to partition a disk and perform reverse or additional actions. Everything is simple here!
Select the desired section, go to the section division item, and then use the slider to set the required size. Please note that you do not then need to create a simple volume and format it as provided in Windows. The created partition will have the same file system as the initial one. But if you choose to resize or create a partition, you cannot do without formatting. If we are talking about a hard drive, after confirming the operation, the system will have to be rebooted in any case, but for ordinary flash drives this is not necessary.
If you need to remove the partition, you can immediately note that it works much better than Windows tools, since it allows you to merge partitions without losing data. In addition, formatting the same removable drives using standard Windows tools does not always allow you to get rid of hidden partitions (for example, containing bootloaders).
AOMEI Partition Assistant Technician Edition 6.6 RePack by KpoJIuK (2017) Multi/Russian
Program version:
6.6
Official website:
AOMEI
Interface language:
Russian, English and others
Treatment:
not required (the installer has already been treated)
System requirements:
- Windows 10 | 8.1 | 8 | 7 | Vista | XP
- Windows SBS 2003 | 2008 | 2011
- Windows Server 2012 and 2012 R2 | Server 2008 and 2008 R2 | Server 2003 and 2003 R2
Description:
Aomei Partition Assistant is a powerful program for working with hard drives and administering partitions for PCs and workstations. The program will answer questions such as: “How to resize a partition or merge partitions without losing data? How to increase computer performance?” Additionally, PA includes AOMEI Dynamic Disk Manager Pro (DDM), which means it has the ability to manage dynamic disk volume.
Main features:
- Ability to expand the NTFS system partition without rebooting the computer to maximize computer performance and minimize downtime;
- Merging adjacent partitions into one large one without losing data, or merging unallocated space into a partition;
- Splitting one large partition into two or more partitions;
- Create as many partitions as you need without using free disk space;
- Copying partitions for Windows system migration or when backing up important data;
- Cloning a hard drive helps with upgrading it;
- Quickly distribute free space from one partition to another to fully utilize disk space.
New opportunities:
- OS Migration to SSD/HDD: For many SSD users, this simple technology can help migrate their OS to SSD and keep the original system.
- Partition Recovery: Recover lost or deleted partitions in a few steps.
- Partition Alignment: Speeds up drive performance when reading and writing data, especially SSD drives.
- Creating bootable CDs: securely manages disk partitions in WinPE mode and boots from CD/DVD, USB flash memory.
- MBR Rewrite: Rewrite from master boot disk to damaged MBR hard drive for easy recovery.
- Convert between GPT and MBR: Convert from GPT disk to MBR without data loss and vice versa.
- Linux partition management: creating, deleting, formatting, copying, destroying, restoring Ext2/Ext3 partitions.
- Changing the partition type (ID) and changing the serial number.
Changes in version 6.6:
- Fully support exFAT file system, including create, delete, format, move, and copy exFAT partition.
- The Windows PE bootable media created on 64-bit system support both UEFI and Legacy BIOS boot modes.
- Remove the limitation to resize/move system boot partition in Windows 10, version 1703 and later.
Version Features:
- Type: installation [official installer]
- Languages: multi, Russian available
- Treatment: carried out [SND] Command line switches:
- Quiet installation: /S /Q
- Selecting the installation location: /D=PATH
The /D=PATH parameter is specified last
Extended capabilities
Some additional functions also look quite interesting. There is no point in describing them all. But separately, you can say a few words about checking the disk.
This can be done using system tools or by using the built-in tools of the program itself, which allow you to track the appearance of bad sectors with a full scan of the disk surface. The app even supports a command console!
Additional modules
Among the additional applets built into the program, we can highlight the tool for quickly creating copies of partitions (Free Backup). However, after clicking the corresponding button on the panel, you will have to download it from the official website and install it.
But the result will exceed all expectations. By the way, some such modules are actually not built into the program initially (the same Safely Partition tool), although there are buttons corresponding to them on the panel. However, if you wish, by connecting them to the main program you can even ensure that it is in no way inferior to the professional modification, while remaining free. In other words, you can turn a standard application into an all-in-one package.