Windows operating systems
25.03.20199865
Even an experienced user who knows how to update Explorer and where to look at the operating system settings will at some point encounter a new problem: Windows’ stubborn reluctance to boot. It's not about activation; and, fortunately, reinstallation is not always necessary - most often restoration saves the day. Let's try to figure out how to return Windows 7 to its original state and get rid of accumulated errors.
System utility
Contrary to popular belief, in order to restore Windows 7, one of the most flexible operating systems from Microsoft, it is not at all necessary to restart your computer or laptop, insert the installation disk and switch to Recovery mode. Most often, to resolve startup issues, reverse changes, or disable unsuccessfully selected options, just a few clicks are enough.
All actions described in this section are provided by the manufacturer and do not in any way affect the validity of the license or the health of the computer. Using them to restore Windows 7 is no more difficult than updating Adobe Flash Player - you just need to carefully follow the algorithm.
Important: if the operating system does not start and the user cannot get to the “Desktop”, this method should be skipped and immediately proceed to the next ones.
You can start Windows recovery using the system utility as follows:
- Turn on your computer or laptop and wait for it to fully boot. If for some reason it is not possible to log in as usual, you should try “Safe Mode” by selecting the corresponding item on the start screen by pressing the Enter key. If there are no problems, a “Normal Windows Boot” will be enough to restore the system.
- Left-click on the Windows flag in the lower left corner of the screen, then go to the “Computer” section, the link to which is located in the right panel of the “Start” menu. If desired, the user can create a shortcut on the desktop - then using System Restore, like many other functions of Windows 7, will become much easier.
- In the list that opens, select “System Properties” by clicking the mouse; By using one of the adjacent buttons, you can configure the camera on your laptop or remove unnecessary programs - one of them could lead to crashes in Windows 7.
- Go to the “Advanced system settings” section, located in the left side menu of the new window.
- Switch to the “System Protection” tab, the second one in the list of settings that opens.
- This is where the system recovery management tools are located. By clicking on the button of the same name, the user can begin the operation.
- Windows 7 will offer to restore the most successful, in the OS's opinion, previous settings. If there are no objections, you should click on the “Next” button and follow the prompts of the utility.
- If the user wants to return Windows to another point, you need to set the circle opposite the bottom line “Select another recovery point.”
- The list that opens in the next window will contain Windows 7 restore points created both by the system automatically and by the user himself manually. Having selected the one you need by left-clicking the mouse, click on the “Next” button again. The owner of a computer or laptop can see which applications will be affected by the changes by clicking on the “Search for affected programs” button. This must be done for each point separately.
- Review the operation parameters and click the “Finish” button. If there is no longer a need to restore or you need to select another point, you should use the “O” buttons accordingly.
- Confirm your intentions by clicking on the “Yes” button in the dialog box. As the OS honestly warns, the operation is irreversible: you can flip the screen on a laptop with Windows 7 at any time and in any direction, but you won’t be able to return to the moment “before recovery”.
- Wait until Windows prepares the data to start the process.
- During the recovery process, the user will be switched to the welcome screen - it will begin to display information about the progress of the process.
- As a result, Windows 7 will inform you that the operation is complete and will reboot.
- After turning on the computer or laptop in normal mode, the user will see a message on the screen indicating a successful recovery. Now most of the OS errors should be eliminated; if this is not the case, you should move on to one of the following methods.
- Before starting everyday activities and enjoying the return of Windows to working order, it makes sense to create a “fresh” restore point. This can be done on the already known “System Protection” tab by clicking on the “Create” button.
- Now you need to specify the name of the new “original” version; The more informative it is, the better - it's worth spending a little time on the name instead of using a few random numbers or letters.
- After a minute or two, the system will notify you that the operation has been successfully completed. Now the user can restore Windows 7 to its current state at any time or subsequently prepare several more successful options.
Important: quite often problems with the system are associated with the unsatisfactory condition of the hard drive. To check its functionality, you should call the “Properties” option in the context menu, go to the “Service” tab and select the “Run check” item.
By checking both checkboxes, clicking on the “Start” button and waiting from several minutes to an hour, the user will receive comprehensive information about the health of the disk; in some cases, this will require restarting Windows 7.
Create a Windows 10 restore point manually
In order to create a Windows 10 restore point, on the previous “System Protection” tab, click the “Create” button.
A window will pop up in which you must somehow name the restore point; in my case, for example, I called it “Restore point before installing an incomprehensible driver.” In this case, the date and time of creation of the point will be added automatically. After that, click the “Create” button.
The process of creating a restore point will begin. It usually takes less than a minute. After completion, the “Restore point created successfully” window will appear (see picture above). Now you can install that incomprehensible driver that I was worried about and, in case of problems, roll back the system using a restore point.
Before loading Windows
The Microsoft operating system can behave in different ways: from time to time it produces minor errors, randomly closes running applications, refuses actions that are familiar to the user, or even “crashes” and stops starting in normal mode.
In the latter case, before reinstalling Windows 7, the user can try to restore the system from the boot menu. This can be done by entering “Safe Mode” (or using the installation disk: you don’t need to reinstall anything, you just need to insert it into the drive, restart your computer or laptop and press any key until the OS loads from the hard drive).
After waiting for the black start screen to appear, the user must:
- Go to the Windows Memory Diagnostic section by pressing the Tab key or another - in accordance with the system instructions.
- Select to launch the utility using the Enter key.
- Wait for the memory check to finish - depending on the parameters of the computer or laptop and the severity of the problem, it can take up to one and a half to two hours.
- By clicking on F1, the user can select one of the verification methods: basic, standard or advanced. It is easy to guess that the time spent on the operation increases in proportion to the increase in the included options; however, it is recommended to select a “full” scan once - if the problem with the performance of Windows 7 is related not to the software, but to the hardware component, the user will be able to find out about this before the machine completely fails and take appropriate action.
- If everything is fine with the memory, the computer owner can reboot the device and wait for Windows to start from the hard drive; As a rule, as a result of all manipulations, the operating system will offer to choose one of the start options: “Safe Mode” already known to the user, as well as launching the last successful configuration and standard startup. If until the last moment there were no problems with the performance of the OS, it is worth trying the second method.
- And if the screen appears after the failures have been corrected, for example as a result of an unplanned disconnection of the computer from the network, then “Normal boot”.
- Having selected “Safe Mode”, the user must wait a little while the system loads the necessary configuration; It will do this within two to five minutes, depending on the device parameters.
- In this mode, there is no Internet connection and most services are blocked, so uninstalling an unnecessary program or calling System Restore is much easier.
- Upon completion of work, the user can simply restart the computer or laptop from the Start menu - after turning on, he will see the standard welcome screen.
How to restore Windows 10 from a flash drive or disk
This method is one of the most effective; first you need to create a bootable USB flash drive with Windows 10 on board, according to the video instructions presented below.
Important: The version of Windows on the bootable flash drive/disk must be the same bit size as the one you want to restore!
Next, we connect the flash drive, boot from it and begin installing Windows 10. As soon as the system loads all the system files and the installation menu appears, you need to select “System Restore” and follow the suggested scenarios (depending on your situation).
From backup
You can restore Windows 7 from a backup or archive: this way the user can return not only successful system settings, but also get back important files. The latter is especially nice considering that in some cases Windows can crash with all the data.
Important: if the owner of the computer or laptop has not made any changes, the backup will not be created automatically, so before describing the recovery, it will be useful to talk about creating a copy and archiving settings.
You can back up Windows 7 as follows:
- Turn on your computer or laptop, open the Start menu and go to Control Panel, located in the right section of the window.
- Open the “System and Security” section.
- Enter the “Backup and Restore” subsection.
- Select where the backup will be saved using the “Change settings” link.
- In a new window, the user will be able to select where the backups will be located. Depending on your needs and the availability of appropriate equipment, a removable hard drive, a folder on an internal network, or an optical disc in DVD-R/RW format will be suitable for storing data.
- The most ergonomic option is to save files online. Having specified a specific folder, entered the name of the current user and created (if one has not been set) a password, the owner of the computer or laptop can safely click on “OK”.
- Having finished with the saving settings, you should, without closing the window, click on the “Next” button and proceed to selecting the data to be saved.
- In the next window, the user will have to choose from two options: creating a backup copy according to the system’s choice or based on their own preferences.
- Having checked the necessary checkboxes, you can continue creating a copy for recovery by again using the “Next” button.
- Here the user can request simultaneous recording of a system image by checking the lowest checkbox.
- All you have to do is click on the “Save settings and start archiving” button.
- The process will take from a few minutes to several hours; You can monitor the progress of the operation by checking the gradually filling scale at the top of the window.
- The “View Details” button will help the user get a little more information about what is happening - in particular, find out what exactly the OS is doing now.
- To avoid wasting your wait, it is recommended to use the “Enable schedule” link located in the same window.
- You can disable automatic creation of copies in the left sidebar of Backup and Restore.
- By clicking on the links located there, the user initiates the procedure of creating a system image or writing it to disk; the procedure in these cases is fundamentally the same, and it makes no sense to talk about it separately.
- When the backup is ready, the user will see in the window the date and time it was created, as well as the size of the image.
To restore Windows 7 from a previously made copy, you should:
- In the “Taskbar”, click on the “Recover files from archive” link in the “Backup and Restore” subsection.
- By clicking on the “Manage space” link, the owner of a computer or laptop will be able to view the current archives (useful if several backups were created) and delete unnecessary ones.
- Now you can start restoring by using one of the links in the field of the same name.
- In the new window, the user needs to select, by clicking on the “Browse Files” button, what data he wants to return.
- Windows 7 will open a window with a folder containing the latest saved copies; Navigation in it is carried out as usual.
- After completing your selection, click on the “Next” button.
- Specify whether to replace the current files with the saved ones and click “Restore”.
Important: the action, like restoring Windows, described in the first section, cannot be canceled - if new important documents were created while working with problems, they should first be copied to another folder.
How to restore Windows 7 system
Unfortunately, there are many reasons for this problem, ranging from incorrectly written drivers, harmful effects of a virus, file system errors and ending with our erroneous actions when working with a computer. There is no need to be afraid of such problems, you need to learn how to deal with them effectively.
Let's think about how to restore a Windows 7 system, and also insure ourselves in the future against possible troubles using the backup and recovery tools built into the operating system.
We will learn how to restore Windows 7 without using third-party backup programs, even when System Recovery Options do not load and the F-8 button is useless.
Windows 7 has in its arsenal a fairly powerful and good tool -> Recovery Environment, which is created automatically when installing Windows 7 in a hidden partition and contains five other tools that solve numerous malfunctions and problems.
Note: If you learn how to use Windows 7 recovery tools correctly, and this is not difficult, then you can do without additional and paid data backup programs.
You can launch the recovery tool by pressing the F-8 button on the keyboard immediately after starting the computer. After this, the menu Additional boot options will open in front of you: Troubleshoot your computer, then Safe Mode, Safe Mode with loading network drivers, etc.
A small digression: Before choosing Troubleshoot your computer, try a simpler option - Last Known Good Configuration - in simple words, the operating system always remembers the last successful boot of the computer and enters this information into the registry.
If there are problems loading, Windows can remember the registry settings and driver settings that were used when the system was last successfully booted and use them if you select the Last Known Good Configuration option.
If this tool does not help, select the first -> Troubleshoot computer problems.
Next, we get to the Windows 7 System Recovery Options menu, this is what we need, this is where we can select the System Restore Tool we need, there are five of them in total, let’s take a closer look at how they all work.
The first thing to do is apply Startup Repair (Automatically fix problems that prevent Windows from starting).
Necessary digression: After pressing the F-8 button when booting the computer, you may not have the item > Troubleshoot your computer, but only Safe Mode and so on, the question arises why.
When installing Windows 7, a recovery environment partition is created automatically and is located in the root of the drive (C:) in the Recovery folder. You can also see in the Disk Management window - a separate, hidden partition of the hard drive, its volume is only 100 MB, it is used to store boot configuration files (BCD) and the system bootloader (bootmgr file).
You can see it under Computer->Management->Disk Management. Under no circumstances should you delete this partition (many people delete it out of ignorance), otherwise you will not have the recovery environment start, that is, you will not have the Troubleshoot your computer option, and in more severe cases, you simply will not boot the system.
In the lower screenshot you can see another hidden partition, with a capacity of 9.02 GB, this is a hidden recovery partition with factory settings on my laptop, yours may be larger or smaller. It’s also better not to delete it; if necessary, you can always restore Windows 7 from it.
What should you do if you do not have a partition with a recovery environment and when you press the F-8 button in the Additional boot options menu, the Troubleshooting computer option does not appear? How then to restore the Windows 7 system?
An installation disk with the Windows 7 operating system can help here. You can run the recovery tool by booting from the original Windows 7 installation disk, selecting System Restore at the very beginning.
If you don’t have an installation disk, then you can use the Windows 7 Recovery Disk (you can make it in any running Windows 7) in five minutes, then you can also boot from it and do the same.
So we finally got to the System Recovery Options, either using the F-8 button and the Troubleshooting item, or the Windows 7 installation disk or the Windows 7 Recovery Disk.
In the System Restore Tools Selection menu, select the first one:
Startup recovery -> will analyze faults that interfere with the normal loading of Windows 7 and further correct them for normal loading and functioning of the operating system.
During the process, we may be warned that problems have been detected in the boot parameters, click Fix and restart.
System Restore -> using this function we can select a previously created system restore point, if we have it enabled, and roll back to the time when our Windows 7 worked and booted perfectly, everything is simple here.
Restoring a system image -> I personally use this tool; if used skillfully, it can replace paid data backup programs, if interested, read on.
What's good about it? It will help when you don't have the original Windows 7 installation disk and you've deleted the hidden partition with your laptop's factory settings, but that's not all.
Sometimes there are situations when, for various reasons or due to the actions of a virus, you will not be able to boot the operating system at all, or many people ask How to restore the Windows 7 system, even if the menu with Additional boot options is also unavailable. Should I reinstall the operating system again?
Therefore, immediately after installing Windows 7 on your laptop or computer, using this function -> Restore system image, we create an archived image of our Windows 7 on the hard drive, and take care of it.
You must create a Windows 7 Recovery Disk (read below), it will help you use the System Image if the Advanced Boot Options menu does not load.
Go to Start -> Control Panel -> Back up computer data.
Select “Create a system image”.
Next, select the Local disk on which we will store the system archive.
In my case, Local disk (E:), if you have several hard drives in the system unit, then of course it is better to place the backup on the hard drive where the operating system is not installed.
Click Next.
By default, the data archiving program will automatically select a partition with the Windows 7 operating system; if you wish, you can add Local disks for archiving, as long as you have enough space.
Note: You may notice that I have two operating systems installed on my laptop, so the archiving program selected two Local disks.
Click Archive and the process of creating an archive with our Windows 7 will begin.
Created, it will look like this.
Now, if necessary, you can deploy the archive with Windows 7 to your computer in 20-30 minutes. It would be better if you additionally copy the archive with the system onto a portable hard drive, this will doubly protect you.
Let's imagine that we can't start Windows 7 and deploy the backup we created, let's do it together.
We launch the Windows 7 Recovery Tool by pressing the F-8 button on the keyboard immediately after starting the computer.
The Advanced boot options menu opens, select Troubleshoot your computer.
Restoring a system image
Use the latest available system image.
Click next and restore our Windows 7.
Of course, all our data on the Local Disk, where the operating system is now being restored, will be deleted, so you can first boot from any Live CD and copy what you need.
How else can you restore your Windows 7 system? Of course, using the Windows 7 Recovery Disk.
Let's create a Recovery Disk that can be used to boot the computer; it will contain recovery tools that can be used to repair Windows 7 boot problems, as well as restore the operating system from the backup copy that we created in advance.
Important: The bitness of the system is important for the recovery disk, you can use a 32-bit recovery disk for any 32-bit Windows 7, and a 64-bit recovery disk for any 64-bit Windows 7.
Let's go again Archiving computer data.
Create a system recovery disk, insert the DVD into the drive, click “Create disk”.
When the Windows 7 Bootable Recovery Disk is ready, put it in a safe place.
To restore Windows 7 from a Recovery Disk, you basically don’t need any working operating system at all.
You will only need to change the boot priority to the disk drive in your computer’s BIOS, insert a recovery disk into it and restore your Windows 7 using the archive.
Many here can draw an analogy with data backup programs, and this is correct, they work on the same principle, only their functionality is, of course, more convenient.
Recovering Windows 7 from a Recovery Disk. I show you how to do it. Let's say we're in trouble, we can't start Windows 7, when we press F-8 on the keyboard immediately after starting the computer, nothing happens.
We cannot get to the menu with Additional boot options and an error message is displayed. In this case, the system archive on the hard drive is not available to us. This is exactly the kind of trouble that happened to our reader Ilya, who wrote us a letter asking for help.
In this situation, many people reinstall Windows 7 from scratch, but not you and me, because we have a System Recovery Disk.
We insert it into the drive and reboot, set the BIOS to boot from the drive, as I said, the disk is bootable, the System Recovery Options program starts.
Press Enter until the prompt to boot from the disk disappears.
Automatically, the recovery tool running from the disk will try to restore Windows 7 to start.
If nothing works, select any tool, for example, try Restoring a computer using a previously created operating system image.
We use the latest available system image.
Click next and restore the system from a backup using the Recovery Disk.
From the installation disk
If the user has an installation disk or flash card with a recorded image at his disposal and it is impossible to restore Windows 7 from a backup copy, you should insert the media into the drive or USB connector and restart the computer, then:
- Enable booting from a disk or flash drive by pressing any key before starting from the disk, wait for the start screen and use the F8 button.
- Select one of the recovery launch modes; in most cases the usual is sufficient.
- On the start screen, select your language.
- And other system language parameters.
- Instead of the “Install” button located in the center of the screen, select the less noticeable “System Restore” in the lower left corner.
- Wait until the computer or laptop downloads the data necessary for work.
- Select a recovery method (standard or from a previously created image) and click on the “Next” button.
- Specify your preferred launch option - most often the user wants the first or second option - and click on it.
- When the work is completed, Windows 7 will prompt you to restart it.
Tip: if the device starts, you can restore the system without rebooting by simply inserting the installation disk into the drive and running it directly in the running environment.
Boot in Safe Mode
It often happens that Windows, being unable to boot in normal mode after a crash, boots in safe mode. In this case, only the most important drivers and utilities are used, so it is possible to remove viruses, drivers that cause conflicts and crashes, and solve other problems without reinstallation.
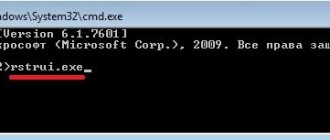
You can enter here from the same OS recovery tool window by selecting boot in safe mode. The line below offers us the same mode with command line support. This feature can also be useful if booting into normal diskless safe mode fails:
- Select the appropriate line and go to the command line window;
- Enter the command sfc /scannow, which forces Windows 7 to scan the most important files and replace any damaged ones;
- You can run the utility that disinfects the system here using the rstrui.exe command.
The command line in safe mode provides a variety of functionality. For example, typing devmgmt.msc will take you to Device Manager.
Acronis True Image utility
This program allows you to restore Windows 7 settings and files to their original state based on a previously made backup and is probably the best replacement for standard archiving. The application is paid, but a demo version with some restrictions is available to the user.
To create a backup using Acronis True Image, you need to:
- Download, install and run the program, then create an account by filling out a short form.
- In the next window, select the “Start trial” option.
- Select which folder the copies will be saved in by clicking on the empty field on the right.
- If necessary, set a password to access the data using the link at the bottom of the same field.
- Choose whether the application should back up the entire computer or individual files.
- By clicking on the “Options” button at the bottom of the window, the user can set a schedule for automatically creating backups and determine the algorithm for saving data.
- By calling the pop-up list next to the “Create a copy” button, the owner of the computer or laptop will determine after what time the operation should begin. If you plan to start creating an archive right now, just click on the indicated button.
- The process will take some time; you can stop it by clicking on the button of the same name, and you can also request to turn off the device when copying is complete.
- The program will notify the user that the archive has been successfully created. Now you can close the application and get to work - until you need to restore Windows 7.
To restore data using Acronis True Image, you should:
- Go to the “Recovery” tab, select the required data and click on the “Next” button.
- Define the process parameters - or immediately click on the “Restore” button. Upon completion, a window similar to that described above will appear in front of the user.
Important: the “Tools” section contains other useful Acronis True Image options: full disk cloning, remote recovery, system cleanup and many others.
Returning the last known good configuration
After each successful system boot, Windows remembers the current PC configuration, storing the information in the registry. If the boot process fails, it is best to immediately roll back without the disk to the last known known configuration. For this:
- Immediately after turning on the power, press F8;
- Instead of a normal boot, a black screen will appear, offering various ways to resuscitate Windows;
- In one of the lines at the bottom of the window, select “Restore the last successful configuration”.
It is not a fact that this method will be able to fix serious boot problems, but usually this simple remedy is always used before resorting to other options.
Disaster recovery using antivirus
The system may crash due to viruses, for example, the Windows blocker. To combat them, boot disks with antiviruses are used; one of the most famous products is Anti WinLocker Live CD, which allows you to boot Windows even in the most difficult cases.
To restore Windows 7 functionality using it, you must:
- Insert the disc into the drive, restart the computer, wait for the data to load and select “Start treatment.”
- Wait until the program finishes dealing with the virus; The process usually takes no more than ten minutes.
- On the “Custom Recovery” tab, the user can choose which startup parameters need to be fixed.
- At the end of the process, a corresponding notification will appear on the screen.
- You can log in by simply rebooting the machine and waiting for it to start from the hard drive - or by using the “Exit” item in the shell pop-up menu.
Selecting a control point
Before each significant change - installing drivers, applications, etc., Windows creates another system configuration point. Thus, it maintains the current stable state - you can always roll back to it even without a boot disk if the OS crashes as a result of this intervention.
Any of these saves is also available from the window that restores the OS:
- Enter this environment via F8;
- Highlight the line “Troubleshooting” and press Enter;
- A window will open offering several available troubleshooting methods;
- Click on the line prompting you to restore;
- In a new window, the OS will notify you about the functionality of this module and offer background information, which you can refuse to read by clicking “Next”;
- Finally, a working window will appear in front of you, in which you can view information about the last automatically created control point and select it;
- If you want to roll back Windows 7 to an earlier state without using a disk, check the box at the bottom of the window that offers to show other saved system configurations, click “Next”;
- In the confirmation window, you can see which programs are most likely to stop working after you roll back to the selected state if you click on the link to search for affected programs.
All you have to do is click “Finish”, after which the OS will roll back to the point you selected and after a reboot, even without using the disk, you will get a fully working environment.
System restore via saved point
A restore point is a copy of the state of the system at a specific point in time. Windows is programmed to independently create restore points when changes are made to the configuration as a result of installing drivers, network components, programs, etc. (see What programs are needed for a computer).
Checkpoints are also created every week if no major changes have been made to the configuration within the previous 7 days.
If desired, the user can create a new restore point himself. This is done without the need to use third-party software, through the menu of a standard tool called “System Restore”.
To get to your destination, open Control Panel
Go to the System and Security tab.
In this menu, select the System category, from there go to Advanced system settings. Here, select the “System Protection” tab.
alternative path – “This PC” → “Computer” → “System Properties”
The procedure is the same for all current OS editions. In Windows 8.1 and later, you can additionally activate/deactivate protection here.
To create a restore point, click the button of the same name and set the desired name. Additional parameters are also entered here: the space allocated for storing recovery points, etc.
The list of copies is available on the “System Restore” tab. If Windows begins to behave suspiciously, go to the specified dialog and roll back to the last working state.
Restore Windows using a full system image
Another option for restoring Windows is to roll back to a previously created system image. The image is written to a hard drive, DVD, or network share.
Unlike a rollback or point-to-point restore, using a full image preserves all files, applications, settings, and drivers installed at the time it was created.
The most appropriate moment to create such an image may be when all the drivers and necessary applications are installed on the system, but there is nothing unnecessary. This way you can continue working immediately after recovery.
To create a full system image, in the Control Panel, select Backup and Restore (Windows 7) → Create a system image. (In Windows 7: Control Panel → System and Security → Backup and Restore → Create a system image.)
In the menu that appears, you can choose which of the existing partitions and files to include in the system image and on what media to burn it.
With a complete system image at your disposal, you can quickly return Windows to the state you want. You can start image-based recovery when you restart the computer: “Diagnostics” → “Advanced options” → “System image recovery”.
Windows emergency recovery using a bootable USB flash drive
Situations are possible when, after successfully creating a system restore point, the user cannot get to the desired menu even through safe mode. Often, this happens due to damage to important system files. The most reliable method to solve the problem is to use the Windows 7 installation disk.
So you have a bootloader. Let's figure out what to do next.
- Insert the bootable USB flash drive into the USB port (or CD into the drive);
- Turn on the computer and immediately (before the Win 7 start logo appears), press the Del or F2 key several times (by default);
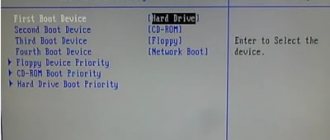
- In the BIOS itself, look for and select the Advanced BIOS Features item (or Hard Disk Boot Priority, depending on the shell manufacturer);
- Click on the line First Boot Device (or 1st Drive);
- Specify your flash drive or CD as the primary device instead of the hard drive and press Enter;
- To save new settings, press F10, then exit the shell with the ESC key;
- A reboot will occur and a black screen will appear with the words Press any key to boot from usb or cd, dvd;
- As a result, the standard Windows installation interface will launch; in its lower left part, select “Restore operating system” (as shown in the screenshot);
- Next, we proceed as in the first paragraph of the article. We restore the operating system using one of the available backup points.
Restore your computer to its original state
If there are no restore points or going to them does not help, try returning the system to its original state. You can roll back while saving the files or completely delete everything and reinstall Windows. Also, some computers—usually laptops—have an option to restore factory settings.
In Windows 8 and 10, you can start restoring to its original state by going to Settings → Update and Security → Reset your PC → Get Started.
In Windows 7, to do this, go to “Control Panel” → “System and Security” → “Backup and Restore” → “Restore system settings or computer” → “Advanced recovery methods” → “Return the computer to the factory-set state.”
Possible errors during system recovery
In the vast majority of situations, the described recovery methods allow you to bring Windows back to life. Along with this, various failures and errors cannot be ruled out.
If you use a special disk or flash drive, such problems do not arise: either Windows is restored and you continue to use the computer normally, or you simply forget about the failures that occurred and reinstall the OS (see How to install Windows on Lenovo).
The user has to deal with errors (they are indicated by a certain index consisting of the letter “x”, zeros and additional letters/numbers or a text description) mainly in cases when Windows is loaded and attempts to restore the system are made through the corresponding section of the Control Panel.
Under such circumstances, before resorting to drastic measures (reinstalling the OS), you can normalize operation through Safe Mode.
Do the following:
- Press the computer's power button, and then click on the F8 key several times until a menu of additional boot methods appears. If before this the computer prompts you to select a device to boot, select the hard drive and then click F8 until the mentioned menu opens;
- highlight the line “Troubleshoot computer problems” and click Enter;
- wait until the recovery program starts;
- in the menu that opens, click Next;
- in the section that opens, enter the name of the computer administrator and click OK. By default, the account created when installing Windows and booting the system for the first time has administrator rights;
- in the section for selecting the appropriate method, double-click on Restore OS image;
- wait until the console opens, then press 1;
- wait until the system prompts you to press Y as confirmation of consent to clear and return the disk storage to its original state. Confirm your choice. If nothing happens, change the keyboard layout to English (see The language bar has disappeared);
- wait for the process to complete, reboot the device and try turning it on in standard mode.
If this does not help, use the previously discussed recovery method from a disk/flash drive.
Now you know how to normalize Windows. The information obtained will help you not only to correctly navigate in the event of failures in the OS, but also to save on the services of third-party computer tuners (see Laptop does not turn on).