Chrome OS is a relatively young brainchild of a world-famous company, which has managed to gain interest and popularity among computer users. This operating system is based on cloud-centric technology. In essence, it is a Chrome browser developed on Linux, with additional features and its own applications.
Convenient and safe operating system for users
The announcement of the project took place in not so distant 2009. And already in December 2010, a trial version was launched. When announcing the operating system, its creators promised their users speed, simplicity, and security. They were the key points. The program should launch in a few seconds, the user-friendly interface of Chrome OS should carry out a large number of requests without user intervention, and you can completely forget about malware and viruses, as the developers of this system assure us. Let's check how reality lives up to the promises in the Chrome OS review.
What is Chrome OS?
Google has long been thinking about releasing its own desktop operating system. The Chromium OS project was first heard about in November 2009. Then Google promised to introduce laptops running this OS, and by 2011 it finally announced a couple of models.
The basis of Google Chrome OS is a hybrid kernel, a kind of mixture of Linux and Google services. A specially designed window system is provided, and the main tool for work is the browser. Of course, constant access to the Internet is strictly necessary.
In fact, Chrome OS is a compact distribution that consumes a minimum of laptop system resources, and all basic computing processes are carried out on Google servers - in the cloud.
As a result, we get an excellent solution for low-power computers, which can be run either from a flash drive or installed instead of popular Windows and Linux systems.
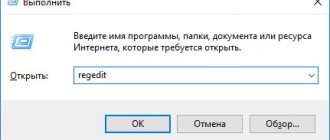
Start - loading the operating system
OS Chrome is the highest level of security, convenient usability and pleasant bonuses in the form of 100 GB of cloud storage and more. When the system starts, an authentication window appears in front of the user, where he must enter his login and password. The OS is not available for an unverified user.
You can work in the system as different users and easily administer them: access rights change, accounts can be configured according to individual parameters, there is a guest mode limited to browser operation. This operating system allows you to easily manage themes, fonts, and home page settings. Everything that is available in the browser.
The cloud system implies minimal use of the disk space of the computer itself. The calculation is based on the fact that the user will store most of the information using Google Docs and Dropbox services. There are also special services for playing videos and listening to music: YouTube, Google Music and so on. But despite this, Chrome OS has its own local storage and also has a file manager.
How to install Chrome OS
Before installation you need to do a little preparation. For Chrome OS you need:
- laptop
- USB flash drive or SD card from 4 GB (card preferred)
- active Google account
- stable internet connection
- 30-40 minutes
Let's start the installation. It is advisable to prepare the flash drive on your main laptop, be it a Windows, Linux or Mac-compatible laptop.
Step 1. Go to the Neverware website using this link and download the Chrome OS distribution from CloudReady. The image size for macOS is just over 900 MB.
Download the 64-bit version if your laptop was made after 2007.
Step 2. Unpack the downloaded archive.
Step 3. To create a flash drive you will need the Google Chrome browser. There is no way without him. Launch the browser and click on the link to install the Chromebook Recovery Utility extension.
Step 4. Launch the installed extension and before clicking Start, insert a flash drive or SD card (volume from 4 GB).
Additionally, you need to click on the gear and select Use local image, indicating the path to the distribution package unpacked in step 2.
Now you can start creating a flash drive.
Step 5. Select your flash drive and click Start.
Depending on the speed of the USB flash drive/SD card, the drive creation process takes from 2 to 10 minutes.
Step 5. Put the MacBook aside and insert the flash drive into our battered laptop.
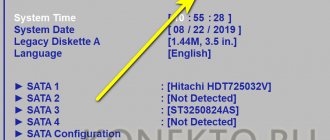
Turn on the laptop and select the drive from which to boot. To do this, in the BIOS settings (called by pressing the Del key immediately after turning it on), find the First Boot Devise item and set the USB Flash or the name of your flash drive.
After rebooting, the laptop will see the flash drive and the installation procedure will begin.
Step 6. After a couple of seconds, the system logo will appear on the screen, and all you have to do is specify the desired system language and connect to WiFi. This completes the installation of Chrome OS.
Please note that the system requires a constant Internet connection and a flash drive or SD card. In this regard, it is preferable to use an SD card.
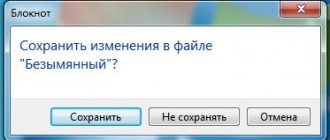
After starting from a flash drive, you can install the system on the built-in drive of the laptop. But it’s up to you to decide.
Download and Install
Please note that you cannot download Chromium OS from the official website - Google does not support the build, so you need to look for other download sources. Before installing Chromium OS on your hard drive, you need to stock up on a 4 GB flash card.
There are several proven developers, one of them is Hexxeh. The developer brought the product to the masses, but the latest build is outdated - it was released in 2013. Therefore, we recommend downloading the Arnoldthebat project files.
Installing Chromium OS on your hard drive:
- Open the website of the above-mentioned developer;
- You will see three options for build folders: Daily (collected daily), Weekly (collected weekly) and Special;
- Select the desired type of assembly for different types of processors: for ARM - CARMOS assembly, for x64 - Camd64OS, and for x86 - Cx86OS;
- Click on the selected option and press the “download” button;
- Please note that the downloaded file must be in img.7z format (vdi.7z versions are intended for virtual machines);
- Wait for the download to finish and unpack the Chromium OS ISO image archive using any file manager;
- Download Win32ImageWriter (use this link: https://www.softportal.com/software-29161-win32-disk-imager.html) to write to a flash drive or try writing to a disk directly from your computer without additional utilities;
- Launch the program, enter the path to the saved document and click Write;
If you use Linux, open a terminal and enter the command “dd if=ChromeOS.img of=/dev/sdX bs=4M/”, where instead of if you must enter the name of the image.
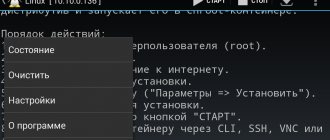
Let's move on to starting the operating system:
- Reboot your device;
- While loading the BIOS (turning on the PC), click on the F12 button and select the device to boot. To do this, open the Boot tab and set the name of the flash card in the Boot Device Priority item;
- After turning on the computer, select the operating language, keyboard layout and network connection type;
- Log in to your Google account;
- Use the keyboard shortcut Ctrl+Alt+T to launch the crosh developer console;
- Type shell and press Enter to access a regular Linux terminal;
- Enter the command “sudo /usr/sbin/chromeos-install -dst /dev/sda” (without quotes) and the password if the system asks for one;
- Remove the flash card and restart your computer. Ready!
To make it more clear, we suggest you watch a video that describes the installation process in detail:
Chromium OS system requirements are not compatible with all custom offering configurations. If you have problems downloading, look for a solution to the problem on the developer's website.
Launching Chromium OS
Next we need to launch the newly recorded Chromium OS.
Step 3. BIOS setup
Restart your computer and during the BIOS splash screen, press F2 , Shift+F2 or Del . Here go to the Boot tab and in the Boot Device Priority or 1s Boot Device , install your flash drive first:
It can be displayed by label or USB Drive. Then all that remains is to go to the Exit and click Exit & Save Settings .
Step 4: Launch Chromium OS
Then wait until the system boots up:
Step 5. Language and network connection
Without a network connection, Chromium OS will not work. In this window, select the language, keyboard layout and network connection, Ethernet, if there is a network cable or Wifi:
Step 6: Google Account
Next you need to log into your Google account. First enter your email address, then in the next step enter your password:
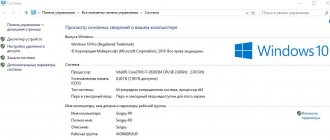
Step 7. You are logged in
Before you is a ChromiumOS system loaded into LiveCD and completely ready for use. You'll be given a short tour of its capabilities, but we'll skip that.
I installed Chrome OS on my laptop. And he was transformed
Devices don't last forever. Even the most sophisticated laptop turns into a “mid-level” computer after a couple of years. After 5-6 years from the date of purchase, it runs the risk of becoming a pumpkin.
This happened with my old HP Pavilion g7. In 2011, a laptop was shipped with a failed Windows Vista, which was immediately replaced with the more adequate Windows 7. But the performance of the device in the Windows environment in 2020 turned out to be very questionable.
I didn’t want to install Linux - there is a separate device + cloud server for this OS. Therefore, it was decided to find the most optimized option. After studying dozens of forums, I finally decided to try out the operating system, which until today I had stubbornly avoided.
As it turned out, it was in vain.
Preparing to Install ChromeOS
In general, installing this operating system is easier than other Linux distributions, with a couple of exceptions.
Step 1. Download the assembly
We will not build the system from source, that would be too long. We will not use the previously popular assembly from Hexxeh. It is already outdated, and we want Chromium OS 54 or a newer version. The Arnoldthebat project collects daily builds of ChromiumOS for x86, amd64 and arm architectures.
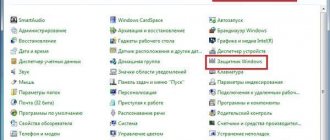
We will use their option. There are three options here, daily, weekly and special:
I recommend downloading spesial, because Chromium OS has problems with hardware, in particular with Wifi adapters not from Intel. These same assemblies include all the necessary drivers, including for Broadcom cards.
Select the desired version of Camd64OS for x64 or Cx86OS for x32, then click on it to download Chromium OS.
Step 2. Burn the image
The image takes up around 600 Megabytes, so the download will complete quickly. The image is packaged in a 7z archive, if you have this utility installed, you can unpack it with the command:
7z e ~/Downloads/Cx86OS-20160824010101.img.7z
You can also unpack using a file manager. Next you need to burn the image to a flash drive. Moreover, we do not need a separate partition, but the entire flash drive. This is not just an image with files, it has markup and several sections.
Therefore, we will use the dd command to record:
sudo dd if=Cx86OS-20160824010101.img of=/dev/sdb bs=4M
Here if indicates your ChromeOS image, and of indicates your flash drive. Be very careful, your flash drive may have a different name. First check with fdisk -l, then replace the name with your own. On Windows you can use the win32diskimager utility.
How to Run Chromium OS on PC or Mac
To do this, you need to unpack the archive, and write it to a USB drive using a special utility (any one will do, for example, Rufus for Windows, or Etcher for Windows / macOS).
For PC
To do this, you need to enter the BIOS and set the boot priority to the USB drive. Or, if it’s easier, you can press F5 at startup and select it through the boot menu.
For Mac
Everything is almost the same here. At startup, just hold down the Option key (or Alt) and select EFI Boot.
Chips and pitfalls
Firstly, when starting this OS flash drive, many people do not have Wi-Fi (and on some stationary devices, Ethernet as well). Further, the Google Play service, DRM, Netflix and synchronization with an Android device do not work. But the terminal works there (Ctrl Alt T in the browser, and Ctrl F2 in full screen mode).