Windows operating systems
23.08.20192262
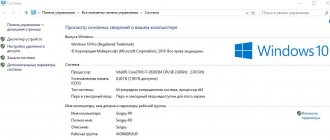
A user who decides to look at a laptop model that has served him for a long time running Windows 7 may be surprised to find that his device is capable of handling more modern operating systems - Eight or Ten. Installing them as a second OS is not always justified - it is more logical to completely demolish the old version and then install the new one. Let’s try to figure out how to do this quickly and without harm to the computer.
Full disk wipe
The simplest and most radical way to quickly and permanently remove a previous version of Windows 7 from a laptop in order to then install a new operating system is to completely wipe the hard drive and then format it. This will also help if Windows 7 is not installed; all the user needs is to carefully follow the sequence of actions and stock up on any installation disk or flash drive in advance:
- Having entered the BIOS using a keyboard shortcut suitable for your computer or laptop, switch to the Boot/Startup tab.
- Select the Boot Device Priority/Sequence section.
- Go to the 1st Boot Device heading.
- And install as the first device that the BIOS accesses at startup, an optical drive or USB drive with Windows 7 written on it.
- To avoid possible errors and the need to repeat the above mentioned manipulations, disable the second and subsequent boot devices.
- So that in the end, only the disk or flash drive with Windows 7 remains as the installation source.
- Return to Boot/Startup, go to the Exit tab.
- And, selecting the Save&Exit option, exit the BIOS.
- If several hard drives are connected to the system unit, while uninstalling the old version of Windows 7, it makes sense to physically disconnect the “unused” hard drives by disconnecting the power or information cables. Next, reboot the computer with the disk or flash drive, depending on the installation menu, select Windows Setup.
- Or, after waiting a little, immediately proceed to familiar actions: select the language for interaction with the installer.
- In the next window, since the plan is not to install, but to uninstall Windows 7, you can set any parameters or leave them at default.
- Click on the “System Restore” link.
- In the next window, switch to “Recovery Tools”.
- And, regardless of whether a working version of Windows 7 is found or not, click “Next”.
- Click on the “Command Line” link.
- Apply the first command diskpart . You can enter it, like the subsequent ones, in lowercase or capital letters; the main thing is not to add unnecessary symbols and punctuation marks.
- Wait until DISKPART appears on the left (now all manipulations will be carried out with media connected to the computer or laptop), and use the new command list volume .
- Find in the list the hard drive with the version of Windows 7 that you plan to remove. The drive letters may not match those displayed in Explorer, so the easiest way to “find out” the required media is by size. In addition, as already mentioned, disabling “unnecessary” hard drives will greatly help the computer owner.
- Apply the select disk DDD , where DDD is the disk number in the list provided.
- Use the clean - it will completely clean the hard drive up to resetting the partition. This is especially useful if you plan to install “Eight” or “Ten” running on GPT disks as a new operating system instead of Windows 7.
- After a few moments, the HDD will actually be reset to its original state.
- That's all - Windows 7 is completely and completely removed; Not only will there be no working version of the OS left on the hard drive, but also no folders reminiscent of the past (and, of course, the user will not have to look for a way to clean the computer of garbage). exit command .
- And wait until the system completes the DISKPART sector.
Important: after completing all the manipulations, the user should restart the computer and install a new operating system instead of Windows 7, which was just successfully removed.
Complete removal of Windows 10
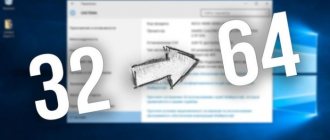
A powerful tool for working with disks is used - GParted, which must first be written to a flash drive using a program for creating bootable drives. Before you remove Windows 10, you need to download a special application to your computer. Actions:
- Open the GParted download page.
- In the GParted Live CD/USB/HD/PXE Bootable Image Stable Releases table, follow the Download link, the name of which contains the corresponding system bitness (i686 – 32-bit; amd64 – 64-bit).
- Confirm downloading to your computer.
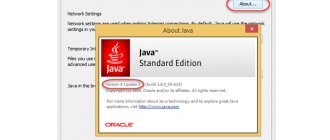
- Open the Rufus program page.
- In the Download block, click on the link Rufus <version> Portable.
- Confirm download.
Downloading GParted and Rufus
Note! You can use Google or Yandex to search for programs.
You should also prepare an external drive, which can be a 4 GB flash drive.
Creating a bootable GParted USB flash drive
The GParted installation image is written using the Rufus program. Need to:
- Launch the application.
- Select the flash drive in the Device list.
- Press the SELECT button and open the previously downloaded GParted ISO image in the file manager.
- Determine the Partition Scheme corresponding to the disk.
- Press the START button.
Creating a bootable GParted Live flash drive
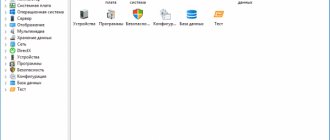
Note! You can find out the partition layout of your hard drive in the standard Computer Management application. Go to the Disk Management section, open the properties of Disk 0. The necessary information will be displayed on the Volumes tab.
Determining the partition scheme
After completing the transfer of image files to the flash drive, a system signal will sound. The program can be closed.
Launching the LiveCD program
It is impossible to remove Windows 10 while working on your computer. The GParted program must be launched from a flash drive. This is done when the computer is rebooted. When the inscriptions appear on the screen, you need to press a special key. Depending on the model of the desktop computer motherboard or the laptop manufacturer, the boot menu button is different. You need to refer to the table:
| Manufacturer | BIOS | Key |
| Laptops | ||
| HP | — | Esc → F9 |
| Asus | — | Esc |
| Dell | Dell | F12 |
| Lenovo | AMI | F12 |
| Sony Vaio | Inside H2O | F11 |
| Acer | Phoenix | F12 |
| Acer | Inside H2O | F12 |
| Packard Bell | Phoenix Secure Core | F12 |
| Toshiba | Phoenix | F12 |
| Toshiba | Inside H2O | F12 |
| Samsung | Phoenix Secure Core | Esc |
| Motherboard | ||
| MSI | AMI | F11 |
| Gigabyte | Award | F12 |
| AsRock | AMI | F11 |
| Intel | Phoenix/Award | Esc |
| Asus | AMI | F8 |
Important! If there is no information about the manufacturer, you can press the designated buttons one by one until you find a suitable one.
Next, you will need to select a flash drive to launch. Moving between items is carried out using arrows, selection is made by pressing the Enter key.
Presetting parameters
After determining the priority disk, the main menu of GParted LiveCD will appear, where you will need to set the program operating mode and set the parameters:
- Select GParted Live (Default settings), press Enter.
- In the Configuring console-data window, select the line Don't touch keymap. Press Enter.
- In the console, determine the localization of the program. Enter the language number from the list and press Enter.
- Enter 0, confirm by pressing Enter.
Launching GParted from a bootable USB flash drive
In the program window, you will need to make preliminary settings: define partitions, specify a command to change the format.
Important! At this stage, changing settings does not affect the operation of Windows 10.
Windows 10 is located on just one disk partition where system files are located. The rest are the recovery partition, EFI data and volumes for user needs. Additional information will help determine which one is correct for deletion:
- size over 40 GB;
- file system - NTFS;
- sometimes labeled as Windows 10.
After determining the desired section, you can proceed to setting the parameters. Actions:
- Right-click on the section.
- In the menu, hover over Format to.
- Define the file system as ntfs.
Formatting a partition in GParted
The selected configuration will clear the disk of Windows 10 files. To completely delete the partition, select the Delete option in the context menu.
Note! To return a disk to factory settings, you need to apply the Delete option to each partition one by one.
Applying changes
Formatting options are selected but not applied. At this point, you can override the settings. To cancel actions, use the Undo last operation button.
Button to cancel action
If the specified configuration is correct, you can clear the disk of Windows 10 files by clicking the Apply all operations button. Next, you just need to confirm the action by clicking Apply.
Button to apply operations in GParted
Important! Once the changes are applied, the data will be deleted. To avoid loss, important information must be moved to backup media.
After completing the cleaning operation, you can close the window: press the Exit button on the desktop, select Shutdown and remove the flash drive after turning off the computer.
Removing a logical drive
The first way to remove the old Windows 7 is optimal if subsequently the owner of a computer or laptop wants to install the OS on a “bare” hard drive. However, it is completely unacceptable if several logical partitions are created on one physical medium - with other versions of Windows or important data. And in this case, the installation disk or flash drive will help the user; Having connected the media and configured the BIOS as described earlier, you should:
- After going through the preparatory steps, click on the “Install” button.
- Accept Microsoft's terms and click Next.
- And be sure to switch to “Custom installation”.
- In the list of logical partitions that opens, select the one in which the old version of Windows 7 is installed; In this case, you can focus on both the name and the volume allocated during the breakdown. If you plan to reinstall Windows 7 or install another operating system on the same partition (of course, if capacity allows), you should select the “Format” option for it.
- And confirm your consent to part with all the data contained in the section.
- If a logical drive is no longer needed, the correct option is to completely remove it.
- Also having gone through the mandatory confirmation procedure.
- In order not to leave the free space in limbo.
- It is necessary to select the logical partition that you plan to “expand” with the left mouse button and click on the “Expand” button.
- Next, select the size to add and click “Apply”.
- And, again agreeing to the terms of the OS.
- Make sure that the logical drive on which the old version of Windows 7 was installed was successfully erased.
Important: all program and user folders will disappear along with it - the user will not need to clean up anything additional.
Removing old Windows after installing a new one - step-by-step instructions
In a situation where the computer starts to work slowly, the only correct solution among the recommendations for setting up the computer yourself, you will find reinstalling the operating system, but this is not always done correctly, so then there is a need to remove the old Windows after installing the new one. Usually the OS is installed on a clean partition, but if it so happens that you installed the new Windows operating system in the same place (in the same logical drive) as the old one, it will automatically remove the files of the old operating system into a folder called “Windows.old” " After all the necessary files have been saved, the folder with the old OS can be deleted. Moreover, there is never too much space on your hard drive. There are two ways to do this.
Removal using Windows
Now you have already figured out the BIOS settings on your computer, your new system is running and you are ready to work. But to make it uncomplicated, Microsoft has already thought about how to remove old Windows after installing a new one in a convenient way for the user, so they added such an item to the standard software as “Disk Cleanup”. We will perform all work performed in the Windows 7 operating system. In other operating systems of the Windows family, the procedure will be the same. Let's take a step-by-step look at how it works:
- Click the Start button (bottom left corner of the screen).
- Type “Cleaning” into the search bar.
- At the top of the window, select “Disk Cleanup”.
- The application selected in the previous step will open.
In the window that appears, select the drive where the operating system was previously installed and click OK. Next, the program will estimate how much disk space can be freed up and open the following window, in which you need to check the box “Previous Windows installations” and click OK. The program will ask again if you want to delete the files. Agree, click “Delete Files”, and in a few minutes the files from your previous Windows installation will be deleted.
There is another way to open a program that will clean up the disk. Click “Start”, then “All Programs”. Then select “Standard”, then “Service”, and then “Disk Cleanup”.
Manually removing an old Windows installation
If for some reason you want to delete the folder with the old version of Windows manually, you will have to tinker a little and make a number of settings.
First, you need to log in with an administrative account with full rights. Otherwise, you will not be able to delete the pack.
Now let's make the settings step by step:
- Open My Computer.
- Open the drive with the operating system installed (for example, local drive C).
- Find the "Windows.old" folder.
- By right-clicking on the folder, open the context menu and select the “Properties” line.
- In the window that opens, select the “Security” tab.
- Click the "Advanced" button - the "Advanced security settings for Windows.old" window will open in front of you.
- Go to the Owner tab and click the Edit button.
- In the next window, select your account as the owner, that is, the account from which the deletion will be performed, and click “Apply”.
- You will see a message stating that you have become the owner of the Windows.old folder - click OK and close the properties window.
- You can start deleting the folder with the old Windows operating system.
There are also two ways to delete a folder. The first is to right-click on the folder icon and select “Delete”. Agree that you want to delete the folder. Then empty the trash. The second is to select the folder by left-clicking the mouse, simultaneously pressing the Shift+Del keys on the keyboard, and agree to delete. The folder will be deleted bypassing the trash, that is, it will not need to be emptied.
After you have completed installing the new OS and deleting old files, we recommend reading the article about drivers for Windows 10, since not all of them are included in the installation package. If you have not yet switched to a new system, then you can find out how to download drivers for the “seven” here.
Cleaning the boot menu
After you have installed a new operating system on the same partition, you may have a problem in the form of a menu that prompts you to choose which OS to select when booting. This problem is quite easy to solve.
- Click "Start";
- In the search bar, type msconfig;
- Select this program in the search results;
- In the next window, go to the “Download” tab;
- Select the old operating system;
- Click the “Delete” button, after which the program will inform you about the need to reboot;
- Restart your computer.
After all the above steps, the operating system will boot in normal mode and the menu for selecting the operating system will no longer appear.
There is nothing complicated about how to remove old Windows installations; the main thing is to decide on the method of execution. Now you can start setting up the sound on your computer, setting up drivers, networking, and other things with peace of mind. Remember: in order to avoid the procedure of uninstalling previous versions of operating systems, it is recommended to install Windows on a pre-formatted partition. Thus, you will save your new operating system from garbage in the form of programs and files of the previous version of Windows.
Formatting a logical drive
Removing all data related to the old version from a hard drive with Windows 7 installed is optimal from the point of view of security and subsequent preparation for installation, but a rather aggressive option; If you use it carelessly, the user may lose important information located on other partitions of the physical hard drive. You can remove Windows 7, if several operating systems are installed on your computer, directly in the environment of one of them; the user will need:
- Start the working OS from which you want to remove Windows 7 and open the Start menu.
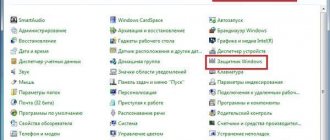
- Open "Control Panel".
- Go to the "System and Security" section.
- Subsection "Administration".
- And double-click on the “Computer Management” shortcut.
- In the new window, go to the “Disk Management” tab.
- Wait until data about the current state of the logical partitions is loaded.
- Then select the one with the old version of Windows 7.
- And by right-clicking on the title, start the formatting process.
- In the following windows, the user who wants to uninstall the old version of Windows 7 will need to select formatting options.
- And agree to the complete destruction of the data stored in the logical partition.
- Unlike the previous method, it is more difficult to completely remove a virtual hard disk from under a running OS. Agreeing to the removal of information.
- The user will be forced to “expand” other sections in a much more complex menu - or come to terms with the presence of a large unused area on the HDD.
Important: Before formatting or deleting a logical drive, it is strongly recommended that you make backup copies of the important data on it.
Acronis Disk Director
A convenient program from a world-famous developer allows you to demolish Windows 7 by deleting a logical partition with a slightly greater level of comfort - and with some additional options. The user needs:
- Start the working operating system from which you want to remove Windows. Download (link - acronis.com), install and run the program. Select the partition with Windows installed in the list that appears.
- From the context menu that appears when you right-click on the logical drive icon at the bottom, select the “Format” option.
- And, having defined the operation parameters, click on “OK”.
- Or "Delete Volume".
- As usual, having previously agreed to the complete destruction of data.
Tip: The user can attach the resulting unallocated space to any remaining partition using the Resize Volume command.
Live CD
The third and fourth options listed earlier to remove Windows 7 are good, if the computer has any other versions of the operating system, older or newer, it doesn’t matter. If Windows 7 is the only OS, a user who does not want to try his hand at the command line can burn any Live CD - an optical disk or flash drive that allows you to run the operating system without installing it on a hard drive. After downloading and recording the product to removable media, the user must:
- Start from it, having previously configured the BIOS, as described for the first method.
- Wait until the “temporary” OS is deployed on the hard drive.
- Go to desktop view - depending on the interface, the user's actions can vary significantly.
- Open standard “Explorer” or another program included by the developer to view files, for example, Total Commander.
- Switch to the system hard drive, focusing primarily on its capacity.
- Here the computer owner can choose one of two paths. The first, simpler and rougher, involves simply deleting the Windows folder - with the need to subsequently clean up traces left from the old OS.
- The second is to completely format the disk in a “temporary” working environment; in this case, there will be no extra directories or junk files left after Windows 7 removal is completed.
Tip: the user can copy important information remaining on the C drive of Windows 7 in the same file manager - this, of course, should be done not to a neighboring directory, but to a flash drive connected to the computer.
How to completely remove a second Windows operating system?
In the previous version, we only eliminated the ability to start the OS, but the question of how to remove a second Windows from a computer was not fully resolved, since all the system files remained. Now you need to clean the system to free up a lot of free space.
To format a disk, you must first make sure that the target partition is selected. Its structure is identical to the system disk; it also contains the basic Windows folders, Program Files, etc. Usually the letter C is reserved for the main system, so the second OS will have a different identifier.
- Click on Start, then “Computer”;
- RMB on the target partition and click on “Format”;
- If there is no special need, then leave the parameters as standard.
Let's sum it up
You can remove Windows 7 from your computer using a boot disk or flash drive from another operating system, or by running a Live CD. In all cases that do not involve formatting the partition, the user will subsequently have to look for ways to completely remove the old Windows after installing the new one. Before proceeding with manipulations, it is recommended to save all important data located on the media being processed.