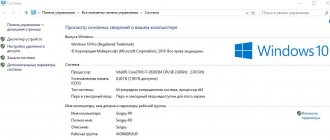
Windows developers do not stand still; versions 7, 8 and 8.1 have been replaced by the famous Windows 10 OS. Despite what was installed before this update, the user receives a 32-bit system. However, although this indicator is set by default, Microsoft specialists made sure that it can be changed at your discretion. Before introducing any changes, you need to be sure that it is 32-bit.
How to upgrade from 32 to 64 Windows 10
The need for other components
Having successfully completed the first stage, you need to move on to the next steps. In this case, processor support for the required version is not enough; you will need to install some drivers for Windows to work correctly. Some components are only suitable for the 32-bit version; when this indicator is changed, they lose their relevance.
Note! If the user recently purchased a computer, then the likelihood of a conflict between drivers and the 64-bit version is minimized. However, on older devices, incompatibility between these metrics is common practice, resulting in loss of audio (due to graphics card issues) or low resolution.
If you have any doubts, it is recommended to find out exactly the name of your components and go to the official websites of their production. In the “Drivers” - “Download” sections you can find links to work with the version the user needs. If the window does not contain information about the 64-bit version, then these drivers do not support it. In this case, it is better to refuse the transition and keep the 32-bit OS.
On the official websites of manufacturers, download the necessary drivers for computer components
If the user has found the necessary indicators, then he will not have to download anything. During the next update, Windows 10 will install everything itself.
Nuances you need to know about the 64-bit version of the system
The essence of the functioning of the “highest” version is the presence of certain technologies that are needed like air for the operation of this software. In other words, the presence of a 64-bit version does not mean that it will work. The first processors in this direction may not have all the necessary functions. Actually, all devices that are more than 5 years old are likely to lack the necessary “firewood”.
To find out if everything is in place, you need to check the “64-bit” using the CPU Z tool (you can download it after following the link: www.cpuid.com/softwares/cpu-z.html).
After downloading and launching the program, you will be able to see a list of all technologies that the 64-bit version supports on your computer. This list is located opposite the “Instructions” line. The optimal set of technologies is expressed through special types of instructions, which look like this: MMX, SSE, SSE2, SSE3, SSSE3, SSE4.1, SSE4.2, EM64T, VT-x, AES, AVX, AVX2, FMA3.
For owners of older devices, it is possible to enable XD or NX support using BIOS settings.
How to activate
To activate a 64-bit system, you will need to reinstall the OS. This is the surest way that will lead to a high-quality installation without any failures.
Reference! It is important to remember that when reinstalling the system, you need to take care of saving all important files, since all data will be permanently deleted from the hard drive.
If the user has not yet installed Windows 10, but uses Windows 7, 8 or 8.1, then first of all you need to take care of updating to the 32-bit version. This is an important step, as you will need an activation key later.
To upgrade Windows 10 to 64-bit, you must have a 32-bit system
It is not always possible to know for sure whether the current version is activated or not. To get an accurate understanding, you need to perform the following algorithm of actions:
Step 1. Go to “Start” and “Settings” using the above method.
Click on “Start” with the left mouse button, click on the “Settings” icon
Step 2. The “Settings” section will contain several tabs, you will need “Update and Security”.
Go to the “Update and Security” section
On a note! Sometimes there is no such tab, so you need to write the word “Update” in the search bar. Select “Windows Update Options” from the drop-down list.
Write the word “Update” in the search bar and select “Windows Update Options”
Step 3. In this section there is a list of tabs, you need to select “Activation”. This contains information about whether Windows is activated. If not, then the activation process can be started in the same window.
Click on the “Activation” tab
Reading the activation information
Installing Windows 7 64 bit
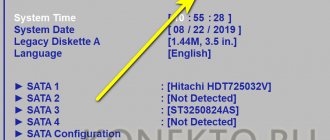
Insert a bootable DVD or USB flash drive with the recorded Windows installation files into your computer. Reboot your system. When the computer starts, press the function key to enter the BIOS. The Del and F2 keys are most often used, but other options are also possible - F10, F11, Esc, Ctrl+Alt+Esc. If something doesn’t work out, you can refer to the instructions for the motherboard. In the BIOS you need to set the boot priority from your boot drive: Boot Configuration Features - Boot Device Priority - First Boot Device - CD/DVD ROM /USB-HDD (when installing from a flash drive). Settings that determine boot order may also be found in the Advancedsettings section. The name of the section and menu items may differ slightly from those indicated, depending on the BIOS version. Save the settings and exit the BIOS.
On new computers, you can open the boot menu without going into the BIOS. When turning on, press F8, F9 or F12, depending on the BIOS version. If the keys do not work, refer to the motherboard documentation.
If everything was done correctly, the line Press any key to boot from CD or DVD will appear on the screen. Press any key, such as Spacebar. The installation of the system will begin, and the line Windows is loading files… will appear at the bottom of the monitor. After extracting the files, you will see the words Starting Windows and the Windows 7 installation window. You must select the language and version of the system that you will install. The program will prompt you to read the license and agree to its terms. Check the box next to “I accept the license terms.” It is impossible to continue the installation without this.
At this stage, you need to select a partition to install Windows. Typically this is Disk 0 Partition 1 System. Its size must be at least 50 GB. If your hard drive is not yet partitioned and is at least 250 GB in size, then it is better to create another local drive to store your own files. Having decided on the number and size of the partitions to be created, click on the “Apply” button.
If the system does not see the hard drive, partition it yourself. When installing into ready-made partitions, problems usually do not arise. In addition, switching the SATA controller operating mode from AHCI to IDE in the BIOS can help.
Now you need to format the system partition. The installer will warn you that all data will be destroyed. Confirm formatting. This stage usually takes place very quickly, after which installation begins, lasting 20-30 minutes.
Enter your username and optionally assign a password and hint. Next, Windows will ask you to enter your serial number. If you are installing a licensed version, it can be found on the distribution box. This action can be postponed by unchecking the “Activate when connected to the Internet” checkbox. Assign security parameters, specify your time zone, set the date and time. If your network card driver is included in the distribution and the computer is connected to the Internet, the system will prompt you to specify the network type. You can select "Home", "Public" or "Work" network. They differ in security settings. In this case, Windows gives a brief description of each of the three options. That's all. System installation is complete.
Preparing for installation
To install the 64-bit version, you need to prepare in advance. To reinstall the system you will need:
Step 1. Purchase a flash drive that either has no files on it or has at least 3 GB of free space.
To create a bootable USB flash drive, you need a media volume of at least 3 GB
Step 2. The “MediaCreationTool” program, which must be downloaded only from the Microsoft website, and an *iso image with a 64-bit system. To get it, you can use the above-mentioned program.
Download the Windows 10 Media Creation Tool to your computer
If the user has already reinstalled the OS, then he will not notice any difference in the process.
On a note! If you do not want to use “MediaCreationTool”, you can use any other utility downloaded from the official source.
Create a bootable USB flash drive
After collecting all the necessary information and components, the user can create a bootable USB flash drive. This stage is the final one; upon successful completion, 32-bit Windows will change to 64-bit. You need to follow a simple algorithm:
Step 1. Launch the previously downloaded “MediaCreationTool” utility and insert a flash drive into the connector.
Insert the bootable USB flash drive into one of the available slots on your computer or laptop
Step 2. The program provides for reinstalling the entire Windows, so even if you need to update, it will offer to create media for another PC. The window will have three tabs:
- release;
- architecture;
- and language.
The release implies the Windows version; in the “Language” tab you can change the Russian version to any other, but “Architecture” is responsible for the bit depth. There you need to select “64-bit (x64)” and click “Next”.
We set the language, in the “Architecture” section, select “64-bit (x64)”, click “Next”
Step 3: Windows 10 Setup will prompt you to select installation media. If the user has chosen another software to download, then he should click on “ISO file”. When installing to a USB device, you do not need to change anything.
Select the appropriate option and click “Next”
Step 4 . When you select the “USB device...” option in the next window, the utility will ask you to select a storage device, select it with the left mouse click, and click “Next”.
Left click the mouse, select the flash drive, click “Next”
Step 5. The process of installing the 64-bit version of Windows 10 on the USB flash drive will begin. During this time, you can continue to do your business on your PC. Then you should restart your computer.
We are waiting for the Windows installation process to complete on the USB flash drive.
After completing the process of installing Windows 10 on a flash drive, we proceed to the installation itself.