How to completely disable DEP
You can watch the video or read the article:
So, let's get straight to the point. Click the “Start” button and write “cmd” in the search bar. In the search results at the very top we find cmd - this is needed to launch the command line. To run it with Administrator rights, right-click on the command and select “Run as administrator” from the context menu.
Accordingly, if you are currently logged into Windows as a regular user, the system will ask you to enter the administrator password. Now, insert the command into the black window that appears and press “Enter”:
bcdedit.exe /set {current} nx AlwaysOff
The result should be the message: “Operation completed successfully”
Next you need to reboot for the changes to take effect. Thus, we have disabled DEP for ALL services and programs, regardless of whether your processor supports data execution prevention at the hardware level or not.
Disabling DEP function in windows7
Windows 7 has a very useful data execution prevention (DEP) algorithm built into it, the original name is Data Execution Prevention (DEP). The bottom line is this: the OS with hardware implementation NX (from the manufacturer Advanced Micro Devices) or XD (from the manufacturer Intel) prohibits the algorithm from executing actions from the sector of RAM that is marked as non-executable. More simply: it blocks one of the vectors of a virus attack.
Disabling DEP for Windows 7
For certain software, enabling this function prevents work processes, as well as causing a malfunction when turning on the PC. This situation occurs both with individual software solutions and with the system as a whole. Malfunctions associated with accessing RAM according to a certain parameter may be related to DEP. Let's consider ways to solve this problem.
Method 1: Command Line
- Open “Start”, enter cmd. Click RMB and open it with administration options.
- Type the following value: bcdedit.exe /set {current} nx AlwaysOff Press “Enter”.
- We will see a notification that says that the action is completed, after which we restart the PC.
Method 2: Control Panel
- . With the ability to administer, we enter the OS, go to the address: Control Panel\All Control Panel Elements\System
- Go to “Advanced system settings”.
- We find the “Advanced” subsection in the “Performance” section, go to the “Options” item.
- Subsection “Data Execution Prevention”, select the value “Enable DEP for ...:”.
- In this menu, we have a choice to configure for which specific programs or applications we need to turn off the PVD algorithm. Select the program presented in the catalog, or click “Add”, select the file with the extension “.exe”.
Method 3: Database Editor
- Open the database editor. The best option is to press the “Win+R” keys and write the command regedit.exe.
- Go to the next section: HKEY_LOCAL_MACHINE\SOFTWARE\Microsoft\windows NT\CurrentVersion\AppCompatFlags\Layers.
- We create a “String parameter”, the name of which is equal to the location address of the element in which it is necessary to disable the DEP functionality, assigning the value – DisableNXShowUI.
Enabling DEP: launch the Windows 7 command interpreter, and enter the command in it: Bcdedit.exe/set{current} nx OptIn Then restart the PC.
When performing these simple steps using the command line or system/registry settings, the DEP function in Windows 7 is disabled. Is there a danger in disabling the DEP functionality? Most often, no, if the program for which this action occurs is from an official resource, then it is not dangerous. In other cases, there is a risk of infection with virus software.
We are glad that we were able to help you solve the problem.
Poll: did this article help you?
Yes No
lumpics.ru
How to disable DEP for a specific program
To do this, go to “Control Panel -> System” or right-click on the “My Computer” icon on the desktop and select “Properties”. On the left side of the window, click on “Advanced system settings”
In the “Performance” section, click on the “Options” button
We need the Data Execution Prevention tab. Here, in principle, everything is clear:
By default, DEP only works for essential programs and services. By moving the switch to the “Enable DEP for all programs and services except those selected below” position, we can determine for ourselves which programs need to disable the DEP function. To do this, simply select a program from the list or click “Add” and manually select the launch (.exe) file.
Please note that 64-bit applications cannot be added to this list. Also, the program itself must support working with DEP turned off. In any case, you will immediately see an error message.
Here’s another thing: before canceling DEP from the command line, first check to see if it worked for all your programs. Then switch first to only basic services and programs and reboot. Perhaps the problem that brought you to this article will be resolved.
Disabling DEP function on Windows 7
If, when you launch certain applications, notifications appear informing you that data cannot be executed, then to solve this problem you will need knowledge of how to disable DEP on Windows 7.
What is DEP?
DEP is a data execution prevention feature designed to protect the system from the activities of malicious applications. This technology is neither antivirus nor firewall, but performs similar duties to protect the system from virus attacks.
The essence of DEP technology is that some memory areas are pre-marked as non-executable. As soon as an application attempts to execute source code in such an area, the DEP function automatically terminates it.
The downside of such protection is the appearance of errors when launching normal programs and games. Messages like “Memory cannot be read” are often just a consequence of DEP.
System-wide shutdown
First, let's look at how you can completely disable this security technology in your system. You will perform the task using a command line launched as an administrator.
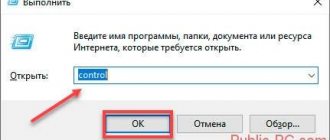
- Press the Win+R combination and enter the query “cmd” (or find the command line through the Start menu).
- Enter the command “bcdedit.exe /set {current} nx AlwaysOff” in the console.
- Restart your computer.
The next time the system is started, the PVD function will not operate. To enable it, you need to run the command line again and enter a query like “bcdedit.exe /set {current} nx OptIn”.
Please note that disabling Data Execution Prevention reduces Windows security.
Therefore, it is better to deactivate this function for individual applications that it prevents from running.
Disabling for individual programs
As stated above, it would be more reasonable not to completely deactivate the function, weakening the system’s protection from virus attacks, but to disable data execution prevention only for specific programs whose operation it interferes with.
On Windows 7 this is done as follows:
- Right-click on the “My Computer” icon and open its “Properties”.
- Go to the "Advanced System Settings" tab in the left menu.
- In the Performance field, click the Options button.
You will see several tabs with useful features. For example, on the “Visual Effects” tab, you can disable all unnecessary design tools and speed up your Windows 7 computer. But in this case, you need another tab called “Data Execution Prevention”.
- ABOUT.
- Click the "Add" button and specify the path to the EXE files of the programs that you want to make exceptions.
Important: 64-bit applications cannot be added to the exclusion list. In addition, the program itself must support working with the DEP function disabled.
If one of the specified conditions is not met, then adding the application to the exclusion list will not work.
Using the Registry
You can perform the steps described above directly through the system registry. True, this method requires some computer skill and basic knowledge of how the registry works.
- Launch the registry using the "regedit" command in the Run menu (Win+R).
- Go to the branch HKEY_LOCAL_MACHINE → SOFTWARE → Microsoft → windows NT → CurrentVersion → AppCompatFlags → If there is no “Layers” section, create it yourself.
- Create a new string parameter, giving it a name that is the path to the executable file of the program you want to add to the exclusion list.
- Set the new setting to "DisableNXShowUI".
After closing the registry, the application should launch without errors due to the DEP function.
mysettings.ru
What is DEP anyway?
Now a short digression: what kind of function is this and what it is used with. Data Execution Prevention is designed to protect the system from certain viruses and system security threats. But, under no circumstances should this be confused with an antivirus or firewall! These are completely different things.
DEP marks some service areas in the computer's RAM as “non-executable”, and if a program tries to execute its code in this area, the function will work, the program will be forcibly closed and a corresponding message will be displayed. The fact is that some viruses can work this way, and therefore this blocking method helps prevent the execution of certain malicious code.
There is both a hardware implementation of DEP (using processor commands) and a software implementation (using special Windows software code). The hardware implementation is more reliable and all modern processors support it. So, if there are no problems, then it is better not to change anything in the settings. But, unfortunately, the DEP function can interfere with the operation of normal programs, so sometimes it is disabled. How to do this - this article will help you!
Disabling DEP for certain programs
I don’t recommend getting rid of the built-in blocker at all, because it can still stop some malware. Therefore, I suggest that you disable DEP specifically for those programs that you cannot run, and not for the entire system as a whole.
But you must be sure that they do not contain viruses. Can they be trusted? Then let's get started:
- Open the System section from the Control Panel. An alternative option: right-click on the “my computer” icon and enter “Properties”.
- Go to “Advanced system settings” and in the window that appears, expand the “Advanced” tab.
- Click on the “Options” button located at the top.
- The following window will pop up, where you should go to the “Data Execution Prevention” tab;
- It has 2 checkboxes and the top one is usually activated. But you need to move the checkbox to the second one, where it says “...except those selected below.”
- Under the large field, the “Add” button will become available, which is what you need.
- Specify the path to the exe file for which you want to unblock.
- Click "OK" and restart your computer.
How to disable DEP in Windows XP/7/8
In order to disable DEP in XP, you need to go to Start-Settings through your administrator account, then find the “System” section in the Control Panel.
In the window that appears, you need to make the Advanced tab active and click on the “Performance Options” button.
In the new dialog box, open “Data Execution Prevention” and enter the current password for the OS administrator account. In the same dialog box, you can disable DEP for a specific program; to do this, just check the box next to its name or add it to the list using the “Add” button.
For versions 7 and 8 of Windows, the easiest and fastest way to disable DEP is through the command line. To quickly access the command line, just type “cmd” in the Start menu search bar. Cmd must be run only as an administrator (right-click on cmd and select the appropriate item); if necessary, enter the requested password.
In the black window that opens, enter the special command:
bcdedit.exe /set {current} nx AlwaysOff.
As a result, a message indicating the successful completion of the operation will appear. All that remains is to reboot the system.
Via Registry Editor
You can add exceptions in another way:
- On the left, navigate to the folders HKEY_LOCAL_MACHINE - SOFTWARE - Microsoft - Windows NT - CurrentVersion - AppCompatFlags - Layers.
- If you haven't seen the last one, create it yourself.
- For the program that you want to free from DEP, make a string parameter with a name that matches the path to the file itself.
- The value of this parameter should look like this: DisableNXShowUI.
All the methods described above work not only in Windows 10, but also in 7, 8 and 8.1.
Did this article help you?
Don't forget to tell your friends about it.
Bye bye.
This article is worth sharing.
DEP in Windows is a kind of system “fuse” that includes specialized hardware and software technologies that check RAM and its contents and, in the event of a threat, can stop malicious code from running.
DEP perfectly blocks many viruses that are designed to work in the system's RAM, after which it begins the process of executing its own codes. For the user, it looks like this: if DEP registers incorrect RAM usage, an error message appears on the screen, and the malware is forced to stop working. This is very important for the security of the operating system.