For several years now, computer equipment and various devices have been reclassified from the category of luxury items into standard devices familiar to people, used daily. Technological modernization of devices has allowed consumers to customize devices to individual needs, install utilities of interest, security programs and much more.
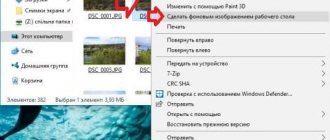
In this article we will talk about the computer's welcome screen. If you have standard desktop wallpaper or background screensavers that can be changed with an interesting picture, background, or a variety of wallpapers, then changing the welcome screen is a more complicated process. Read on to learn how to change or disable the Welcome screen on a Windows computer. There are several methods for doing this, each of which is effective and simple. Let's look at each of them.
Making changes in Registry Editor
Changing the startup screen of a personal computer by editing the registry editor is one of the most difficult, but most effective, methods. The process involves interfering with the operating system settings, so you must strictly follow the subsequent instructions.
First, let's look at how to change the Windows 7 welcome screen, since performing the procedure in new versions of Windows has some fundamental differences. The steps to change the Windows 7 welcome screen are as follows:
- Go through the Start menu by entering the regedit command in the search field.
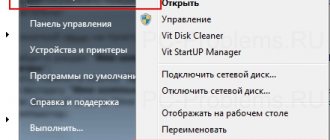
You can open the registry editor by pressing the Win + R keys and entering the command regedit
- At the initial stage of work, the program may display a warning to the user, where confirmation will be required if “User Account Control” is enabled in the software. Next, a window will open in which you need to select the HKEY_LOCAL_MACHINE folder, right-click on it and go to “Search”.
- In the pop-up window, enter the OEMBackground command, after which a list of options will open that you will need to uncheck: all except the “Parameter names” item. Click “Find Next”, which will take you to the next search window.
You can quickly access the Background folder by following the path: HKEY_LOCAL_MACHINE\SOFTWARE\Microsoft\Windows\Current Version\Authentication\LogonUI\Background
- In the section that appears, look for OEMBackground, by opening the folder, go to the “DWORD Parameter Changes” category, where you need to change the default value “Zero” to the number one.
Change the value 0 to 1
If the ultimate goal was to remove the screensaver, then at this stage the work can be considered complete, otherwise, to install another background, you will need to perform a few more steps:
- Go to settings at C:\Windows\System32\Oobe, and then, in the window that opens, create a folder called info.
- In it, create another folder called backgrounds, into which you will need to download the graphic screensaver you need. It must be in JPG format and weigh no more than 256 kilobytes.
- Let's move on to setting up the background: you need to change the image name from the standard name to backgroundDefault.jpg.
All that remains is to restart the PC. If the actions are performed correctly, then during this download you will be able to see a new image, instead of the standard welcome screen.
The versions following version seven also require intervention in the operation of the OS, but the process is slightly different. Let's look at how to customize the welcome screen on Windows 10:
- Similar to the previous instructions, go to the registry editor and the HKEY_LOCAL_MACHINE folder. To remove the greeting, you must then select the SOFTWARE folder, go to the Policies section, where you check the Microsoft item, after which the editing option will open.
- At this point, right-click on the free field and select “Create DWORD 32 value”, giving the name NoLockScreen.
- All that remains is to expand the renamed parameter to detail the contents, enter the indicator 1 in it, confirm the action and check the result by pressing a combination of the Win and L commands.
If, in addition to the welcome screen, you also need to remove existing passwords, you need to remove the blocking command. To do this, you will need to find “Login Options” in your computer settings and remove the lock, or disable automatic login, if you only want to remove screensavers, leaving the PIN.
Program “W7CLogonUIChanger”
Unlike Logon Screen , this program has an English-language interface, but it does not require installation - the program is portable. You can download the archive with the program from this link.
Open the archive and open the folders one by one: W7CLogonUIChanger/source/bin/Debug (arrow 1 indicates the path to the launch file).
Then, run the program by double-clicking on: W7CLogonUIChanger.exe (arrow 2).
In the main program window that opens, click on the entry in the center of the window (arrow 3).
The literal translation looks something like this:
“Click to load image, leave blank to only enable/disable.
Right-click to open the resulting folder.”
Select the desired image (note the size/weight of the image (circled by a frame)) and press the button: Open .
The selected image should be displayed in the main program window. Click on the button: Apply (arrow 1). transl . Apply now
The next pop-up window says: transl. “Image saved at JPEG quality 87 and size 254121 bytes.”
Click: OK . Close the program.
Open the folder with the image. As you can see, the program, like all others that I have tested, created the necessary folders: info and backgrounds .
Since the weight of the image was greater than required, the program created and saved a backup copy of the image with the extension “. bak ". If this file bothers you in some way, you can delete it in the usual way. This file does not have any useful or harmful load on the system.
This is what the image folder looks like. At the top, in a frame, the path to the picture is shown. Now this image can be changed to any other without a program. The main thing is that the image has a size of no more than 256 kb and has exactly the same name: backgroundDefault.jpg
The registry editor is the same, everything is fine. The program, like others similar to it, created the necessary parameter and set the value to “1” , which means allowed. If you put a zero (disable) or delete the created parameter, the standard Windows image will be displayed again.
It turns out that no matter how you look at it, using the program is much more convenient, faster and safer, especially for novice users. Almost any picture can be used for the background of the welcome page using programs.
Good luck to you!
© mkoven
Installing a third-party application as an option to change the screensaver
The question of how to change the welcome screen also implies a less complicated solution, using a third-party utility. In this case, there is no need to intervene in the computer’s operating system: you can change the welcome screen of a system running on Windows 7 by specifying subjective preferences.
The Logon Background Changer program is the most popular utility among applications of this class. To use it, just download the application and you can start working with it. The application has an interesting and at the same time concise interface, where the following options are available for implementation:
- Ability to view the picture set as the background of the welcome screen.
- Images available for changing the screen.
- Utility settings in which the user can specify the parameters of interest, screen design style, tone and quality indicators of pictures.
- Specify the path to the folder from which the pictures will be used.
- Key to confirm the changes made.
- Using full screen format.
As wallpaper, you can set both the graphic images available to the program, and use a third-party picture or photo downloaded to a folder on your computer, specifying the path to it using the Choose a folder option. After the user selects the picture he likes, all he needs to do is confirm the action and restart the PC.
By installing this application, you can solve not only the issue of changing the welcome screen on Windows 7, but also replace the background image on later versions of the OS, including 8, 8.1 and even 10, which by default do not have audio when turning on the computer.
On the seven, you can also replace the welcome screen using applications such as Tweakslogon Changer, Logon Screen Rotator, but these utilities do not always allow you to change the boot screen on the latest versions of Windows.
If you need to change the greeting sound, this can be done in parallel with changing the image of the welcome screen that appears when the computer boots. To change the audio when you turn on your computer, you will also need to download a special application - Startup Sound Changer. This is a small utility with a narrow specialization, used to replace the computer startup sound on both Windows 7 systems and the latest versions. The utility allows you to set any file loaded into the program as sound, provided that the audio file format is WAV.
You can also change the input music using system settings. To do this, you will need to go through the “Sound” settings, to the “Default” item, where in the “Sound scheme” section, select for each of the modes, namely PC startup, shutdown and other processes, a melody from those available in the system. You can select a ringtone not from the list of standard ones in the “Sounds” line, which is located at the bottom of the window that opens: enter the downloaded WAV file, and confirm the command by pressing the “Apply” key. In the same window, you can completely remove the sound from the taskbar when you boot the computer by removing the checkbox next to the “Play Windows startup ringtone” item.
How to change the startup screen in Windows 7: change the welcome screen
The recommendations will help you change the startup screensaver in Windows 7 . It is also called the welcome screen, on which we are accustomed to seeing the inscription “welcome” when starting the system. To further transform the appearance of the system, I advise you to also change the desktop background to Windows 7.
Namely, the startup screensaver is the background image when the Ctrl + Alt + Del combination is pressed to lock the computer, log out, change the user and password, launch the task manager and other purposes.
The standard image is located in the C:\Windows\System32\oobe and is named background.bmp. If you think that to change the startup screensaver you just need to replace one image with another with the same name, you are mistaken.
The article will describe 2 programs for changing the startup screen in Windows 7, as well as the method used in the registry.
Important! Use an image whose size is no more than 260 kilobytes, otherwise nothing will work for you.
Using the Windows 7 Logon Background Changer program to change the startup screensaver
This program will allow you to change the picture of the welcome screen. You can restore the display to the default image (last article title) or choose a different one. To use the application, follow these steps:
- Download the program here.
- Unzip the archive anywhere, for example, to your desktop.
- Run Win7LBC.exe and follow the instructions.
Note: This is a standalone file (.exe) and does not need to be installed. The installation package is in the archive with the extension (.msi).
The program has a simple interface. For convenience, you can expand it to full screen by pressing the “full screen” button. In settings you can prevent other users from changing the startup screen. Click on the inscription, then on OK, as shown in the picture below.
When attempting to launch the application in this case, other users must enter the administrator password in the User Account Control field.
At the bottom you will see pre-installed startup screens for Windows 7 . By clicking on any one, a preview of the greeting image will be displayed in the center of the program.
To select your image format (.jpg), click “choose a folder” and specify the location of your images. Make sure the image matches your display resolution.
If you have made your choice, click on “apply” and press “yes” or “yes” for the changes to be applied, wait until the progress bar is filled.
Note: if you use a custom image as a startup screensaver, the size of which is more than 260 KB, then the program automatically reduces this size to the acceptable size (about 256 KB).
To view the result, press Ctrl + Alt + Del to see the new startup screen. For complete harmony, install a Windows 7 theme that complements the design of the welcome screen.
Changing the Welcome Screen with Tweaks Logon
An alternative program to change the background of a greeting image . Follow these steps:
- Download the application here.
- Extract to any folder.
- Run TweaksLogon.exe and follow the instructions below.
Unlike the previous application, there are no pre-made images here, so use your own. Click the button (shown in the screenshot), specify the path to the graphic file (jpg) corresponding to the pixel dimensions of your monitor, and click “open”.
Note: If the image is too large, then click "yes" to automatically resize it.
The black background of the window will be replaced with your image. To check, click “test”, after which you will see the changes on the lock screen.
To set the default logon screen, click “revert to default logon screen”.
I also advise you to read the article on how to change the screensaver in Windows 7, which turns on after a specified time if you do nothing on the computer.
How to manually change the startup screensaver through the Windows 7 registry
Download the registry file startovaya-zastavka.zip and unpack it. Double-click to run the reg file, which itself adds the parameters, and you will not need to launch the registry and make changes yourself. Click “yes” everywhere and after the message about successful addition, proceed further.
My screen resolution is 1366 by 768 pixels. It is for this that I will change the Windows 7 startup splash file. Add your image to a graphics editor or use standard paint, then change it, without maintaining the proportions, to match the size of your screen.
Along the path C:\Windows\System32\oobe, create an info folder, and in it another backgrounds . Fill in the last one with your finished image. Look at the result.
If you want to install the standard Windows 7 screensaver, then download the file ubiraem-zastavku.zip, unzip it, run it, click “yes” everywhere. It will delete all entries in the registry and roll back changes that were made in one of several ways above.
Let's finish this topic, I hope you don't have any questions. I advise you to use one of the programs to change the startup screensaver in Windows 7.
Check out more articles:
You can skip reading the entries and leave a comment. Posting links is prohibited.
Disabling via Group Policy Editor
Sometimes you need to remove the welcome screen on Windows 10, which by default displays the owner’s personal data when booting. This can be done either using the previous methods or by using the method of editing the computer’s network policy. To remove the welcome screen, you need to use the “Run” command or press the Win + R combination to go to the “Local Group Policy Editor”, where you go to the “Administrative Templates” list. The window that opens will contain a registry of folders, among which you need to select “Control Panel” and go to the “Personalization” menu. In the list of commands that open, you must select “Prohibit display of the lock screen”, disable the task by alternately checking the “tick” next to the “Enabled” item and confirming the command with the “OK” button. If you correctly disable the login style on Windows 10, the next time you start Windows, the user will immediately be shown a window for entering a password, without pictures.
In parallel with disabling the greeting in Windows 10, the operating system allows you to change the graphic design of the display and use sounds. To do this, in the category of administrative or management templates, you will need to select the “System” section, then go to the “Login” list item, where a window will open, in the list of commands you need to select “Always use a custom login background”, confirm the command and set the Windows 10 welcome policy settings. Next, you will need to select your preferred pictures and sounds on your computer. To check the result, just restart the PC, using this method to verify the effectiveness of the operations performed. All this allows you to change the welcome screen and sounds in Windows 10, 8 and 7.
Summarizing
The standard computer welcome screen can be annoying to the owner of the device, sometimes even annoying the person. It is worth noting that such a statement is a proven, scientific method, a fact: scientists have confirmed the relationship between distracting elements on a computer screen and an unfavorable emotional and psychological state of a person.
Modern solutions allow you to eliminate or modify the Windows welcome screen both through intervention in the system and using third-party programs, which makes it possible to change the boot background on the monitor.