Windows 7 is an operating system whose visual style can be changed beyond recognition. There are a huge number of third-party themes available for free download. Gamers can design the system in the style of their favorite game: Stalker, World of Tanks, Dota, Diablo, Skyrim, Call of Duty, etc. Fans of simple compact themes pay attention to minimalism. There are themes to suit every taste:
- mentioned games;
- movies;
- anime;
- music;
- minimalism.
Skins in the style of the Mac OS operating system are especially popular. No Apple computer - no problem now.
How to install a theme on Windows 7
Where to download third party themes
There are many sites on the Internet with themes to suit every taste. Below is a list of trusted resources. You are guaranteed to download the theme you like without registration and will not drag viruses or adware onto your computer.
Comparison of sites
| Website | Description | Number of topics | Sorting by category (games, movies, etc.) |
| 7Themes.su | 7Themes. A site that hosts more than 650 themes only for Windows 7. A big plus of 7Themes: division into categories | More than 650 | Yes |
| Oformi.net | The site is similar to the previous one. But the number of topics is half that – 300 pieces. The download is free, there are clear instructions for installing themes. A nice feature of the site is the ability to sort topics by date added, popularity, number of comments and alphabet | More than 300 | No |
| All4os.ru | All4os.ru completes the top 3 sites with free themes. There are over 230 of them here. As on previous resources, there is a sorting option, a detailed description of each topic and screenshots | More than 230 | No |
How to change the theme in different versions of Windows? Standard and software methods
Greetings to all blog readers.
Probably every user of a Microsoft operating system knows that after the main name there is also an additional one, such as “ Maximum ”, “ Professional ” and others. Many people can use an OS for a long time without suspecting that there is a difference between them. For example, some people want to know how to change the theme in Windows 7, because they simply do not have the right tool. But first things first.
General information (to contents ↑)
So, as mentioned above, each version of Microsoft OS is divided into some modifications. So, for example, Windows 7 is offered:
- initial;
- home Basic;
- professional;
- corporate and others.
Different options have different capabilities. So, for example, in the same “ Maximum ” users can do absolutely everything. But the basic version provides limited functionality - there is not even such a thing as changing the theme, because there is no “ Personalization ” tool. However, the situation is the same in Windows 10. For additional features you need to pay more money for a license.
Changing the topic (to contents ↑)
If you have the Home Premium or more expensive, there is no need to worry. To change the appearance, you need to right-click on the “ Desktop ” and select “ Personalization ”. A window will open where you can select the appropriate design (in Windows 10, a table will appear where you must first indicate “ Themes ” in the left column, and only then the desired functionality will appear).
What should users do who don’t even have the “ Personalization ” menu item? They are the ones who have operating systems installed that simply don’t have this.
Changing the design in simple OS (to contents ↑)
So, how can you change the appearance of a system (this includes the background and color of the windows) that simply does not provide this? As usual, there are several ways out:
- Reinstalling Win.
- Purchasing an additional package from Microsoft to get a more advanced version.
- Patch and program.
Although the first two options do exist, only a few resort to them. But the latter is especially popular when clients cannot change the type of system.
Patch and software (to contents ↑)
To do this, we use a small program that replaces some files. We take several steps:
- Download and unpack the Universal Theme Patcher .
- Several files will appear here. We launch the one that corresponds to the system bit size - 64 or 86 (32) bits. Required on behalf of the Administrator.
- Choose a language. Click “ Next ”.
- A window will appear where we will be shown information about the number of files that will need to be processed. All that remains is to read and confirm.
- We press all the buttons that say “ Patch ”. Depending on the versions and some parameters of the operating system, there may be two or three of them.
- Reboot
- Let's move on to installing the program.
In Windows 8.1, as well as other recent OS modifications from Microsoft, you next need to use the Personalization Panel software. It is this application that will add a “ Personalization ” tool, similar to that presented in the Ultimate Build. So, we do the following:
- Download and launch Personalization Panel .
- Select the appropriate language and confirm.
- Then select “ Normal installation ”.
- At the end we confirm our intentions.
After completing the procedure, go to the desktop, right-click and see that the desired element is now present in the context menu. The window is close to the Maximum edition. There are now all the necessary functions that allow you to change the color of windows, background, sounds and other elements.
So, if you are the “ happy ” owner of a “ simple ” operating system, don’t get upset right away - there is a way out.
I hope this article helped you. Subscribe and tell others about the blog.
Share to:
How to add a theme in Windows 7
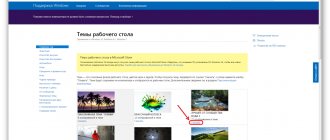
Step 1. Download the theme you like. Click “More details”.
Click “More details” to go to the window for downloading the theme
A separate topic page will open. On the right there is a "Download" button.
Click on the “Download” button
Note! If you can’t download the theme using the first button, try Yandex. Disk"
The downloaded archive is opened using WinRar.
Opening the archive using WinRar
Drag the file to the desktop.
Drag the file to the desktop
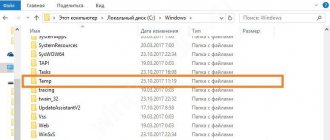
Then open “C:” - “Windows” - “Resources” - “Themes” and move the theme files to this folder.
Move files to the specified path
Note! The drive is not necessarily called "C". If your system is installed on “D” or another drive, then drop the files there.
Select the location where the files will be moved
Step 2. Check. Go to “Personalization”. Right-click on the desktop and select “Personalization” at the bottom.
Select the item “Personalization”
If you follow the instructions and follow the steps correctly, you will get the result - the installed theme will be displayed in the window.
Step 3. Click on the topic. We wait a few seconds. Ready! The photo shows an example of the installed “Mac White” theme.
Click on the selected topic
Preparing the system
First, we need to prepare the Windows 7 system for installing third-party themes, namely, install 2 patches: 1. Theme Resource Changer
Installation process (pictures are clickable):
Show/Hide text
In the archive there is a patch for x86 and x64 bit OS, select the one you need and run it in administrator mode
At the initial stage of the installation process, you will have the opportunity to change the path for installing the patch
Read the user agreement and agree to it, otherwise there is no other way =)
The installation process has started
Congratulations!
2. Universal Theme Patcher
Show/Hide text
Run the patch as administrator
Next, leaving the English language, click “OK”
In the next step, the installer displays information about how many files need “treatment”
Next we need to click “Patch” in 3 places
The installer writes that all patches were installed successfully!
Next, you need to restart your computer for the changes to take effect.
Where are the installed Windows 7 themes located?
All themes are located in the folder “C:” - “Windows” - “Resources” - “Themes”. "C:" is the name of the drive where your system is installed. It may be different. The main thing is to find the folder with “Windows”.
Themes are located in the folder “C:” - “Windows” - “Resources” - “Themes”
Appearance of the operating system
In 2001, Microsoft made a real revolution in the appearance of operating systems by releasing its famous Windows XP. Pleasant appearance of dialog boxes, new features of a carefully designed graphical interface, etc. In turn, the recently released Windows 7 combines all the best features of both XP and the “intermediate” version of Vista. The design and themes have become even more functional and attractive - just look at the Aero theme! Typically, there are still conservatives who manage to install on their computer (even a new one) themes typical for the Windows 9x operating system. But the functionality and capabilities of the system are not the most important parameters. Much also depends on the graphic design - the system must have a shell in which it will be pleasant to work. This is why many users are wondering how to install or change the theme on Windows 7.
Fixing system files
Windows checks whether themes are signed by Microsoft before downloading them. If they are not, Windows will not load them at all. To use them, you will have to modify Windows system files - uxtheme.dll in particular - and disable the check. Previously, this required booting into safe mode and manually replacing system files. Today there are easier ways to do this.
UxStyle is an ideal solution for Windows 7 users (it no longer works with Windows 10, so if you are using Windows 10, you can use UltraUXThemePatcher as an alternative). UxStyle works entirely in memory, disabling scanning without changing any system files. This is the easiest and safest way to enable third-party themes. To use UxStyle, download it, extract the .zip file and run the x64 (if you are using 64-bit Windows) or x86 (if you are using 32-bit Windows) installer. Once installed, a new process named “UnsignedThemesSvc.exe” will be launched in the background. Restart your computer and you will be able to install unsigned themes.
UltraUXThemePatcher is an easy to use application that modifies uxtheme.dll for you. It supports all versions of Windows: 32-bit and 64-bit versions of Windows 10, 8, 7, Server 2008, Vista, Server 2003 and XP. All you need to do is download the application, launch it and restart your computer when prompted - you will now be able to install third-party themes.