Today we will talk about one of the ways to free up free space on your hard drive. Deleting temporary files in Windows 10 is one of the methods to solve the problem under discussion. Typically, such data is deleted from the hard drive without outside intervention. But periodically, without a person, the machine itself cannot cope with this task.
The same can be said about Windows 7. When using this release, similar problems arise with the appearance and accumulation of temporary exe files. We will also provide below methods that allow you to delete temporary files in Windows 7.
Temporary files - what and why
In order to transfer a large array of data, the OS cannot place it entirely in operating memory, and it also happens that the volume of deleted data exceeds the resources of RAM (random access memory) on the PC. Then temporal binaries (binaries) are created. Windows generates files of this type and places them in the system Temp folder (C/Windows/Temp).
More options for creating the described type of binaries:
- Various programs for desktop computers for the purpose of further editing by the user.
- When placing a job in a print queue for further sending to the printer command environment.
- Modern OS developers recommend saving 2 MB or more to create and store temporary data.
Thus, the temporary data storage in the system is its own folder for these purposes. The computer creates another identical backup folder in the user profile. If there are several user profiles (when everyone has their own account), then there will also be several such folders.
Uninstall via Options
As already mentioned, to delete temporary files in Windows 10, it is advisable to use the built-in tools. This way you don’t risk deleting something important and disrupting the operating system.
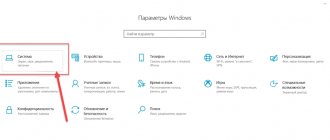
The first thing you can do is delete temporary files through the Options menu. To do this, open the Start menu and click on the gear button or use the Win-i key combination. After entering the “Options” menu, go to the “System – Device Memory” (or “System – Storage”) section.
In this section you will see a list of disks that are installed on your system. Here you need to click on the drive on which you want to delete temporary files.
After this, you need to wait until Windows 10 analyzes the disk and go to the “Temporary Files” subsection.
In this section, you need to mark those objects that you would like to delete and click on the “Delete” button.
In addition, Windows 10 can be configured to automatically delete temporary files. To do this, return to the “System – Device Memory” section in the “Options” menu and scroll down the settings to the “Memory Control” function, which is responsible for cleaning unnecessary files. To configure this feature, click on the “Change method” link.
After this, a window with settings will appear. Here you can specify when to automatically delete temporary files, and also set up the removal of items from the Recycle Bin and Downloads folder.
For temporary files, you can specify daily, weekly, or monthly cleaning here, and files from the Recycle Bin and Downloads folder can be deleted after 1, 14, 30, or 60 days.
Working and deleting temporary files in Windows storage
The Windows 10 operating system has at its disposal such a tool as “Storage”. With its help, you can easily scan all disks and, after analyzing the contents, carry out a thorough and high-quality cleaning of your computer from “garbage”. The result of such actions will be an increased speed of the machine.
To use this utility, you need to simultaneously press the Win+I buttons on your keyboard, immediately click the “System” button in the window that appears and go to the “Storage” tab.
Select the desired disk to clean and study the data about it. Find the parameter about temporal binaries and left-click on it.
In the window that opens, select “Temporary files”. Left click.
After the completed actions and the last mouse click, the window can be closed; this will not affect the execution of the program’s task.
Automatically delete temporary files in Windows 10 version 1903 or later
Additionally, you can use "Storage sense" to automatically free up space by deleting those temporary files and contents from the Recycle Bin.
Use these steps to automatically delete space-wasting files using Storage Sense in Windows 10 version 1903 or later:
- Open Settings .
- Click on System .
- Click on Storage .
- In the “Storage” section, turn on the toggle switch.
After you complete these steps, Storage sense will delete most temporary files, as well as those files that have been in the trash for more than 30 days.
Additionally, you can always click the Configure Storage Sense button or run it now to configure cleanup settings or run Storage Sense on demand.
Removal via the system Disk Cleanup utility
Accumulating on the hard drive, these binaries significantly reduce the amount of free space and must be removed periodically. The safest way to perform this procedure is through the Disk Cleanup system program. You can launch it in Windows 10 using the following algorithm:
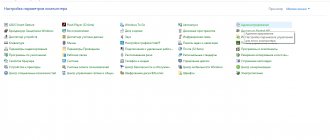
- Open the “This PC” shortcut on the desktop or in the Start menu, right-click on the Disk C shortcut and execute the Properties command.
- In the window that opens, click the “Disk Cleanup” button.
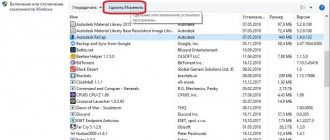
- Now let's mark all the categories of data that we see in the window.
- Click the “Delete files” button and confirm the action by clicking OK again.
We execute the last two commands in the corresponding windows that open.
If you look carefully, when performing these actions you will see how much disk space will be freed up after the cleaning is completed. It is recommended to manually delete this kind of temporary Windows 10 files at least once a week.
When performing the described actions, only temporary binaries are deleted. At the same time, what was created by the computer user himself is not deleted by these actions.
The system is designed smartly, and it can only manage data that belongs to the operating system. The system does not delete user programs or anything created by the user without the user’s initiation of deletion.
Temporary files in Windows 8 are deleted using the algorithm described for Windows 10.
To make it easier for users to maintain their personal computer, a special program is provided for automatically deleting temporary files in Windows 10 or 7. This helps to significantly increase the quality of cleaning the disk from debris and simplifies the actions of the PC user.
Sometimes it happens that deleting temporary files does not work in Windows 10. This situation can arise for a number of reasons. We list the most common of them:
- If the binary file being erased is running or open at the time of deletion. You need to close it and try to delete it again.
- If you do not have access rights to the executable file that you want to delete. To overcome this reason, you should log in with rights
- Administrator or under the name of the user who created this file.
- If the binary file name contains invalid characters (symbols) or the path to it is too long. It is recommended to rename the binary to be deleted and run the uninstaller again.
- If the program being deleted is damaged, it will also be impossible to remove it.
- A serious problem, in the event of which the extirpation of temporal binaries will also become impossible, is the resulting damage to the Windows system kernel. To solve this problem, it is recommended to check the hard drive.
- If the file to be extirpated is infected with a computer virus. In this case, this object will be deleted when the computer is scanned by an antivirus program.
- You cannot delete a Windows system object that is installed on your computer. The operating system cannot delete itself and its own system data.
Here are the main reasons why temporary objects cannot be cleared. In any case, the extirpation of any files on a computer must be approached thoughtfully and carefully.
Disk Cleanup service
This function was implemented in previous versions of the operating system, and you can still use it now. Cleaning temporary files in Windows 10 is done as follows:
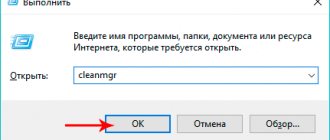
- Press the “Win + R” keys simultaneously;
- In the Run window, enter the cleanmgr command and click OK;
- A small gray window will appear where you need to select “Disk C” from the drop-down menu;
- Click on the “OK” icon;
- A new Disk Cleanup window will appear, showing the amount of data that can be erased;
- Check the box next to the line and click OK.
We told you where to find unnecessary items on Windows 10, how to remove them manually or using built-in tools. Let's try the last method!
Deleting temporary files using CCleaner
Before you can use this program, you must install it correctly. To do this, download the distribution kit from the site:
After that:
- Open the “Downloads” folder on drive C and double-click on the downloaded exe file with the left mouse button.
- Click the Install button in the window that appears. The installation of the program will start.
- Once the installation is complete, click the Run CCleaner button.
- In the cleaning section, set the browser cache and all the checkboxes in the “System” category.
Using this disk cleanup program, you can not only significantly increase the amount of free space on your hard drive, but also speed up your computer without deleting the necessary programs and documents.
Storage
1. Open “Options” using the Win + I key combination.
2. Go to the “System” section.
3. Click on the vertical menu item “Device memory”.
4. To analyze the contents of the system volume, click on it.
Afterwards, the window will display information about the allocation of memory on the partition, where there will be an item “Temporary files” with the amount of unnecessary objects.
6. Check the required boxes and click on the first button to delete temporary files from the system volume.
Where is the Temp folder in Windows 10
By default, Temp folders are located on the system drive in several locations. All users can find the Temp folder on their local disk where the system is installed. See below for specific locations of the Temp folder on the system drive. However, before searching, do not forget to enable the display of hidden folders in Windows 10.
- C:\Windows\Temp
- C:\ProgramData\Temp
- C:\Users\Username\AppData\Local\Temp
Malicious programs often end up in the Temp folder and, even after being removed, are installed in the background the first time you connect to the Internet. You can find the folder with temporary content by running the command %temp% in the Win+R .
In the current location, you can basically use the keyboard shortcuts Ctrl+A to select all files and delete them. In this case, some applications may begin to work incorrectly or stop working altogether.
Using the Vault to delete
In version 10 of Windows, a new tool “ Storage ” has appeared, which allows you to analyze the contents of hard drives and clean them of unnecessary garbage. You can find it in the Start menu by going to Settings, and then to the System tab . Space cleaning can be done automatically; to do this, go to the Storage Memory Control and set the switch to the On position. To select how to free up disks, click on the Change how to free up space and cancel the necessary options. In addition, it is possible to delete binaries manually. To do this, click the Clear Now .
Inside the Storage, all hard drives with partitions and drives are displayed. At the very end of the list of elements is the Temporary files item, at the bottom of which information about the location in which these documents are located is displayed. By clicking on the area of this window, you can select the actions that need to be performed with these elements, including deleting them.
Why search stopped working in Windows