06/13/2018 Category: SettingsAuthor: Denis Dolgopolov
The interface language in Windows 10 is selected when installing the operating system. But after the installation procedure is completed, it can be changed. To do this you will need a language pack.
- Installing a language
Installing a language using Windows settings settings - Installing a language from the Windows Control Panel
- Adding a language from a cab file
- Video: working with language packs in Windows 10
Installation of the language
Windows 10 has several built-in methods that allow you to work with the language. Thanks to them, you can select a language from already downloaded packages, as well as install new languages.
If you need to change the language on one computer, then the easiest way is to use autoload, that is, let the system itself download and install the necessary package. If you need to change the language on several PCs, then it is more convenient to download the language file once, and then transfer it using a flash drive to each of the computers, thereby saving Internet traffic. PL files have the extension .cab. You can download them from third-party resources, since Microsoft does not distribute the language in the form of separate files on its official website.
Installing a language using Windows settings settings
Windows 10 has a built-in Settings utility that allows you to manage system settings. If the OS on your computer has already been updated to version 1803 April Update, then using this utility you can download additional language. If you have an older version of Windows installed, then use any of the methods described below - the result will be the same. To load a language using the “Options” utility, do the following:
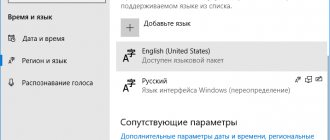
- Once in the Windows Settings console, expand the Time and Language block.
Open Time & Language settings
- Expand the “Region and language” sub-item, then click on the “Add language” button and select the appropriate option from the list that appears. The download of the language from the network will begin.
After clicking on the “Add language” button, a list of languages that can be added will open
As soon as the download is complete, a new language will appear in the list of languages - select it to translate the system into the desired language.
Installing a language from the Windows Control Panel
Users who have not yet updated their Windows to version 1803 or later can change the language through the control panel. To do this, do the following:
- Once in the control panel, go to the “Language” section. The control panel can be found using the system search bar.
Open the Language section in the Windows Control Panel
- Click on the “Add language” button to select the desired language. A list of languages available for adding will appear. Select the one you want to add.
Click the "Add Language" button and select the desired language pack
- Go to the properties of the selected language.
Click the Properties button for the language you want to add
- In the language properties window that opens, click the “Download and install language pack” button, after which the download of the language will begin.
By clicking on the “Download and install language pack” button, start downloading the language of the selected language
- After completing the language installation process, go to the language properties again and assign it as the main system language.
Set the selected language as your default Windows interface language
Ready. The new language has been downloaded and applied. You may be asked to log out to apply the changed settings. Agree, then log in to your account again and check the result.
Adding a language from a cab file
If you have a separately downloaded language in cab format, then follow these steps to install it:
- Press the Win + R key combination to open the Run window. Enter the lpksetupe command in it and start its execution by clicking OK.
Type and run the lpksetup command
- The YAP installation window will appear. Indicate that you want to download a new language and not delete the existing one. To do this, click on the line “Set interface language”.
Specify that you need to install a new language pack
- Open the cab file by clicking the Browse button and finding it on the disk. The line next to the button will display the path to the file. If the file contains several languages at once, select the ones you want to install. Start the installation procedure by clicking Next and wait for it to complete. Then go to the “Settings” window or to the Windows control panel, select the new language as the main one (how to do this is described in the two previous paragraphs).
Specify the path to the file and select the desired languages
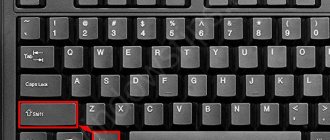
Adding an input language to the Windows 10 keyboard layout
Add an input method:
Here we will switch the selected language up - the system will select the desired language when loading.
In “Advanced options”, select switching input methods...
And we do it as we are used to. I did it like this:
Or Ctrl+Shift. Or Alt+Shift
It all took about ten minutes. Good luck to you!
Author of the publication
offline for 5 days
Changing the interface language
Installing a new language does not guarantee that the system language will change. Typically, this requires entering the appropriate command, which will change the interface language. Follow these steps:
- While in Control Panel, expand Regional Options. If you can't find it in the main menu, use the built-in search bar.
Go to the "Regional Options" section of the control panel
- In the first tab “Formats”, select the interface language that suits you, and then save the new values. You may have to log out and log in again for the changed settings to take effect.
Select the appropriate interface language and save changes
Video: working with language packs in Windows 10
How to install Russian interface language in Windows 10
If a non-Russian version of Windows 10 is installed on your computer, and not in the “Single Language” option, you can easily download and install the Russian language of the system interface, and also enable the Russian language for Windows 10 applications, which will be shown in the instructions below.
The steps below are demonstrated for Windows 10 in English, but will be the same for versions with other default interface languages (except that the settings items will be named differently, but I think it won’t be difficult to figure it out). You may also find it useful: How to change the keyboard shortcut to change the language in Windows 10.
Note: if, after installing the Russian interface language, some documents or programs show crappy language, use the instructions How to fix the display of the Cyrillic alphabet in Windows 10.
Welcome language changes
If you want to see the same language as the interface language when you log in, follow these additional steps:
- Expand the Advanced tab in the Regional Options window. Click the "Copy Settings" button.
Click the "Copy Settings" button in the Regional Options window
- Check the box to copy the current language settings to the welcome screen and system accounts. Clicking OK will then save the new language for the welcome screen. Also, by checking the appropriate box, in this window you can enable copying of the installed language to all new accounts that will be created in the future.
Enable copying of current language settings to the Welcome screen and system accounts
How to enable Russian interface language in Windows 10 applications
Despite the fact that the previously described actions change the interface language of the system itself, almost all applications from the Windows 10 store will most likely remain in another language, in my case - English.
To enable the Russian language in them too, follow these steps:
- Go to the control panel - “Language” and make sure that Russian is first in the list. Otherwise, select it and click the “Up” menu item above the list of languages.
- In the control panel, go to “Regional Standards” and on the “Location” tab, in the “Primary location” item, select “Russia”.
Done, after this, even without a reboot, some Windows 10 applications will also acquire the Russian interface language. For the rest, run a forced update through the application store (Launch the store, click on the profile icon, select “Downloads and updates” or “Downloads and updates” and search for updates).
Also, in some third-party applications, the interface language can be configured in the settings of the application itself and does not depend on the settings of Windows 10.
Well, that’s all, the translation of the system into Russian is completed. As a rule, everything works without any problems, but the original language may be preserved in pre-installed programs (for example, those related to your equipment).
Installing the language on the Single Language version
There is a special edition of Windows - Single Language. It includes only one language and does not allow you to download additional languages through the control panel or the Settings utility. This was done to prevent an inexperienced user from accidentally translating the system into a language he does not understand.
If you are faced with the fact that the Single Language version is installed on your computer, and you need a new language, then use the method described in the paragraph “Adding a language from a cab file”. You can install the package and start using it by first downloading the cab file from a third-party resource.
Installing the Russian interface language in Windows 10 versions 1903, 1809 and 1803
In the latest Windows 10 updates, versions 1903, 1809, and 1803, installing language packs to change the language has moved from the Control Panel to Settings.
In the new version, the path will be as follows: Settings (Win + I keys) - Time and language - Language or Region and language (Settings - Time & Language - Region and language). There you need to select the desired language (and if not, add it by clicking Add a language) in the “Preferred languages” list and click “Settings”. And on the next screen, download the language pack for this language (in the screenshot - downloading the English language pack, but for Russian it’s the same).
After downloading the language pack, return to the previous Region and Language screen and select your language from the Windows Display Language list.
Also, language packs are now available for download in the Microsoft Store application store: launch the store, enter “Russian language pack” in the search and download “Russian localized interface pack”.
Via Control Panel
If the version of Windows 10 installed is 1709 or earlier, then you can change the interface language through the Control Panel window. Go to Settings and select the language section, as described at the beginning of the article. Next, go to the second tab “Region and Language” and click on the link “Additional date and time settings...”.
Then click on the second item “Language”.
The next step is the very first button at the top “Add…”.
If the list below the button contains the language you are interested in, then you should skip this and the next item.
How to access this window differently is described in paragraph 3 of the article: adding a language in Windows 10.
Select the one you need from the list, select it and click “Add”.
Then we return to the familiar window and opposite the desired language, click on the “Options” button.
In the options window, click on the “Download and install language pack” button. This requires administrator rights and an Internet connection.
When the installation is complete, click on the “Make this the primary language” button. After this, a window will appear asking you to restart your computer. To do this right away, click the “Log off now” button; if you want to reboot a little later, click on the second button.
If you want the default language for typing to be offered to you in a language other than the one selected for the interface, then you need to select it and move it to the top of the list using the “Up” button.
For example, when logging into Windows, you want the password step to always be set to English. Move it to the top of the list and click on the “Advanced options” button.
Then click on the link “Apply language settings to the welcome screen...”.
Then go to the third tab and select the “Copy parameters” button.
Check the "Welcome screen and system accounts" checkbox. After this, the input language should change. Save changes with the “OK” button.
If you were able to change the Windows 10 interface language, but when you log into the Microsoft Store everything is in a different language, then check that the appropriate region is selected. Also pay attention to which language is installed at the very top of the list.
Rate this article:
( 1 ratings, average: 5.00 out of 5)
About the author: Anya Kaminskaya
- Related Posts
- Removing a local account in Windows 10
- How to return the language bar to the taskbar in Windows 10
- My Computer icon on Windows 10 desktop