08.08.2018 Category: OptimizationAuthor: Leonid Levin
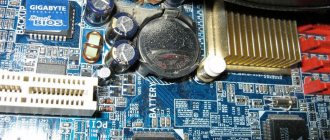
Sooner or later, each of us thinks about a complete upgrade of our computer, or a partial upgrade by replacing its individual components. The main advantage of such a “point update” is that the user does not need to reinstall Windows OS after the upgrade (provided that the user does not change the system hard drive). However, when changing the motherboard, some difficulties may arise, since it is a fundamental link in the operation of the entire PC. Therefore, before upgrading the motherboard, it is necessary to carry out a kind of “preparatory stage”.
- How to keep Windows 10 working when upgrading your motherboard
“Preparatory stage” of the Windows registry
What problems does the user face after upgrading the motherboard?
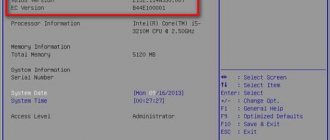
As already mentioned, the motherboard is a kind of “central link” of the entire computer, where data about all devices connected to the PC is concentrated. During the installation of the Windows 10 OS, the motherboard’s “database” receives information about the installed ATA/SATA drivers for hard drives (especially the system one), but during an upgrade this data is lost, which ultimately leads to problems starting the Windows OS . Such as a BSOD error or “blue screen of death”:
- with code "0x0000007B";
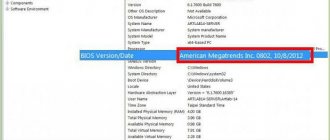
Error STOP: 0x0000007B appears after the start system boot screen of the PC (information window about the version of the motherboard and BIOS system)
- or "INACCESSIBLE_BOOT_DEVICE".
Error STOP: INACCESSIBLE_BOOT_DEVICE appears after Windows boot screen
Process of elimination
It doesn't matter whether my wording is legally accurate or whether a new motherboard is considered a new PC, because...
Microsoft has an exception process for OEM licenses and its digital licenses. A legitimate replacement of a key component due to a breakdown is considered an exception to the general rule and allows activation, i.e. transferring a license to the current hardware configuration.
The exclusion process previously only existed within the framework of telephone activation. It developed with the release of Windows 10 and the mass issuance of digital licenses to all those who upgraded from older OSes or bought Windows 10 or an upgrade to it in the Windows Store.
The digital license is tied to a specific PC configuration. It is automatically registered with your Microsoft Account ( MSA ) when you sign in with it. You can see a list of such PCs in the devices section of your MSA.
Starting from version 1607, the exclusion process is implemented for users in the activation troubleshooter (hereinafter referred to as troubleshooter) from the OS. The ability to launch it appears automatically in case of problems in Settings - Update - Activation.
How to keep Windows 10 working when upgrading your motherboard
To protect your computer from BSOD errors and ensure Windows 10 starts correctly after upgrading the motherboard, you need to do a little preparatory work - make certain data adjustments in the system registry.
"Preparatory stage" of the Windows registry
To prepare your PC for component upgrades, follow several steps step by step:
- Open the task bar (WIN+R) and type regedit in it.
The “task bar” can also be launched through the “Task Manager” of Windows
- Then in the root directory of the registry, find: HKEY_LOCAL_MACHINE\SYSTEM\CurrentControlSet\services\msahci.
The directory path is also displayed at the bottom of the registry window
- In the work field (right column), highlight the “Start” line. Double-click on it with the mouse to open the parameters and set “0” in the “Value” field.
You can also open the Start parameter settings by right-clicking on it and selecting “Change”
- Then navigate to the directory: HKEY_LOCAL_MACHINE\SYSTEM\CurrentControlSet\services\pciide.
It doesn't matter what order you change the registry settings in.
- Find the “Start” line again, and similarly set the “Value” to “0”, saving the data.
Even if in the “Value” parameter settings is “0”, still write zero again and save the data
- Done, you can now exit the system registry.
The “preparatory stage” is over. You can turn off your PC and upgrade the motherboard. The next time you start your computer, Windows 10 should boot without critical errors.
Based on my personal experience in upgrading the motherboard on a PC, I would like to note that even after completing the “preparatory stage” of changing the system registry settings, there is still a small probability of a “blue screen of death” appearing after the upgrade. This can usually happen due to differences in chipset versions on motherboards. A way out of the situation may be to “brute force” the PC startup settings in the BIOS. You just need to load the BIOS and in the Configure SATA As tab (Main category) set the available boot modes one by one. Go through them until the Windows OS boots.
The Configure SATA As setting category may also be called SATA Mode
What to do if Windows 10 activation is lost
If the user is unable to restore the missing activation of Windows 10 or he has not previously switched from the old edition, but now he has finally decided and does not have a digital license, then there are two ways to activate his operating system. Each of them has its own advantages and disadvantages.
Connecting to the insider program
The insider program makes it possible to legally obtain a new edition of Windows 10 without having a digital license obtained when upgrading from an old edition of Windows 7 or Windows 8.1, or entering a 25-digit license key. The program is designed for preliminary evaluation and testing of a new software release. Participants have the opportunity to work with a licensed edition of the program, but they must keep in mind that the assembly with which the user will work has not been completed and has certain inconveniences in use. The digital license of the test edition will not allow activation of the system in the same way as real holders of a license key or digital license . A watermark will often appear at the bottom of the desktop reminding you to activate, and new releases will often arrive, which will take time to update the system. You can connect the test program from a “pirated” or unlicensed version of Windows 10 when it begins to request activation.
To enroll in the Insider Preview program and become a legal Windows 10 user, you must do the following:
- Using the Start key's Services menu, expand the Settings panel.
In services, click on the “Settings” icon
- Go to the “Update and Security” tab.
In the panel, click on the “Update and Security” icon
- Select the Windows Insider Program icon.
In the panel, select the “Start” button
- Click the "Start" button.
We are waiting for the download of the insider assembly to finish
- After downloading the Insider version, restart your computer. The legal edition of Windows 10 is installed.
You can also connect to the insider program through the official Microsoft website.
- Register on the Microsoft website under the Windows Insider Program tab.
Select the “Windows Insider Program” icon
- Fill out all required information.
Press the button “Register a personal account”
- Download the Windows 10 distribution and install it on your computer.
- During installation, log in using an account registered with Microsoft.
Enter your account
- After this, activation will occur and a digital license will be created.
The official website of Microsoft Corporation is not entirely convenient to use, especially when searching for a product. First you need to understand its structure in order to understand where and what to look for.
Video: how to connect to the Windows 10 Insider program
Software activation of Windows 10 edition
There is another way to activate Windows 10 using a third-party activator. Whether to use it or not, everyone decides at their own peril and risk.
The most reliable and widely known KMSAuto Net activator for Windows 10 actually works. Its use is the best solution to activation problems. A legal activator, contrary to popular belief, was created for the corporate segment and is used to activate Microsoft software products .
The main advantages of the utility:
- speed work;
- clear interface;
- the ability to configure the utility;
- presence of a help system;
- ability to install product keys;
- additional tools.
The utility is universal, but, as practice shows, sometimes activation ceases to be effective after 180 days. After this, the product key needs to be replaced. Before you try to restore the activation status of Windows 10, you need to determine whether the installed version has a 25-character license key or an electronic digital license.
- After downloading the utility, run it using the KMSAuto.exe file.
- Click on the “Activation” button.
In the utility window, click on the “Activation” button
- In the next window, click the “Windows Activation” button.
- Wait for the activation to complete. This is indicated by the appearance of a line in the lower half of the window “Your system is in an activated state.”
- Restart your computer. System activation is complete.
How to restore Windows 10 after replacing the motherboard
Do not forget that it is not always possible to complete the “preparatory stage” before upgrading your computer. What to do if the motherboard has already been replaced and it’s too late to edit the system registry settings? Don’t worry, you can still adjust the registry and “restore” Windows 10 functionality thanks to the “System Restore” mode. All you need is a bootable CD/USB drive with Windows 10 OS.
- Before starting the PC, insert a bootable CD/USB media into the drive/slot. After turning on the computer, enter the BIOS settings (which button you need to press is written in the information help of the start window).
The BIOS settings key depends on the PC motherboard model
- Next, in the BIOS settings window, select the Boot tab.
Navigation through the BIOS settings menu is carried out using the arrow keys.
- In the Hard Disk Drives category, highlight 1st Drive, press Enter and set the value to CD/USB device. Press F10 to accept the changes.
If the boot device is not a USB drive, but a CD or DVD, then you need to prioritize the corresponding drive
- After restarting your computer, you will see a black screen with a notification: Press any key to boot from CD/USB. Press Enter.
- Next, the “installer” will autorun the “Windows Installation Wizard”. Go to the System Restore settings.
Through the "System Restore" function you can access the offline Windows registry
- In the subsequent Diagnostics window, go to Advanced Options.
You don't need to restore Windows 10 itself
- Click on the "Command Prompt" icon.
If you accidentally went to the wrong settings section, you can always go back a step by clicking on the “arrow” icon at the top of the window
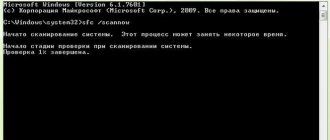
- After activating the “command line”, enter the value regedit. Press "Enter".
Command Prompt automatically runs as administrator
- In the root directory of the registry, select the HKEY_LOCAL_MACHINE subdirectory, click on the "File" tab/"Load hive" option.
You need to select the entire folder, not individual files.
- Specify the path to the installed Windows OS on your hard drive, namely: Drive\Windows\system32\config. Open the file system.
You need to open the system file (refer to the “file type” description), and not its text document
- Give the new hive a name.
The name can be anything (in Latin)
- After this, follow the root directory of the registry to the branch: HKEY_LOCAL_MACHINE\Name of the created “hive”\ControlSet001\services\msahci. In the properties of the “Start” parameter, set the value = 0.
To open the parameter settings, right-click on it and select “Properties”
- Then similarly change the “Start” value in the pciide folder, which is located along the path: HKEY_LOCAL_MACHINE\Name of the created “hive”\ControlSet001\services.
The path taken through the registry root directory is displayed at the bottom of the window
- Select the “hive” folder you downloaded, click on the “File” / “Unload hive” tab.
You only need to select the “hive” you created, and not the entire HKEY_LOCAL_MACHINE folder
- Done, now you can close the registry and restart your PC. After this, your Windows 10 OS should boot.
Instructions for replacing the board for Windows XP
First way
If the board being replaced is intact and it is possible to boot from Windows XP, then in this case it is necessary to install standard drivers for motherboard controllers in the device manager. Select the required controller, in the properties go to the “ Driver ” tab and click on the Update… button.
We refuse to search for a driver on the Internet, click Next >, select “Install from a specified location”, check the radio button next to “Do not search. I’ll choose the right driver myself” and click Next >. According to the list of drivers, you must select “ Standard dual-channel PCI IDE controller ” and click Next >.
After the installation of the standard driver is complete, you need to turn off the computer and replace the outdated equipment with new one. After Windows has fully loaded, in Device Manager we install the necessary driver from the supplied disk drive for the new hardware.
Second way
If your motherboard for some reason has stopped functioning and there is no way to log into the system from it, then you need to perform more complex operations. This method requires installation disc .
In order for Windows XP to boot after installing a new motherboard, you need to do some steps:
- install new hardware (motherboard);
- boot from the Windows XP installation disk drive, press Enter to begin the XP installation process.
Next, accept the license agreement by pressing F8. The installation program will search for installed operating systems.
To restore an installed OS, you need to select it and press R. The recovery process is very similar to the Windows XP installation process.
After the recovery process, it is necessary to install the required drivers for the new board; the rest of the software and personal data of the user will be intact.
home
If you replace the motherboard with a different model, Windows may display BSOD 0x0000007b. This occurs due to a mismatch between the installed SATA controller drivers.
The solution to this problem is to reinstall the operating system. But it happens that it is important to maintain the functionality of the installed system. Don’t be upset! ERD Commander 6.5 will help us. With its help, we will make adjustments to the Windows 7 registry necessary to boot on the new controller.
- Create a boot disk or flash drive with ERD Commander.
- Loading up
- To the question “Initialize a network connection in the background?” We answer No.
- To the question “Reassign drive letters...” we answer Yes.
- Select the keyboard layout and click Next. Then select our operating system from the list and click Next
.
6.If the previous Windows 7 download was unsuccessful, a search for boot problems will begin
7. Click Cancel so as not to waste time, since this startup recovery tool will not help if the motherboard is changed.
8. Select Microsoft Diagnostics and Recovery Toolset
9. Now launch the registry editor
10. First of all, you need to delete the registry branch HKLM\SYSTEM\MountedDevices
11. Now you need to enable the launch of services that load standard drivers for IDE> and SATA controllers
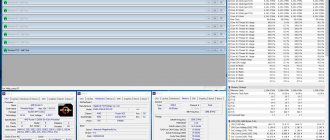
12. Open the HKLM\SYSTEM\CurrentControlSet\services branch on the left side of the registry editor. Now we check the following sections in this thread: amdide, amdsata, amdxata, atapi, intelide, msahci, pciide. The Start parameter for each should be equal to 0x00000000 (0).
13. After start is set to 0 for all of the above registry keys, close the registry editor and restart the computer in normal mode. In most cases, this is enough to successfully boot Windows 7. Now you need to install the drivers on the new motherboard.
If it didn't help. If the above steps did not help and Windows 7 still does not load and displays the STOP 0x0000007b error, then the required controller driver is not loading.
Let's try to enable the loading of all drivers known to the operating system. To do this, set the value of the Start parameter to 0 in the following services: adp94xx, adpahci, adpu320, aic78xx, amdsbs, arc, arcsas, elxstor, HpSAMD, iaStorV, iirsp, LSI_FC, LSI_SAS, LSI_SAS2, LSI_SCSI ,megasas, MegaSR, nfrd960, nvraid, nvstor, ql2300, ql40xx, SiSRaid2, SiSRaid4, vhdmp, vsmraid, aliide, cmdide, nvraid, viaide.
Reboot the computer in normal mode. The OS should boot.
aa-mir.ru
Software installation
After installing the motherboard, the actual installation of the software begins. At the same time, not all devices are connected at the initial stage; there is simply no need for them. First of all, configure:
- CPU;
- RAM;
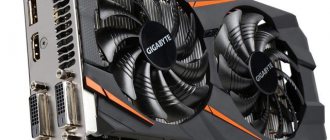
- Video card;
- Motherboard power supply.
Further work consists, first of all, of setting the settings in the BIOS. It is launched immediately after the first turn on of the computer with the replaced MP. Initially, “safe mode” is configured. In some BIOS versions, the setting item is called “LoadStandard”, but not always.
After configuration is completed, all settings are saved when the computer is restarted. Then the power and clock speed are adjusted. At the same time, when initially setting up the motherboard, trying to overclock it is strictly prohibited.
Having established all the basic settings in the system, we proceed directly to the peripheral devices. At this stage the following are set:
- Winchester;
- Drive;
- Speaker.
Other devices will be connected later.