Most users create partitions on their hard drive for their convenience.
They are usually called C, D, etc., and their usefulness cannot be denied in any way. Let's say you have the operating system on one volume, and all other user files (music, photos, movies) on the second. When you reinstall the OS, the partition with your files will not even be touched, which will allow you to save your data and continue to use it in the new Windows. One of the extremely common problems that users often encounter is that the computer does not see hard drive partitions and cannot find them. This problem occurs unexpectedly and can be caused by a number of reasons that affect the operation of the hard drive. Let's figure out what to do in this situation and how to solve the problem that has arisen.
If suddenly the volume you need has not only disappeared, but the format has changed to RAW, then to solve the problem, I recommend reading a separate article.
Assigning a letter
If your PC or laptop does not see one of the hard drive partitions, then the first thing you need to do is go to the special control menu and check whether it is displayed in the corresponding list. If it is there, then it needs to be assigned a letter.
Let's look at the process in order:
- Go to the menu “Control Panel” - “Administration”.
- In the new window, find the “Computer Management” item and double-click on it.
- Another window will open, in its left area we find and open “Disk Management”.
The requested information will be instantly displayed on the screen. It is necessary to look through the local drives, and if there is one that has disappeared, then you need to set the letter.
To do this you need:
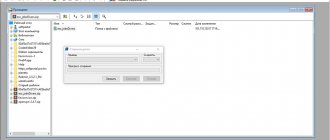
- Right-click on the empty area, and in the context menu select “Change letter... or path...”.
- In the window that appears, click “Add”.
- Select the appropriate letter from the list and save the changes.
- Next, you will see a notification that installed programs may stop working. Click “Yes”.
For the changes to be successfully applied, you need to restart your computer. As soon as the operating system boots, check whether the partition is visible, it should appear under the letter you specified.
What to do if drive D is missing?
A computer's hard drive is usually divided into several partitions called local disks. This is done for the convenience of the user, since saving personal and system files on the same partition would be stupid. This is because if system files fail, they can be replaced or restored. Most often, partial or complete loss of files and information occurs. If we were to perform the same procedure with personal data, then the computer, as a storage medium, would lose all its meaning.
So, if your computer already had several partitions, but something went wrong and drive D disappeared, don’t worry. This is not fatal and, unfortunately, it happens.
One day they made fun of one of my friends. The guys, when playing on her laptop, decided to hide her local drive. It would seem like an innocent joke. But the girl, out of ignorance and due to her panicky nature, did not come up with anything better than to take and reinstall the entire operating system.
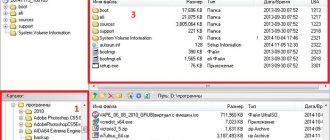
To prevent you from making similar mistakes, we recommend reading this article. There is such a thing as a “hidden drive”. This is exactly from the above story. If we go to:
My Computer - Management
Disk Management
Then we will see unused space there. This will be our missing disk. In order to restore it, you need to make a little minimal effort.
Creating a new volume
It is likely that when you go to the management menu you will not find the missing area, instead there will be an unallocated part that cannot be assigned a letter; you can only create a new volume:
- To do this, right-click on it, select “Create a simple volume” in the drop-down menu and follow the instructions of the “wizard”.
- At the last step when creating a partition, you need to format it in NTFS, the only way it is readable and writable.
But at the same time, you will completely lose the files stored on it. Therefore, if you do not value them, then feel free to use this method; in other cases, I recommend using the method discussed below.
All processes are analyzed using Windows 7 as an example, but in other versions, Windows XP/8/10, they will be similar.
Restoring a logical partition using special programs
Now let's look at the situation related to the logical partitions on which important user files were saved.
In this case, the partition can be recovered with the Recovery Expert tool, which is available in the Disk Director program from Acronis. Having launched the appropriate “Wizard”, you need to select the manual recovery method, set the full search type and wait until the restoration of the missing partition is completed, after which, by opening “Explorer”, make sure that all the information present in the partition is safe and sound.
Note: in some ways, this is also similar to working with an unallocated area.
Creating a new partition
If the first method did not help and the computer still does not see the hard drive partitions, then the problem may be that the OS itself cannot see it due to the loss of the file system, as often happens, but the data on it will still be saved.
In this case, to correct the situation, we will use one very effective tool, namely the Acronis Disk Director program. With its help, we will recognize the disappeared local hard drive partition, separate a small part from it, from which we will make a new area with the NTFS file system, and then simply merge them.
This may seem very difficult to some, but if you follow the following instructions, which detail what to do in this situation, you will easily cope with this task:
- Download the program from the official website or any other trusted resource and install it on your computer.
- Create a bootable USB flash drive or CD in it.
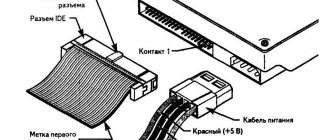
- Go to BIOS settings.
- Go to “Advanced BIOS Features” and in the “First Boot Device” column indicate the previously created boot disk or flash drive. Depending on the BIOS version, the names of the items may differ slightly.
- Save the settings (usually use the F10 key) and exit the BIOS.
- After booting the computer, go to the Acronis program interface.
- In the main window of the program, all existing partitions will be displayed, both the one that has disappeared and others with an unallocated area.
- In the left menu of the main window, select the “Split Volume” tool.
- Specify the new size and click “OK”.
- To apply changes, click the “Apply Pending Operations” button at the top of the window.
- The next step is to click “Continue” to start the process.
After you create a partition, all that remains is to merge the problematic and new partitions using the “Merge” function.
Now you need to save the changes and reboot the system. To do this, you need to enter the BIOS again and return the boot to its original location - from the Hard Disk. After exiting the BIOS, the system will automatically boot into Windows OS. We check the disk partition again, now it should definitely be displayed correctly.
Windows 10 does not see the hard drive. Working with sections.
This article is intended to solve the problem when Windows 10 does not see the hard drive or part of it. That is, how to work with sections.
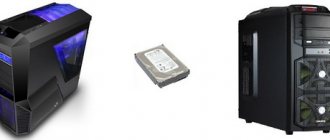
Go to “My Computer”. For example, in our example, a 2TB hard drive is connected to the computer, but only one 300GB is visible in the list of partitions.
If the second hard drive is connected, it is also not visible. This means that either it is not connected, or it does not exist, or the partitions simply have not been created.
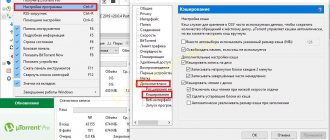
Let's start solving the problem. Right-click on the Start icon and go to the “Disk Management” section.
A window will open in which we will see that 500 MB are reserved by Windows, 300 GB, as we have already seen, are allocated to the “C:” section, and 1562.5 GB are not defined.
Right-click on the unallocated volume and click on the “Create simple volume...” item.
The “Create Simple Volume Wizard” starts. Click on the “Next” button. In the next window you can specify the size of the partition to be created.
You can leave the entire free space, or if you want to create more partitions, you can specify a smaller size. Click “Next”.
The next step is to choose which letter to assign to the partition. Next you are asked to select a file system. It is advisable to leave NTFS. Check the box for “Quick Format”.
The next window shows all the data about the partition, where all your previous settings are listed. Click on “Finish”.
Literally in a few seconds a new partition appears in the system.
There is an option that the section will appear, but it will not be available for use. To fix this, you can right-click on it and select “Format”.
To create several disks, you need to repeat the procedure for creating a partition, only specify not the entire available volume, but only a part (for example, 500 GB out of 1500 GB).
Then repeat the procedure again, including the remaining amount of free memory in the next section (the remaining 1000 out of 1500).
Be sure to check the “Quick formatting” box, otherwise it will start formatting as usual, which will take a lot of time.
You also need to know that you cannot separate disks with information, because it will be deleted.
As a result, we get 3 sections.
To delete a partition, go to the familiar “Disk Management” and, by right-clicking on the partition that you want to delete, click on “Delete volume...” or “Delete partition,” depending on what you want to delete.
Thus, we can work with disks if we do not need the information on them. That is, before you split a volume, you need to format it.
And partitions such as the system partition cannot be formatted.
Now let's look at what actions you can perform with hard drives in Windows 10.
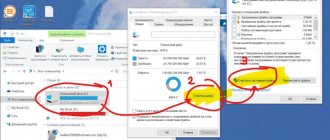
Right-click on the partition and select “Properties”.
In the “General” tab we can rename our section, allow files to be compressed or indexed.
For the changes to take effect, you need to click the “Apply” button.
On the “Service” tab, you can check the disk or optimize and defragment disks.
To disable scheduled optimization, click on “Optimization”.
In the window that opens, go to “Change settings”.
Uncheck the “Optimization by schedule” checkbox.
You can leave this feature enabled, but this may cause the system to freeze while optimization is running.
The “Equipment” tab displays what disks are on the computer (DVD-ROM, hard drive).
In “Sharing” you can enable access to files and folders for other users if the computer is connected to a local network.
In the “Settings” tab, you can determine the format of files located on the disk and change the disk display pattern.
There are also “Quota” tabs for dividing the hard drive between different users, “Previous Versions” and “Security”, where you can set access rights for different users.
In general, all the settings are not very different from Windows 7.
- < Back
- Forward >
Partition recovery
In almost all cases when a logical partition of a hard drive disappears, it can be returned. For recovery we will use the same Acronis Disk Director. So here's how to do it:
- I will not repeat myself and describe how to create bootable media and run from it, you can read about this above in the previous paragraph.
- We go to the utility interface and select “Recovery Expert” in the menu on the left.
- Click “Next” and select manual mode, then “Next” again.
- Select the unallocated space (highlighted in green) and click “Next”.
- In the “Search Method” window, I recommend specifying “Full”, but in most cases, fast is enough.
- After the missing partition is found, by the way, do not be embarrassed if it has a different letter indicated, Acronis often confuses the names, select it and click “Next”.
- We wait until the status in the “Status” column changes to “Restored”, mark it and click further.
- In the “Recovered Volumes” window, mark our partition and move on.
- All you have to do is click on the “Continue” button to start the process.
- Upon completion of the procedure, exit the LiveCD and start the computer using the installed Windows OS.
The procedure for restoring information from a partition that the PC has stopped seeing can take a significant amount of time. The duration of the process depends on the amount and volume of data available on the disk. Therefore, you should be prepared for the fact that the computer may work for quite a long time.
We hope that the methods we have listed for solving the problem are easy to implement, and you can use them to fix the problems that have arisen.
Why the disk may disappear after installing Windows 10
Before you can determine the cause and fix the problem, you need to understand what type of problem you are experiencing. In particular, you need to find out what exactly has disappeared: a logical partition on the hard drive (if there is only one hard drive, it is usually divided into partitions - system C: and user D:, although their number may be larger) or a separate hard drive ( if you have two physical drives installed on your computer). Most often, users deal with the first case.
Depending on the type of problem, its causes may be as follows:
- The hard drive cable is not tightly connected to the connector or has come loose. As a result, the system is simply unable to see the hard drive and show its contents. This reason is suitable for the second type of problem - the disappearance of an individual disk.
- The device experienced a random failure that caused damage to the logical structure of the hard drive partitions.
- The hard drive structure was damaged by malware that entered the computer.
- The partition letter on the hard drive has disappeared: it was not assigned when the OS was booted for the first time after installation. This may be caused by corruption of the file table or an error that occurred during installation.
- Logical block D: (or any other letter) was hidden by some user.
- A new, just purchased hard drive is connected to the system unit, which has not yet gone through the initialization and formatting procedures.
- Motherboard drivers need updating.
If an uninitialized disk does not have a specified size
If Disk Management doesn't have any hard drive information, it doesn't show capacity, or you can't perform operations in Disk Management with an I/O error, there might be a problem with the drive itself or the external hard drive container.
If it is an external hard drive, replace its container.
If the external hard drive is not initialized, change its container
If it is an internal drive, follow these steps.
Step 1. Turn off the computer, disconnect all wires from it, remembering the order in which they were disconnected. Remove the battery if it is a portable device.
Removing the laptop battery
Step 2. Remove the cover of the PC system unit by unscrewing the screws securing it.
Remove the cover of the system unit by unscrewing the screws securing it
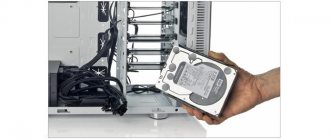
Step 3: Disconnect the data and power cables from the problematic hard drive.
Disconnect the data and power cables from the problematic hard drive
Step 4: Remove the CMOS battery located on the PC motherboard for ten minutes, resetting the BIOS settings. Reinsert the battery.
Remove the CMOS battery on the computer motherboard for 10 minutes
Removing the CMOS battery on a laptop
Step 5. Connect the data and power cables to the drive.
Connecting data and power cables to the drive
Step 6. Reassemble the computer in the reverse order of shutdown and turn it on.
We assemble the computer in the reverse order of shutdown and turn it on
Step 7. Go to Windows Disk Management and see if the hard drive shows its size by right-clicking on the “This PC” icon and clicking on the “Manage” line. Then select the “Disk Management” subsection and look at the disk status. If there is no disk, move on to the next solution.
Right-click on the “This PC” icon and click on the “Manage” line
Left-click on the “Disk Management” subsection
External hard drive and user data?
Personal computers play a big role in the daily life of every person. We use them for work and entertainment, communicating with friends and communication. In addition to personal computers, other computer devices have been developed that complement and expand the possibilities of using computer technology for everyone. They greatly simplify any production process, allowing you to create, manage, edit and exchange any projects, documents, tables, presentations, etc. Computers also allow you to receive and send correspondence via email; process, view or listen to a variety of images, video streams or music; upload, download or exchange any information via the network; receive the latest news and communicate with friends on social networks and much more.
Possible causes and solutions to the problem of disk not being recognized
If the system is Windows
does not see your drive at all, then there may be a problem with the hardware of
“USB port
,” a problem with the driver, or you may simply have a damaged drive.
First, disconnect the drive from the “USB port”
and try connecting it to a different
“USB port”
on your computer.
If it works in one "USB port"
but not in another, then your
"USB port"
bad.
If you connected the drive through a “USB hub”
(a device that allows you to increase the number of
“USB ports”
and provides the ability to use them simultaneously), then try connecting the drive to the computer directly.
Some USB hubs
may not provide enough power to operate an external drive.
If the drive doesn't appear in Disk Management
Even after you've removed
the "USB hub"
and plugged the drive into another
"USB port"
on your computer, it's difficult to know for sure whether your drive is bad or perhaps the computer itself is experiencing some kind of problem. If you have another computer nearby, try connecting the drive there to see if it can be detected there. If the drive doesn't work on any computer you connect it to, then it's probably completely damaged and will need to be replaced.
If the disk is detected and works on other computers, then there is a high probability that in the Windows
There are problems with the drivers for your disk.
You can check this using the Device Manager
, which can be opened in various ways. The list of ways to access the application is quite large, but we will describe only three of them.
Method one
: Right-click on the
“Start”
located on the
“Taskbar”
or press the
“Windows + X”
and open the pop-up menu.
Select the "Device Manager"
.
Method two
: Open the
Run
Windows + R
key combination together .
Open
prompt, enter the command
"devmgmt.msc"
and press
Enter
or
OK
.
Method three
: Open the
Computer Management
in the manner we described earlier in this guide.
In the left pane of the window, go to the following address: “Computer Management (local)”
–
“Utilities”
–
“Device Manager”
.
Find the "Disk Devices"
and check for any device with a yellow exclamation mark located near it.
This marking of a disk device means that the Windows
has encountered certain problems with the driver for this device.
Right-click the device with the yellow exclamation point, select Properties, and
look for the error message. This message may help you troubleshoot the problem - you can search for a solution to the indicated error on the Internet and fix the problem.
Recovering information on a hard drive
If there are important files on the disk, you can try to extract them after the disk has been initialized using EaseUS software.
Step 1: Go to URL: https://www.easeus.com/datarecoverywizard/free-data-recovery-software.htm and click “Free Download”.
Step 2. Launch the downloaded file by left clicking the mouse.
Step 3. Select a language and click OK.
Step 4. Click “Next”.
Step 5. Click “Accept”.
Step 6. Next, click “Confirm”.
Step 7. In the next window, click “Install”.
Step 8. Click “Finish”.
Step 7. Select the drive and click “Scan” to start scanning the deleted data.
Step 8: After scanning, you can view your lost files by selecting categories and folders on the left. Having selected the necessary files in the central window, click “Recover” at the bottom right.
Step 9. Select a folder to save the recovered files and click “OK”.
After some time, the data will be restored.
A folder with recovered files will open.