How to make a table in Word: Inserting a table
There are several ways to insert tables, but any of them begins by clicking the Table located in the Tables Insert tab of the toolbar.
After executing the command, all table creation tools will be displayed on the screen, each of which offers its own insertion method.
First way.
Insert Table area allows you to add a simple table with the required number of rows and columns to your document. To do this, move the pointer to the cell where the table should end and left-click. Please note that the borders of the cells included in the created table are highlighted in color.
For example, clicking the left mouse button will create a table containing five rows and six columns. All you have to do is fill it with content.
Second way
Consists of the following actions:
- Run the Insert Table .
- In the window that opens, enter the number of columns and rows in the appropriate fields in the Table Size . OK to complete creation .
NOTE
In order to quickly create the correct table, containing exactly as many rows and columns as needed, before you start inserting, you should think about its structure and imagine what it should look like. Sometimes a sketch is made on paper for this.
Third way.
Run the Draw Table in the Insert Table . The text cursor will turn into a mouse pointer and take on the appearance of a pencil. This means that Word has switched to table drawing mode. To draw a cell, left-click where you want its upper-left corner to be and, while holding the button, move the pointer to the lower-right corner of the cell. Release the button. The first cell of the created table will appear in the document. To exit drawing mode, press the Esc .
Fourth way.
Convert to Table command in the Insert Table allows you to create a table from existing text. To understand the essence of this method, follow several steps.
Create a file Lists containing lists. Select its contents. To make this more convenient, use the key combination Ctrl + A.
Run the command Insert ► Table ► Convert to Table .
In the window that opens, click OK, Word will automatically format the lists in the form of a table.
Fifth way.
Excel Table tool allows you to add complex tables created using formulas and functions in Microsoft Excel to your document.
Express tables
The essence of this function is to select a specific template that may be suitable for organizing your data. In the 2003 edition of the office this is called "auto format".
Again, all actions are performed using the “insert” tab, the “table” button and selecting the “express tables” drop-down list, where we need to select the template we need.
After choosing the type you like, you can edit the inserted plate to suit your data.
How to make a table in Word: Table Builder
When creating a table and when editing it, two additional tabs appear on the toolbar: Design and Layout . They are designed to change the structure and appearance of the table.
Design tab is responsible for changing the appearance of the table.
In the Table Styles the Design tab , you can use ready-made stylistic solutions to change the appearance of the table. To do this, hover your cursor over one of the ready-made table styles, and your table will immediately change its appearance. To confirm the selected result, click once on the style you like.
In addition, you can create your own unique table style using the Create table style (1).
This will open the Create Style , where you can change the font, font size, text color, background color and much more. Changes can be applied both to the entire table and to its individual elements.
The Fill button the Table Styles section allows you to color the selected cells in any color you like.
Table Style Options section allows you to color certain rows and columns of the table with one click. Using this section, you can color the title bar, total bar, first and last columns, and also alternate colors in the bars and columns.
The last section of the Design tab is called Framing. It includes tools for changing the thickness of table borders, their style and color.
Borders button allows you to change the style of borders automatically; just select certain cells or the entire table, and select a specific border from the drop-down list of the Borders .
There is also a manual mode for changing boundaries. Border Coloring button is responsible for it . When you activate this button, the mouse cursor changes to a pen, thanks to which you can color the table borders the way you want.
Working with tables
After you have made a table in Word , or when you click or select the created table, the Working with Tables section appears in Microsoft Word, which includes several tabs: DESIGNER and LAYOUT. These tabs contain tools with which you can adjust the table, for example, make a beautiful table in just a few seconds. Let's look at the main tools.
CONSTRUCTOR tab
The CONSTRUCTOR tab is intended for adding style to the table, changing the table borders, setting up columns and header and total rows.
How to make a table in Word – Working with tables, Design tab
If you want to make a beautiful table in Word, but spend as little time and effort on it as possible, then in the “Table Styles” group there is a collection of different table styles that you can apply to your table. To do this, just click on the style you like. And from a simple table, you can get a completely different one, with certain formatting.
How to make a table in Word - Example of adding a table style
In the “Table Style Options” group, you can modify the resulting table by managing the available items.
How to make a table in Word – Groups Table Style Options and Table Styles
For example, you can add a header row or a total row, or change the formatting for alternating rows and columns.
On the same tab, in the “Bordering” group, you can change the borders of the table.
How to make a table in Word – Border Group
For example, remove or add a line in the table, change the border color or thickness, make the table bold. You can also make the table invisible using this group.
LAYOUT tab
The LAYOUT tab allows you to change the structure of the table, change the direction of the text, make it vertical or horizontal, and much more.
How to make a table in Word – Working with tables, Layout tab
In the Table , you can select the current cell, column, row, or entire table; open table properties for detailed settings; and show or hide the grid for invisible tables.
The “Drawing” group is intended to create a table of any kind, for example, a very non-standard one. This method has already been mentioned above.
Using the tools in the Rows and Columns group, you can insert rows or columns at a specific location or delete existing ones.
How to make a table in Word – Working with tables, groups Table, Drawing, Rows and Columns
The “Merge” group is intended for merging or splitting cells, as well as for splitting a table. This article explains how to correctly create a table break
In the “Cell Size” group, you can set the row height and column width, or align their height or width, and also select automatic selection of the column size in the table.
The “Alignment” group is responsible for the direction of the text in the table, i.e. you can choose horizontal or vertical, and you can also choose the alignment of text in cells; and set the margins and cell spacing.
How to make a table in Word – Working with tables, groups Merge, Cell size, Alignment
In the “Data” group, using sorting, you can make a table alphabetically ; convert table to text; enable repetition of header lines, i.e. make a repeating table header; and also add simple calculation formulas to cells, such as sum, average, quantity and others.
How to make a table in Word: Drawing a table
We have already figured out the purpose of the designer tab, now it’s time to get acquainted with the capabilities of the Layout tab . As mentioned earlier, the Layout is responsible for the structure of the table. It allows you to create and delete table rows and columns, set a specific cell width and height, and change the direction of text in the table.
Let's get acquainted with the tools of the Layout and learn all their capabilities.
Let's start with the Drawing . It allows you to manually create additional table cells, split and merge created cells. This section contains two buttons: Draw table and Eraser . As you might guess, one draws lines, the other erases them.
If you need to change the line thickness and color, you can do this on the Design tab.
Option 1: Split cells
The simplest, but not always suitable way to add new cells to a Word table is to split an existing one. This can be done through the context menu or using the tools of the “Layout” tab (the “Working with Tables” group). You will first need to indicate where new elements will be added, and then specify the required number of rows and/or columns. All the nuances of this procedure are described in more detail in a separate article on our website.
Read more: How to split cells in a Microsoft Word table
How to make a table in Word: Merging and splitting cells
The Merge section of the Layout tab contains tools for automatically merging and splitting cells, as well as for splitting an entire table into several separate tables.
To merge several cells into one, you must first select them and then click the Merge Cells .
To split a specific cell into several parts, you need to click on the cell, a text cursor will appear in the cell, and then click on the Split cells . When the Split Cells , you must specify the number of columns and rows you want.
There is an even faster way to merge and split cells: just right-click and select the appropriate item in the context menu to merge and split cells.
To split a table into two separate tables, click on the Split Table button. In this case, the text cursor must be placed in the cell that will be the first in the new table. The table is split horizontally and an empty paragraph appears between the two tables.
To merge two tables, simply delete all rows between them using the Delete key.
Change the color of cells in a ready-made table in Word 2003
After creating the sign, you have the opportunity to fill it with the desired color. To do this, you need to select the desired cells and right-click on the selection. In the context menu you need to select the “borders and fill” command.
An options window will open, in which we are interested in the “fill” tab. Go to it and select the color we need and then click “OK”.
After which we can admire the result.
And now I propose to consider modern versions of the office.
How to make a table in Word: Selecting table cells
Selecting cells in a table may seem quite simple at first glance. However, there are some nuances and tricks here.
So, before performing any operation on the cells in the table, you need to select these cells. Otherwise, the operation will be performed in the cell in which the text cursor is blinking.
Let's first consider a simple selection of one cell; as they say, you need to start small.
To select a cell in a Word table, simply move the mouse pointer to the edge of its left border, while the cursor must still be inside the cell. As the cursor approaches the left border, the cursor will change to a black arrow. Then you need to left-click (hereinafter referred to as LMB ) to select the cell.
In order to select an entire row in the table, you need to move the cursor beyond the left border of the desired row, and the cursor will take the form of a right-handed arrow. And then click LMB to select the entire table row.
To select a column , place the cursor over it. When the cursor changes to a black arrow, click LMB.
To select several adjacent cells , columns or rows, you need to hold down the LMB and drag the cursor from the first to the last cell and then release the LMB.
The same thing can be done using the Shift , but the procedure is slightly different. To begin, select the first cell (row, column), then hold Shift and select the outermost cell (row, column). This will highlight the range from the first cell to the last.
To select non-adjacent cells, you need to hold down Ctrl key and select the desired cells with the mouse cursor.
And finally, to select the entire table, you need to click on the square with arrows in the upper left part of the table. This square is also used to move the table.
How to make a table in Word: Adding and removing rows (columns)
There are several ways to add and remove cells (rows, columns) in a Word table. Let's get to know them in more detail.
First way
Go to the Layout in the Rows and Columns . Here you will see tools for adding and removing cells (columns, rows).
To add an additional row to the table, you need to place the text cursor in the cell relative to which the row will be added. Then you need to click the Insert Top or Insert Below in the Rows and Columns . An additional line will be inserted either above or below the cell with the text cursor, depending on the button pressed.
To insert an additional column, you need to do the same thing: place the cursor in the cell and click the Insert Left or Insert Right .
Using the Delete the Rows and Columns section of the Layout tab , you can delete unnecessary cells, columns, and rows. You can even delete the entire table.
Second way
Not everyone will find it convenient to constantly go to the Layout tab to add or delete a row or column. It is much more convenient to use the context menu that appears when you right-click (hereinafter referred to as RMB ) on one of the cells.
The mechanism for adding and deleting rows and columns is the same as the first method. Select the desired column (row), then press RMB and select one of the buttons from the context menu: Insert columns on the left (right), Insert rows on top (bottom), Insert cells .
You can also delete cells (rows, columns) through the RMB context menu by selecting Delete cells...
Third way
In my opinion, this is the easiest way to add and remove columns and rows, but it is only available in the latest version of Word.
So, if you move the mouse cursor to the left edge of the line, a marker with a “+” sign will appear, and when you click on it, a line will be added above the marker.
A similar marker appears if you move the mouse cursor to the top edge of the column. Then the addition of a new column will occur to the right of this marker.
Fourth method
There is one useful feature in Word. , the Quick Format panel automatically appears , which contains buttons for inserting and deleting columns and rows.
Option 4: Drawing by yourself
The methods presented above solve the problem stated in the title of the article, but with some limitations - the first allows you to turn one cell into two or more, and the second and third increase the table by a row, column, or several of them at once. However, in some cases it may be necessary to add one and/or more cells to a random location in the table, leaving the rest of the table unchanged. The easiest way to do this is by drawing yourself.
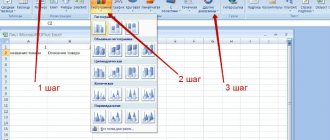
- Go to the “Insert” tab, click on the “Table” button and select “Draw Table”.
Tip: You can call the same tool by first selecting the entire table or any part of it and going to the “Layout” tab.
- The usual cursor pointer will immediately change to a pencil, with which you can draw the required number of cells anywhere in the table.
So, if you need to add just one,
Just draw a rectangle of the required size.
If there is more than one, make a rectangle of suitable size in the right place,
and then divide it into the desired number of rows and/or columns.
Or, as an option, draw the required number of rectangles one by one.
When using this tool, it is important to draw exclusively straight lines and, if splitting cells, strictly from border to border.
This way, you can add not only one cell corresponding to the size of those in the entire table, but also one smaller one or, conversely, a larger one (for example, the size of an entire row or column), or several at once, taking up the same space as one.
- You can find out in more detail about what other capabilities the manual table drawing tool provides and how to use it, from the instructions provided at the following link.
Read more: How to draw a table yourself in Word
How to make a table in Word: Entering data into a table
To fill cells with text information, just click on it with the left mouse button. This will cause a blinking text cursor to appear in the cell. Then you can start entering data.
To fill cells line by line, you can use the hot key Tab . It allows you to move through cells from left to right.
To move to the previous cell, press Shift + Tab
You can also move through the cells using the arrows on the keyboard : up, down, left, right.
The text in cells can be formatted as you like: change the font, font size, text color, background color, etc.
In addition, in the Layout in the Alignment , you can find tools for aligning text relative to the cell. They allow you to align text horizontally and vertically. Those. You can press the text to the left (right) or top (bottom) corner of the cell, or position the text in the center of the cell.
The Alignment section also has a tool for changing the direction of text. If you click on the Text Direction , the cell in which the text cursor is located will rotate the text 90° clockwise. If you click on this button again, the text will be rotated 180° relative to the first position, etc. Thus, with the help of one button you can choose any direction of the text.
You can change the direction of the text through the context menu by right-clicking by selecting Text Direction... In the dialog box that appears, select the text orientation.
How to make a table in Word: Table dimensions
There are several handy tools for resizing table rows and columns in Word.
In the Layout the Cell Size section, you can change the row height and column width with an accuracy of a tenth of a millimeter. However, such precision is useful in very rare cases. Here you need to keep in mind that changing the height of one cell will change the height of the entire row. And changing the cell width will affect the entire column.
If accuracy is not important for you, but you just need to set the same row heights or column widths, then in the Cell Size there are special buttons for aligning selected table cells. With their help, you can align the row heights and column widths both in the entire table and in selected cells.
You can also resize cells manually; just move the mouse cursor to the border of a row or column, then the appearance of the cursor will change. And by moving the pressed LMB you can change the row height and column width.
In addition, you can change the size of cells using a ruler. The mechanism for changing sizes is the same as in the method described above. Move the mouse cursor to the ruler, namely to the area with the grid, hold down LMB and move the cursor to the desired distance, thereby changing the size of the cells.
Well, to change the size of the entire table, just move the market in the lower right part of the table.
Also in the Cell Size of the Layout tab there are several more useful tools for changing cell sizes, namely Auto-Fit to Content , Auto-Fit to Window Width and Fixed Column Width .
AutoFit by Content button changes the column width based on the size of the text in those columns.
The second button Autofit to window width stretches the table to the entire width of the page.
And the third button, Fixed column width, blocks resizing of the column and, when the volume of text in the column increases, the text is moved to a new line, while the column width remains unchanged.
The process of creating a table in Word 2003
If you want to create a table in the 2003 version of Word, place the cursor on the worksheet where you want the table to be. After this, follow the instructions:
Step 1. In the menu at the top, find the “Table” section, then “Insert”, then click on the “Table” icon.
Find the “Table” section, then “Insert”, then click on the “Table” tab
Step 2: The Insert Table menu should appear. Decide on the parameters (number of rows and columns) and enter these values.
In the fields with numbers, enter the appropriate number of rows and columns
In this window, you can also edit the “Auto-fit column widths” option:
Auto-Fit Column Width settings
- when you select “Constant” in the “Automatic” value, the columns will become the same width;
- when you select “Constant” and enter the required size, the columns will become the selected width;
- If you select "Fit to content", the width will be oriented to the largest content of the cell;
- if you select “Fit to window width”, the table will adjust to the width of the entire page, and its columns will be equal in width;
- The AutoFormat button allows you to customize the format.
On a note! There is another way to place a table in Word 2003. Click on the “Add table” panel, then mark the number of rows and columns, click once.
Click on the “Add table” panel, mark the number of rows and columns, click once
How to make a table in Word: Working with data
It is not uncommon to have to perform some manipulations with the data in the table. For example, sort the values in ascending order, or calculate the sum of a column, and if the table is large and does not fit on one page, then you need to move the headings to a new page for more information. the Data the Layout tab comes to our aid . Let's take a closer look at all the tools in this section.
So, the Sort allows you to sort the data in a column in ascending and descending order. This tool works with both numeric and alphabetic values, sorting them alphabetically.
First, you need to select the entire table (it’s much more convenient to work with sorting this way), then click the Sort the Data section the Layout tab . In the dialog box that appears, in the First by , select the column by which we need to sort the data. As an example, let’s sort the data in ascending order in the “1st quarter” column. In the drop-down list, in the “ First by ” , select the column name “1st quarter”. Leave the Number ascending sort in the checkbox
As a result, we will get a sorting of workshops from the most unprofitable to the most profitable. This tool will be very useful in working with tables.
And don’t forget that this sorting can also be done using text data, for example, arranging the names of participants from A to Z.
The next useful tool in the Data is the Repeat Header Rows button. It can be used to automatically transfer headings to a new page. Just place the text cursor in any cell with a heading and click the Repeat heading rows button. And when the table moves to a new page, all headers will automatically be added to the new page.
The next tool in line is the Convert to Text . It deletes the table but retains all its data. When you click on this button, a dialog box appears in which you can select the type of separator: paragraph, tab (space), semicolon and other (any character of your own). As a result of the transformation, you may get the following result (see screenshot below).
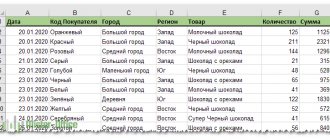
And the last tool in the Data section is the Formula . With its help, you can calculate the sum of columns, calculate the arithmetic mean, display the minimum or maximum value in a cell, and many other operations. In parentheses after the formula name, the position of the initial values is indicated (ABOVE - top, BELOW - bottom, LEFT - left, RIGHT - right).
As an example, let’s calculate the sum of the “ 1st quarter ” column. To do this, we will use the “SUM” formula and indicate that the data should be taken from above the cell. As a result, we will get the following formula: =SUM(ABOVE) . In the number format section, select the item Rubles . Click OK. As a result, the formula will calculate the column amount for us and convert it into ruble format.
How to create a table in Word: step-by-step instructions for beginners
Another useful article on our website will tell you about the intricacies of working with the Word text editor. The latter has long become an indispensable working tool, allowing you to solve many problems. However, it is important to know about its capabilities and be able to use them. Today we’ll talk about how to make a table in Word. The process is quite simple and even a novice user can handle it. The main thing is to follow our instructions, which we will describe in great detail in the article.
How to make a table in Word
If you need to organize certain data or compare two objects, a table will come to the rescue. To create it, no special knowledge is required. The main thing is to master a simple algorithm and know where the right tool is.
At the top of the screen there is a toolbar with various sections. In our case, you need to go to the “Insert” tab and select the “Table” subsection. A menu will open with several tools. Let's look at each of them.
- Inserting a table - constructor. It looks like a field of their cells, which by default allows you to insert an area of 10 units horizontally and 8 units vertically. If the table fits into the proposed framework, then just use the mouse to select the desired area corresponding to the number of required rows and columns. The result will instantly appear on the page.
- If you need more cells vertically or horizontally, the following Insert Table tool will help. After clicking, a new dialog box will appear in which you need to specify the table parameters (number of rows and columns). You can also adjust the width of the columns and set parameters for the placement of text in cells. Then we confirm our actions with the “Ok” button. If necessary, you can save your settings to automatically configure the following tables.
- The next tool asks you to draw a table. In this case, a pencil appears in the work area, which draws lines that form the table. The user creates a layout area, and then draws the table with the required number of rows and columns. Regardless of artistic skills, the lines are smooth and perpendicular to each other.
- The next available tool is “Excel Table”. After clicking, a table appears in the workspace of the text document corresponding to the above program and with all the functionality available to it. This will be useful if you need to quickly fill a table area with data using mathematical formulas.
- The last menu item worth talking about is Express Tables. Ready-made templates for non-standard solutions are located here. For example, calendar tables, ready-made designs with a header, and so on. The peculiarity of this section is that the user can add his own templates by simply selecting a frequently used format and saving it through this menu.
Here are all the table creation tools available to the user. After this description, one could consider the question of how to create a table in Word exhausted. However, we want to tell our readers a few more nuances so that they get as much benefit from reading as possible.
Editing a table
In this section, we will figure out how to modify a table inserted into a text editor. Often the user needs not just a set of a certain number of rows and columns, but also some formatting. Let's talk about him.
After inserting a table, a special block becomes available to the user in the tools section at the top of the screen. It is called “Working with Tables” and includes two tabs “Design” and “Layout”. In the first one, you can define your own or select ready-made table styles. The second allows you to insert, delete, merge cells, as well as set the size and alignment of the data and the table itself.
Important! For the “Working with Tables” block to appear in the toolbar, you must select the table or place the cursor inside a cell. All changes in the structure must also be carried out in advance by selecting the entire object or the desired area.
Merging or splitting cells
Often, to create a table header, you need to merge cells. To do it right, follow our algorithm.
- Select the area that needs to be merged using the mouse.
- In the toolbar, go to the “Layout” tab of the table area.
- In the “merge” menu, click on the button that opens the drop-down menu and select the desired action.
You can divide cells in a similar way. To do this, simply select the appropriate command in the drop-down list. After this, a dialog box will open in which you need to specify how many rows and columns you want to divide the selected area into.
These tools allow you to quickly and easily give your table the desired structure.
Borders and Shading
Now let's talk about what to do when the need to visually highlight areas is added to the question of how to create a table in Word. In this case, there are several options: filling the desired area with a certain color, highlighting the cell with a special border style.
In order to paint a cell, you will need the fill tool. To use it, you don’t have to go to the “Layout” tab. You can also find it in the toolbox of the main section. The icon looks like a bucket of paint and a stripe indicating the selected color. Just select the desired area and click on the icon, and then select a color.
Advice! For the budget conscious. If you plan to print the material, we recommend choosing paler color solutions (for example, if a black fill is required, it is better to give preference to gray). This will reduce ink consumption in the printer.
The cell border style is set using the tools on the Design tab. Expand the drop-down menu of the “Framing” section. Here you can not only highlight the boundaries of a certain area of the table in a special way, but also delete or restore them. This will give the object not a standard rectangular, but a special look.
It is worth noting that almost all of the described actions are available through the context menu. To do this, just select the cells or the entire table, depending on your goals, and right-click. All available actions will be presented in the tool block that opens. All you have to do is select the one you want and click on it.
We have presented a detailed guide to the work and after reading the article, the question of how to create a table in Word will not arise. If something doesn’t work out for you, you have additional questions, or you need to do something that is not included in the article, we are waiting for you in the discussions. We will answer all questions. And you, in turn, share the article on social networks and stay with us.
Table properties
Almost all of the above operations with a table can be done through Table Properties, which is located in the context menu when you right-click on the table.
When you open Table Properties, you will find several tabs: Table, Row, Column, Cell, Alt Text.
In the Table , in the Size , you can control the width of the entire table. Width checkbox , you can set the exact width in centimeters, or you can set the width in percentages, then the width of the table will adjust to the width of the sheet and when changing the borders of the sheet, the width of the table will also change.
In the Alignment , you can position the table relative to the right and left edges, or place it in the center.
Wrap section enables a mode in which the text will be placed either around the table or after it.
For a more precise location of the table on the sheet, there is a Placement . Here you can set the horizontal and vertical position, as well as the distance from the surrounding text.
To adjust the margins in cells and the spacing between cells, click the Options the Table tab . In the dialog box that opens, you can adjust the margins and spacing in centimeters.
And finally, when you click on the Borders and Fills , a dialog box will open in which all the functionality of the Design , discussed at the very beginning of the article, is hidden. Here you can adjust the line type, its appearance, color and thickness.
Row , Column , and Cell tabs allow you to adjust the row height, column width, and cell width, respectively. The Previous line (column) and Next line buttons allow you to navigate through cells without closing the dialog box.
Drawing
If the rows and columns do not need to be the same size, draw it by hand. How to draw a table in Word? Select: The cursor will change to a pencil shape. Let's draw the outer border. Draw a rectangle with the selected width and height. Click LMB and draw it.
Draw the columns and rows. Draw the lines with a pencil.
Editing occurs as in the cases discussed above.