You will need:
- Mac computer with an Intel processor (2007 or newer) with the latest Mac OS updates installed.
- Windows OS ISO image and license key.
- Blank USB drive (if you want to install Windows from external media).
- Free hard drive space: 55 GB or more for installation via Boot Camp.
- Parallels, VMware or VirtualBox program for installing a virtual system.
How to install a Windows program on Mac?
To fully work in a Windows environment, you need to install the distribution using the built-in Boot Camp utility or a virtual machine (Parallels Desktop, Virtual Box, VMware Workstation and others). There is also an alternative option for installing Windows applications directly on macOS using WINE. This is specialized software that adapts 32- and 64-bit Windows applications using WinAPI. We wrote more about this method in this material.
We hope that you found this material useful. Leave your questions in the comments below.
See also:
- Features of the ⌥Option (Alt) key on Mac (macOS) that you might not know about.
- How to make calls (cellular calls) from an iMac, Macbook Pro, Air or Mac mini?
- Active corners on macOS: what they are, how to set up and use them.
October 5, 2020 Tags: iFaq, Mac secrets, macOS Sierra, OS X, OS X El Capitan, Apple News.
Comments for the site
Cackl e
Boot Camp
Boot Camp technology allows you to install Windows on a Mac computer as an additional system on a separate hard drive partition. When you turn on or restart your computer, you can choose whether to run Mac or Windows.
To select the system to start, press and hold the Alt (Option) button on your keyboard while your computer is restarting. Mac OS starts by default.
When you boot into Windows, all computer resources will be used to run it (unlike virtualization). This will provide better performance when working with multiple applications or resource-intensive programs such as graphics editors and 3D games. To switch between operating systems, you need to restart your computer.
To install Windows on Mac using Boot Camp:
- Prepare an ISO image with Windows Installer (you can download the image from the Microsoft website).
- Launch Boot Camp Assistant from the Utilities folder (use Spotlight for quick access) and select the following:
- Create a Windows installation disc and insert a blank USB drive.
- Install Windows 8 or later.
- The Boot Camp installer will prompt you to partition your hard drive to install Windows into a new sector: click Continue. Apple recommends setting aside 55 GB for Windows 10 installation.
Note: According to Microsoft recommendations, 20 GB of hard drive space is sufficient to install Windows 10. It should be remembered that additional space must be left for the system to operate and install programs. In addition, it is quite difficult to change the sector size on the disk in the future, so it is better to immediately reserve a sufficient reserve.
If you don't have enough space on your hard drive, install an earlier version, such as Windows XP (Service Pack 3). It requires only 5 GB to install and is also compatible with iSpring programs.
- Continue the installation process as directed by Windows Installer.
Check out the installation process in more detail on the official Apple website:
How to Install Windows Using Boot Camp →
Installing Windows 7 and earlier versions →
Click Continue.
Installing Windows on macOS
In total, there are three ways to install a Microsoft OS on an Apple computer - using a virtual machine, installing on a separate partition using Boot Camp, and merging mode, in which the OS installed via Boot Camp can be launched without rebooting the machine. Let's look at them all in order.
Method 1: Using a virtual machine
If you need to use Windows for simple tasks like office work or only from time to time, the best option would be to install this OS on a virtual machine. There are three of them for macOS: Parallels, VirtualBox and VMvare. The example below shows the installation of a Microsoft OS in the VirtualBox environment.
- To download the VirtualBox installer for Mac, on the download page, click on the “OS X Hosts” link.
- After downloading the installer, run it. The installation process is no different from that of any other program on macOS. Once installation is complete, launch the application - by default it is installed in the Applications directory.
- From the VirtualBox main menu, use the New button.
- The interface for creating a new virtual machine will appear. First you need to set a name (for example, let's say Windows 10), and also select the type and version. When you specify the name from the example, the appropriate version will be installed automatically. To continue, click “Continue”.
- At this stage, you need to set the amount of RAM that will be used by the virtual environment. It is recommended to set values equal to 50-60% of the available amount: for example, with 4 GB of RAM, it would be reasonable to set the value to 2048 MB.
- Next, you will need to select one of the HDD formats that the virtual “ten” will use. To install the system, select the “Create a new virtual hard disk” option.
Now set the type of Virtual HDD used. The default option is set to VDI, you can leave it.
Also leave the data storage format as “Dynamic virtual hard disk”.
Set the storage capacity, 50 GB will be enough. Don't be alarmed by the large numbers, the actual size of the VDI file will be several times smaller.
- After these steps, a new virtual machine will be created. You will need to install Windows 10 on it like on a regular computer, and here everything is not so simple. To begin with, you should prepare the environment: select the item of the desired machine in the appropriate menu and click on the “Configure” button.
- First of all, open the “System” - “Motherboard” tabs and in the “Boot order” section, uncheck the “Floppy disk” option. Also don't forget to activate the "Enable EFI" option.
- Next, open the “Media” tab. Click on the controller entry, then find the “Optical drive” item and click on the button with the disk icon.
In the pop-up menu, use the “Select optical disk image...” item.
In the Finder dialog box, navigate to the location of the ISO image you want and select it.
- Then click OK to save any changes you made and close the customization tool. When you return to the main application, use the "Launch" button.
- If you did everything correctly, the installation of Windows 10 will begin.
The further procedure is no different from installation on a real computer, so we will not dwell on it in detail.
This option allows you to use the “top ten” without rebooting, but it is not suitable for launching games or other resource-intensive applications.
Method 2: Installation via BootCamp
Sometimes macOS users require Windows to run specific software. As practice shows, rare and highly specialized applications on a virtual machine often refuse to work normally. In such cases, it seems advisable to install a full-fledged Windows on a separate partition of the hard drive using the Boot Camp tool. All the features of the procedure were described by one of our authors in a separate material, so we recommend using the link below.
Lesson: Installing Windows on Mac using BootCamp
Method 3: Hybrid installation
There is also a method that allows you to combine virtualization and full installation via Boot Camp.
- First of all, install the Microsoft OS on your Mac via Boot Camp; the instructions above will help you do this.
- You can use both VMware and Parallels to enable a hybrid system. The last option is much more convenient, so we will use it.
Attention! Oracle VirtualBox does not officially support hybrid system!
- Install Parallels on Mac. After installation is complete, open the program - the “Use Windows from Boot Camp” option should automatically launch, click on the corresponding button.
- The installation process will start. It usually takes a long time, so be patient.
- At the end of the procedure, the installed Windows 10 will automatically launch, configured and ready for use.
This option combines the advantages of the first methods presented, but requires paid software.
Virtualization
Virtualization software allows you to run an operating system (virtual machine) inside another. This makes it possible to run Windows as an application on Mac OS.
There are several widely used programs for virtualizing Windows on Mac:
- Parallels Desktop (from RUB 3,990)
- VMware Fusion (RUB 5,153)
- Oracle VM VirtualBox (free)
iSpring users are recommended to use Windows using Parallels or VMware.
This is what Windows looks like running on a Mac computer in VMware Fusion:
Using virtualization, you can work with two operating systems in parallel, running Windows in a separate window as an application or expanding it to full screen.
Unlike Boot Camp, virtualization does not require partitioning the hard drive. In addition, you can easily transfer the virtual version of Windows to another computer or delete it as a regular file.
When using virtualization, Windows works less efficiently because the two systems share the computer's resources (processor and RAM) between each other. If you plan to use lightweight applications such as iSpring, they will function fine in a virtual environment.
To install Windows using Parallels:
- Prepare an ISO image of Windows (you can download the image from the Microsoft website).
- Install Parallels Desktop for Mac.
- Create a new virtual machine: File > New or press Command + N on your keyboard.
- Select the option Install Windows from a USB flash drive or using an ISO image.
Read more on the official Parallels website.
Tips for working with Parallels
Use of computer resources. Windows virtualization applications can only use a portion of your computer's resources. To improve performance, in the settings panel, allocate more processor cores and more RAM to Parallels. Please note iSpring's minimum technical requirements.
OS display method. Using a virtual machine, you can choose exactly how the two systems will be displayed. We recommend Full Screen mode. The default Coherence mode can be confusing when working with PowerPoint and iSpring, as Windows applications appear directly on the Mac desktop.
Screen resolution. Retina displays in modern Mac computers have high resolution. Because of this, icons and fonts in some Windows applications, including iSpring, are displayed very small. To avoid this:
- In Parallels settings, go to Hardware > Video and make sure the Retina friendly option is selected.
- Right-click on the Windows desktop > Screen Resolution > Make text and other elements larger or smaller, set the scale to 100% and click Apply.
Read in the Parallels knowledge base: Problems with virtual machine screen resolution on portable Macs with Retina display →
How to install apps and games from the Mac App Store
The main way to install apps on a Mac is still the Mac App Store. First of all, to download any software from the Mac App Store, you will need an Apple ID account. You will find detailed instructions on creating an Apple ID on this page.
In the Mac App Store, everything is simple “Apple-style” - launch the branded store, log in to your account and find the application you are interested in in the “Selection”, “Top Charts”, “Categories” tabs or through the search and click the “Install” button.
Once the download and installation process is complete, the application will appear in Launchpad (screenshot below), as well as in the Applications folder of the Finder.
ON TOPIC: Applications (games) cannot be downloaded from the Mac App Store - solution
Boot Camp + Virtualization
You can use virtualization in combination with Boot Camp. For this:
- Install Windows via Boot Camp on a separate sector of the hard drive, as described above.
- Install a virtualization program (for example, Parallels).
- When creating a new virtual machine, select Use Windows via Boot Camp.
Pay attention to the installation order: first Boot Camp installation with disk partitioning, then connecting this image through a virtualization program. If you install Windows OS on a virtual machine first, you will not be able to boot into Windows.
By combining the two methods, you can enjoy the benefits of both:
- You can run Windows on Mac OS to work with two systems in parallel without rebooting. This is useful if you need to work with iSpring programs or other “light” Windows applications.
- Can boot to Windows for maximum performance. This will allow you to work with resource-intensive graphic editors that may not start when working with a virtual machine.
Note: The free VirtualBox application does not allow you to use Windows through Boot Camp.
Perhaps the only drawback of combining the two methods is the problem of activating Windows and some programs. Every time Windows starts, it checks to see if the hardware has changed since installation. When you alternate booting Windows between Parallels Desktop and Boot Camp, Windows Activator notices the difference in hardware (virtual and real) and may require reactivation. Solving this problem is not difficult.
Read more on the Parallels website →
How we clutter the system
And it turns out as follows. We install the program, uninstall it after a while, but there are a lot of residual files of various settings and the like.
Desktop
Unfortunately, everyone knows about this, but this rule is ignored. The desktop is one of the system folders; do not clutter your desktop with files, folders and archives.
If possible, save not on the system partition, but if you need quick access, place folder shortcuts on the desktop.
The latest iCloud updates have added a desktop synchronization feature. Now placing any file on the desktop entails placing it in the ICloud folder on the computer, as well as in the ICloud folder on the Apple server. That is, you store duplicate files and folders on your computer unnoticed.
Adobe
Have you noticed that sometimes after re-installation, installers, in particular Adobe, no longer ask you for your login and password, but fill it in automatically. Or, after reinstallation, all previously made settings are saved. These are the signs that indicate a large number of residual files in the system.
For a long time I used Photoshop, After Effects, Dreamweaver for my work, and installed Adobe Flash Player for the Safari browser. Until I encountered real operating system brakes and all the difficulties of uninstallation. When I tried to find a solution on the Internet, I realized that I was far from the first.
And under pressure from censorship, and not just bad reviews, Adobe nevertheless released an Uninstaller for its software, which I strongly recommend everyone use when uninstalling. Removal utilities you can.
At the same time, I would like to note that with the advent of Adobe Creative Cloud, the launch time of programs has increased significantly. And installing these programs also increases the system boot time. It doesn’t matter whether you remove Adobe services from autorun or not. It is difficult to judge what this is connected with.
Did you know that all Adobe photo and video editors create their own Cache. If you create a small video in After Effects, then its volume can be 12-15GB, and when you create a poster for printing in Photoshop, up to 40GB of hard drive memory is used. Why Photoshop needs such a huge amount of memory is anyone’s guess, but it is what it is. The allowed volume can be reduced in the program settings, and you can also move the caching folder and disk usage from the system partition to any other. How do you think this affects the performance of your Mac or Hackintosh?
Autodesk
The second developer of cluttering software is Autodesk. The editors of these developers litter, although more or less less, but it is still not pleasant to clean out leftovers from various system folders. It is common to be unable to install another version after uninstalling Autodesk products. The developers do not provide utilities, but you can find a lot of information on the developers forum.
It's very nice that with the latest versions of Maya things are already a little better. It was really hard with versions 2013-14. The installation of Autodesk programs does not affect the system boot time in any way, which is good news.
Virtualization programs
Virtualization programs such as Parallels Desktop and Virtualbox significantly slow down the system. In this case, the system begins to slow down only after installing any system on the virtual machine; the location of the virtual machine image does not matter. The system takes noticeably longer to load and we work less quickly even with the virtualization program and virtual machine not running.
When deleting, you can clean it by the name of the program through the Finder search. After removal and cleaning, all system parameters return to normal.
Cleaning utilities
Starting with El Capitan, cleaning utilities not only do not bring the expected effect, but can also cause irreparable harm to the system. Which can lead to restoring from Time Machine, if you use it, or reinstalling the system. This is not at all difficult to achieve by setting the wrong utility settings.
In El Capitan, CCleaner, MacClean, CleanMyMac utilities do not have enough rights to access system folders, this is due to Apple security innovations. In this and subsequent versions of Sierra, it is not a complete cleanup, as was previously the case, but a cache of programs installed on the computer. The system cache and browsers are not accessible to utilities.
It’s interesting that they still write that the browser cache is cleared, but when you log in, you understand that all the history and data of the sites are there.
When using various cleaning utilities, be extremely careful when checking the cleaning boxes.
Conclusion
What conclusion can be drawn from the above?
- Be extremely careful about the software you install on Mac OS X. If possible, use Portable versions.
- If possible, use analogues of programs that are installed by the OS X installer. In the case of Maya, it is difficult to find something, but I easily replaced Photoshop with a completely similar Gimp. If you don’t yet know about this editor, you can familiarize yourself with it on the developers’ website. It has the full functionality of Photoshop, but does not affect the operation and loading of the system, which I consider the most important fact. Plus, it's absolutely free.
- Delete all residual folders and files after uninstalling the program.
- Don't install the buggy Adobe Flash Player. The video can also be watched wonderfully in Chrome, which does not require additional extensions for this.
- If possible, avoid cleaning utilities and perform the cleaning manually. Manual cleaning takes no more than 10-15 minutes, depending on the number of programs.
- Use Time Machine backup software. This will save time when restoring deleted files and folders, as well as the system itself.
If you use Mac OS X more carefully, it will respond to you with speed and high performance. It may not be possible to complete all the points, but you can try...
Summary
Boot Camp
Suitable for using resource-intensive Windows applications.
Advantages:
- High performance of the running operating system.
- Does not require installation of additional software. Boot Camp is free software that comes with Mac OS.
- Apple certified technology with technical support.
Flaws:
- Requires partitioning of the hard drive, where sufficient space must be allocated to the partition with Windows.
- You need to restart your Mac every time you want to start Windows.
- You cannot use two systems in parallel, since they are installed on different sectors of the disk.
Virtualization
This method is recommended for most iSpring users.
Advantages:
- No hard drive partitioning required.
- The virtual machine takes up exactly as much space on your hard drive as required by Windows and installed programs. The memory size for the virtual machine changes dynamically.
- There is no need to restart your computer to work with Windows; two systems can be used in parallel without rebooting.
- The Windows virtual image is easy to copy, move, and delete.
- You can install several operating systems on one computer, for example, different versions of Windows or Linux.
Flaws:
- Slower virtual system performance compared to using Boot Camp.
- You cannot boot into Windows to use all the computer's resources.
- Most virtualization software is not free (with the exception of VirtualBox).
Boot Camp + Virtualization
Allows you to boot into Windows, as well as run the same Windows system in a virtual machine in a Mac OS environment if you don’t want to reboot.
Requires a large supply of free hard disk space.
Advantages:
- Possibility to choose a loading method.
- High performance when booting the computer under Windows (Boot Camp technology).
- Windows can be used simultaneously with Mac OS without restarting the computer (virtualization technology).
Flaws:
- Requires partitioning of the hard drive, where sufficient space must be allocated to the partition with Windows.
- Using different operating system boot methods may cause Windows activation problems.
Installing Windows Using Boot Camp Utility
The first method we will consider is installing the Windows operating system using the Boot Camp utility already built into Mac OS. Apple developers were well aware that the OS X system could not fully cover all user needs. Some software simply isn't made for the Mac. Here you can object - there are analogs that are not only no worse in functionality, but most often, on the contrary, much better, but if the software is required for work, then you are unlikely to have enough time to learn the new interface and settings.
I will give an example from my experience. Working in computer graphics, I come across a number of graphics programs, such as Photoshop, After Effects, Dreamweaver, and the main one in my specialization is 3D Max , but it is not available under OS X - that’s why I have to install it in parallel or as a second system Windows. Of course, I tried to try analogues such as Cinema 4D, Maya, and each of these programs has something good, but constantly encountering difficulties in basic operations, it was very difficult for me to complete the entire project from beginning to end. Somewhere it’s better to render, and somewhere it’s more convenient to model. Therefore, it is much easier for me to install a second system than to lose several years on retraining.
But I digressed a little from the topic, let's continue. Installation using the Boot Camp allows us to install a full-fledged second system Mac
The advantage of this utility is that by installing the program through it, all the resources of your PC will be available to Windows, this will allow you to use the Mac’s performance to the maximum. The computer will easily play the latest games and perform complex tasks.
Before installing an additional OS, keep in mind that it will take up a lot of space on your hard drive. Make sure it has the required gigabytes. On average, we may need about 15 GB for Windows itself, and we will also need space to install software. It is recommended to use at least 30 GB.
For installation we will need:
- Windows operating system image. Boot Camp supports Microsoft versions of Windows 7 or later;
- Flash drive 8GB or more;
- Internet access;
First, let's launch the utility . There are two ways to launch it through the Finder top menu. Go to -> Utilities and launch Boot Camp Assistant.
The second method is through launchpad mac, if you have not made any special rearrangements or movements, the shortcut will be available in the Others .
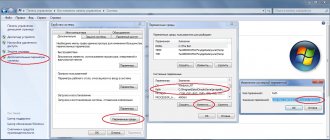
Before you begin installing the operating system on your iMac or Mac, check and prepare Boot camp. First, make sure that all updates from Apple are installed on it. To do this you need to do the following:
- Bootcamp has a support page. Go to it to find out if there are updates.
- You can update the application yourself by going to the Apple menu and opening the “Software Update” section.
- Once everything is ready, be sure to back up your data.
When you launch the utility, you will have the opportunity to select the location where OS Windows will be installed. Before starting the software, you should close all open applications and programs.
Once the utility and flash drives for copying information are ready, you can proceed to the first steps:
- To install Windows 7, go to the menu of your Mac, open the “ Programs ” item and through it go to the following sub-items: “ Utilities ” and “ Boot camp Assistant ”. Click the Continue button.
- In the next window, check the boxes next to “ Download the latest software ” and “ Install Windows ”.
- It is worth noting that in versions starting from OS X 10.9, a bootable flash drive is created automatically! The first process is copying Windows image files, and then downloading and installing Apple drivers. Therefore, if the download or installation of software (drivers) fails, you should start by restarting the installation window, but you only need to select “ Download the latest Windows support software from Apple ” and “ Install or remove Windows 7 or later .” This way, time will not be wasted on successfully erasing the flash drive and copying Windows files.
- Next, in the window that opens, the program will offer to make a copy of the Windows support software on DVD, CD, or save the software to an external drive. Check the box next to the action that suits you.
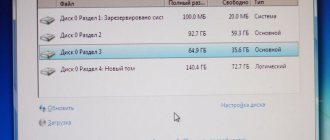
- After loading the drivers onto the USB flash drive, decide on the size of the hard drive that you will allocate for Windows. For normal operation of the program, select at least 20 GB.
Once all the files have been copied, the Mac will automatically begin to restart. Next, to display the boot manager, press and hold the Alt key. On the Mac, the disk menu will open, mark the partition with the name of the operating system. This will be followed by launching the OS and setting the parameters.
To install Windows you need to do the same. Only in the “ Select actions ” window should you check the boxes next to “ Download the latest software ” and “ Create a disk to install Windows 7 or later .”
Installing Windows on a Mac, or rather, setting up the program, begins with choosing a language. Select the correct language right away, otherwise you will have to do all the steps again. Having selected all the parameters in this window, click the Next button, which is located in the lower right corner.
To install the Windows operating system on a Mac, carefully follow all the instructions provided. Do not restart or turn off your computer during the process. The procedure cannot be interrupted in any way.
After your iMac reboots a second time, you can begin installing the necessary drivers. To do this, download them back from the flash drive, install and run the installation program.
https://www.youtube.com/watch?v=5JJpF9Tbf2M
Installing Windows via Bootcamp using a USB flash drive
Installation can be carried out either using a disk with the operating system or via a USB drive. To load a program from a flash drive onto a Mac, you must first download it. The Windows system must be in ISO format.
This installation option on Mac and iMac is no different from the previous one. Before you begin, you should also check the boot camp for updates and save all the necessary data. The following instructions will help you complete the task:
- Insert the flash drive into the USB connector. Open Disk Utility .
- Click on the flash drive on the left side and in the adjacent table, instead of “Current”, select “Partition 1”.
- Set the format to MS-DOS (FAT) and click the Options… button.
- In the menu that appears, select “ Master Boot Record ” and confirm the action by clicking OK and Apply.
- Next, click “ Disk Partition ” and free up space on it for an additional operating system.
- Launch the Boot Camp Assistant .
- After checking the boxes next to the proposed actions, click Continue.
- Copying data from the Mac system. A yellow triangle that appears means that the system is asking for a password for the new operating system - enter it.
- After selecting the disk for installation, the system will reboot itself. At this time, hold down the Alt key to display the settings window for the new operating system. After setting the settings, the new program is ready for use.
But it happens that when the installation media is a flash drive, the utility requires you to insert a disk with the program and refuses to continue downloading the software to the iMac. In this case, you can download the Daemon Tools Lite iMac driver. With its help, we mount the Windows iso image, it will serve as a virtual drive and then Bootcamp will complete the installation process of our OS without any problems.
Popular questions
Question: Can I use Wine or CrossOver to run iSpring?
Answer: No. Wine and other similar programs create a virtual copy of only part of the operating system. iSpring runs in a complex environment that includes MS Office and its components, so you won't be able to run iSpring using Wine.
Question: Can I get full access from Mac OS to the Windows Boot Camp sector on my hard drive? I can open BOOTCAMP through Finder, but I cannot make changes on this sector.
Answer: Yes, but to do this you will need to install additional software, such as Paragon or Tuxera. Mac OS and Windows use different file systems (Mac OS Extended (HFS+) and NTFS), so Mac OS does not allow you to make changes to NTFS sectors.