Need to flash Android using FastBoot, but don't know how? In this article we will tell you in detail how to use FastBoot, where to download it from and how to flash an Android device.
This manual will fully explain how to use FastBoot! How to use Fastboot to clean partitions, flash IMG files, reboot and many others.
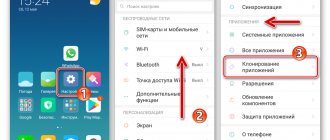
If you don’t know how to install archived updates, then you need an article on how to install firmware in zip format on Android with pictures.
Launching the Fastboot utility
Depending on what you chose, downloaded the fastboot utility separately or selected adb run, the launch may differ!
If you downloaded Separately Fastboot
Extract the files:
- adb.exe
- AdbWinApi.dll
- AdbWinUsbApi.dll
- fastboot.exe
- libwinpthread-1.dll
Move them to the C:\ drive, Windows folder. You have successfully installed ADB and Fastboot on your computer!
After you have downloaded and installed FastBoot, open the Command Prompt .
Windows command line example
Example of installing ADB and Fastboot.
If you downloaded ADB RUN
If your choice fell on the proprietary program ADB RUN , then launch it, type the A button and press Enter.
It is advisable the files that need to be flashed in the same folder with the Fastboot utility .
ADB Basics
To start working with ADB, you should activate it on your device and install the adb utility and drivers on your computer. The first task is performed by enabling “USB Debugging” in the “For Developers” settings item (if this item is hidden, click seven times on the build number in the “About Phone” menu).
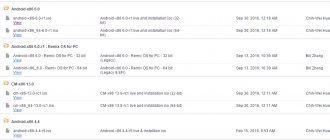
To install ADB on your computer, download Adb Kit and unpack it into any folder (I recommend using folder names without Russian characters). We also download and install ADB drivers.
You need to work with adb from the command line. Press Win + R and enter cmd, then go to the folder in which adb is located. For my folder the command would be:
cd\android
In order not to do all these manipulations every time, you can add the desired folder to the Path variable. To do this, go to “Control Panel -> System -> Advanced system settings -> Environment variables”, find the Path variable and add the path to the adb folder to the end of the line, separated by a semicolon. Now, after starting the console, you can immediately enter the necessary commands.
Adding adb to the Path variable
Other articles in the issue:
Xakep #208. Attack on the signal
- Contents of the issue
- Subscription to "Hacker"
Let's check our connection to the phone using the following command (it should display a list of connected devices):
adb devices
You can work with ADB via Wi-Fi. To do this, you need root rights and the WiFi ADB application. We launch the application, press the switch and connect to the smartphone using the connect command and the IP address shown by the application:
adb connect IP address
Further work with ADB is no different.
Instructions on how to flash Android using FastBoot
Android firmware in Fastboot means flashing separate files for different blocks of device memory (system, data, boot).
It is very important to write commands and firmware files as they are specified!
If you have the command:
fastboot flash cache NazvaniAFiLe.img
then you need to write exactly this way, and not any other way. In other words , the case of letters is important , otherwise you will receive the error cannot load 'image' - there is no such file.
Fastboot reboot commands into firmware mode (bootloader)
- In order to start working with an Android device using Fastboot, you first need to put your smartphone or tablet into bootloader mode using adb:
adb reboot bootloader
Or you can switch to Fastboot / bootloader mode manually!
- Reboot Android from firmware mode (bootloader) to the same mode:
fastboot reboot-bootloader
- Reboot Android from bootloader firmware mode to bootloader mode:
fastboot reboot-bootloader
- Reboot Android to normal mode from bootloader firmware mode:
fastboot reboot
The command "sees" your Android PC
Make it a habit before doing anything in Fastboot to check if there is a connection between your computer and Android:
- Checking whether the PC “sees” your Android:
fastboot devices
This command must be executed when the device is already in firmware mode (bootloader)
Commands for unlocking and locking Google Pixel, Nexus bootloader in Fastboot
- Unlock bootloader for Pixel, Nexus:
fastboot oem unlock orfastboot flashing unlock
- Lock bootloader for Pixel, Nexus:
fastboot oem lock
Command to find out bootloader version
Shows the bootloader version number installed on Android:
fastboot getvar version-bootloader
Commands for formatting a partition in Fastboot (Fastboot Erase)
Before flashing any partition in Android, you must first format it so that there are no problems in further work:
- Erases the Cache partition in Fastboot:
fastboot erase cache
- Erases the Date section (Data/UserData) in Fastboot:
fastboot erase userdata or fastbot -w
- Erases the System partition in Fastboot:
fastboot erase system
- Erases the Recovery partition in Fastboot:
fastboot erase recovery
Commands for flashing Android partitions in Fastboot (Fastboot Flash)
After you have formatted the Android partition or partitions, you can proceed to the next step, flashing the firmware:
- Flash the system partition:
fastboot flash system imya.img
- Flash the cache partition:
fastboot flash cache imya.img
- Flash the Data section:
fastboot flash userdata imya.img
- Flash the Recovery partition:
fastboot flash recovery imya.img
Instead of imya.img you need to insert the name of the file to be flashed!
- Flash all partitions (boot, recovery and system):
fastboot flashall
Command to install update.zip
Flashes an update archive on Android in the update.zip format - a ZIP archive with IMG images of various sections:
fastboot update filename.zip
Why do you need to flash devices?
Device firmware is necessary to significantly expand user capabilities.
But ADB is not limited to this. The debug bridge also performs a number of other functions. With its help it is possible:
- cope with the so-called bricking of the device;
- install a new operating system;
- get acquainted with gadgets on the general network that can also use ADB;
- view logs;
- copy files from device to device;
- install and remove additional software;
- execute various application scripts.
For Sony devices
Checking the connection of the Sony device, if the answer is 0.3 device, then it is connected:
fastboot.exe -i 0x0fce getvar version
Unlock bootloader Sony
fastboot.exe -i 0x0fce oem unlock 0xReceived_Key
More detailed information on unlocking Bootloader Sony - How to unlock Bootloader Sony.
Waiting for Device error
If you see the message waiting for device , it means:
- The driver is not installed or installed incorrectly - reinstall or install
- Android device is not in Bootloader mode - translate
- Incorrect connection to the USB port - use the rear USB 2.0 ports of the computer, do not use USB hubs
For more information about this “Waiting for Device” error, read the special article dedicated to this, Waiting for Device .
Video example of working with the Fastboot utility
Firmware problems
Sometimes during the process of flashing devices, the user may encounter various errors that prevent the process from being completed successfully. One of the reasons may be outdated software.
Before working with the ADB utility, be sure to check that the drivers installed on your PC are up to date. Always use the latest software products as they provide the proper level of optimization.
Also, if errors occur, pay attention to the “mechanics”. Check the USB cable connecting your PC and Android device. If the wire is defective, the firmware process may fail for no apparent reason.
If you have up-to-date drivers and the wire does not cause any problems, pay attention to the model and brand of your gadget. It is possible that the settings provided by the device developers conflict with the requests performed by ADB.
For those who don't understand anything!
For those who don’t understand anything, then use the proprietary ADB RUN , this program contains almost all the commands that are needed for FASTBOOT!
Below is an example of how ADB RUN works - how to quickly flash a Recovery file using ADB RUN in less than 5 seconds (just don’t forget to switch to bootloader mode first)!
That's all! Read more articles and instructions in the section Articles and Android Hacks . Stay with the Android +1 , it will be even more interesting!
System utilities
I will briefly highlight several useful commands (the functionality of some, however, may depend on the firmware version and phone model).
Change DPI . Does not require root and runs on Android 5.0+. The standard value for Nexus 5 is 480. With a value of 420, the stock launcher desktop displays five icons in a row instead of four:
$ wm density 420 && adb reboot
Connect /system in recording mode . For some commands that change system files, you must first remount the /system partition to write. This is also necessary when uninstalling system applications. Remounting is done with the following command:
$ su # mount -o rw,remount /system
Soft reboot:
$ setprop ctl.restart zygote
Putting your smartphone into Doze power saving mode (Android M+):
$ dumpsys battery unplug $ dumpsys deviceidle step
...we repeat the steps until we see idle.
Battery percentage (Android 4.4+):
$ content insert —uri content://settings/system —bind name:s:status_bar_show_battery_percent —bind value:i:1
Using ADB
Using the utility allows you to:
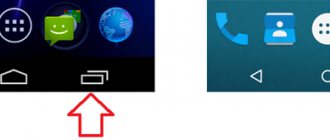
- reboot the gadget using different modes;
- transfer files and folders from phone to PC or vice versa;
- work with applications , installing or uninstalling them;
- work with firmware;
- execute various scripts ;
- remove the lock with a graphic key.
SAP program is the best for enterprise management, overview of capabilities
The utility is usually installed and used together with the Fastboot application.
Using custom recovery
Recovery is a lifeline for smartphone or tablet users. This is a means of restoring the operating system in case of critical errors during use. The program’s functionality also includes limiting user actions in relation to the gadget’s internal system.
Despite this, users who want to change the smartphone’s firmware or install an external operating system for the device replace the factory Recovery with a custom version.
The functionality of the custom recovery system is similar to its standard counterpart. Although there are also several additional features of custom Recovery, for example, access to protected files and functions. Most often this is used as a basis for global user changes to the system.
The most reliable custom recovery systems are:
- ClockworkMod Recovery.
- Team Win Recovery Project (TWRP).
Bootloader is a program that does not allow the owner of a portable device to replace the firmware with third-party firmware. However, there are several ways to unlock the restriction from developers.
ADB, ADB run and Fastboot
Android Debug Bridge allows you to manage Android using a PC. This application is installed directly on a laptop or computer, which is connected to a mobile device via a USB cable in debugging mode. Then, after launch , it is possible to execute special commands that allow you to initiate any actions with the gadget.
The utility allows you to perform actions such as:
- reboot in various modes;
- transferring folders and files to/or from the device;
- working with firmware: installation, updates;
- removing a lock made using a pattern key;
- execution of various scripts.
Most often, the application is installed together with the Fastboot utility.
This mode allows you to reset all settings to factory settings, which is why it is sometimes called Recovery - a recovery function. In addition, you can install firmware using Fastboot, but in this case only work via a PC is possible. It is better to install these two programs together , which allows you to access more features.
In turn, ADB run simplifies work and automates typical commands and actions most often used by users. Although it has a console, it has a visualized appearance and consists of 14 points.
This program is much simpler, it is suitable for those who find it difficult to understand the command line, who do not know how to work with it. It already provides a menu and items that you can select. It has a simple interface , great functionality, and does not require additional software installations.
All utilities can be downloaded, installed to operate and update your mobile device.
The main reasons why Bootloader Android fails
The most popular reason for problems with the Bootloader system is a problem during flashing a mobile gadget. Most often, this occurs due to the fact that the selected version of custom Recovery contains internal defects or a failure occurred during the installation of components.
We recommend: Increasing speaker volume on Android
Bootloader also stops functioning due to a virus that has collected files in the portable gadget.
There are no irreparable situations with the performance of the internal system of a portable device. The files responsible for restoring the OS are located in a specialized memory section that is not accessible to the user. If Bootloader or Recovery fails, the path for starting the recovery is broken, but the data itself remains unharmed. Reinstalling a capable program solves this problem.
Installing applications on Android. ADB Install
In order to install any application from a computer to Android, you need to enter the command:
adb install
An example of how to install an application using the adb install command should be written:
adb intsall C:\papka_gde_hranitsya_proga.apk
That is, write the command adb install path to the application and the name of the application.
Send any file to Android. ADB PUSH
To send any file from your computer to Android, use the following command:
adb push
Example, to use the Adb command to send a file from a PC to Android, you need to write the adb push command:
adb push C:\papka_gde_hranitsya_file\imja_file /sdcard
That is, write the adb push command path to the file, the name of the file and the location where to save the file.
Send / Receive a file from Android to Computer. ADB PULL
In order to receive absolutely any file from an Android device to a computer, there is a command:
adb pull
In order to use the Adb command to receive a file from an Android device to your PC, you need to write:
adb pull /sdcard/xxx/Keks_s_Pameloy_Anderson.avi C:\papka_gde_budet_hranitsya_file
That is, write the adb pull command and the path to the file located on Android, the name of the file and the place where to save this file on the PC.