The hosts file is a text file located in the same location in all modern versions of Windows. Most people never need to go into this, but if you do, you need to know how to open and edit the hosts file.
However, some versions of Windows do not allow editing the hosts file directly. In fact, you will get an error if you try to save your changes. Luckily, there is a simple tip you can use to edit the hosts file in Windows 10, 8, 7, Vista or XP.
We have already talked about how to edit hosts on Linux. It's the turn of operating systems from Microsoft.
What does the Hosts file do?
The original purpose of the hosts file was to do what DNS servers now do—match friendly domain names to unfriendly IP addresses.
It's much easier to remember a domain name like YouTube.com than an IP address like 172.217.1.238. Instead of typing an IP address into the address bar every time you want to watch a YouTube video, you can simply enter the domain name and the DNS server used by your device will match the name to the correct address so you can access the web page is much simpler.
The hosts file, since it serves as a sort of DNS server, works the same way. You can enter the IP address to which the domain name should be resolved. In other words, you can tell your computer to load a different IP address than the DNS server, which allows you to do some interesting things.
Editing the hosts file in safe mode
The procedure differs little from the method where the file was opened through Notepad, but the entire operation is performed in safe mode.
First, reboot the computer. As soon as it turns on, before the OS starts loading, press the F8 key several times. The computer will prompt you to select a source from which to boot, select the hard drive. Next, press F8 again and select the “Safe Mode” option from the list. Lines will run across the screen, then a low-resolution black window will appear.
Through “Start” we launch “Notepad” and follow the algorithm described above. After saving the file, you can restart your computer.
Why edit the hosts file?
One reason to edit the hosts file is if you want a super basic way to block websites from loading on your computer. Enter an invalid or incorrect IP address for the site you want to block, and every time you try to access it, the hosts file will load the IP address you selected. Depending on what you choose, this may block the site completely.
You can use the same technique to force your hosts file to block malicious sites. There are even lists of hosts file entries (like this one) that you can download and import into your hosts file to block hundreds of malicious sites or ads.
Another use of the hosts file is to speed up web browsing. If the DNS server you're using isn't working or isn't fast enough, manually entering IP addresses and domain name mappings in the hosts file allows the computer to find those addresses almost instantly rather than relying on the DNS server.
Opening the Hosts file
Let's start by simply opening the hosts file. We'll be using Notepad, which is built into Windows 10 through Windows XP.
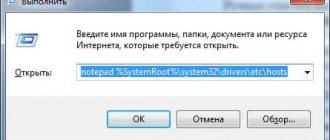
- Open the Run dialog box by holding down the Windows key and then pressing the R key once.
- Type notepad and press Enter to open the program.
- Go to File → Open.
- In the file name text box below, type (or copy and paste) the location of the hosts file shown above and press Enter.
- Select the menu to the right of the text field to change Text Documents (*.txt) to All Files (*).
- Double-click hosts in the file list to open the hosts file for editing in Notepad.
Method 1
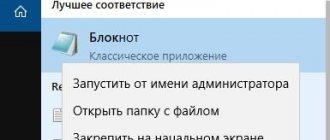
1. First, in the taskbar, click on the search button. It is located next to Start.
2. Enter the word “notepad” into the search bar. Search results will appear, namely a link to the Notepad application. Right-click on it and select “Run as administrator” from the menu. This will launch your text editor with elevated privileges.
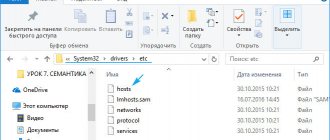
3. Open the hosts file through the menu item “File >> Open”:
Let me remind you that it is located in the directory:
C:\Windows\system32\drivers\etc
4. Now you have full access to change the hosts file and you can add any entry there:
5. Save the file after changing through the menu item “File >> Save” or by pressing the key combination Ctrl+S. Saving should go without problems!
Editing the Hosts File
There are several examples in the hosts file showing how to format your entries. You must first enter the IP address and then the domain name, and both must be separated by at least one space (tab is a good way to format them).
Here are some examples:
127.0.0.1 www.google.com 13.249.79.104 www.bing.com
As you can see in the image above and read the directions in the hosts file, the # character is used as a comment, which means that everything following it is escaped. This is why the two example lines above are useful in this hosts file; they are not followed by this symbol.
If you want to block websites using hosts file, such as YouTube, Amazon, Google, Reddit.com, etc., you can enter a false IP address, such as 0.0.0.0.
Note. When you enter the URL of a site that you want to associate with a specific IP address, be sure to exclude the leading part and enter only the subdomain, such as www or whatever you add.
How to change the contents of the hosts file
Below is how you can make changes to the hosts file.
Run Notepad as administrator
First, you need to run Notepad (or another text editor) as an administrator. This is because the hosts file is a system file and cannot be changed by another user.
Open the hosts file
Most often, the hosts file is located in the directory: c:windowssystem32driversetc and is named hosts. But this path may be different depending on the version of the operating system you are using:
- Windows 95/98/Mec:windows;
- Windows NT/2000/XP Proc:winntsystem32driversetc;
- Windows XP Home/Vista/Windows 7c:windowssystem32driversetc;
- Windows 8c:windowssystem32driversetc;
- Windows 10c:windowssystem32driversetc.
Now you need to open the hosts file. In Notepad, select the "File" menu, then "Open...". The hosts file is not the standard .txt file that Notepad will look for by default. Therefore, change the value “Text documents” in the drop-down list in the lower right corner to “All files (*.*)”. Then double-click the file to open it in Notepad.
Find the IP address associated with your account
- Login to cPanel.
- On the right, find a column of statistics that describe your account. Find the server information and click on the link.
- Below on the page, find “Public IP Address.” If you have a dedicated IP address, it will say “Dedicated IP Address” instead of “Public IP Address.” This is the information you will need to make changes to the hosts file.
Edit the hosts file
Private designer: the most common misconceptions of the customer
The contents of the hosts file look something like this:
# Copyright (c) 1993-1999 Microsoft Corp. # # This is a sample HOSTS file used by Microsoft TCP/IP for Windows. # # This file contains the mappings of IP addresses to host names. Each # entry should be kept on an individual line. The IP address should # be placed in the first column followed by the corresponding host name. # The IP address and the host name should be separated by at least one # space. # # Additionally, comments (such as these) may be inserted on individual # lines or following the machine name denoted by a '#' symbol. # # For example: # # 102.54.94.97 rhino.acme.com # source server # 38.25.63.10 x.acme.com # x client host 127.0.0.1 localhost
Attention: Before making changes, be sure to create a backup copy of your hosts file! To do this, follow these steps:
- In Notepad, go to the File menu and select Save As...
- For the file name, enter something you remember, for example hosts_file_09.16.2013
- Click the "Save" button
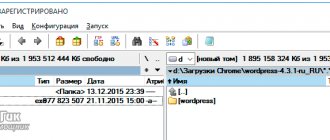
Add a few lines to the hosts file. They will look something like this:
202.133.229.123 my-wordpress-site.com 202.133.229.123 www.my-wordpress-site.com
After making changes, go to the "File" menu, then select "Save".
Saving the Hosts file
Here's how we'll save the hosts file to make sure it works no matter what operating system you're using, what text editor you've chosen, or how your Windows settings are configured:
- Go to File → Save As.
- Change the Save as type option to All files (*).
- Rename the file to hosts.backupfile and then save it to your desktop.
- Close Notepad and then locate the hosts file you just created on your desktop. You want to delete. Backup part of the name and leave only the hosts (no dot or text after the word).
- Once you've done this, click on the file on your desktop and confirm the name change when asked.
- Copy the hosts file.
- Open the folder with the hosts file that you opened earlier (the etc folder).
- Paste the hosts file you copied from your desktop and confirm any overwrite prompts if you see them.
Admin Notepad
If there is no Notepad application icon on the desktop, open the Start menu and write the word “notepad” in the bottom line.
A link to the program will appear at the top.
Right-click on it and select “run as administrator” from the drop-down list.
Using the Ctrl+O key combination, we call up the file opening window and go to a familiar address. Make sure the bottom right line says “all files” and select hosts. Make changes and save.