The hosts file is a Windows file that translates website domain names into IP addresses. It performs the function of converting host names into numeric protocol addresses that will determine the location of the host on the IP network. The hosts file is in the form of a simple text file. This file is currently useless as this process is already automated via DNS. Unfortunately, this file is often compromised and infected with a virus via malware in order to redirect you to a phishing site and extract sensitive information from you. Also, if the Hosts file is infected with a virus, then you may not be able to access sites or receive updates for Windows 10/7/8.1. In this instruction, we will look at where the Hosts file is located, how to restore it to default, edit it correctly, and how to save it if it gives us an access error.
What is this?
Hosts (without extension) is a text document containing a list of domain names and IP addresses that must be used to broadcast them. This file has higher priority than the DNS server provided by your ISP. Its contents can be changed by any computer user with system administrator privileges.
Through the skillful use of hosts, you can speed up the loading of web resources and block slow ones.
Hosts location
This small section is created for those who do not know where the hosts file is located in Windows 10.
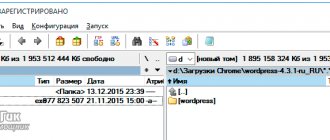
The document is located in the same path as before, in the etc directory at Windows\System32\driver. It has no extension, but can be read by any text editor, be it Notepad++ or the standard Notepad integrated into Windows 10.
The location of this document can be changed, which the user rarely needs. Still, it is useful to know about such a function. Everything is done as follows.
- We call the system database editor by executing “regedit” in the “Run” line or Windows 10 search.
- Let's go to the HKLM section.
- In the SYSTEM subsection, go to the path CurrentControlSet\Services\Tcpip.
- Open the Parameters branch.
- We change the value of the “DataBasePath” parameter to a new path where the current hosts will be transferred.
Why is the hosts file needed and where is it located?
You've probably already heard something about this file; it seems to be used to block sites or something like that. Yes, it does contain such functionality, but it was originally used for other, more important purposes. By the way, did you know that the hosts file is present not only in Windows 7/10, but also in Linux, Mac OS and Android? This versatility is not at all accidental, because the hosts file appeared at the dawn of the Internet.
Actually, there was no Internet in the full sense of the word then, and if there was anything, it was small local networks. As now, computers in them communicated through IP addresses, which were understandable to machines, but not very convenient for users. Then the IT people decided to implement access to computers by name, which they did, but IP addresses did not go away; hosts still needed digital, not analog addresses for messages.
A solution was found very quickly. A special Hosts file containing a list of host names and their corresponding IP addresses was sent to each computer on the local network. When one computer addressed another by name, the latter was matched with its digital address, and thus a connection was established. At first everything was wonderful, but there were more and more resources, the list in the Hosts file grew, and sending it to a PC became more and more problematic. A new solution was needed, and one was also found. The correspondence table was transferred to the then already formed Internet, forming a domain name system, and the Hosts file became largely unnecessary.
However, the developers did not remove it from their operating systems. It is still present in most operating systems, still establishing a correspondence between the IP address and the domain of the site and, as before, a request to it has higher priority over access to DNS servers, but its contents have now become much poorer, limited to two entries, and even then inactive. Currently, hosts are used mainly to block sites and banner exchange networks, automatically redirect from one resource to another, and also speed up access to sites.
In earlier versions of Windows, the host file was located in the %windir% folder; starting with NT, its permanent location is C:/Windows/System32/drivers/etc. In rare cases, the HOSTS file is located in a different folder; the path to it can be determined in the registry editor by expanding the HKEY_LOCAL_MACHINE/SYSTEM/CurrentControlSet/services/Tcpip/Parameters branch and looking at the value of the DataBasePath parameter.
Editing hosts
Only administrators or accounts with appropriate rights will be able to open the file in save changes mode.
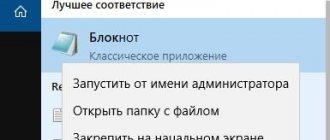
1. To do this, launch a text editor (let’s look at the integrated Notepad as an example) as an administrator. Notepad can be launched using the search bar.
2. Through the “File” item, call the command to open documents or press the key combination Ctrl + O.
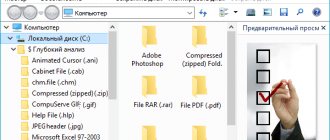
3. Select “All files” from the drop-down list on the right.
4. Specify a document called hosts.
By default, all lines in a document begin with a # character, indicating a comment. That is, functionally, the document does not contain any information.
Editing consists of adding a new line, where the first number is the IP address, and separated by a space is the url of the web resource where the browser or any other application will be redirected when requesting the specified IP.
To block a resource, enter a line like “127.0.0.1 www.adres.com” (in the example, blocking the VKontakte site).
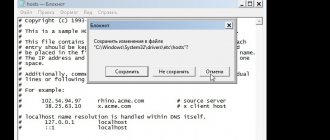
Now call “File” and click “Save”. If the changes do not take effect, then you need to repeat the steps by running the text editor as an administrator.
Sometimes you have to change the access rights to a file through the “Security” tab in the hosts properties and even become its owner.
Changing the hosts file in Windows 10
To change the hosts file, you will need administrator rights. For more information on this topic, see the Microsoft help documentation "Administrator for local accounts."
To edit the hosts file:
- Login as administrator
- Right-click on the Windows icon in the toolbar.
- A pop-up menu will appear. Find Powershell (Administrator) and select this option.
- You'll see a pop-up asking if you want to allow the app to make changes. Click "Yes" to continue.
- When the command line tool opens, type “Notepad.” Since you are running Notepad from Powershell, it will launch with administrator rights.
- In the Notepad menu, click File, Open. Go to the folder with the hosts file. Standard path: c:WindowsSystem32driversetc.
- Type "hosts" then press "Enter". This will bring up the hosts file. Since the hosts file is a system file, it will be hidden unless you set the settings to show hidden files.
- At this point you will see the hosts file. Make sure you follow the example above. Place a space between the IP address and the domain name you want to use.
- Click File > Save to save the changes you made to the file.
Close Notepad and then download the hosts file again and check that your changes have been applied.
Restoring the original host in Windows 10
The original hosts text document, as noted, is functionally absolutely clean and does not in any way affect the operation of the computer. If, after installing a program, this document has been changed, and you do not know how to return everything back or the file is not at all at the specified address, and its location in the above-mentioned registry branch has not changed, perform the following operations.
1. Using the context menu in any folder, be it the Desktop or the directory itself, etc, create a text document and rename it hosts without an extension.
To do this, you may need to enable the option to show file extensions in the File Explorer options in Control Panel. In the “View” tab, check the box next to the appropriate option.
When renaming, we agree that the next time the file may not open correctly.
2. If the folder for creating the text document was not etc, copy it to this directory located at Windows\System32\drivers.
How to edit the hosts file
You can change the contents of the host file yourself by editing it using a text editor. One of the easiest ways to be able to change a file is to open the hosts file in Notepad, opening the program as administrator.
You may also be interested in:
- The browser opens itself with advertising: how to fix it
- How to disable Windows Defender - 7 ways
To do this, create a shortcut for the Notepad utility on the Desktop, or launch the application in standard programs that are located in the Start menu. To run, first click on the program shortcut with the right mouse button, and then select “Run as administrator” from the context menu. After this, the Notepad text editor window will open.
Next, go to the “File” menu, and then select “Open...” from the context menu. In the Explorer window that opens, follow the following path:
C:WindowsSystem32driversetc
After opening the "etc" folder, you will not see the "hosts" file, since Explorer will be selected to display text files. Select the All Files setting. After this, the hosts file will be displayed in this folder. You can now open the hosts file in Notepad to edit it.
After editing is complete, changes to the hosts file. Please note that the file type when saving should be “All files”.