In the modern world, cybernetic space has become much more popular than the real world. Young people are more likely to spend time playing online games and social networks than going for a walk or reading a book. And this is understandable - the availability of information increases awareness and overall human development. However, for some reasons, information and social resources may be blocked by providers, government agencies, or the sites themselves. In this case, do not despair, since in most cases the blocking can be bypassed.
What is a VPN connection and why is it needed?
VPN (English: Virtual Private Network) is a generalized name for technologies that allow one or more network connections (logical network) to be provided over another network (for example, the Internet). Despite the fact that communications are carried out over networks with a lower or unknown level of trust (for example, over public networks), the level of trust in the constructed logical network does not depend on the level of trust in the underlying networks due to the use of cryptography tools (encryption, authentication, public key infrastructure, means to protect against repetitions and changes of messages transmitted over the logical network).
Wikipedia
https://ru.wikipedia.org/wiki/VPN
To explain it in simple and understandable words, VPN is the ability to access Internet resources through other networks. In this case, several levels of channel changing are used, which means that your IP address is encrypted, and access is provided according to the following scheme: Internet - virtual network (or several virtual networks) - Internet. When using a VPN, providers “see” the connection to a certain network or server, and further requests to resources occur through an encrypted channel. Thus, data packets are returned to you regardless of blocking by the Internet provider.
When connecting to the Internet via a virtual network, the provider does not monitor traffic
The main disadvantage of a VPN is considered to be a reduction in speed while surfing and downloading files, however, technology does not stand still and paid services already provide good communication speeds.
How to create and configure a VPN connection on Windows 10
There are several options for setting up a VPN for Windows 10. Conventionally, they can be divided into:
- built-in (standard OS tools);
- third-party (special programs and browser extensions, as well as functions of some routers).
Creating a VPN through Windows Settings
Creating a virtual network through Windows Settings is the most time-consuming, but at the same time the most reliable way to gain access to blocked resources. In addition, once the VPN is created, it is quite easy to manage it and, if necessary, change the server address:
- Press the Win+I key combination and go to the “Network and Internet” applet.
In the “Windows Settings” block, open the “Network and Internet” element
- Open the VPN tab and click on the plus icon that says “Add a VPN connection.”
Click on the plus icon with the caption “Add VPN connection”
- Next, fill out the form:
- "VPN service provider" doesn't have much choice, leave it to Windows;
- We choose the “connection name” at our discretion;
- “Server name or address” must be found independently on the Internet. It is best to use the search engine query “Open VPN servers”;
- “VPN Type” is left at “Automatic”;
- “Login data type” is set to “Username and password”;
- the remaining two points do not need to be filled in.
Fill in the required fields, then save the connection
- We save the changes using the button of the same name.
On the computer
Most often, a secure connection, also known as a VPN, is used on a computer. This is due to a number of reasons, but the most significant are the simplicity and efficiency of installation. In addition, there are several connection methods, so you will also have to disable the VPN in different ways. This can be through browser or system settings, using extensions, or using Turbo mode.
VPN connected via browser or Windows.
If a secure connection is established in this way, then you need to disconnect it there. To do this, you need to follow several steps.
- Open the browser settings.
- Scroll to the very bottom of the page that opens, where we find the “Proxy server settings” button. This is exactly what we need.
- In the system settings window that opens, find the “Use proxy server” slider and disable it. Do not be alarmed that the Yandex browser has opened the system settings window. Often web clients use system proxy settings.
- After disabling the proxy, click the “Save” button at the very bottom of the settings window.
After this, the connection to the VPN will be disconnected, and the browser will again work with your real IP address. If you want to delete data about proxy servers, then before disabling them you need to clear the corresponding fields in the settings window.
VPN is connected using an extension.
Browser extensions allow you to supplement it with functions, including the ability to connect a secure connection without having to delve into the system settings. To disable such an extension you will also need to perform a number of steps.
- Open the settings, as in the previous paragraph.
- Go to the “Add-ons” tab.
- Disable the extension using a similar slider.
Everything is obvious here: after disabling the extension, the browser continues to work using the real network address of your computer.
Turbo tool included.
In general, Turbo is not a VPN service as such. It analyzes data about pages on its own servers, and then provides the user with the finished result. This means that the user, without knowing it, becomes a user of the Yandex proxy server. Disabling turbo in the Yandex browser is very simple: just open the “Menu” on any page and click “Turn off turbo”.
All about local networks and network equipment
Continuing the topic about a secure VPN connection, let’s look at how to connect to the network on a modern “ten”. From other articles on our site you can find out what a virtual network vpn windows 10 is, and how to create a connection via vpn windows 7.
Here we will focus on how to set up a VPN connection on Windows 10 and how to disable VPN if the client interferes with normal operation.
Why install a VPN?
We have already described everything about how to set up a VPN on iOS and selecting an application in this article: How to set up a VPN on iOS 12
In general, VPN (Virtual Private Network) is a method of organizing a virtual computer network that is created on top of the real Internet network. This is necessary in order to solve a variety of problems, for example, bypassing the blocking of prohibited sites. This technology is used to increase the level of confidentiality. For example, if you are connected to an unfamiliar Wi-Fi network, where a hacker at the next table can easily steal personal data. Using a VPN, you can easily encrypt all data that comes out of your computer. But when newer services appear or simply when there is no need for technology, the question arises: how to remove VPN from iPhone?
How to create a VPN connection on Windows 10?
So, setting up VPN Windows 10 consists of the following steps:
First, click the Start button ( 1 ) and select Settings ( 2 ).
In the open “parameters” window, click the “Network and Internet” subsection.
In the “VPN” menu ( 1 ), go to “Add a VPN connection” ( 2 ).
At this stage of setting up a Windows 10 VPN connection, you will be able to select built-in VPN tunnel protocol methods:
First, let's look at setting up a Windows 10 VPN with the L2TP/IPsec protocol:
(1) select built-in VPN service provider: Windows item.
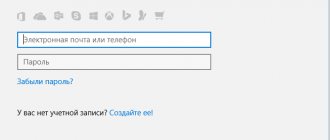
( 2 ) connection name: think of any connection that is memorable to you. ( 3 ) You must also specify the name or address of the server. There are many foreign servers that provide their own VPN for different services. ( 4 ) chose the L2TP/IPsec protocol ( 5 ) for authorization to the VPN server. ( 6 ) The “your login” field must be unique. ( 7 ) write down your password ( 8 ) this item is optional
After filling in the required information, click the “Save” button.
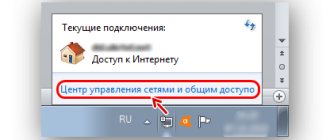
Your VPN profile has been successfully created ( 1 ). Go to Related Settings and select Network and Sharing Center ( 2 ).
In the new network information window, select "change adapter settings."
On a network connection with the profile name “vpn” ( 1 ), select “properties” ( 2 ) from the function menu.
On the security tab ( 1 ), check the protocol type ( 2 ), encryption ( 3 ), and also check the box next to “chap verification protocol version No. 2” ( 4 ).
If your network requires the use of a negotiation key, then in the properties of the tunnel protocol, click “Advanced parameters” ( 1 ) and in the new window enter ( 2 ).
After all the settings, click the “Ok” button.
Go to the “network” tab ( 1 ) and select Internet protocol version No. 4 ( 2 ), then click the “Properties” button ( 3 ).
In a VPN network, you can use both dynamic ( 1 ) and static ( 2 ) IP addresses.
After changing the network configuration, click the "Ok" button(3).
This completes the creation of a Windows 10 VPN connection for the L2TP/IPsec protocol.
VPN settings for the PPTP protocol are similar to the instructions described above for L2TP.
Don't forget to enable data encryption ( 1 ), chap password verification protocols ( 2 ) and Microsoft version 2 ( 3 ).
How to disable VPN on Windows, browsers and mobile devices
The fact that VPN connections and private virtual networks are used everywhere today is probably not worth reminding. However, few people know how to disable VPN not only in different operating systems and applications, but also on different devices. This is why many users need to fill this knowledge gap. As additional material, a solution for ensuring the security of VPN connections will be presented, which can sometimes be useful.
How to disable VPN on different systems, applications and devices: general information
In general, if you look at it, almost all solutions for deactivating a VPN connection can be roughly reduced to several basic methods.
You may be interested in:High-speed LVDS interface: description and application
So, for example, on any mobile device or in a Windows environment, you just need to click on the disconnect button. To more fully solve the question “how to disable VPN,” you can use more drastic methods related to deleting a connection or connection that was remembered by the mobile device. But these are only general principles. Next, we will consider the most common situations in which you may need to deactivate the VPN.
How to disable VPN in Windows systems in the tenth modification
And first of all, let’s look at the method of deactivating a connection in stationary systems, and as an example, let’s take the tenth modification, since its tools are much wider than its predecessor systems.
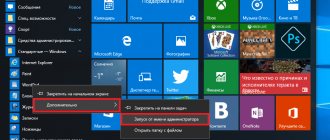
So, as already mentioned, the simplest thing is to click on the VPN connection icon in the system tray and select disable from the menu.
A similar result can be obtained if you enter either the network connections section in the classic “Control Panel” or use the corresponding options menu items for this.
But it also happens that disabling the VPN is not enough - you also need to get rid of the created connection. Nothing could be simpler. In the network connections section, when calling the context menu via RMB on the selected connection, you need to use deletion rather than disconnection. Exactly the same actions are performed in VPN profiles.
Disabling VPN in Browsers
As for browsers that have a VPN client pre-installed, everything is simple here too. For example, in the same “Opera” the VPN icon is located to the left of the address bar on the main panel.
First, a left click brings up the client menu, and then the activity slider is set to the off position.
How to disable VPN in Yandex Browser? There is nothing particularly complicated either. The essence of the issue comes down to deactivating extensions and add-ons installed as a VPN client (Hola, ZenMate, etc.). Since they, like the Opera client, display their icons on the main panel, you just need to click on them to change the status. To completely get rid of them, you just need to remove installed add-ons in the extensions section.
Deactivating VPN on mobile devices
In mobile devices, to create a VPN connection of this type, you can use either the built-in tools of the system itself or additional applets. Again, as in the case of Windows, you can limit yourself to simply disabling or deactivating installed applications (or completely deleting them).
That's it for general removal steps. Now let's look at how to disable VPN on iPhone. First you need to enter the basic settings section and select a network. In the next window, select the connection to be deleted, enter its settings and click on the corresponding button.
On Android devices, when deleting, you can use the optional “Forget this network” option to get rid of all saved configuration data. This approach is applicable in situations where there are problems with virtual networks, in particular, connection errors.
Preventing VPN DNS Leaks
We figured out how to disable VPN in different situations. Now a few words about one of the most important issues, which is not directly related to the topic under consideration, but plays a key role in ensuring the security of the connections being created.
The problem here is that creating a VPN connection in Windows is as easy as shelling pears. But there is no hope that all encrypted traffic will be completely secure. The main problem is the system's activation of Smart Multi-Homed Name Resolution technology, which uses all available network adapters installed in the system, which speeds up DNS queries. These are precisely the ones that can be transmitted outside a secure connection.
The simplest method to disable this service is to use Group Policy (gpedit in the Run console). In the editor you need to find the corresponding disabling component, enter the settings editing (double click or RMB menu) and set the status to “Enabled”. Don't get confused because here the enabled state in the options corresponds to deactivating the selected component. After this, you need to save the changes and reboot.
Brief summary
In principle, questions about how to disable VPN in completely different situations can be considered exhausted. By and large, everything that was written above can be summed up in one phrase: “VPN can either be disabled, but leave the connection untouched for further use, or deleted entirely.”
As for disabling DNS leaks, knowledge of the algorithm for solving this problem will only be useful if the VPN connection is not deleted, but will be used in the future. Agree, but many not only did not know about this, but also did not imagine that in Windows such a function is activated by default. The idea seems to be quite good (query acceleration), but the implementation leaves much to be desired.
Source
How to connect to VPN on Windows 10?
To connect to the selected VPN network, in the lower right corner, click on the network icon (1).
Then select the profile you saved earlier with the name “vpn” (2).
Click on the “connect” button.
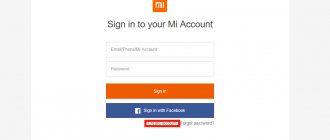
To authorize, enter the username and password for the VPN server.
How to manually add and connect to a VPN
Once you sign up for a VPN - such as NordVPN - you should have access to a list of servers that you can connect to. You must also determine which protocol you can use to connect. If you're not running Windows 10 in S mode and can download files from places other than the store, you can download the OpenVPN configuration. If not, always try to use the most secure protocol available. In most cases, you should try to avoid PPTP.
Once you have the necessary information to set up your connection, you can go to settings:
- Open the Settings app – Win + I or right-click the Start menu.
- Go to the Network and Internet .
- Click the VPN .
- Click Add VPN Connection.
- Open the drop-down menu under VPN Service Provider .
- Select the Windows (Embedded) option.
- Click the connection name field.
- Enter a name for the VPN connection. (In this case, I'll use my vendor name and server location.)
- Click the Server Name or Address .
- Enter the server address . (You can probably find this in your VPN account.)
- Open the drop-down menu under VPN Type .
- Select the connection protocol .
- Click the Save button.
- Click the VPN you just set up. (It will now appear in the VPN list.)
- Click the Connect button. (Depending on the sign-in method used by your provider, you may be required to enter your username and password.)
Open the drop-down menu to select Login Data Type .
How to remove VPN from iPhone, iPad, iPod configuration?
Often during the installation of a program, it begins to require the installation of additional certificates for its operation. It is for this reason that, preferably when deleting a VPN, you need to check your gadget for dubious profiles. They are capable of transmitting confidential data to developers. This is as easy to do as removing VPN from iPhone. You just need to find unverified certificates in the profiles and delete them. But you need to be careful, because... Some profiles help the application work correctly.
How to disable and remove VPN on Windows 10
If you no longer want to use the VPN or simply want to remove the server from the list, you can disable or delete it completely.
- Open the Settings app – Win + I or right-click the Start menu.
- Go to the Network and Internet .
- Click the VPN .
- Select the VPN connection you want to disable or delete.
- First, click the Disable button and then Delete.
Our pick for the best VPN
To complete the steps above, you will need to invest in a quality VPN, such as NordVPN. With rock-solid encryption and a variety of connection protocols, including OpenVPN, it's one of the best services running today.
NordVPN operates from Panama, which means it has no legal obligation to record any activity of its users. You can connect to any of 5,000+ VPN servers in 60 countries for free, and you can use NordVPN on six different devices at the same time. I gave NordVPN a near-perfect score for its wide range of advanced features, such as dual VPN, P2P dedicated servers, DNS leak detection, and dedicated IP address.