In many cases, modern users of personal computers have a need to protect personal data - if several people have access to the computer and access to it is open, if there is an external hard drive with their data. In these cases, a good solution would be to set a password. In this article we will take a closer look at how to put a password on your hard drive.
Let's consider working in the operating systems Windows 7 Ultimate, Professional and higher.
Protect your drive with built-in Bitlocker
The first thing you can use if you need to protect your data is to use the Bitlocker function built into Windows, which will reliably protect your disk. To do this you need to follow a few simple steps:
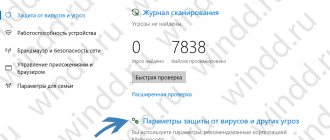
- Go to the Control Panel and find the “Bitlocker disk encryption” button there.
- In the window that appears, opposite the icon of the disk that we want to protect, click the “enable Bitlocker” button.
- In the next window, carefully select the methods for removing the password. The simplest one is the first one – “Using a password to unlock the disk”.
- You need to choose the option of saving a special recovery key, which will need to be used if the password is suddenly lost. Perhaps the optimal solution would be to “Save the password to a file” and store the recovery key, for example, in your cloud.
- If you have Windows 8 or higher operating system installed, there will be a few more options to choose from: “Specify the part of the disk to be encrypted” and “Select the encryption mode to use.”
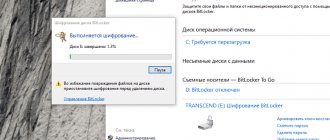
Encryption of the disk will begin and after it has finished, access to the disk will only be possible after entering the password you specified. An image of a lock will appear on the image of the encrypted disk in Explorer.
When using the Bitlocker function, you need to be extremely careful, since if you lose your password and recovery key, you will be able to work with this disk only after it is completely formatted, during which, accordingly, all data will be deleted. It is also necessary to remember that when reinstalling Operating Systems, if you did not decrypt the disk before starting the reinstallation or did not copy the certificate to a replacement hard drive in advance, you will no longer be able to access your data!
Hard drive password using BIOS
When setting a password on the hard drive, more professional users use the BIOS. This allows you to protect your system as much as possible, get the best results, and disable the password at any time. This procedure can be performed on absolutely any computer, including a laptop, netbook and other devices. If suddenly you somehow forgot the password for your hard drive, then you will not be able to boot the operating system and this will crash your computer, but in any situation, thanks to the BIOS, any password from the hard drive can be removed. How to set a password on a hard drive via Bios? To do this you need:
- Restart or turn off your computer.
- When turning on or restarting the computer, press the Delete or F2 key.
- Enter the BIOS itself.
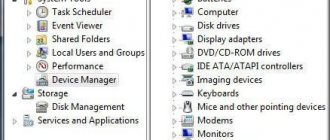
The BIOS itself will appear in front of the user. Now the user needs to understand a little about the functions and tabs of the BIOS.
To control the BIOS, you need to use the forward, backward, left and right arrow buttons.
The BIOS has the following tabs:
- Boot
- Advanced
- Main
- Security
- Exit
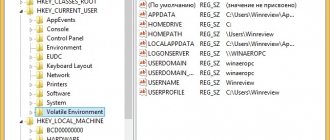
The user will need exactly the Security tab, where he can see the password settings on Bios and on the hard drive
- SetSupervisor Password - special password for the chief administrator.
- SetUser Password - the main password for the computer user.
- HDDPassword - password for the hard drive or HDD.
- Password on boot—disable passwords for the computer.
It is in this tab that you can set a password on your hard drive and save the data when you exit. After that, a password will appear on your computer on your hard drive, which will need to be entered whenever you log in and load Windows.
Protect your drive using third party apps
In addition to the Bitlocker function, which actually encrypts the data on the disk, there are third-party applications that can both encrypt your disk and lock the disk without actual encryption, but using a password protection function.
You can use programs such as Disk Password Protection, Lockngo or Folder Lock.
With the help of various programs and utilities, access to the disk or part of the data is completely blocked for third-party users. The main thing is that when choosing and using such programs, be careful about saving your passwords and study all the possible options offered for unlocking the disk and data, so as not to lose access to them yourself.
Other solutions to protect your files and folders on Windows
Files and folders are not frequently used
. An easy way to password protect files is to create an archive of the files using a compression tool. When the archive is created, you can encrypt the contents by specifying a password.
Windows ME and Windows XP users
- Windows ME and Windows XP come with their own compression utility. This utility can also be used to compress and password protect files.
Windows Vista and Windows 7 users
- Windows Vista and Windows 7 also include a compression utility. However, password protection for compressed files is not possible without using a third-party program.
Advice. When a file is compressed, users can still view a list of files in the compressed file. If you want both your filenames and contents to be hidden, move all your files into one folder and a password will protect that folder.
Files and folders that are frequently used or accessed
If you need to password protect or encrypt data that you use frequently, you need to install a third-party program that allows you to protect your files and folders. Below are some free and commercial solutions.
- 7-Zip
is a free file and folder decompression utility that also includes the ability to protect passwords for encrypted files and folders. - AxCrypt
is an excellent free encryption utility that allows users to encrypt all files in a folder and not allow those files to be viewed unless the passphrase (password) is known. - Folder Guard
is a commercial version of password protection software that allows you to protect files, folders, and other Windows resources with passwords. - Secure Folder
- For a small fee, this is a great program that allows you to protect your passwords.
Protecting your disk using an archiver
It is also possible to close your data using any archiver that can archive not only part of the data, but also the entire hard drive. For example, WinRar will do this task perfectly. To do this, in the Explorer menu, right-click on the icon of the selected drive, then in the drop-down menu, find the “Add to archive” item.
Before starting archiving, click on the “Set password” button and enter the password in the new window. Then start archiving. After the data is stored in a password-protected archive, the original files can be deleted, and then all new data can be added to the archive under a password. But you need to take into account that when closing the data in this way, the lists of files and folders remain visible, as they are shown in the archiver window before entering the password.
What is the result? If a hard drive with personal data really needs to be protected from prying eyes, then it is most reliable to use the built-in Bitlocker encryption system. And once again, when working with passwords and encryption, you need to be extremely careful, since there is a possibility of losing all your own data. Don't lose your passwords!
How to put a password on drive D
Typical Microsoft Windows operating system tools do not provide password protection for drive D, but allow you to restrict access to the selected drive. Third-party software will allow you to expand your security options.
Instructions
1. Make sure that the NTFS file system is used or perform formatting of the selected disk. 2. Call the main menu of the Microsoft Windows operating system by clicking the “Start” button and go to “All Programs” to initiate the procedure for restricting access to drive D. 3. Expand the “Typical” node and launch the “Windows Explorer” application. 4. Expand the “Tools” menu in the top toolbar of the Explorer window and select “Folder Options”. 5. Go to the “View” tab of the dialog box that opens and byvbnt check the “Apply easy file sharing” box. 6. Call the context menu of the drive D that is subject to access restriction by right-clicking and selecting “Properties”. 7. Go to the “Properties” tab of the dialog box that opens and delete the accounts of all users on the computer, in addition to your own and system accounts. 8. Enter your account in the Groups and Users section and check the Full Control checkbox in the Allow column. 9. Confirm your selection by clicking the Apply button and click OK to apply the selected changes. 10. Download and install the specialized application Disk Password Protection, which allows you to: - set password protection for loading the OS; - protect disk partitions and make them visible and inaccessible to other users; - install low-level hardware protection of hard drives; - apply password protection for launching programs. 11. Use the command line support option of the Disk Password Protection application to hide the process of setting password protection for the selected disk and remember that even deleting the application itself does not cancel the installed protection of drive D. Disabling password protection can only be done by the Disk Password protection application.
Probably every PC user has some information that he would not like to show to others. Regardless of whether an mp3 file is a secret document, the information on the hard drive requires protection. A large number of programs have been developed for these purposes. Let's look at one of them as an example.
You will need
- Disk Password Protection Software.
Instructions
1. To download this program, follow the following link https://www.exlade.com/ru/disk-password-protection and click “Download”. After installing it, launch the utility by double-clicking on the keyhole icon. In the main program window you will be able to see all currently available hard drives, including their partitions. 2. Select the disk partition or the hard drive itself, the one that you would like to protect with a password. For self-protection, it is recommended to run the Security Wizard. Click the top menu “Security” and select “Disk Protection Wizard”, or click the corresponding button on the main toolbar. 3. In the welcome window that opens from the “Security Wizard”, you need to select the disk partition category. Set the required parameters and click the “Next” button. 4. In the next window you will see a list of available partitions and the disks themselves. Select the one for which you want to assign a password from the list. To go to the next window, click the “Next” button or press the Enter key. 5. After this, check the box opposite the “Set security” item and click the “Next” button again. In a new window you will see a form for entering a password, come up with a difficult password, enter it twice (in the first column and in the confirmation column). It is also recommended to activate the hidden security mode; to do this, check the box opposite the corresponding line. Click the “Next” button to continue the setup. 6. A message will appear on the screen indicating that passwords have been successfully set for the selected partitions. A corresponding mark will appear in the list of disks. The operation of installing the code on the disk is completed. 7. It is worth noting that after uninstalling this program, the hidden sections will become available to every user as before. Therefore, it is recommended to install the program in a good location in the Program Files folder. Video on the topic
Properly protecting your computer from harmful programs means you can work in peace and keep your personal information intact. To prevent your PC from experiencing external threats, protect it with an antivirus. This is how you can do it.
You will need
- For this you will need avast antivirus!
Instructions
1. Go to the antivirus developer’s website at www.avast.ru and fill out the registration form. Later, click on the “Submit Form” button. 2. Get your avast antivirus key! With the key, your antivirus will work not for 60 demo days, but for more than a year. 3. To get a key on the developer’s website, follow the link “Registration and purchasing a key for Home Edition.” 4. In the registration form to purchase a key, enter the required information and also enter your email address twice. Check that the address you specified is working properly. 5. After registration is completed, go to your mailbox - the program will send you an email with the subject avast! Registration. Your license key will be sent to you in this email. 6. Go back to the avast! manufacturer’s website, go to the “Download” section and follow the link “Download avast! 4 Home Edition". Download antivirus 7. Run or save the installation file to your PC. 8. After installation, restart your PC. You will see the avast! welcome window on your monitor. 9. Right-click on the avast! icon, select the “About avast!” option, click on the “License Key” button and enter your license key there. The antivirus has begun its work - protecting your computer. Video on the topic
Note! An antivirus with a license key will work for 14 months. Helpful advice After the registration period ends, you can easily obtain the newest key and extend the operation of the antivirus.
In our time of highly developed special technologies, one of the most important tasks is the sound protection of information. store a variety of data on computer hard drives Works of many years of work or an individual photo archive - any personal information must be protected from third-party viewing or copying. To prevent someone else's access to the disk with information, you can put a password . There are a lot of different utilities that allow you to set a password on a disk. One of these programs, Disk Password Protection, protects against intrusion not only on an ordinary hard drive partition, but also sets a password on the boot disk.
Instructions
1. Download and install Disk Password Protection on your computer. Launch the installed program. The utility's working window will open, displaying all available disks in the system.
2. Using the mouse, select in the window the area of the disk prepared to be locked with a password. Launch the “security wizard” program. To do this, select items in the “Security” – “Master...” menu or click the “Master” button on the toolbar. A “wizard” window will appear on the screen. 3. Select the type of protected disk in the window. In the appropriate field, check the box when protecting the boot disk or when setting a password for any other disk. Click the "Next >>" button.
4. At the next step of the wizard, a list of available disks will appear. Select the one you need. To do this, click on the corresponding list line. Proceed to the next step using the “Next >>” button.
5. In the new window, select the type of operation to be performed. To do this, check the “Set security” box. Click the "Next >>" button.
6. A password entry form will appear. Enter the password and its proof in the form fields. If desired, set a hidden security mode by turning on the checkbox for this mode. Click on the “Next >>” button.
7. The program will set a password and display a corresponding message in the “security wizard” window. In the main utility window, the rank of the protected disk will change. The disk is now protected.
Often, in order to avoid copying expensive files that you save on your computer or on the network, it is important to protect them. A huge number of files can be stored in Zip archives. It is worth considering the method of installing guards on them.
You will need
- - computer;
- - Internet access.
Instructions
1. Go to the official website 7-zip.org and download the 7-Zip file compression program. Install this program using the installer that you downloaded. Open 7-Zip File Manager by going to Start -> Programs -> 7-Zip -> 7-Zip File Manager. 2. Open the folder where the file that needs to be compressed and encrypted is located. Left-click on the selected folder. Click the "add" button on the toolbar. It should have a large green “+” sign above the text. 3. Give the archive something memorable. You can also apply a mechanically generated name. 4. Click the drop-down list next to Archive Format. Select Zip format. Select "Maximum" under Compression Tier. 5. Enter the required password in the appropriate field. Retype it on the line below. Click on the list below. Select AES-256 formatting type. Click the OK button at the bottom of the dialog box. 6. Wait until the program finishes compression. The time required for this operation will vary depending on the size of the files you are compressing and the speed of your computer. Pay attention to the indicator. When it reaches 100 percent, the archive creation will be completed. 7. Try to open the newest archive after finishing the job. Enter the selected password and press Enter to check whether the file is protected or not, as well as whether all the files that must be in the folder are safely saved. Now only you will have access to this archive. Video on the topic
Note! You can also use ultra-compression to make the archive a little smaller, although this can be achieved by compressing not all types of files. Helpful advice Don't forget your password. Without it, you will not be able to restore the files contained in the archive.
In order to protect your computer (or laptop) from being launched by third parties, you can set a password to launch the core computer program - the operating system. In order to set a startup password, you will need to go into your own user settings and slightly correct them.
You will need
- – manager rights.
Instructions
1. Go to the “Control Panel” (via the “Start” menu) and launch the “User Accounts” section. It is in this section of system settings that all users on your computer are displayed. Click on your own account shortcut. Click on the inscription “Create a password for your account” to go to the password settings window. A new window will open in which you will need to enter the intended password twice (2nd time for confirmation). Be sure to fill out the “Password Hint” field carefully, because after a long break in using the computer you may forget your password. 2. You can set a password for your account using another method. Enter the command control userpasswords2 in the “Run” line (this element is also located in the “Start” menu) and confirm by entering. In the window that appears, check the “Require username and password” checkbox and set a password for the account. Disable all other accounts, or set a password for all. If you leave at least one account enabled without a password, a third party can log in through it. 3. Reboot the computer to check the changes made. As soon as the system boots, a welcome window will appear where you will need to select a user and enter a password. There is also special software that allows you to set passwords, although not on programs, but on PC folders. You can put the necessary programs and files into the folder by setting a complex password. As practice shows, passwords do not play a special role in operating systems, because all systems can be hacked. Be diligent about keeping copies of your main data on removable media and using anti-virus software.
Programs for setting a password for a folder
Easy File Locker
Easy File Locker is a free XOSLAB utility. Users add the files and folders they want to protect in the list by using the Add File and browsing their system.
Settings such as visibility and access can be changed on the fly from the tool's clean user interface - this is especially useful if you have a lot of files or folders on your system that need to be protected.
Privacyroot
Developed by PrivacyRoot, Secret Disk works by creating a virtual drive that can be password protected or simply made invisible to prying eyes.
SecretFolder
Instead of applying password protection to individual files, SecretFolder simply makes them invisible if the user is unable to log into the application using the specified password.
This is a good solution if you're hiding a birthday gift or a personal diary, but it's not strict enough to keep track of the really important stuff. Consider this tool best used for privacy on a shared computer rather than security.
My castle
My Lockbox is a tool that works best when the user intends to store all of their password-protected content in one place. Instead of picking and choosing individual files and folders to protect, the utility allocates one specific folder as a "lock" where sensitive content will be stored, similar to the folder lock process at the beginning of this article.
This is a great alternative to manual filing for anyone who doesn't have the confidence to do this procedure. However, its single-folder focus, as opposed to the flexibility of something like Easy File Locker, makes it less useful in a work environment. Also, at $29.95, the pro edition doesn't offer great value for money.
On the phone
Since a smartphone is always at hand, quite a lot of explicit functions have been invented to protect personal information.
Healthy:
Set PIN
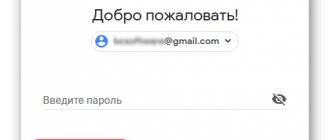
How to protect Yandex.Disk using the application itself? Use the PIN code function:
- Go to the application (you must be logged in) and click "Feed" .
- Click “Settings” - “Set PIN” .
- Enter it, repeat.
- Each time you launch the application, the system will request a PIN.
Set a password in system settings
Every Android and iOS smartphone has a password protection feature. It is used to block all information on a smartphone, and until you enter the access code, you will not advance beyond the lock screen. To set this protection (using the example of EMUI 9.1 firmware, Android add-ons):
- Go to “Settings” - “Security and Privacy” . Select Lock Screen Password .
- Create a password (PIN) for the screen lock and remember it. Enter it several times for the system to accept the changes.
- Now each phone activation will require entering a PIN code.
Install a security code using the program
There are many programs for setting password protection in the AppStore and Play Market, choose any one. Some smartphones even support this feature from their native firmware. The whole process comes down to a single algorithm of actions:
- Select and install the application on your smartphone.
- Launch it (Application Lock) and in the settings, specify the application that you want to password protect.
- Create and set a password.
- Also use a master password to protect access to the program to set a security code. More advanced versions can be linked to “fingerprint” or “face recognition” if the phone supports this type of scanner.
- The input will be blocked every time the screen is turned off.