Rollback to a restore point
Restore points, also called shadow copies, are backups of critical system and program files, including configuration files, as well as registry branches. They are created automatically when significant changes are made to Windows, for example, when installing drivers, and are saved in a special hidden folder System Volume Information, located in the root of the system directory, access to which is limited even to the computer administrator.
If Windows 7 starts to malfunction, you can roll back to a restore point, but it is advisable that it be created immediately after installing the system.
To roll back Windows 7 to a restore point, in the Run (Win + R) run the rstrui and follow the simple instructions of the step-by-step wizard, selecting your restore point.
If Windows is so damaged that it cannot boot on its own, first try booting the system in safe mode (pressing F8 when turning on the PC), and if that fails, boot it from the installation disk, and when the installer wizard window appears on the screen, press Shift + F10 . This will open a standard command line, in which you need to run the already familiar rstrui , thereby calling the rollback wizard to the previous restore point.
Further steps are practically no different from those described above, so after completing the recovery procedure, all you have to do is restart the computer in normal mode. It should, however, be understood that such a restoration is not a reset to the “factory” state in the full sense of the word, the system will be restored only partially, and all programs you installed, with a few exceptions, will not be affected.
Reset by reinstallation
The second option for resetting Windows 7 is more severe; in fact, it is equivalent to a complete reinstallation of the system, with the only difference being that during such a recovery, a Windows.old folder is created in the root of the system drive, containing a significant part of the old system. Also, a prerequisite for resetting Windows 7 to its original settings is that the user has an installation disk for this version of the operating system. If the system is still able to boot, open the Win + R the command
control /name Microsoft.BackupAndRestore
Backup and Restore window and click the " Restore system settings or computer " link, and then the " Advanced recovery options " link.
You will be offered two recovery options to choose from - using a system image and using an installation disk. If you did not take care of creating a full backup in advance, select the second method, click “ Yes ” in the recovery window and select whether you need to archive the user files stored in the profile directories to an external drive or flash drive or not. If yes, the wizard will prompt you to specify a location to save the files; if not, just click “ Skip ” and restart the computer.
When the computer boots, follow the instructions of the step-by-step wizard, not forgetting to insert the installation image into the drive in advance, from which Windows 7 will take the necessary files. There is no need to set the BIOS to boot from disk in this example. Further actions, up to the creation of a user, are no different from the actions during a classic OS installation, except that at the first boot, the system will offer to restore your user files from the archive, if you bothered to create it, read the previous paragraph.
Practical ways to rollback and reset Windows 10
Each subsequent build of Windows 10 can be “rolled back” to the previous one. So, you can roll back from Windows 10 Update 1703 to Windows 10 Update 1607.
How to roll back to a previous build of Windows 10 within 30 days
Take these steps:
- Give the command “Start - Settings - Update and Security - Recovery”.
Choose to roll back to a previous build of Windows 10 - Note the reasons for downgrading to an earlier build of Windows 10.
You can explain in detail the reason for downgrading to a previous version of Windows 10 - Confirm the rollback by clicking "Next".
Confirm your decision by clicking the button to proceed to further actions - Confirm the return to the previous build again.
Confirm Windows 10 rollback again - Click the button to start the Windows 10 rollback process.
Finally, click the button to go back to the previous version of Windows 10
The OS update will be rolled back. After a restart, the old assembly will start with the same components.
How to undo the latest Windows 10 update
Such a reset helps when Windows 10 errors have accumulated in such quantities that normal operation in the “ten” has become impossible.
Windows 10 will begin to reset.
Video: how to reset Windows 10 with a running OS
How to Restore Windows 10 to Factory Settings Using Refresh Tool
To do this you need:
- Go to the familiar Windows 10 recovery submenu and click the link to clean install Windows.
To initialize the Refresh Tool download, click on the link to the Microsoft website - Go to the Microsoft website and click on “Download Tool Now” (or a similar link to download the Windows 10 Refresh Tool).
- Launch the downloaded application and follow the Windows 10 Refresh Tool instructions.
Follow the Windows Refresh Tool wizard instructions
The Windows 10 Refresh Tool application resembles the interface of the Windows 10 Media Creation Tool - for convenience, it is made in the form of a wizard with tips. Like the Media Creation Tool, the Refresh Tool allows you to save your personal data. It seems to perform the opposite function of the Media Creation Tool - not an update, but a reset of Windows 10.
During the reset process, the PC will restart several times. After that, you will start working with Windows 10 as if you had just reinstalled it - without applications and incorrect OS settings.
There is no rollback from version 1703 to 1607/1511 yet - this is the task of future updates to the Windows 10 Refresh Tool.
Video: Refresh Tool shortcomings
How to reset Windows 10 if it has startup problems
The operation is performed in two stages: checking startup from a flash drive in the BIOS and selecting options to reset the OS itself.
Checking the PC boot from a flash drive in BIOS
As an example, here is the BIOS version of AMI, which is most often found in laptops. Insert the bootable USB flash drive and restart (or turn on) your PC before proceeding further.
- When your PC manufacturer's logo screen appears, press the F2 (or Del) key.
The inscription below tells you to press Del - Once in the BIOS, open the Boot submenu.
Select the Boot submenu - Give the command Hard Disk Drives - 1st Drive.
Enter the list of drives that are visible in the BIOS list - Select your flash drive as the first media.
The name of the flash drive is determined when it is inserted into the USB port - Press the F10 key and confirm saving the setting.
Click Yes (or OK)
Now the PC will boot from the USB flash drive.
The BIOS version indicated on the manufacturer's logo screen can be any (Award, AMI, Phoenix). On some laptops, the BIOS version is not indicated at all - only the key for entering the BIOS Setup firmware is described.
Running a Windows 10 reset from installation media
Wait until your PC starts booting from the Windows 10 flash drive and do the following:
- Click the "System Restore" link.
- Confirm to reset Windows 10. The reset request message here is not much different from those discussed in the guides above.
Once the reset is complete, Windows 10 will start with default settings.
Resetting from a Windows 10 installation flash drive is, in essence, restoring lost or damaged files due to which the OS could not start. Windows recovery options have been around since Windows 95 (fixing startup problems) - the steps have been made clearer over 20 years, without having to type fancy commands.
Recovery from image
Compared to reinstallation, restoring from an image has a significant advantage, since it contains not only system files, but also all programs installed on it. As in the case of recovery points, it is advisable to create such a backup immediately after installing and initially setting up Windows or purchasing a PC with a pre-installed system. This image is called WindowsImageBackup and it can be stored either on the second physical disk or in the root of the user volume.
In this article, we will not touch upon creating an image; we will only note that it can be created both using Windows itself and using third-party programs. Let's assume that you already have it, as well as a recovery disk, which Windows 7 offers to burn immediately after creating a system backup. If there is no recovery disk, then boot the computer from a regular installation disk, click “ System Restore ”, and when the “ Recovery Options... ” window appears on the screen, select the “ Recover your computer using a previously created system image ” option.
Select your backup copy in the wizard window that opens (you can also select it manually) and follow the instructions, which usually boil down to asking you to click the “ Next ” button, and then “ Finish ”, after which the image deployment procedure will begin. Wait for it to complete, and you will receive a fully restored system with all settings.
How to use Windows Recovery?
Windows creates points in case corrections are required, and the user can create them independently and determine the saving time. When the user creates such a point, it is necessary to disable all applications. Next, go to “Control Panel” - “System”. Then enter the “System Protection” window and click “Create a restore point” (you need to come up with and type its name). A notification will appear: “The recovery point was created successfully.”
To fix Windows, click “Start”, enter “Control Panel” and then go to “Recovery - Run System Restore”. In the menu that appears, click on the point (it is recommended to select a point a few days before errors occur).
Next there will be a reboot.
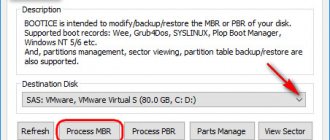
Also in this window, it is possible to reset settings and roll back the OS using a pre-created image, which is written to a disk or other external media in advance. Currently, flash drives are popular. It is recommended to use the default settings.
Reset to factory settings
As for actually resetting Windows to factory settings, or otherwise Factory Reset, there is one important detail to note. The methods described above are not essentially such a reset, since it is not available on all computers, but only on those on which the manufacturer deems it necessary. The disks of such PCs have a special recovery with the same “factory” system with original drivers.
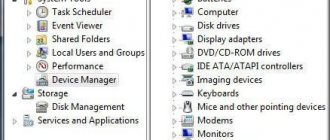
Open the command diskmgmt.msc through the Win + R “ Disk Management ” window and see if you have such a partition.
Additionally, on some laptops and computers, the manufacturer integrates either the WinPE recovery environment or a special utility into the BIOS. In Acer, for example, it is called Acer Recovery Management and is called by repeatedly pressing F10 while holding Alt and then entering the password 000000 ; in HP it is called HP Recovery Manager and is called by pressing F11 when restarting the computer; Lenovo provides a special hardware button for this. More detailed information about the procedure can be found either in the instructions supplied with the computer or on the manufacturer’s website.
The factory reset procedure itself is not particularly difficult, being presented in several stages, accompanied by wizard prompts. There is a universal way to launch the reset utility: if you have a Recovery partition on the disk, in the advanced recovery methods window, instead of “ Reinstall Windows ”, you will have the option “ Restore the computer to its original factory-specified state ” or something like that. It can also be accessed from under the boot disk in the recovery environment, as shown in the screenshot.
Using a boot disk
I have already talked about this procedure using Windows 10 as an example. But resetting Windows 7 to factory settings is a little different. Therefore, keep the instructions for the “seven”.
This method is the most effective if the system is deeply infected with viruses, does not boot at all or constantly crashes (blue screen).
- In the BIOS settings, select the boot method from removable media (flash drive, DVD) on which the image is recorded. Of course, you first had to create it (or ask your friends). I showed how this is done in a separate publication.
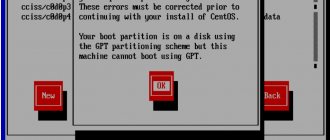
- When the window with the “Install” button loads, do not rush to click it. Below is the “Restore...” link that we need:
- Several options will be offered below. You need to click on the item indicating the image:
- Now just follow the "wizard's" instructions. You just need to click “Next” several times and then wait for the procedure to complete.
For the future: if there is no Recovery partition
A special section with the original factory OS is not available on all computers. What to do if you don't have one? It is best to create a complete backup of the configured system using a built-in or third-party tool and save it, if not on a separate physical disk, which is preferable, then on a user partition. When something happens to your Windows, you can always deploy the created image. Well, if you consider yourself an advanced user, you can try to create a special Recovery partition on your PC yourself by finding a specific image of the Recovery partition on the Internet, but we warn you in advance that this procedure is quite labor-intensive, and it’s not a fact that everything after that will work correctly.
Loading a successful configuration
The easiest way that will help you return the system to working condition in a few minutes.
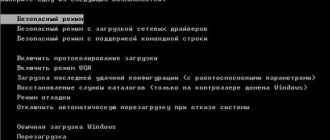
- First you need to restart your PC and press F8 during startup to display the boot menu:
- Select the “Last successful configuration” section;
- Windows will try to repair damaged files and restore default settings, followed by a restart.
Let me immediately note that the above method can solve minor problems associated with defective drivers or parameter failures. You need to start with it, and if it doesn’t help, then move on to the next instructions.