Content:
- Document password: principles Setting a document password in Word 2003
- Setting a password for a document in Word 2007
- Setting a password for a document in Word 2010
- Setting a password for a document in Word 2013
- Setting a password for a document in Word 2016
- Removing a password for a document in Word 2003
Document password: principles
By setting a password to open a document, the file itself will be encrypted. This is done in order to reliably protect the information contained in it.
To decrypt the document and view it, you will need the password that was set earlier. Remember that a strong cryptographic algorithm is used to encrypt the file, and if you forget the password set for the file, then with a very high degree of probability you will no longer see the information contained in the file.
It is strongly recommended to set a complex password for the file in order to protect the information stored in the document as much as possible. You can read about how to create a complex password in the article Creating a hack-proof password. Practical recommendations.
Now let's look at how a password is set for a document in different versions of the Word editor.
Setting a password for a document in Word 2003
First of all, you need to open the document in the editor for which you want to set a password.
Next, click on the Service and select Settings .
As a result, a window with many tabs will open. In this window you need to go to the Security . By going to this tab, at the very top you will see a form for setting a password for the document.
Enter the desired password and press the OK .
After pressing the key, a password confirmation window will be displayed - enter the password again and press the OK .
Ready! The password for the Word document has been set. By closing the document and opening it again, you will be asked for a password to open this file.
It must be said that the number of attempts to enter a possible password is unlimited, so you don’t have to worry about errors in the entered combination.
Disabling Protected View
To disable Protected View for all documents, you need to change the settings:
- Select the “File” tab in the menu and go to the “Options” section.
- sequentially select the following items: Trust Center → Trust Center Settings → Protected View Mode.
In the "Protected View" blog, by default the checkboxes are set to "Enable..."; to disable Protected View, you need to uncheck these boxes.
We remind you that Wicrosoft Word does not recommend completely disabling Protected View mode, due to the increased danger of working with infected documents.
Setting a password for a document in Word 2007
In this version of the text editor from Microsoft, the interface is slightly different from Microsoft Office 2003. This means that the instructions will be slightly different:
In the upper left corner of the Microsoft Office editor there is a button with a logo, clicking on which opens the main menu of the editor. Click on it and in the list that appears, select Prepare , and then Encrypt document .
And then all that remains is to enter and confirm the entered password, and the document will be successfully protected.
Setting a password for a document in Word 2010
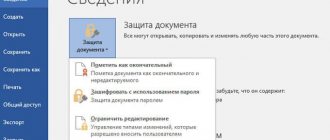
In the Word editor, click on the File . In the list that opens, click on Information . A window will appear on the opposite side, in which you will need to click on the button labeled Protect document , and then Encrypt with password .
As a result, all you have to do is indicate the desired password and then confirm it. Ready! Your document is securely protected.
How to remove editing protection from a Word document: four simple and effective ways
Sometimes .doc or .docx text files created using Microsoft Word cannot be edited or copied. The reason for this is the enabled protection against such operations, backed by a password. This article will tell you how to remove this type of protection from a document in Word.
What are the different ways?
To overcome limitations when working with a document, 4 simple and free methods were invented:
Removing a protection setting using the WinRAR archiver.
Each of these methods for understanding how to unprotect a Word document from editing works in any version of the editor, starting from 2003.
Method #1: Paste protected text into another document
This method has one drawback: when inserted into a new document, only text and its formatting are added, but pictures, graphs and other multimedia elements are not.
The sequence of actions for this technique is as follows:
- Create a new document – Ctrl + N.
- Microsoft Word 2003 – go to the “Insert” menu and click on “File”. Specify the path to the protected document and click “Insert”.
- Microsoft Word 2007 – 2020 – switch to the “Insert” tab and in the “Text” block, click on the inverted triangle next to the “Object” inscription. In the menu that opens, click on the line “Text from file”. Using the Explorer window that appears, open a file that is protected from editing.
After this operation, the text will become editable.
Note. To use this technique in Microsoft Word 2003, the protected file format must be DOC (.doc).
Method No. 2: editing file settings using an archiver
To use this method, you will need the WinRAR or 7Zip archiver program and the display of file extensions turned on. To make extensions visible, you need to:
- Go to the “Control Panel”.
- Switch the view to “Large/small icons” in Windows Vista, 7, 8, 10. In Windows XP you don’t need to do anything.
- Find the “File and Folder Options” or “Folder Options” icon for XP and other versions of Windows, respectively, and double-click on it with the left mouse button.
- In the new dialog box, switch to the second tab and find the line “Hide extensions for known file types” and uncheck the box next to it.
After preparation, you can remove protection from the file. This is done as follows:
- Right-click on the desired document and select the “Rename” sub-item in the context menu or select it and press F2.
- Move the cursor to the end of the name and delete the last 3 or 4 letters and write zip instead. Press Enter.
- Extract the resulting archive to any folder.
- Among the unzipped files, find a document called settings.xml. It is located in the Word folder.
- Right-click on it and select “Open with” and “Notepad” in the context menu.
- In the Notepad window, press Ctrl + F and enter the value Protection (without quotes) in the text field.
- After detecting this inscription in the text, you need to remove the following values: w:documentProtection and w:edit=”readOnly”.
- Save changes to the document by pressing the Ctrl + S key combination.
- Open the archive, go to the Word folder and drag the edited file into it.
- Run the archiving procedure with the option to replace files with the same names.
- Change the extension of the resulting file to the original one.
You can then open the document and edit it.
This technique is approximately equal in complexity to the previous one, but it does not require any third-party software. The algorithm is as follows:
- Open a document that is protected from editing.
- Press F12, select a location to save the new file and select “Web page (*.html)” from the “File type” drop-down list.
- From the context menu of the created document, select the “Open with” and “Notepad” items.
- In the new window, in the “Edit” menu, click on “Find” or use the hotkey Ctrl + F.
- In the window that appears, enter the value Protection in the search bar and click “Find Next.”
- Find the line in the document: ReadOnly and delete it.
- Save changes.
- Open the edited file using Microsoft Word and resave it in .doc or .docx format.
Note. When using this technique, the text formatting is partially lost.
This completes the description of the third method, which allows you to remove protection from a document for editing in Word.
Method number 4: converting to DOC or DOCX format
To remove the ban on editing using this method, you need to:
- Go to the website of the multifunctional online converter Online-convert.com and change the language to Russian using the drop-down list in the upper right corner of the page.
- On the main page, in the “Document Converter” block, select “to DOC\DOCX format”.
- On the next web page, click on the “Select files” button. In the Explorer window that opens, indicate all the documents that need to be converted.
- Click on “Start Converting”. Upon completion, the archive with the converted files will automatically download.
This is the way to understand how to remove protection from a document in Word in an online converter.
Note. Not every Internet service for converting one format to another is able to remove protection. One of them is zamzar.com. It converts successfully, but the new file cannot be modified.
The methods to remove protection from a Word document are quick and simple enough that an ordinary user of this editor can freely use them.
Source: https://FB.ru/article/428548/kak-snyat-zaschitu-s-dokumenta-word-ot-redaktirovaniya-chetyire-prostyih-i-effektivnyih-sposoba
Removing a password for a document in Word 2003
First, open the file from which you want to remove the password. Then click Service , and then Options . In the window that opens, go to the Security .
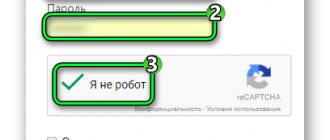
Remove from the password entry field located there all the characters that are represented by black dots and press the OK .
When closing the document itself, be sure to answer yes to the prompt to save changes.
Ready! The password for the Word document has been removed.
How to remove protection from a Word document
If you downloaded a document in MS Word format from the Internet, or you were given some kind of plan at work, college or school, then there is a high probability that the ability to edit this document will be limited.
What does it mean? This means that the document was protected from editing and copying by the person who last opened it. Accordingly, you will not be able to change anything in the text or copy the desired fragment.
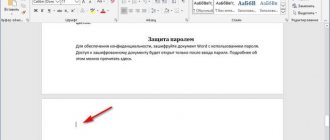
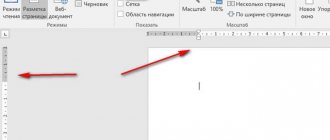
And when you try, an area will open on the right, as shown in the screenshot below. At the bottom of this area there will be a “Disable protection” button, but by clicking on it, a window will appear for entering the password that was set when editing was limited.
Considering that we don’t know the password, let’s look at how you can disable protection against editing and copying text in Word so that you can again make the necessary changes to the text.
Removing copy protection and text editing
You can remove the protection by changing the extension of the document itself from *.docx to *.zip and slightly adjusting one file from the created archive. Using this method, you will be able to remove protection from text editing, no matter what version the document was created in: Word 2007, 2010, 2013 or 2020.
Before you start working with the blocked file itself, you need to make sure that their extensions are shown in Explorer. To do this, open Windows Explorer (go to any folder or click on “My Computer”), click on the “Arrange” button and select “Folder and Search Options” from the list. This is on the Windows 7 operating system.
If you have Windows 10 installed, then open Explorer and go to the “View” tab. There will be a “Options” button at the top right, click on it and select “Change folder and search options.”
After this, a window like this will open. In it, go to the “View” tab. In the “Advanced Settings” section, you need to find the “Hide extensions for known file types” item and uncheck the box next to it. Then click "Apply" and "OK".
Now, next to the name of the document we need, editing of which is blocked, its extension is also shown.
Select it by clicking on it once with the mouse. Then click on the name of the file itself. When the field for editing the name appears, remove the *.docx extension and enter *.zip instead. In the example, the file was called “Word.docx”, but became “Word.zip”. As you can see, we are not changing the name.
When this window appears, click “Yes” in it.
We go into the newly created archive. It will contain several files and folders. Find the “word” folder and go into it. In the folder you will see “settings.xml” - this is what we need. Left-click on it and, without releasing the button, drag the file to the desktop.
Then right-click on “settings.xml”, which you placed on the desktop, and select “Open with” from the context menu. From the proposed programs, you can choose the usual “Notepad”.
The selected file will open in Notepad. Now we need to find the tag that concerns the protection and fix it a little. To open the search window, press Ctrl+F. Then enter the word “Protection” into the search bar and click “Find Next.”
This word will be highlighted in the text. As you can see, in the parameters – “edit”, it is indicated – “readOnly”, which means that this Word document can be used only for reading. Remove the “w:edit=”readOnly” fragment.
This screenshot shows the text in which the unnecessary line has been removed. After that, click “File” - “Save” to save the changes made to the document.
Next, we need to replace the “settings.xml” file, which is located in the archive, with the one that we just corrected.
To do this, select “settings.xml” on the desktop, and, without releasing the left mouse button, drag the file back to the archive. A dialog box will appear, in which make sure that “Add with file replacement” is selected in the “Update Method” field and click “OK.”
Let's rename our Word document again. Only now we make a Word file from the archive - change the extension from *.zip to *.docx. In the dialog box that appears, click Yes.
You can enter a document whose text has been protected from editing. As you can see, the protection in Word has been removed, and you can print in the document or copy the desired text from it.
Second option for removing protection
Let's look at another method that will help remove the protection of the necessary document. It is simpler than the previous one. I will show using MS Word 2010 as an example; these recommendations are also suitable for those who have Word 2007 and Word 2013 installed. If you have MS Word 2020, then the steps are the same, only the necessary buttons may be in other tabs.
You need to start by creating a new document. This is done like this: “Start” - “All Programs”, find the “Microsoft Office” folder and click on the “Microsoft Word” item in it.
In the new document, go to the Insert tab. In the “Text” section, click on the small arrow next to the “Object” button. From the list, select "Text from file".
Next, in the “Insert File” window, open the folder in which the protected document is saved. Select it with the mouse and click “Insert”.
After this, all the text from the protected document will be inserted into a new file opened by you. And it will already be possible to change the text and copy it.
I hope these recommendations will be useful to you. Removing protection from a document in which editing and copying text is prohibited is not so difficult; choose one of the described methods and work with the necessary files again.
(8 5,00 of 5) Loading...
Source: https://comp-profi.com/kak-snyat-zashitu-s-dokumenta-word/
Removing a password for a document in Word 2007
Open the document in which you need to remove the password.
In the upper left area of the Microsoft Word 2007 window there is a button with the Microsoft Office logo - click it. In the list that appears, click on Prepare , and then Encrypt document .
Clear the password input field by removing all existing characters (represented by black dots) and click OK .
When closing the document, save your changes by answering yes to the Save changes or not?
All. The document is no longer password protected.
Password recovery by changing the format
Any document contains not only text, but also data about the user, and along with them a number of other information, including the password for the file, if there is one. To find all this data, you need to change the file format and then “look” into it.
Changing the file format
1. Launch Microsoft Word (not the file) and go to the File .
2. Select “Open” and specify the path to the document that you want to unlock. To search for a file, use the "Browse" .
3. You won’t be able to open it for editing at this stage, but we don’t need that.
Still in the same “File” , select “Save As” .
4. Specify the location to save the file, select its type: “Web page” .
5. Click Save to save the file as a web document.
Note: If the document you resave has special formatting styles applied, you may see a warning that some of the document's properties are not supported by web browsers. In our case, these are the boundaries of signs. Unfortunately, there is nothing left to do but accept this change by clicking on the “Continue” button.
Password search
1. Go to the folder where you saved the protected document as a web page, the file extension will be “HTM” .
2. Right-click on the document and select “Open with” .
3. Select the Notepad++ .
Note: The context menu may contain an “Edit with Notepad++” item. Hence, select it to open the file.
4. In the program window that opens, in the “Search” , select “Find” .
w:UnprotectPassword tag in the search bar in angle brackets (<>) . Click Search Next .
6. In the highlighted text fragment, find a line of similar content: w:UnprotectPassword>00000000 , where the numbers “00000000” located between the tags are the password.
Note: Instead of the numbers “00000000” indicated and used in our example, there will be completely different numbers and/or letters between the tags. In any case, this is the password.
7. Copy data between tags by selecting them and pressing “CTRL+C” .
8. Open the original password-protected Word document (not the HTML copy) and paste the copied value ( CTRL+V ) into the password entry line.
9. Click OK to open the document.
10. Write down this password or change it to any other one that you know you won't forget. This can be done in the menu “File” - “Tools” - “Document Protection” .
Removing a password for a document in Word 2010
First, open the word document from which you want to remove the opening password.
In the top menu, click on File . In the menu that opens, select Information . A menu will appear on the right with additional items. In this menu, click on the large button located there Protect document , and then Encrypt with password .
Remove the previously set password, removing all the black dots there, and click OK . When closing your document in the editor itself, be sure to save your changes.
Great, the password for the once protected document has been removed.
Opening in Protected View
In all Microsoft Office programs, files that meet certain criteria open in Protected View by default.
This mode is a system security feature and is triggered if:
- the system has determined the source of the file to be unreliable;
- the file is opened from the insecure (by default) Temporary Internet Files or Downloads folders;
- the file is blocked by the scan function due to an outdated format vulnerability;
- the document was received from mail servers or some other applications as an attached file;
- The file was taken from a third-party user's repository.
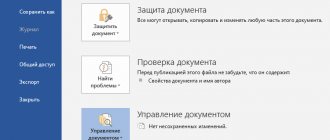
Open “File” → “Info” and see why the document will be opened in Protected View. In my case, the editor indicates that this file was from the Internet, so it was flagged as dangerous.
This mode is also activated if any failure occurred during the scan or the user has set additional settings for enabling Protected View on his device.
You can open a protected document as follows: “File” → “Open” → expand the list next to the “Open” button → select “Open in Protected View”.
Now let's see how to edit a protected Word document. There are several ways.