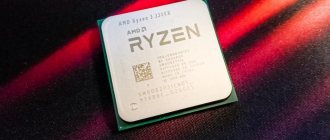
The computer processor is one of its most important parts. It is this chip that performs all the calculations, and it controls the execution of all programs and controls almost all devices of the system unit. Without a processor, a computer simply turns into dead hardware. After all, if without a hard drive or even a video card it can still work and perform some functions, then without its main computing part it will not even turn on.
A technique for replacing a process on a computer yourself.
When replacement is required
In some cases, replacing the CPU is necessary, and sometimes it is desirable to solve a number of problems.
Possible reasons for replacement:
- The CPU burned out. One of the signs is that the PC does not show any signs of life. And on motherboards with an Amibios BIOS chip installed, 5 short beeps may sound. You can determine for sure whether the processor or motherboard is at fault after a thorough inspection of the CPU. If you can see a change in color on the surface, melting of the crystal, or defects in the legs, then it is obvious that he is the culprit. When there are still doubts or whether the defects listed above are not present, it is recommended to check the questionable chip on another motherboard;
Signs of a burnt processor - discoloration on the surface, melting of the crystal, defects in the legs
- system upgrade is required. May be needed when purchasing a new computer game. Or the user decided to engage in video editing, animation, or complex engineering calculations. All of these activities at some level require a powerful system. In parallel with replacing the CPU, it is best to also increase RAM and improve the video system.
Replacement of the processor may be required when upgrading the system
Advice! Modern processors are reliably protected from overheating and failure, so most often breakdowns are not associated with them, but with other components. Therefore, it is important to make sure that it is the processor that is faulty.
CPU failure may be caused by thermal protection being disabled. This happens when you overclock the system yourself.
How to find out which processor to buy
To purchase a processor, you will have to find out which motherboard is installed on a particular PC. Its modification, the type of “connector” (socket) for connecting the CPU.
There are two main manufacturers of boards and processors:
- Intel;
- AMD.
Important! These are old competitors, their components are not interchangeable. That is, an Intel processor will not fit an AMD board.
The main manufacturers of boards and processors are Intel and AMD
Motherboards are equipped with sockets - a kind of multi-pin connectors for installing processors. Each “leg” of the CPU corresponds to a hole with a contact.
There are several popular types for Intel and AMD:
- Intel: LGA 2011, 1155, 1156, 1366 and 775. The latter is obsolete, but is quite common;
- AMD: AM3, AM3+, AM2, AM2+, FM1, FM2.
For inexperienced users, the following method is recommended for determining the required CPU, so as not to go into the intricacies of processor design.
Step 1. You need to download the free CPU-Z program, there are Russified versions (also freely distributed).
On a note! If the system has more than 3 GB of RAM installed, it is recommended to use the 64-bit version; in other cases, the 32-bit version is suitable.
In the search engine of any browser, enter “CPU-Z download in Russian”, follow the first link
Select the appropriate version and click on the download link
Step 2. No installation is required, launch is carried out by double-clicking on the application icon from the folder where the download was made.
Click on the downloaded zipped file
Click on the “exe” file
Step 3. Information about the processor will be visible in the main window. In this case, the processor socket is called 1156 LGA. This is a common connector from Intel. Therefore, it is the CPU with this socket that should be purchased.
We recommend reading the article on how to choose a processor for a socket.
In the “CPU” tab, in the “Processor packaging” section we see the name of the processor socket
Important! But you need to remember that certain motherboards support specific processors.
Step 4. To find out which chips can be installed on a given MP, you will have to find out the list of CPUs it supports. To do this, you need to open the “Boards” tab, where the corresponding model in the system will be indicated. In our case it is H55M-S2.
Open the “Board” tab, find the necessary information in the “Motherboard Model” field
Step 4. Now you will need to enter this name in the browser search bar (for example, in Yandex search or Google) and find the official website of the board manufacturer.
In the search engine of any browser, enter the motherboard model and go to the official website of the manufacturer
Step 5. There, in the “Support” section for this product, there will be a list of chips that can be installed on the MP. An image of the board is also presented here, so you can verify that the model is correctly identified by appearance.
Go to the “Support” section, then open the “List of compatible processors” item
The figure shows a table with supported processors for our Gigabyte board.
In the table we find information about which processors are compatible with our motherboard
On a note! You can do it even simpler: write down the MP model and go to a computer hardware store, where sales consultants will help you make your choice.
How to install a processor
Installing a new processor on the motherboard is a fairly simple procedure, but requires attention and accuracy. First, you should purchase a processor with the required socket, that is, a special connector that must be attached to the motherboard. The question of how to properly install a processor on a new or old motherboard should not arise any further. You can see the keys on the CPU - small indentations or legs that are supposed to fit into the socket, so putting it upside down simply won't work. So you need to carefully look at the details to understand exactly how the selected processor is installed on a specific motherboard, and take several steps:
- Move the fastening lever to release the socket.
- Having connected the keys, carefully and effortlessly put the processor in place.
- Close the lever.
If the processor doesn't work, don't put pressure on it! You need to pull it out and place it again so that all the notches match.
Interesting to know: How to choose a motherboard for a computer?
Preparing to replace the processor
To work you will need:
- screwdrivers (small set);
Small screwdriver set
- a small paint brush with soft or medium bristles;
Small paint brush with soft or medium bristles
- thermal paste (purchased at a computer parts store).
Tube of thermal paste
Step 1. The system unit should be placed on a clean table. First you need to disconnect all external devices and cables:
- monitor cord;
- mice and keyboards;
- modem or router;
- printer;
- power cable.
Disconnect all external devices and cables from the system unit
Important! In order to protect electronic components from damage by static electricity, which inevitably accumulates on the surface of the body (in particular, hands), you need to take a small metal object and touch any large steel structure (for example, a gas stove, radiator).
Step 2. It should be noted that the cases of system units look different. In order to understand how to disassemble a particular “system unit”, you need to carefully examine it from the back and side. Most often, you need to dismantle one of the side covers; they are attached with several screws.
On a note! It is advisable to prepare a couple of boxes in advance where you can put screws and other fasteners.
Unscrew the fixing screws of the side cover and move it back
Step 3. After removing the cover, you will be able to see the motherboard with installed components. The processor is located approximately in the center of the MP, usually hidden by a cooler (fan) and radiator. On powerful gaming PCs, liquid cooling (LCO) can be installed, then there will most likely be no fan, the LCO device works on a different principle.
Carefully remove the motherboard components that interfere with removing the processor
Now you need to evaluate which elements can interfere with replacing the CPU; they will have to be carefully removed. Most often this is:
- the cooler itself;
- radiator;
- housing and communal services system;
- unit cooling fan (usually present in powerful models and placed on one of the walls of the “system unit”);
- video card;
- sound card;
- cables going to hard drives and CD/DVD.
Important! When removing the video card and sound device (if it is not built into the motherboard), you will need to carefully tilt the latch. It looks different on different MPs. Most often, it is in the form of a lever on the slot; it should be bent to the side with one hand, and the expansion card should be smoothly pulled out with the other.
Carefully remove the latches to remove the video card and sound device
Step 4. If you plan to replace RAM modules, you need to remove it too. The strips stand perpendicular to the MP; to release them, the latches should be moved to the sides, the recessed modules will freely come out. They can now be carefully pulled out.
To release the RAM sticks, carefully move the latches to the sides and remove them
Now that everything unnecessary has been removed, you can begin dismantling the CPU.
The importance of correctly replacing the processor on a PC
Replacing the processor on a computer with a more powerful one is a process that needs to be approached with the utmost care. Before starting this process, it is necessary to clearly understand that incorrect installation can lead to subsequent overheating of the chip during load, and consequently to its failure.
Rotate the processor back and forth carefully. Eventually the radiator will be freed and you can lift it up. Steps 4 and 5: Press the locking lever, pull it outward slightly and release it upward. Lift the slot cover on its hinge and out of the way. Photos by Robert Cardin. Press the lever, pull it outward slightly and release it upward.
The socket cover will now lift up. Carefully lower the processor directly into the socket. Spread it evenly over the surface with a knife or screwdriver. Step 12: Rotate and lift the radiator latch covers. Turn the radiator retainer caps to the right and pull them up. Make sure none of the actual separation buttons are bent.
Copper or aluminum radiators are used to remove heat from the processor. Special thermal paste used during installation helps increase heat transfer. Next, using a fan (cooler), the heated air is removed from the radiator, allowing it to again take heat from the running processor.
Prepare a special insulating mat before replacing the processor on your computer; it will protect electronic circuits and chips from static charges.
Align the four plastic pins with the mounting holes in the motherboard. You should be able to feel the four pins settle into the mounting holes properly. Hold the radiator with one hand to keep it level. Press each of the four buttons in a diagonal order until each one locks into place.
Attach the radiator fan connector to the assembly. Reconnect any wires or cables that you may have removed, or reinstall the motherboard if you removed it at the beginning of the process. You may need to use a thin screwdriver to free the radiator bracket.
Removing the cooler and replacing the CPU
Step 1. For more convenient work, it is recommended to lay the system unit on its side and disconnect the cooler power cable from the MP.
There are several ways to mount the CPU fan and heatsink:
- using studs screwed into nuts on the MP itself;
- long plastic pins;
- on special latches if the board has a special bracket.
- In the first case, you need to unscrew 4 fasteners; they are fixed to the cooler body, pressed with special springs and will not fall out. After this, you should carefully remove the fan along with the radiator.
We unscrew the 4 fasteners that are fixed to the cooler body, and then carefully remove the fan along with the radiator
- In the second case, the plastic pins should be held by the upper parts and rotated around their axis until they are completely released from the grooves. After this, the radiator and cooler can be removed.
Holding the plastic pins by their upper parts, rotate them around their axis until they are completely released from the grooves, then remove the radiator and cooler
- In the third, if the cooling system is fastened with latches, you only need to turn the levers until they disengage.
Turn the levers until they disengage
Important! You should not use excessive force, all actions are performed with smooth movements, otherwise you can damage the plastic mechanisms, which will entail the need to purchase a new radiator housing and fan.
Step 2. After removing the cooling elements, you can clean the surface of the heatsink adjacent to the processor from old thermal paste using a napkin and set it aside.
We clean the surface of the radiator adjacent to the processor from old thermal paste using a napkin and put it aside
Step 3. The CPU itself is removed from the socket after the latch securing it is released. This is usually done by moving the lever to the side and then up. The processor can now be carefully removed. Do not use metal objects: screwdrivers, tweezers. In 99% of cases the CPU can be easily removed with two fingers.
We remove the processor from the socket after releasing the latch securing it
Step 4. Now you need to prepare to assemble the PC. First, you should thoroughly clean the entire board with a dust brush, or you can use a vacuum cleaner.
Clean the motherboard from dust with a brush or vacuum cleaner
Step 5. Before placing the new chip, it is recommended to carefully look at the location of the contacts (there should be a complete coincidence with the position of the holes that is visible on the MP slot). The processor is designed in such a way that it cannot be installed incorrectly, but if you do it carelessly there is a risk of damaging the “legs”. Once the CPU is in place, you need to secure it with a latch.
We install the processor so that all its holes coincide with the holes on the motherboard slot, then secure it with a latch
Step 6. Now take a tube of thermal paste, carefully distribute the composition on the upper plane of the CPU in a thin, uniform layer.
Important! If you apply too much paste, it will collect dust and the bottom of the radiator will quickly become clogged, which can lead to overheating and unstable operation. An insufficient amount of thermal composition will impair heat dissipation.
Take a tube of thermal paste and carefully distribute the thermal paste in a thin, even layer on the surface of the processor.
Step 7. After this, you can start assembling. The radiator and cooler are installed. You should try not to smear the thermal paste too much.
Important! Don't forget to connect the fan power connector.
Reinstalling the radiator and cooler
Step 8. Now you should assemble the components and connect the cables.
We assemble components into the system unit
Reconnect all cables and connect devices
If everything is done correctly, the computer will start after pressing the power button.
Replacing the processor on a computer
Before we begin describing the process, we should warn you that not all motherboards allow you to replace the main chip. If the processor is in a special socket (socket), replacement is possible; if not, unfortunately, replacing the processor is impossible.
So how do you replace the processor? Or rather, what do we need for this?
Lift it and swing the lever until it stops. Store the processor in an antistatic bag. Match this with the same size triangle that is etched into the corner of the CPU socket. If it won't be completely settled, don't force it. Instead, raise the processor and try again.
If there is an old thermal connection on the heatsink, remove the connection with isopropyl alcohol and let it dry. Reconnect the heatsink by securing it down to one set of tabs on one side and then gently pushing the other side down while pressing the metal holes against the other tongue.
In addition to the processor itself and the motherboard, we need:
- Thermal paste
- Wet wipes
- Screwdriver
- Insulation mat
First of all, you need to turn off the power to the system unit, unplug all the cords and move it to the work site. Then lay it on one side, unscrew the bolts of the side cover and remove it. All system units have this opportunity in one form or another. Disconnect all wires leading to the motherboard and move them out of the way so they are out of reach during the process. It is best to remove the motherboard altogether and work only with it.
Turn the radiator lock lever back into place. Connect the radiator fan connector. Overwhelmed by an old, slow processor on your laptop? Ripping it off and detonating it in a new one can result in an exceptional increase in speed. But this update is not as easy as most other laptop updates.
If the processor is being upgraded, you will need to find a compatible replacement. Be sure to consult your laptop's service manual before opening the device. Also, ensure that your equipment is not exposed to electrostatic discharge by wearing an antistatic wrist strap when handling any internal components.
On the board itself you will see a radiator with a cooler, under which is the processor we need. They can be attached in many ways. It depends on what design the manufacturer used. Therefore, first you need to carefully study and understand how exactly this is implemented in your case. Often fastening is carried out using special keys, which need to be turned to the left and pulled up.
Step 2: Remove all pads
Laptop designs vary, but the upgrade process usually starts with removing the hinge cover: lift any plastic cover and slide it out of the case. Avoid using excessive force, as pulling too hard may break the plastic parts.
Step 4: Remove the Display Assembly
Disconnect the keyboard by removing the screws under the hinge cover that secure it, removing it, and then disconnecting the connector. On some laptops, simple latches allow you to remove the keyboard without unscrewing anything. Then remove the optical drive; this usually means pressing the latch on the bottom of the laptop and sliding the drive to the side.
Under no circumstances should the radiator itself be pulled. It is connected to the processor with thermal paste and incorrect movement may damage the socket. After unscrewing the mounting bolts, it needs to be swung left and right. This is a much better way to peel it off the thermal paste. Then you take a damp cloth and gently wipe away any remaining paste from the bottom of the radiator.
When you remove the case from the case, make sure there is no part of it attached to the bottom of the case or the motherboard. If you feel like you need to do this, it probably means the screw is still in place or the clip is left unopened. Before proceeding, open and double check your service manual to spot any well-hidden screws that may have slipped through your fingers.
Step 6: Remove the graphics card
Now we've reached the part of the update that involves actually putting your hands on important components of the system, so make sure you're wearing an anti-static wrist strap and are well grounded before continuing. Obviously, you will have to use caution when handling any components that you touch.
So, the radiator has been removed, and now we have to replace the processor on the PC. It is also secured using one or more special clamps. To open them, you just need to lift up the lever of this lock. Then remove the side plate, open the processor cover and carefully remove it. That's it, the old processor can be put aside.
Almost every laptop and notebook allows the user to upgrade the memory on the computer. This is often done by opening a compartment on the bottom of the laptop and adding or removing and adding a new memory stick. Many times, you must purchase memory for your laptop through the laptop manufacturer or an authorized dealer. However, many memory manufacturers and companies also make compatible memory for many new laptops. If you have questions about your laptop memory performance or how to upgrade your memory, contact your laptop manufacturer.
Now take the new one and carefully examine its corners and the corners of the socket. In both cases, you will see a small triangle on one of them. The triangles need to be combined. You need to install the new processor very carefully, without bending any legs.
After the new chip is in place, you need to carry out all the above steps in reverse order. At the same time, do not forget to apply new thermal paste to the surface of the processor. The layer and its size depend on the processor power, so you should follow the manufacturer's recommendations.
The importance of correctly replacing the processor on a PC
A list of memory manufacturers and their associated web pages can also be found in our Memory Network section.
Some laptop and laptop manufacturers allow their customers to upgrade their processor speeds. However, if they are available, seriously consider upgrading the speed and cost, often for the money spent and the small increase in performance, it may not be worth the upgrade. This update often requires the laptop or laptop manufacturer or authorized repair shop to perform the update and is not something that the end user can do. So, we looked at how to replace the processor in a computer. As you can see, this procedure is not particularly difficult. You just need to be careful and careful.
Today, many computer users are faced with a lack of resources for system performance. New programs and games are being created that require optimal system requirements to run them on your computer. The most important part that processes every mathematical operation of the application is the processor. With its help, we can run various software, play computer games, and generally do what we want. But sometimes there are cases when new games or applications do not run on this processor, or freeze, or its performance is poor. Therefore, the CPU needs to be replaced.
If you are wondering about the availability of upgrading your laptop or portable computer processor and the costs associated with it, you should get more information. Some high-end laptops and notebook manufacturers offer models that allow users to upgrade the laptop's video card or graphics accelerator. Unless you're one of the lucky few who have one of these laptops or laptops, you won't be able to upgrade your graphics card.
If you are unsure, contact your laptop manufacturer for more information. For laptops that allow the user to easily replace the hard drive, there is usually a bay that allows access to the hard drive. While these solutions take up extra space and may be a little slower, they are fairly inexpensive and may be your only option.
How to change the processor in a computer if you are not satisfied with its speed? First you need to know which CPUs your motherboard supports and what socket it has. A socket is a connector where your (stone - in computer geek parlance) is inserted. This information can be found in the motherboard manual, on the website of the motherboard manufacturer, or by running the Everest program.
The right chip can turn a sluggish machine into a powerhouse. Now you have to keep this in mind, as well as an increasingly complex set of other variables. Next, you need to consider the processor itself. Each manufacturer will have a variety of subtle technologies, all packaged inside chips with names that tell you a little about them.
Once you've chosen a chip type, you need to weigh how many processor cores you need. Should you choose fewer cores or get more cores that run at comparatively low speeds? Then there are nuances such as automatic turbo modes and hypertension to consider.
How to change the processor. Step 1.
When all the details of the motherboard are known, you need to buy a CPU with higher and higher specifications. Consult with the seller which processor should be installed on your motherboard.
How to change the processor. Step 2
. You bought Central and now you need to replace it with the motherboard instead of the old one. First, disconnect the cooler along with the radiator from the motherboard. The socket connector has a special lever for securing the CPU. Pull this lever up to release the processor from the socket. Now you can take it out.
Briefly about modern processors
Let's look at one factor in detail: the number of cores.
As perverse as it seems, more cores don't necessarily mean more speed. Speed is largely determined by the applications you use and how they use those cores. Fortunately, many video editing suites and games are now written to use multiple cores simultaneously. Therefore, you need to think about your system holistically, keeping in mind your requirements. There are other factors to consider. We will test you on the matter of choosing the best chip. It may not be an easy decision, but with new silicon you're sure to find one that's right for you and your system. The Great CPU Battle is heating up.
How to change the processor. Step 3.
Carefully place your new part into the socket connector so that it fits correctly into the socket tabs. As you can find in your motherboard manual. It will show you each step when installing the CPU. After installation, secure it by pushing the lever down.
How to change the processor. Step 4.
So, the installation is complete. Now let's move on to applying thermal paste. Clean the old compound from the radiator mesh of the cooler. Degrease the surface with gasoline. Take a tube and apply a drop of ointment to the surface of the processor. Now this drop needs to be spread over the surface so that the surface of the CPU is completely covered in thermal paste. To do this, take a piece of paper and carefully spread it over the surface. The layer should look no more than 1 millimeter to the eye. After a layer has been applied to the surface, you can put the radiator mesh and cooler in place.
The design of the bulldozer looks very advanced and efficient. He is the undisputed heavyweight champion of the world among chips. Just remember that you need a lot. But what kind of processor do you get in return? But each of them is only single-threaded. However, this is not unique.
What should you be wary of?
These are all new processors and they are ready to go. This suggests that the performance difference isn't too big unless you're planning on overclocking, so you might as well opt for that slightly cheaper model and save some money. Its low price may be due to the fact that it is not a new chip.
After this procedure, you can safely turn on your personal computer to check its performance. Turn on your PC and go into the BIOS to check information about the CPU, as well as its temperature. Wait 5 minutes. BIOS gives full CPU load. Go to the CPU information section and look at its temperature.
Its temperature should not be higher than 50 degrees Celsius. Now you can boot your operating system and check your computer configuration for performance. Launch a program or game that you haven't run before. If it works flawlessly and without brakes, then you have chosen the right CPU.
But when you have. If you want a faster computer but aren't sure which component would be most beneficial to upgrade, here are the guidelines you should follow. It's probably time to roll up your sleeves and start watching. One of the important upgrades is the motherboard.
When you're sure you want to make the leap, does a motherboard give you the biggest bang for your buck in terms of when you should buy a new computer? it's still tired and sluggish after cheaper upgrades. But for this you will need a motherboard that supports the update.
Sometimes after replacing the CPU, you turn on the computer and hear squeaks, or nothing happens at all. This means that you have selected an unsuitable or non-working processor for your motherboard. Remove the CPU and take it back to the dealer for replacement.
Try to provide him with all the information about your motherboard to select the required CPU.
What follows is done at your own risk. If the computer is under warranty, you will lose it
On the other hand, if you're upgrading for gaming, save your money and upgrade your graphics card.
Most modern games lean more heavily. For the past five years or more, computer hardware has been described all around. And do I need a quad core or dual core processor? We're here to help explain the difference! If speed is the only reason to upgrade, rethink where you're spending your money. All the above reasons are good, but in my opinion this is the only reason to upgrade your motherboard. Games will run faster and with less lag, all while allowing you to crank up your game settings to run at more graphically intensive levels than your previous card.
But before you take it away, try installing it again, because maybe you did something wrong.
Setting in BIOS Setup
Most chip manufacturers allow you to slightly increase the operating clock speed of the processor. In order to change it you should:
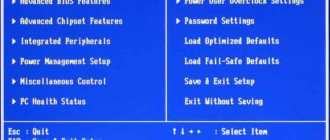
- After turning on, hold down the "Del" button (on some motherboards you may have to use other keys, for example, "F11"). You will be entered into the BIOS setup program.
When you turn on the computer or reboot, press the “Delete” or “F11” key to enter the BIOS settings
- Here you can increase the CPU speed by going to the Chipset Settings menu.
Go to the “Advanced Chipset Features” section
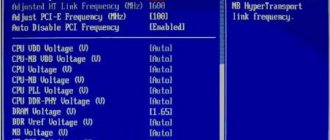
- To do this, change the frequency must be enabled, usually set to “Auto” by default.
In the “CPU Host Clock Control” item, change the value to “Manual”
Important! Changing the frequency should be done in small steps, ensuring that the PC works stably.
In the “CPU Frequency” item, gradually change the value so that it is suitable for stable operation of the computer
Setting up on Windows
Most modern processors have multiple cores - two or more. This allows you to perform calculations for several programs simultaneously.
Windows 7 and 10 systems have a built-in ability to enable or disable individual kernels involved in processing data from specific applications (except for some system ones).
This is necessary, for example, if the system begins to “slow down” when executing some “gluttonous” program. This applies to, say, a defragmenter, an unpacker (when working with large archives). In such cases, you can manually limit the use of processor cores by such programs and free up resources for other tasks.
- “Task Manager” is launched by right-clicking in a free area of the taskbar and selecting “Launch Task Manager”.
Right-click on an empty space in the taskbar and select “Start Task Manager”
- In the “Applications” area, hover the mouse pointer over the desired program, let it be “Skype,” and right-click to bring up the context menu. Select the “Go to process” option.
Move the mouse pointer over the desired application name, right-click, calling up the context menu, select the “Go to process” option
- The “Processes” window will open, where the desired item will be highlighted, you should hover over it and right-click again, and in the menu that appears, select the “Set Match” option.
Right-click on the selected process and select the “Set Match” option in the menu that appears.
- Some system programs will not allow you to change this parameter, which will be notified to the user. In the window that opens, you can limit the number of cores that the application can use. Click "OK".
Uncheck the required “CPU” items and click “OK”
Now the process will not overload the system. However, when the program is restarted, it will again use all resources.