Disk Defragmenter
When adding a large number of files to the hard drive, information is not written sequentially, but in fragments on different parts of the disk surface. In this case, fragmentation occurs, and when requesting data, the computer takes longer to process it because it needs to put all the “pieces” together. To minimize such situations, defragment your disk. This is done using standard utilities.
Good to know! In Windows 10, disk defragmentation occurs automatically once a week at a set time. But you can start this process after adding a large amount of information to your computer in order to optimize the disk.
- In the Run window (Win+R), enter “defragmentation” and run the utility.
- In the Disk Optimization window, click Analyze. If more than 5 - 7% is fragmented, click "Optimize". Repeat for all drives.
Important! In the "Disk Optimization" window, you can enable/disable and configure automatic defragmentation.
Sound failure due to driver issues
As mentioned above, drivers for setting up sound on a computer are installed along with the motherboard drivers. Even if a sound icon is displayed on the notification panel, it is far from certain that the drivers were installed correctly. When you first start Windows 10, the operating system automatically selects drivers from its library and installs them for all elements of the computer. If after this there are problems with the drivers, they need to be reinstalled to the versions recommended by the manufacturers.
To reinstall the sound drivers you will need:
- On the computer.
Determine the model of the motherboard used in the computer. Next, you need to go to the motherboard manufacturer’s website, find your model and download the latest drivers for Windows 10. - On a laptop.
Find out the laptop model, go to the manufacturer’s website and download the necessary drivers.
Please note: If you still have a disk with drivers from your motherboard or laptop, you can try installing the software from it. But it is important to understand that during the time that has passed since the purchase of the device, the drivers may have been updated more than once, and the most current version is available on the manufacturer’s website.
Startup optimization
In many programs, when they are installed on a computer, the autoload function is enabled during system startup. They may not be used by the user, but, working in the background, they take up computer resources, so its work slows down. Applications that you do not use should be disabled or completely removed from your computer if they are not needed.
- Task Manager > Startup tab.
- Right-click (RMB) on the unnecessary program > Disable.
Alternative options for disabling programs in startup can be seen in the video.
How to Change Windows 10 Power Plan Using Command Prompt
You can completely change the power scheme without using the control panel settings. Or rather, using only the command line or Windows PowerShell. Open Start and search for any of these applications and run them as administrator.
- To view the available power supply schemes, run the command: powercfg /L
- Next, among the list of available ones, we find the maximum performance mode and copy the mode ID.
- Then we execute the following command, where you can replace the mode ID with your own. powercfg /s fa443288-462a-4944-96e7-e5dd8e595672
Disabling unnecessary services
Just like programs in startup, some Windows 10 services load computer resources, which leads to slowdowns. Disabling them will increase system performance.
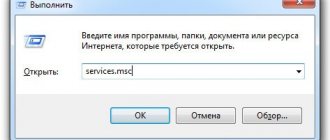
- In the Run window, enter the command services.msc . Alternatively: Control Panel > Administrative Tools > Services or open System Configuration (in the Run window, enter msconfig ) and go to the Services tab.
- RMB > Properties > Startup Type > Disabled.
- When using the Computer Configuration utility, uncheck the required services and save the changes.
- Restart your computer.
Important! If you are not sure which process a service is responsible for, do not disable it. See the list of services that can be disabled here.
Video
In the video you can learn more about which Windows 10 services can be disabled and how to do it.
Main settings block
And here I’ll immediately make a reservation: there are a huge number of subtle adjustments that you should pay attention to. Having set out to write this article, I also did a little magic on myself to achieve the most pleasing sound to my ears. Don't forget, unless you are an experienced sound engineer, you will have to experiment a little to find the option for yourself.
It's quite obvious that right-clicking the volume icon in the lower right corner of the system window will open up more options for customization than just adjusting. Let's go through the list, detailing the description of the functions.
- Open the volume mixer. This button opens the ability to adjust sound and volume for current applications. Why is this necessary? The first thing that came to my mind personally was to set different volumes for the music player and the system so that I could listen to music while working, but not miss critical system messages.
- Playback devices. This part is responsible for finer adjustments of devices. From here you can adjust, for example, the volume of calls played in Skype, if necessary. The last settings tab will be useful for this.
- Recording devices and Sounds essentially duplicate the previous tab. They simply open different pages of a given window.
- Detect audio problems. The tab is responsible for possible troubleshooting. If there are system failures with sound, then this tab will be your first aid.
Setting up visual effects
In Windows 10, a lot of PC resources are used to create interface visuals. Disabling some performance parameters (visual effects) will increase the speed of older computers. But they will have less effect on modern gaming PCs.
- Start menu > System > Advanced system settings.
- In the System Properties window > Advanced tab > Performance block > Options.
- Set the toggle to "Get the best performance." You can turn off each effect separately so as not to radically change the Windows 10 interface.
Disable windows and taskbar adaptation to the desktop background color, as well as Windows animation.
- Start menu > Settings > Personalization > Colors > Choose a color > Automatically select main background color > Turn off.
- Win+I > Accessibility > Other Options > Play Windows Animations > Turn Off.
Setting up Windows 10 for maximum performance
First of all, you need to understand that not all problems can be solved by optimization alone. For maximum operating speed of the OS, you also need good hardware. Ideally, your PC has at least 8 GB of RAM, as well as a high-speed solid-state drive on which Windows is installed. True, in this case you are unlikely to need optimization, except for better performance of games.
But in any case, the system must be kept clean, tidy and up to date. Updating drivers, the absence of garbage and viruses will have a beneficial effect on the operation of the OS, and the need to reinstall or restore Windows will disappear for years.
There are many ways to reduce the load on RAM and hard drive, some help only a little, while others can breathe life into an old PC.
Optimizing Windows 10 improves performance and extends the life of your computer
Setting up startup
Startup is the process of launching applications when the operating system starts. That is, when you turn on the PC, programs are launched that can run in the background regardless of user actions. Some malware can also get into startup and load RAM. This often happens when installing unlicensed software and utilities that are obtained from dubious sources.
It is recommended to optimize autoloading - eliminate everything unnecessary. This will reduce the consumption of computer computing resources.
- In the Windows search, enter “dispatcher” and select the best match.
In the Windows search, write the word “dispatcher” and select the best match
- In the window that opens, go to the “Startup” tab.
All processes launched when the operating system starts are located in the “Startup” tab
- Right-click on the unnecessary process and select “Disable”.
To remove an unnecessary process from startup, right-click on it and select “Disable”
- We restart the computer so that Windows starts without unnecessary programs.
Removing temporary files and other junk using Disk Cleanup
As you know, a heavily cluttered hard drive interferes with the operation of the operating system. The more space and files are occupied (especially on the system drive), the more difficult it is for Windows to get to the required directory while running. That is why you need to regularly clean the partition on which the OS is installed.
- In Explorer or any other file manager, right-click on the C: drive and select “Properties”.
Right-click on the C: drive and select “Properties”
- In the window that opens, go to the “General” tab and click on the “Disk Cleanup” link.
On the “General” tab, click the Disk Cleanup button
- We wait for the cleaning wizard to generate a list of files to delete, then check the boxes for the required groups and click OK. Be careful when choosing file categories. All of them, including the contents of the trash, will be deleted permanently. Check again to see if the marked categories contain the information you need.
Mark the categories that need to be cleared of unnecessary files and click OK
It is worth noting that disk cleanup can free up a huge amount of memory. Especially when the system has been updated several times. I remember a case where the Disk Cleanup utility detected 27 GB of unnecessary information. In this case, the removal took place over two hours. Therefore, I advise you to be patient if the section is very cluttered.
Disabling unnecessary services
Services are standard Windows programs that are created to communicate between the system and individual computer devices. Services always run in the background and do not have their own interface. There are a lot of similar programs, but there are “superfluous” ones among them. For example, why do you need a working fax service if this device is not among those connected to the computer?
There is a large list of programs that can be easily disabled without any harm to the computer. This will free up operational space, which can be used to solve more useful problems.
- In the Windows search, enter “Services” and select the best match.
In Windows search, enter “services” and select the best match
- In the services window, double-click on a program from the list to bring up its properties. Then change the startup type to “Disabled” and save the changes with the OK button.
In the services properties, change the startup type to “Disabled” and restart the computer
- We carry out the same operation with all unnecessary services and reboot the computer.
List of services that can be safely disabled without damaging the operating system in any way:
- "Fax machine";
- NVIDIA Stereoscopic 3D Driver Service (for NVidia graphics cards if you are not using 3D stereo imaging);
- “Net.Tcp Port Sharing Service”;
- "Working folders";
- "AllJoyn Router Service";
- "Application Identity";
- "BitLocker Drive Encryption Service";
- "Bluetooth Help" (if you don't use Bluetooth);
- “Client License Service” (ClipSVC, after disabling, Windows 10 Store applications may not work properly);
- "Computer Browser";
- Dmwappushservice;
- Geographic Location Service;
- "Data Exchange Service (Hyper-V)";
- "Guest Shutdown Service (Hyper-V)";
- "Pulse Service (Hyper-V)";
- "Hyper-V Virtual Machine Session Service";
- "Hyper-V Time Synchronization Service";
- "Data Exchange Service (Hyper-V)";
- “Hyper-V Remote Desktop Virtualization Service”;
- "Sensor Monitoring Service";
- "Sensor Data Service";
- "Sensor Service";
- “Functionality for connected users and telemetry” (this is one of the options to disable Windows 10 “tracking” of the user);
- “Internet Sharing (ICS)” (provided that you do not use Internet sharing functions, for example, to distribute Wi-Fi from a laptop);
- "Xbox Live Network Service";
- Superfetch (assuming you are using an SSD);
- "Print Manager" (if you don't use printing features, including Windows 10's built-in printing to PDF files);
- "Windows Biometric Service";
- "Remote registry";
- "Secondary login" (if you don't use it).
Among the default Windows 10 services, there are quite a few that can be disabled without harming the operation of the computer.
Disabling visual effects
Visual effects such as shadows on windows, beautiful minimization, the ability to view media elements without opening a file, and others have a huge impact on system performance. All this “beauty” takes up space in RAM and video memory, so if you are not dependent on the aesthetic contemplation of visual effects, it is better to turn them off.
- In the search, we enter any characters from the name of the section we need, “Configuring presentation and system performance,” and select the best match.
In the search, enter any characters from the title of the section “Configuring presentation and system performance” and select the best match
- In the window that opens, move the toggle switch to “Ensure the best performance” or uncheck all the visual effects, then save the changes with the OK button.
We put the toggle switch on the item “Ensure the best performance” and save the changes with the OK button
Disk Defragmenter
Fragmentation is a method used by Windows for writing files to disk. Let's say there is a movie and you need to save it to your hard drive. But there is no free space among the clusters located next to each other. In this case, Windows literally splits (fragments) the file into parts and writes it separately, into different sectors of the hard drive. In the opposite case, when the data needs to be read, problems begin - the file must first be glued together. This wastes RAM resources. It is for such cases that an optimizing process was invented - defragmentation.
Defragmentation is the rewriting of files into consecutive sectors . This process significantly reduces the load on the hard drive, thereby freeing up resources to increase the performance of the operating system.
- Open the disk properties as shown above.
- In the window that opens, go to the “Service” tab and click “Optimize”.
The button to start defragmentation is located on the “Tools” tab of the disk properties window
- We wait until the program finishes its work. We repeat defragmentation for each partition and restart the computer.
To maximize system performance, you need to defragment all hard drive partitions.
Defragmentation is not always an optimizing process. In cases where a solid-state drive (SSD) is installed on the computer, the process of overwriting files only causes harm. The fact is that hard drives of this type have an extremely limited resource in terms of the ability to write information to the media. At the same time, the speed of an SSD is so high that the disk simply does not need to be defragmented. Most users simply disable the file rewriting service.
Disabling Defender
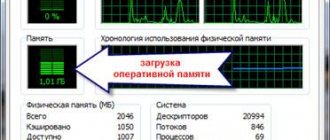
Windows Defender is a built-in antivirus program. It just so happens that the application consumes on average up to 100 MB of RAM when running in the background and up to 1 GB when scanning the disk. And although the work to protect your computer from external threats is invaluable, sometimes it is advisable to disable such a program.
- Open the Startup menu, as shown in the example above.
- Right-click on Windows Defender and click “Disable” in the drop-down menu.
In the Startup window, right-click on Windows Defender and disable it in the drop-down menu
- Reboot the computer.
It is important to remember that disabling Defender makes your computer vulnerable to viruses and malware. Disabling an antivirus program is really justified only if the application is replaced by a less resource-intensive one or the computer is disconnected from the global network for the time being.
Driver Update
Drivers are the most important software products that are responsible for the correct operation of devices. In fact, this is the connecting link between Windows and the hardware. It is very important that the drivers are up to date, otherwise the system performance will be “limpy”. This is especially true for devices such as a chipset, video card (video controller, video adapter), buses, etc.
Standard drivers (which come with the OS and are installed during updates) only make the devices work, while programs from the manufacturer’s official website reveal all the capabilities of the connected devices.
All official driver suppliers work on the same principle: you need to find the required model through a search, select the operating system for which installation will take place, and download the product. Then you will need to install the driver and restart the computer.
On the manufacturer’s website, select the model, operating system and download driver installers
Conventionally, manufacturers are divided into two types: those creating complex (laptops and assembled system units) and private (individual components - video cards, disk drives, etc.) equipment and drivers for it.
It's worth noting that the drivers that Windows provides are often really up to date. But on my laptop, I noticed that the video card driver works better when installed from the official website. In this case, the power of two video cards is combined, and accordingly, gaming performance improves several times. Perhaps this is because Windows does not have time to process the entire flow of device software, or maybe not everything is licensed, but in any case, it is better to download drivers from the developer’s website.
Disabling file indexing
File indexing is a process that makes it easier for queries to find the files you need. At the same time, the indexing service consumes resources, and if the user does not have several thousand documents on the computer or there is no need to constantly search for favorites among them, it is better to disable indexing.
- Open the properties of the hard drive, as shown in the example above.
- In the “General” tab, uncheck the “Allow indexing...” item and save the changes with the OK button. The procedure will take some time and in the case of a system disk will require user participation, since some Windows files must be indexed.
In the disk properties, uncheck the “Allow indexing...” item and click OK
Video: Settings for maximum Windows 10 performance
Disabling indexing
Indexing speeds up the search for files stored on your computer. But this function constantly scans them, monitors changes, and therefore uses system resources.
Important! You should only disable indexing when you are not using search on your computer.
- In the Run window, enter the command services.msc .
- Windows Search > RMB > Properties > Disabled.
- Confirm the changes and restart your computer.
Driver setup
One of the problems with slow operation of Windows 10, which is encountered by a large number of users, is non-original or outdated drivers. This problem is especially relevant for a video card. Look at the driver provider and their version in Device Manager.
- Start menu > Device Manager > select the desired hardware > RMB > Properties > Drivers tab.
- If necessary, download and install drivers from the official website of the equipment manufacturer or update them to the latest version.
Driver settings or fine tuning
IMPORTANT! I begin this section with a similar note for a simple reason. Your settings block may not only be different, it will be different. It depends on the motherboard and specifically the version of the sound card.
If you follow the path: “Control Panel” - “Hardware and Sound”, you can find a program that is responsible for fine-tuning the sound. In my case, this program is “”. It is by launching it that you can find the most detailed settings for the sound signal.
When you open the manager window, you can find quite a few important elements. Some of them are designed to adjust the volume - this adjustment operates in parallel with the general volume of the system. That is, by moving the volume slider in the manager, you will also move the slider on the volume panel. There is also the sneakiest part of the configuration, which often confuses users. We are talking about setting the environment and equalizer.
I have everything set to default, because these days I listen to a wide variety of music, and I watch movies quite often and I don’t want to leave an imprint on the film’s voice acting. The room can distort the sound very much. Just try to change the settings in this section while listening to music and everything will become clear.
Cleaning the Temp folder
The Temp folder in Windows 10 is used to store temporary and intermediate files created by the system and programs. Therefore, to speed up your computer, clean it:
- %TEMP% variable in the line where the path to the folders is indicated .
- Close running programs and delete the contents of the folder > restart your computer.
An alternative way is to use the built-in Disk Cleanup utility.
- Open System Disk Properties > General tab > Disk Cleanup.
- Specify the files to be deleted (be sure to select “Temporary files”) > confirm the actions.
Power settings
By default, Windows 10 is set to Balanced power mode, which reduces processor speed when the device is idle or does not require maximum hardware. To speed things up, set your computer to High Performance power mode.
- Start menu > Settings > System > Power and sleep > Advanced power options.
- In the Power Options window, move the switch to High Performance.