Over time, your PC's boot speed slows down. This is caused by deteriorating system performance and other negative factors. Owners of computers and laptops are interested in how to speed up Windows 7 without the help of a specialist.
It is possible to speed up the operation of the operating system yourself, without the help of specialists.
Why is Windows 7 performance slow?
The operation of Windows 7 is disrupted due to illiterate use of the PC, which leads to overload of the hard drive and lack of free space in memory.
Problems may also arise if, when purchasing a computer, the future user did not change the initial system settings, which often turn out to be not entirely optimal.
Software problems
The internal memory of the PC gradually accumulates many programs that start automatically every time the OS boots. Because of these utilities, the speed of turning on the computer slows down and the system overloads.
Hardware
Hardware errors are associated with:
- incorrect removal of files from the DirectX package;
- the presence of a video card with outdated drivers;
- lack of regular OS updates.
Hardware acceleration
To speed up Windows boot time and improve performance, you can offload some of the processor's functions to hardware devices.
Some tasks of the central processor can be performed by the video card, if it is working properly.
Checking the operation of the video card
First you need to determine the type of video card installed on your PC. It could be Nvidia or Intel. In the Control Panel, you need to open the “Nvidia Control Panel” or “Display” tab, then go to the “3D Graphics” settings section and set the maximum performance level of the video card.
The quality of a device's performance can be judged by how it reacts to the inclusion of complex graphic games. A low-power card will become noticeably warm, and the computer itself may restart during the game.
Update video card drivers
In order to speed up your video card, you can update its drivers. The graphics card manufacturer regularly posts updates for it on the company's official website.
You can check for updates by clicking on the appropriate link in the video card settings on your computer.
Turn on acceleration
On Windows 7 devices, hardware acceleration is enabled by default.
It controls the use of graphics display devices. It is acceptable to adjust the function manually. You can check its presence by right-clicking on the desktop screen and opening the “Screen Resolution” tab.
Here you need to go to “Advanced options”.
If the “Change settings” button is locked, it means hardware acceleration was previously set by the developer.
In the “Monitor Adapter Diagnostics” section, you need to move the slider to o.
To confirm the action, click OK in all windows.
How to make Windows 7 boot faster when you turn it on?
BIOS (UEFI) settings and eliminating certain programs from startup will help speed up booting your Windows 7 computer.
If you configure the BIOS correctly, you can save up to half the time it takes to start the system. Let's change the basic parameters:
- We restart the computer and during startup press Del, F2 or another key (if the button is different, look at the documentation for the computer).
- Go to the “Boot” section in older versions – “Boot Priority”.
- In the “Fast boot” section, set the position to “Enable”.
- In the “1st Boot Priority” column we set our HDD or SSD.
After the changes have been made, the system will stop searching for the presence of a disc in the DVD drive, flash drives and other USB devices. During startup, the USB keyboard will not work, and in the future it will be more difficult to start in safe mode.
Overclocking the operating system
To speed up the operating system, it is recommended to delete all unnecessary files from your computer. On a PC with inherently weak software, the changes will be more noticeable than on new generation devices.
Removing unused programs
Extra files that take up space in the internal memory of the PC reduce system performance.
Many of them are broken into separate fragments, and later the OS has to combine them again in order to open a particular program, which leads to an overload of the hard drive.
To remove unnecessary files from your PC, you need to open the control panel and go to the “Uninstall a program” section. From the list that opens, you can select any irrelevant program, right-click on it, click “Delete” and confirm the action.
Disabling unnecessary Windows 7 services
The "seven" has many services that run by default, and not all of them are needed by the user. In order to find unnecessary ones, you need to open the “Start” menu and enter the word “services” in the search bar. A list of all services running on the PC will open with a detailed description of each of them. If you do not use features such as Fax, Parental Controls, etc., you can disable them.
When disabling any service, you need to determine which programs are associated with it. You can do this by studying the “Dependencies” section. All disabled services can be reactivated.
Table of system services that can be disabled
Some services do not affect the operation of the OS. You can see them in the table below.
| Bluetooth support | Allows you to exchange data wirelessly. If the service is not in use, you can disable it |
| Windows Backup | Creates OS backups. It can be replaced if necessary with other programs |
| Windows Update | Installs updates for some programs, which are sometimes unnecessary |
| Remote Desktop Services | Provides remote access to the system from different devices |
| Print Spooler | If there is no printer and scanner, this service works in vain |
| Windows Search | Provides internal search |
| Home Group Provider | The function is not relevant if there is no home network |
Removing unnecessary programs from startup
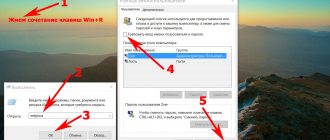
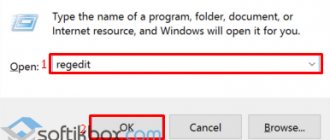
First, you need to call up the configuration menu by simultaneously pressing the Win and R keys. Next, in the line that opens, enter the symbol msconfig and click OK. In the next window, select the “Startup” sub-item and uncheck the boxes next to those services that are not used. Finally, all you have to do is click OK and restart the computer.
Limiting the number of simultaneously running programs
A large number of simultaneously open tabs in the browser creates unnecessary load, slowing down the computer. You can change the situation by limiting the number of simultaneously open windows while surfing the Internet.
You should also remove programs that perform the same functions. So, it is enough to install only 1 antivirus on your PC.
Turn off visual effects
Some visual effects negatively affect system performance, and to overclock the OS it is advisable to disable them. To do this, go to the “Computer” menu, open the “Properties” tab and select “Advanced settings”. A new window will appear. In the “Advanced” tab, you need to click on the “Options” button located in the “Performance” section.
In the “Visual Effects” section, it is recommended to check the box next to “Ensure the best performance.” To confirm the action, click on the “Apply” button.
After completely disabling visual effects, the appearance of Windows may deteriorate greatly. To avoid this, you can leave some sub-items with effects unchanged by unchecking the boxes next to them and clicking OK.
Setting up system sounds
To manage system sounds, call up the context menu by pressing the Windows and R keys, enter the mmsys.cpl command in the search bar and confirm the action by clicking OK. A new window will appear in which you need to go to the “Sounds” section and instead of the “Default” value, select the “Silent” mode. Finally, just click OK. In order to confirm the changes made, you need to restart your computer.
Optimizing your hard drive
Unnecessary files gradually accumulate on the hard drive, fragmented into parts. To improve the performance of the disk, it is necessary to optimize it.
Speed up copying and moving files
The system automatically detects differences in the size of individual downloaded files, compressing those that take up more space than others.
A lot of resources are spent on calculations, which leads to freezing of the PC.
To disable the option, you need to open the Control Panel and go to the “Programs and Features” section. Here you should select the sub-item “Turn Windows components on or off” and uncheck the box next to the line “Remote differential compression”.
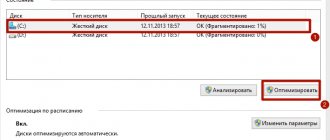
Defragmenting your hard drive
To defragment, you need to right-click on the disk and select “Properties” from the drop-down menu. In the “Service” tab, click on the “Run defragmentation” button and wait for the process to complete. This procedure can be carried out with all existing disks.
Cleaning the hard drive
Having opened the “Computer” menu, you need to go to “Properties” of the local drive C. After this, all you have to do is click on the “Disk Cleanup” button in the “General” tab. Next, you should check all unnecessary files on the disk and confirm their deletion. Finally, you need to remove the o and confirm all actions by clicking OK.
Adding Memory
First, go to the Start menu, right-click on Computer and select Properties from the drop-down menu. The window that opens will display all the necessary information, including the amount of PC RAM. On the left side of the window, select “Advanced system settings”, and then in the “Performance” section, click the “Options” button.
In the “Virtual Memory” section of the “Advanced” tab, click on the “Change” button, and then uncheck the box next to “Automatically select the size of the pumping file” and set the required file size in M-bit. The pumping file size must be at least 1.5 times larger than the amount of RAM. The pumping file can be attached to any disk.
Disabling visual effects
A very attractive design is envisaged. If you want to speed up the system, you need to understand that visual effects involve unnecessary resource consumption. You need to follow the specified path: Start -> Control Panel -> System -> Advanced system settings.
When the settings window opens in front of us, the following actions are carried out: Advanced -> Performance -> Settings
In the design, the developers tried to simplify the optimization task as much as possible. You just need to select “Ensure the best performance” and the settings will be set automatically. This greatly simplifies the task at hand. The result will be a classic look. All this is presented in the screenshot below.
The new appearance may not always suit you and this requires some additional actions. You can easily choose any suitable option from the available list, taking into account the operating speed requirements of the OS. You should right-click on any free area of the desktop and click “Personalize”.
Aero Glass mode can be accelerated by turning off transparency. This ensures that the translucency effect will disappear. Still in the same personalization section, you need to select the “Window Color” item, where you uncheck the “Enable transparency” checkbox.
For powerful devices this will not give any noticeable increase, but in the case of a weak video card it can provide a visible result.
Windows Readyboost
This setting is available in all versions of Windows except XP.
The option helps increase the speed of your PC using an external flash drive. You need to connect a pre-formatted flash drive to your computer, then in the “Computer” menu, right-click on the removable drive and select “Properties”.
In the pop-up window, you need to open the Readyboost tab and click on the “Use this device” line.
The drive in use is not ejected.
In this mode of operation, the flash drive can quickly fail, so you should select more reliable models.
Restoring the Quick Launch bar
If you are used to older operating systems, you may experience the inconvenience of the Quick Launch bar disappearing. In order to return, the following list of actions is required:
- Right-click on the “Toolbar” icon
- Panels -> Create Toolbar
- A field opens where you need to enter a new path
- %appdata%\Microsoft\Internet Explorer\Quick Launch
When you click "Select Folder", you will be able to see Quick Launch. To return to the usual place, you need to left-click the mouse and then move to the “Start” button. You should right-click on the “Quick Launch Toolbar”, where the “Show captions” and “Show title” checkboxes should be unchecked.
After all the procedures performed, the panel will have the same appearance as in the OS predecessor XP. This is clearly shown in the screenshot below.
Other optimization methods
Optimization involves clearing all temporary files and unloading RAM.
It helps stop all background programs that slow down the processor.
Regular reboot
You should periodically reboot your computer to clear the RAM and confirm changes made to the system. This should be done at least once a week.
Windows 7 update
Updates help clear the OS of accumulated errors. You can update Windows by downloading and installing the software package again or using a restore point.
Setting process priorities
In order to speed up important tasks on your PC, you need to set priority for them. In the task manager, you need to go to the “Processes” section, select the desired process from the list and right-click on it.
Here you need to set the priority value to “High” and confirm the action. In the context menu, select the “Set mapping” sub-item and select the number of active processors involved in a particular process.
Accelerate loading by connecting all processors
OS loading can be accelerated by using all processors. To do this, you need to open the system configuration window by pressing the Win + R buttons simultaneously and then entering the word msconfig. In the window that appears, you need to select the “Download” tab, and in it - “Advanced download options”. In the additional window, you must set the maximum possible number of processors. The next time you turn on the PC, it will boot faster.
CPU is always 100 percent loaded in Windows 7
There is another fairly common problem that often occurs on Windows 7. It is that on many PCs and laptops the processor is constantly loaded at 100 percent when idle (that is, even on the desktop). And if you open the task manager, you can see the svchost.exe process there, which is duplicated several times.
The reason here lies in the automatic updating of Windows 7. The fact is that updates are now released only for Windows 8 and 10. For Windows 7, they, of course, are not suitable, and therefore do not work correctly. It is for this reason that on Windows 7 the processor is loaded at 100 percent.
To fix this, you just need to turn off automatic updates. For this:
- Go to Start - Control Panel - Update Center.
- Click on the “Settings” line.
- Select "Do not check..." and click "OK".
- Restart your PC or laptop.
Third-party programs for cleaning RAM, removing viruses, etc.
Special programs are used to eliminate registry errors, get rid of parasite programs and optimize the amount of RAM.
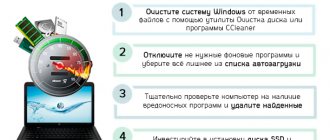
CCleaner
This software is used to delete temporary files created by the system, clean and defragment the disk. Some tools are designed to change the startup menu, identify unnecessary files, and uninstall applications.
Advanced Systemcare
The free utility works with limitations, but even this functionality is enough to speed up the OS. The application identifies vulnerabilities, cleans the hard drive and RAM, and clears the registry.
PC Decrapifier
This program does not require prior installation. It detects the presence of unnecessary applications installed by OS developers. The utility is equipped with a regularly updated database that helps detect and neutralize parasitic programs. It is recommended to remove any unwanted software found immediately.