The Windows 10 operating system requires access to a computer by multiple users. To do this, the creators of the system provided for the mandatory entry of a password - it can provide access through a local record. You can also log in to the system by entering your Microsoft account password.
The security combination prevents unwanted access by strangers to your desktop and personal data. In addition, the password keeps your account safe, regardless of the computer you are working from. Therefore, before setting up passwordless login in Windows 10, it makes sense to carefully weigh the pros and cons.
How to switch users in Windows 10 from the login screen
If you've just started your Windows 10 computer or device, the first thing you see is the login screen. Additionally, if you are already signed in, you can press Windows + L on your keyboard to lock Windows 10.
Then click or tap the lock screen to display the login screen. By default, Windows 10 loads the most recent user account that was used to sign in. A list of available user accounts appears in the lower left corner of the screen.
If you want to switch users, in this list, click or tap the account you want to use, and then enter your login information. By default, Windows 10 asks for the last thing that user used to sign in: password, PIN, or picture password.
If you need to change your sign-in method, tap or tap Sign-in Options and then tap the method you want to use. After that, enter the required login information.
If you want to know how to create and sign in with a PIN or picture password, read this article: How to sign in to Windows 10 with a PIN or picture password (create and sign in).
How to fix - installation is prohibited by the administrator's system policy
Changing Group Policies
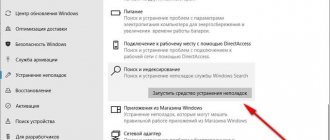
Open the Group Policy Editor by running the gpedit.msc in a Win+R . Go to the location Computer Configuration > Administrative Templates > Windows Components > Windows Installer . Find the Turn off Windows Installer .
Change its value from Enabled to Not Configured . In principle, you can leave Enabled and set the value to Never . It indicates that the use of Windows Installer is fully permitted. Users will be able to install and update programs.
Additionally, find the Deny users installation and change its value to Disabled or Not Configured . Hide installations for users is specified , the installer ignores all applications.
To avoid having to restart your computer, you can force a policy update. In a command prompt running with administrator rights, run the command: gpupdate /force . Although some settings may only be applied after logging out.
Registry Editor
You can also change the settings in the registry section that allow installation of programs. Additionally, we recommend creating a backup copy of the Windows 10 registry. This makes it possible to restore the registry after unsuccessful changes.
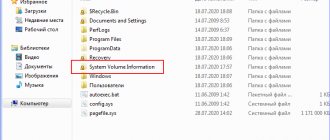
Open the registry editor by running the regedit in a Win+R . Go to location: HKEY_LOCAL_MACHINE\ SOFTWARE\ Policies\ Microsoft\ Windows\ Installer . Change the value of the DisableMSI , DisableLUAPatching and DisablePatch to 0 .
Some sources recommend removing the Installer . And check whether the required program can be installed. In fact, there is no difference; you can simply change its value to zero. This also disables the options highlighted above.
Account Control
As you know, user record control helps prevent changes made to your computer by dangerous software. The program may be malicious. If you are sure that it is safe, then you can try disabling UAC.
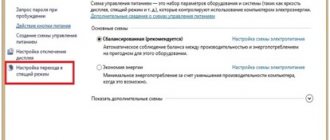
Open the settings by running the command UserAccountControlSettings in the Win+R . Drag the slider to the bottom position ( Do not notify me ). When applications try to make changes to the system, then you will not be warned.
Conclusion
A common warning is that this installation is prohibited by a policy that was set by the system administrator. This all happens when you try to install a program or update drivers. To fix the problem, the user will need to have administrator rights, Group Policy Editor, or Registry Editor.
How to Switch Users in Windows 10 from the Start Menu
If you're already signed into Windows 10, you can switch your user account from the Start menu. Open the Start menu and click on your account symbol/image.
Then select the user account you want to switch to.
You will be taken to the login screen where the selected user is loaded. Enter the appropriate registration information and you are in the system. You can switch between sign-in options by tapping or tapping Sign-in Options and then selecting the option you want to use.
How to Switch Users on Windows 10 Using Windows + L
If you're already signed into Windows 10, you can switch user account by simultaneously pressing the Windows + L keys on your keyboard. When you do this, you are locked out of your user account and you will see your lock screen wallpaper.
Tap or tap anywhere on the screen and you will see the login screen. Select the account you want to use and enter your login information. You can switch between sign-in options by tapping or tapping Sign-in Options and then choosing which you want to use.
conclusions
In conclusion, I would like to remind you that often it is we who decide what to provide, what information or data to share, what advertising to see on our device or to get rid of it altogether. Remember that it depends on you whether your confidential information will leak onto the Internet. And we will always tell you how to configure, disable or disable it.
Read the latest news from the world of mobile technology on Google News , Facebook and Twitter , and subscribe to the YouTube channel
How to switch users in Windows 10 using CTRL + ALT + DELETE
This method only works when you are already logged in with a user account. First, press the CTRL + ALT + Delete keys on your keyboard at the same time. A new screen will appear with several options right in the center. Click or tap Switch User and you will be taken to the login screen.
Select the user account you want to use and enter the appropriate registration information. You can select one of the sign-in options by clicking or tapping "Sign-in Options" and then selecting the option you want.
How to Switch Users in Windows 10 Using ALT + F4
This method also only works if you are already logged in with a user account. First, go to your desktop and make sure that no applications are open or displayed on the screen. All your applications must be minimized, or the end result will be closing the applications you have open, one by one. Then, after all applications are minimized or closed, press the ALT+F4 keys on your keyboard at the same time. In the Shut Down Windows window, select the Shut Down option and you will get a list of other options. Select Change User and click OK.
On the login screen that appears, select the user account you want to use, enter the appropriate login details and you are logged in. You can switch between sign-in options by tapping or tapping Sign-in Options and then choosing the option you want to use.
Windows Defender
This is a standard antivirus program that is built into the system. The main purpose of which is protection against various malicious software. If you install any other third-party antivirus, the standard defender will simply turn off, allowing its “colleague” to do all the work.
Attention! By disabling Windows Defender and not installing additional antivirus software, you can seriously reduce the security of your system.
Here you can turn off the “Cloud Protection” function, as well as “Sending detected malware for study.” In addition, it is possible to add files to exceptions that will not be scanned by Defender.
How to switch users in Windows 10 when prompted for an image password
If the last user account signed in to your Windows 10 PC or device used an image password, when you're on the login screen, you see that user account and the image that is used as the password. Below the user account name there are two links: one to access other sign-in options for the same user account and one to switch users.
Click or tap Switch User and you'll see a list of user accounts that exist on your Windows 10 computer or device. Click or tap the user you want to switch to.
You'll then be asked to enter the login information you previously used for that account: Password, PIN, or Image Password.
How to Switch Users in Windows 10 from Command Prompt (CMD) or PowerShell
If you like command line environments, open Command Prompt or PowerShell. Then type tsdiscon and press Enter.
tsdiscon command takes you back to the lock screen. On it, click, tap, or press a key on your keyboard, and then select Switch Users. Please note, however, that this method does not work on Windows 10 Home. You can only use it on Windows 10 Pro or other editions such as Windows 10 Enterprise.
How do you prefer to switch users in Windows 10?
Now you know all the methods we know to change the registered user in Windows 10. Try them and use the ones you prefer. If you have any suggestions, questions or concerns, feel free to use the comment form below.
Disable your location
A lot of controversy and rumors regarding Windows 10 concerned tracking the location of users. Some experts and my colleagues vying with each other wrote and shouted everywhere that Microsoft wants to know everything about us, see where we go, so that they can then transfer our data to partners. But we ourselves allow the company to do this.
If you use a Windows 10 tablet or laptop and often move around the city or take it on trips, then it still makes sense to allow the operating system and third-party applications to access your location. This will give you access to information about which cafe or gas station is nearby, and learn about the attractions of the city you are visiting. There are many advantages. But that doesn't mean your location should always be on. You need to understand that if your location data is constantly at the disposal of Windows 10, then applications installed on your device also have access to it. Both the operating system and apps store your devices' location history for 24 hours, possibly longer.
Of course, if you turn off all data, then some applications, such as, for example, Maps, will not be able to find you. And sometimes, especially in a foreign city, this can come in handy. But you have the option to manually set a default location that apps can use as an alternative.
Let's try to figure it all out. To turn off your location, you need to follow a few simple steps:
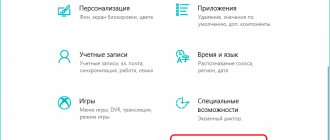
- Click on Start, open Settings.
- Find a section Confidentiality.
- Go to Location. I'm using the newest version of Windows 10 1809, so in some other versions the item is called Location.
- Here you will be able to disable location detection for all users by clicking on the Edit option. There is also an option to turn off allowing apps to access your location.
- It is possible to set a default location or clear the location information log, the same one that Windows 10 stores throughout the day.
Just below you can choose which applications are allowed to determine your location.
I know that some of my colleagues suggest disabling the location completely, using many settings, including the Registry. I would strongly advise you not to do this, as sometimes you will need to use it and there is also a risk of breaking something. You need to understand that any change in the Registry can lead to problems with your operating system.
There is also quick access to enable or disable your Location, but it only partially fulfills its functions. For more detailed and thoughtful settings, it is better to use the method described above.