This article will be useful to any PC or laptop owner. Have you ever wondered how big your losses could be if your information falls into the wrong hands? Some of you back up important data to removable drives or to the cloud, but this does not protect against loss or theft of equipment. I started encrypting data immediately after my friend’s laptop was stolen twice in a year. At the same time, I am an “old believer”; today I do not use a laptop and work exclusively on a PC, and I exclude for myself risks like “forgot my bag with a laptop in a cafe.”
Think about the most paranoid use case for your data. Will your customer base be taken away? Will money be taken away from your WebMoney wallet? Will they get access to dozens of client projects for which you are responsible? Will you become a YouTube star?
Start encrypting your data.
Important point. I am not an information security professional. And the article was written based on my experience and preferences, and it describes methods that are suitable for personal use or small business, in the format “It is better to secure information this way than not at all.”
If you constantly use mobile devices, you can find useful applications in the article about free mobile applications for business.
Why encrypt data and be paranoid about passwords?
Here are examples from the life of those closest to us over the past few years:
- They asked to borrow more than $1,000 in total from friends on social networks and instant messengers from a stolen laptop;
- We merged the client base, which had been accumulated over the years, into a forum of mailing list enthusiasts;
- The cost of a new foreign car was deducted from the keeper's webmoney;
- Domains with good history and traffic were taken away.
More unpleasant options are also possible - if the equipment was “taken away” on purpose. The basics of security when working with data are neglected everywhere. These are passwords saved in services and on websites, and passwords on the desktop in the “passwords.txt” file.
Most services are tied to mail; many receive mail either through mail clients (Outlook, Thunderbird and the like), or read it in a browser, of course, saving the password. Often the main mail was also set up 15 years ago, without linking a mobile phone. In this case, you can lose all access to services that do not have a phone number attached to them.
If in a hurry you started copying passwords onto a piece of paper and googling “how to remove a password from your browser forever” – stop. Later in the article there will be several simple encryption options for household and commercial use for small businesses.
Data encryption options, in what cases is it better to use them for life and business?
Here are the three simplest, most cost-effective and relatively reliable options for storing data. Even if your equipment falls into the wrong hands, you will not be able to gain access to the information.
The first option is encryption on removable media
When connected, a removable hard drive or flash drive requires you to enter a digital password on the media itself; in addition, the data on the memory chip itself is encrypted. This is roughly what it looks like:
I see only 2 advantages of this option:
- Compatible with different operating systems (it's just a flash drive).
- Ability to enter a super secret password to delete all data, instead of a decryption password.
Well, another dubious plus is that every time you connect the device, you will look like a bad parody of Tom Cruise in the Mission Impossible film series.
Minuses:
- Price.
- Speed of work. External drives (and especially flash drives) are slower.
- The chance to get an additional headache when one of the numbers gets stuck or breaks.
My opinion is that this is for those who like to play spies. It can be used as a repository of important information (write down all the passwords and hide it in a can of cereal or a drawer with socks), but nothing more.
We are against purchased links, spam mailings and cheating. Only comprehensive “white” promotion gives long-term results. More details
The second option is to use programs to encrypt data on the disk.
Since in my work I use many Windows programs to collect and process data, I am limited in the choice of operating system and work in Windows OS. Like more than 80% of PC and laptop users:
I settled on two data encryption implementations for Windows (BitLocker and VeraCrypt) because of significant advantages:
- In the case of Windows operating systems from Vista and higher, there is a standard tool for encrypting a disk or part of it - Bitlocker;
- You can encrypt an entire disk partition, regardless of its size;
- You can create a separate encrypted container of several gigabytes, which will look like a regular file, and you can get the data only by knowing what program the data was encrypted and receiving the password. As an example, an encrypted section in .mp4 format may be located in the “Movies” folder and it is unlikely that anyone would think of trying to open a “broken” movie with VeraCrypt;
- If you use VeraCrypt, if you install the appropriate software, the encrypted disk can be read under both MacOS and the most common Linux distributions.
- VeraCrypt allows you to create an additional encrypted partition inside an encrypted partition, sorry for the tautology. This allows you to create a cache within a cache, in simple terms. I haven’t used this function, but it may be useful for you to know.
The following will contain detailed instructions on using the standard Microsoft Windows encryption tool Bitlocker and the third-party VeraCrypt program.
Among the shortcomings discovered over several years of use:
- Bitlocker is not a cross-platform option. Neither under Mac OS nor under popular Linux distributions can a partition or disk encrypted with Bitlocker be opened. I accidentally found out about this when I needed to transfer data from an encrypted removable drive to a laptop with Ubuntu. What’s interesting is that under Windows XP there is the official Bitlocker To Go program from Microsoft, which allows you to read encrypted partitions.
- A partition encrypted with VeraCrypt can only be opened using a computer with the program installed. True, there is an option to create a portable version of the decryption program along with the encrypted partition. But this immediately catches your eye and you can see that there is encrypted data on the disk, partition or flash drive.
The third option is to store passwords securely
Sometimes information protection is limited by the need to safely store passwords, for example, from:
- Cloud data storage.
- A remote server on which all work is carried out.
- Mail, social network accounts, etc.
In this case, there is no point at all in using specialized software for storing passwords. At the end of this article, I will tell you how you can store passwords even if written on the monitor, and at the same time secure them.
Personal experience. How to encrypt a drive with Bitlocker
I use Bitlocker on my home computer for three reasons:
- I am a realist and understand that I do not have any super-secret data that would make it worth using any complex data storage and encryption schemes.
- Bitlocker allows you to encrypt a disk partition that is already in use. That is, it is enough to save critical data separately just in case, and you can start encrypting the disk.
- This data does not require regular access from computers with another OS, so instead of a bunch of third-party programs, it was easier and more logical to use the standard feature of the operating system.
How to enable BitLocker on Windows?
BitLocker can be run on the following OS versions:
- Microsoft Windows Vista Ultimate/Enterprise;
- Windows 7 Ultimate or Enterprise;
- Windows Server 2008 R2;
- Windows 8 Professional or Enterprise;
- Windows 8.1 Professional or Enterprise;
- Windows 10 Professional, Education, or Enterprise.
If you have a different version of OS, the easiest option is to connect the disk to a computer with the desired version of Windows. To work with an encrypted disk, one of the above versions is not required. For example, you can encrypt a disk partition by connecting it to a computer running Windows 7 Ultimate, and use it on a computer running Windows 7 Home Basic.
BitLocker on Windows 7, Windows 8 and Windows 10 - Compatibility
There is a compatibility problem with disks encrypted in versions 7 and 8 and in version 10. Windows 7 and Windows 8 use XTS-AES algorithms for encryption. The developers say that this is not a bug, but a feature. Although, in my opinion, the incompatibility of encryption systems for operating systems released 5 years apart (2009 and 2014) is not a very good idea. On the official Microsoft forum, in such a situation, they recommend using another computer. Which is at least strange, because even for the ancient Windows XP (released in 2001), they released the BitLocker To Go program, which allows you to connect a drive encrypted in Windows 7 and 8.
How to set up BitLocker?
Everything related to encryption settings is stored in the Local Group Policy Editor. To get into it, click “Start” and enter in the search bar:
In the window that opens, go to the sections “Computer Configuration” – “Administrative Templates” – “Windows Components” – “BitLocker Data Encryption”:
Among the useful ones for the average user, I can highlight 2 settings in the local group policy editor.
The first is the choice of encryption method and the strength of the cipher.
The most reliable option to choose from is AES with a 256-bit key with a diffuser. But to accomplish the task “an unauthorized person will not gain access to your data if they find your bag with a laptop,” any of the settings is sufficient. I didn’t notice a significant difference in the speed of work “by eye,” so you can use the most advanced option.
The second setting that may be useful is the ability to encrypt the system drive (usually drive C) without the presence of a TPM module. TPM - Trusted Platform Module - a cryptoprocessor that allows you to encrypt data on the system disk. This module is not installed on most PCs and laptops, so you won’t be able to encrypt the system drive without additional BitLocker configuration.
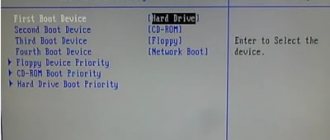
You can check whether the TPM is installed on your computer or laptop in the BIOS security settings.
If it is not installed, and you still want to encrypt the system drive, you will need to go to the section “Computer Configuration” – “Administrative Templates” – “Windows Components” – “BitLocker Data Encryption” – “Operating System Drives”:
In the window that opens, you can allow the use of BitLocker without TPM:
Before encrypting your system drive, answer yourself 3 questions:
- Does your laptop or computer support booting from a flash drive? If not, the system disk cannot be encrypted.
- Do you really have important data stored on your system drive? It is usually a good practice to have multiple partitions (C, D) and store important information on the D drive.
- What is the chance that the flash drive will break or be lost?
In my personal opinion, it is much easier to split the disk into several partitions (or in the case of a computer, use multiple disks) and encrypt the data disk. There is only one drawback - you can turn on the computer and load the operating system.
There are many advantages:
- Even if your computer crashes, you can simply remove the disk and decrypt it on another computer.
- I already expressed my opinion on the daily connection and disconnection of a USB dongle at the beginning of the article - after 3 days you will get tired of pulling it back and forth, and it will always be connected.
- Even expensive flash drives break. According to the law of meanness, this will happen at the most inopportune moment.
For me, the best answer to the question “Why shouldn’t you encrypt your system drive just because you can” was a week of observing unsuccessful attempts to decrypt the drive when the USB key was lost.
Therefore, the best option for personal use is to encrypt your data on a separate drive, stop worrying and start living.
To be fair, it is no longer a problem to buy a laptop or motherboard with a TPM module:
What's the catch? If your computer or laptop supports TPM, but something happens to the motherboard, you can say goodbye to your data on the system drive. The only way to avoid this is to make several USB keys and hope that the flash drive with the key and the laptop motherboard do not fail at the same time.
And an additional nuance - Windows is a rather capricious system. If your 2020 laptop burns out in 2020, and there is 3 years of accounting on the system disk, you will most likely have to look for a laptop of a similar configuration. Because even if you have a USB dongle, the operating system may not start on other hardware.
I repeat - for home use it is enough to simply store important data on a separate disk or partition encrypted by BitLocker. Then, in the event of a computer failure, they can be decrypted on any other computer with a suitable OS version.
Let's move on to the practical part.
Encrypting a disk or flash drive using BitLocker
Practice is easier than theory. In the drop-down menu of the disk or flash drive, select “Enable Bitlocker”:
Important point. Back up your important data before encrypting. In case something goes wrong (the light “blinks” in the middle of the process, for example), this is the best option. A 2 TB removable disk costs 5,000 rubles, which is several times cheaper than data recovery if encryption is interrupted in the middle of the process.
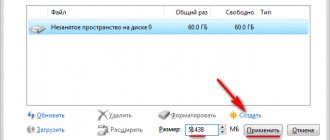
Next, you can choose from two options:
After encryption, in addition to the password, you will receive a key, with which you can also decrypt the disk if you forget the password.
After selecting one of the options, encryption will begin.
A 16 GB flash drive was encrypted for about 1.5 hours. I left the two-terabyte disk overnight, so I didn’t track the exact time, but 6 hours was enough.
It is precisely because the process itself can take 3–6 hours that I recommended making a backup to a separate disk. If your lights are turned off during disk encryption, neither the UPS nor the laptop battery will most likely be sufficient for the entire process.
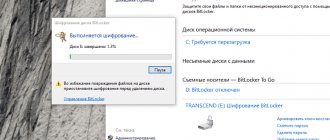
When opening an encrypted disk, just enter the password:
After unlocking, the disk operates as usual. Once unlocked, in the drop-down menu under Manage BitLocker, you can:
- change the password to unlock the disk;
- remove disk password;
- add the need to connect a smart card to unlock;
- save or print your BitLocker recovery key;
- automatically unlock the current computer (never use this option).
How to encrypt and hide a hard drive partition using CyberSafe
With CyberSafe, you can encrypt more than just individual files. The program allows you to encrypt an entire hard drive partition or an entire external drive (for example, a USB drive or flash drive). This article will show you how to encrypt and hide an encrypted partition of your hard drive from prying eyes.
Spies, paranoids and ordinary users
Who will benefit from the ability to encrypt partitions? Let's discard spies and paranoids right away. There are not so many of the former, and their need for data encryption is purely professional. The second one just wants to encrypt something, hide it, etc. Although there is no real threat and the encrypted data is of no interest to anyone, they encrypt it anyway. That is why we are interested in ordinary users, of whom, I hope, there will be more than paranoid spies. A typical partition encryption scenario is when a computer is shared. There are two options for using the CyberSafe program: either each of the users working at the computer creates a virtual disk, or each one allocates a partition on the hard drive for storing personal files and encrypts it. It has already been written about creating virtual disks, but in this article we will talk specifically about encrypting the entire partition. Let's say there is a 500 GB hard drive and there are three users who periodically work with the computer. Despite the fact that the NTFS file system still supports access rights and allows you to limit one user's access to another user's files, its protection is not enough. After all, one of these three users will have administrator rights and will be able to access the files of the remaining two users. Therefore, the hard drive disk space can be divided as follows:
- Approximately 200 GB - shared partition. This partition will also be the system partition. It will install the operating system, the program and store common files of all three users.
- Three sections of ~100 GB each - I think 100 GB is enough to store each user’s personal files. Each of these sections will be encrypted, and only the user who encrypted this section will know the access password to the encrypted section. In this case, the administrator, no matter how much he or she wishes, will not be able to decrypt another user’s partition and gain access to his files. Yes, if desired, the administrator can format the partition and even delete it, but he will only be able to gain access if he tricks the user into giving him his password. But I think this will not happen, so encrypting the partition is a much more effective measure than differentiating access rights using NTFS.
Partition encryption vs encrypted virtual disks
What is better - encrypting partitions or using encrypted virtual disks? Here everyone decides for himself, since each method has its own advantages and disadvantages. Partition encryption is as secure as virtual disk encryption and vice versa. What is a virtual disk? Look at it as an archive with a password and a compression ratio of 0. Only the files inside this archive are encrypted much more securely than in a regular archive. A virtual disk is stored on your hard drive as a file. In the CyberSafe program, you need to open and mount the virtual disk and then you can work with it like a regular disk. The advantage of a virtual disk is that it can be easily copied to another hard drive or flash drive (if the size allows). For example, you can create a 4 GB virtual disk (there are no restrictions on the size of a virtual disk, except for natural ones) and, if necessary, copy the virtual disk file to a flash drive or external hard drive. You won't be able to do this with an encrypted partition. You can also hide the virtual disk file. Of course, if necessary, you can create an image of the encrypted disk in case you want to back it up or move it to another computer. But that's a different story. If you have a similar need, I recommend the Clonezilla program - it is already a reliable and proven solution. Transferring an encrypted partition to another computer is a more complex undertaking than transferring a virtual disk. If there is such a need, then it is easier to use virtual disks. With partition encryption, the entire partition is physically encrypted. When mounting this partition, you will need to enter a password, after which you can work with the partition as usual, that is, read and write files. Which method should I choose? If you can afford to encrypt the partition, then you can choose this method. It is also better to encrypt the entire section if the size of your secret documents is quite large. But there are situations when using the entire section is impossible or makes no sense. For example, you have only one partition (drive C:) on your hard drive and for one reason or another (no rights, for example, because the computer is not yours) you cannot or do not want to change its layout, then you need to use virtual disks. There is no point in encrypting the entire partition if the size of the documents (files) you need to encrypt is small - a few gigabytes. I think we’ve sorted this out, so it’s time to talk about which partitions (disks) can be encrypted.
Supported drive types
You can encrypt the following types of media:
- Hard drive partitions formatted in FAT, FAT32 and NTFS file systems.
- Flash drives, external USB drives, with the exception of drives representing mobile phones, digital cameras and audio players.
Cannot encrypt:
- CD/DVD-RW disks, floppy disks
- Dynamic disks
- System drive (from which Windows boots)
Starting with Windows XP, Windows supports dynamic disks. Dynamic disks allow you to combine several physical hard drives (analogous to LVM in Windows). It is impossible to encrypt such disks with the program.
Features of working with an encrypted disk
Let's imagine that you have already encrypted a hard drive partition. To work with files on an encrypted partition, you need to mount it. When mounting, the program will ask you for the password to the encrypted disk that you specified when encrypting it. After working with an encrypted disk, you must immediately unmount it, otherwise the files will remain available to users who have physical access to your computer. In other words, encryption only protects your files when the encrypted partition is unmounted. Once the partition is mounted, anyone with physical access to the computer can copy files from it to an unencrypted partition, USB drive, or external hard drive and the files will not be encrypted. So, when you are working with an encrypted drive, make it a habit to always unmount it every time you leave your computer, even for a short time! Once you have unmounted the encrypted drive, your files will be securely protected. As for performance, it will be lower when working with an encrypted partition. How much lower depends on the capabilities of your computer, but the system will remain functional and you will just have to wait a little longer than usual (especially when you copy large files to an encrypted partition).
Getting ready for encryption
The first thing you need to do is get a UPS somewhere. If you have a laptop, everything is fine, but if you have a regular desktop computer and you want to encrypt a partition that already has files, then encryption will take some time. If the power goes out during this time, you are guaranteed to lose data. Therefore, if you don’t have a UPS that can withstand several hours of battery life, I recommend doing the following:
- Back up your data, for example on an external hard drive. Then you will have to get rid of this copy (it is advisable to wipe the free space with a utility like Piriform after deleting data from an unencrypted disk so that it is impossible to recover deleted files), since if it is present, there is no point in having an encrypted copy of the data.
- You will transfer data to the encrypted disk from the copy after the disk is encrypted. Format the drive and encrypt it. Actually, you don’t need to format it separately—CyberSafe will do it for you, but more on that later.
If you have a laptop and are ready to continue without creating a backup copy of your data (I would recommend doing one just in case), be sure to check the disk for errors, at least with a standard Windows utility. Only after this you need to start encrypting the partition/disk.
Partition encryption: practice
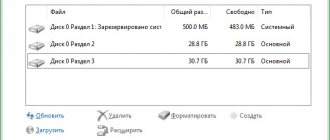
So, theory without practice is meaningless, so let's start encrypting the partition/disk. Launch the CyberSafe program and go to the Disk encryption, Encrypt partition
(Fig. 1).
Rice. 1. List of partitions/disks of your computer
Select the partition you want to encrypt. If the Create
will be inactive, then this partition cannot be encrypted.
For example, this could be a system partition or a dynamic disk. Also, you cannot encrypt multiple drives at the same time. If you need to encrypt several disks, then the encryption operation must be repeated one by one. Click the Create
.
Next, the Crypo Disk
(Fig. 2).
In it you need to enter a password that will be used to decrypt the disk when mounting it. When entering your password, check the case of characters (so that the Caps Lock key is not pressed) and the layout. If there is no one behind you, you can turn on the Show password
.
Rice. 2. Crypto Disk
From the Encryption Type
you need to choose an algorithm - AES or GOST.
Both algorithms are reliable, but in government organizations it is customary to use only GOST. On your own computer or in a commercial organization, you are free to use any of the algorithms. If there is information on the disk and you want to save it, turn on the Save file structure and data
.
Please note that in this case the disk encryption time will increase significantly. On the other hand, if the encrypted files are, say, on an external hard drive, then you will still have to copy them to the encrypted drive to encrypt them, and copying with on-the-fly encryption will also take some time. If you haven't backed up your data, be sure to check the Save file structure and data
, otherwise you will lose all your data.
The remaining parameters in the Crypto Disk
can be left as default.
Namely, the entire available size of the device will be used and quick formatting will be performed into the NTFS file system. To start encryption, click the Accept
. The progress of the encryption process will be displayed in the main program window.
Rice. 3. Progress of the encryption process
After the disk is encrypted, you will see its status - encrypted, hidden
(Fig. 4).
This means that your drive has been encrypted and hidden - it won't show up in Explorer and other high-level file managers, but partition table programs will see it. There is no need to hope that since the disk is hidden, no one will find it. All disks hidden by the program will be displayed in the Disk Management
(see Fig. 5) and other disk partitioning programs. Please note that in this snap-in, the encrypted partition is displayed as a partition with a RAW file system, that is, without a file system at all. This is normal - after encrypting a partition, Windows cannot determine its type. However, hiding a partition is necessary for completely different reasons, and then you will understand exactly why.
Rice. 4. Disk status: encrypted, hidden. Partition E: not visible in Explorer
Rice. 5. Disk Management snap-in
Now let's mount the partition. Select it and click the Restore button.
to make the partition visible again (the disk status will be changed to simply “
encrypted
”). Windows will see this partition, but since it cannot recognize its file system type, it will prompt you to format it (Figure 6). This should not be done under any circumstances, as you will lose all data. This is why the program hides encrypted disks - because if you are not the only one working on the computer, another user can format a supposedly unreadable partition of the disk.
Rice. 6. Suggestion to format the encrypted partition
Of course, we refuse formatting and press the Mount
. in the main CyberSafe program window. Next, you will need to select the drive letter through which you will access the encrypted partition (Fig. 7).
Rice. 7. Selecting a drive letter
After this, the program will ask you to enter the password necessary to decrypt your data (Fig. 8). The decrypted partition (disk) will appear in the Connected decrypted devices
(Fig. 9).
Rice. 8. Password for decrypting the partition
Rice. 9. Connected decrypted devices
After this, you can work with the decrypted disk as with a regular one. In Explorer, only drive Z: will be displayed - this is the letter I assigned to the decrypted drive. The encrypted E: drive will not be displayed.
Rice. 10. Explorer - viewing computer disks
Now you can open the mounted disk and copy all the secret files to it (just don’t forget to delete them from the original source and wipe out the free space on it). When you need to finish working with our section, then click the Dismantle button.
, and then click the
Hide
or simply close the CyberSafe window. As for me, it’s easier to close the program window. It is clear that you do not need to close the program window during the operation of copying/moving files. Nothing terrible or irreparable will happen, just some of the files will not be copied to your encrypted disk.
About performance
It is clear that the performance of an encrypted disk will be lower than that of a regular one. But how much? In Fig. 11 I copied my user profile folder (where there are many small files) from the C: drive to the encrypted Z: drive. The copy speed is shown in Fig. 11 - approximately at 1.3 MB/s. This means that 1 GB of small files will be copied in approximately 787 seconds, that is, 13 minutes. If you copy the same folder to an unencrypted partition, the speed will be approximately 1.9 MB/s (Fig. 12). At the end of the copy operation, the speed increased to 2.46 MB/s, but very few files were copied at this speed, so we believe that the speed was 1.9 MB/s, which is 30% faster. The same 1 GB of small files in our case will be copied in 538 seconds or almost 9 minutes.
Rice. 11. Speed of copying small files from an unencrypted partition to an encrypted one
Rice. 12. Speed of copying small files between two unencrypted partitions
As for large files, you won't feel any difference. In Fig. Figure 13 shows the speed of copying a large file (400 MB video file) from one unencrypted partition to another. As you can see, the speed was 11.6 MB/s. And in Fig. Figure 14 shows the speed of copying the same file from a regular partition to an encrypted one and it was 11.1 MB/s. The difference is small and is within the error limit (the speed still changes slightly as the copy operation progresses). Just for fun, I’ll tell you the speed of copying the same file from a flash drive (not USB 3.0) to a hard drive - about 8 MB/s (there is no screenshot, but trust me).
Rice. 13. Large file copying speed
Rice. 14. Speed of copying a large file to an encrypted partition
This test isn't entirely accurate, but it can still give you some idea of performance. That's all. I also recommend that you read the article “CyberSafe - an encryptor for all occasions.”
How to use VeraCrypt? Installation and configuration instructions
I recommend downloading the program only from the official website. You can download VeraCrypt for your OS from the following link:
Portable version (no installation required) is available only for Windows. Its use is advisable in the case when truly secret data is encrypted, and even the presence of an installed program may lead one to believe that there is an encrypted partition on the computer or laptop. I'm using the regular version.
I will omit the installation process; it is unremarkable (agree with the license agreement, add a shortcut to the desktop and in the start menu, installation for all users). During installation, you can select Russian for the program interface.
How to encrypt a disk or flash drive with VeraCrypt
Actually, the encryption process itself. Let's run the program:
Click “Create Volume”:
- Creating an encrypted file. The most “spy” option. If you create a file “Zvezdnle.W0yny.Khan.s0l0-fullHD.mp4” weighing 9–12 GB and put it in the “movies” folder among 15 other films, then it will not be easy to guess that this particular file is an encrypted container.
- Encrypt a disk, flash drive or partition completely. The disadvantage is that you can immediately see that the disk is encrypted. Although it will still not be possible to decipher it using improvised means.
- Encryption of the system disk partition.
We use the first option; the others are not fundamentally different, except for the time required to encrypt the entire disk.
Before encrypting any important information, make a copy of it. In any case, this will be cheaper than restoring data from a semi-encrypted disk.
Next option:
The second option allows you to create another encrypted partition inside the first encrypted partition. A relevant option if you accept the possibility that the first password will be decrypted using you and a soldering iron. I'll choose the first option:
Please note that you need to specify the name of the file, and not the existing file, because if the file exists, it will be deleted, and an encrypted partition will be created in its place.
We choose AES encryption with SHA-512 hashing - this is enough to make it impossible to decrypt the password on a regular computer by brute force. The next step is to set the size of the encrypted partition:
And set the password for the section:
At the next stage, you will be asked to select the file system of the encrypted partition. To do this, you need to answer the question - are you going to store files larger than 4 GB in it. And let's move on to encryption:
Now we move the cursor inside the window until the progress bar is filled, and then click “Mark”.
This completes the encryption process. For the uninitiated, there is a movie on the flash drive:
To use an encrypted partition, you must:
- Launch the VeraCrypt program;
- Select the drive letter on which the encrypted volume will be mounted;
- Select the encrypted partition file;
- Click “Mount”;
- Enter the password, wait 3-10 seconds.
- A new disk will appear in Explorer, which is an encrypted partition.
That's it, you can work with the encrypted partition as with a regular disk. Before finishing work with an encrypted partition, you need to close all applications that used files from this partition. After that, click “Unmount all” and the encrypted partition turns back into a regular file.
As you can see, there is nothing complicated about data encryption at the household level. But the likelihood of loss of nerve cells along with the loss of a laptop with confidential data is sharply reduced.
How to encrypt a Windows 7 system drive with VeraCrypt
Preparing to encrypt the Windows 7 system drive
First, launch the VeraCrypt program. If you do not already have VeraCrypt installed, read our article Installing VeraCrypt on Windows 7.
Launch VeraCrypt
You will see the main program window:
VeraCrypt main window
In the “System” menu, select “Encrypt system partition/disk”
Select menu item
Set the system encryption type to "Normal". In this case, you will set only one primary password for disk encryption. If you select the “Hidden” type of system encryption, you will have to set two passwords - the main one and the fake one, which will be used to decrypt the decoy disk.
Specify "Normal" encryption type
In the Encryption Area option, select Encrypt entire disk. In this case, VeraCrypt will encrypt the entire disk, and not just the system partition with Windows installed.
Specify "Encryption Area"
When asked about “Encrypt protected area”, answer “No”.
“Protected area encryption”: “No”
If you only have one operating system on the drive, select the Single Boot option in the next step. If you have several operating systems installed on your disk, select the “Multiboot” option.
Specify "Number of operating systems"
Selecting an encryption and hashing algorithm
In the “Encryption Settings” step, you can select the desired encryption and hashing algorithm that will be used when VeraCrypt encrypts and decrypts data. We recommend leaving the default values:
- Encryption algorithm: AES
- Hash algorithm: SHA-256
Confirm "Encryption Settings"
If you want to check the possibility of using various algorithms, click on the “Check” button and then “Autotest all”. The message “Test of all algorithms passed” will mean that your computer configuration successfully works with all algorithms and you can freely select any of them.
Comparison of performance of encryption algorithms
If you want to compare the speed of different algorithms in VeraCrypt, Click on the “Test” button and in the window that appears, click “Test” again. After a while, you will see a comparison table with the results of various algorithms. We recommend that you choose the fastest one (usually AES).
Performance test of various encryption algorithms
Having decided on the encryption algorithm and hashing algorithm, click “Next”:
Select encryption and hashing algorithm
In the next step you will need to set a password. This password will be used immediately after turning on the computer and after loading the BIOS. Create a password that is long enough to be difficult to guess but that you can remember. The maximum password length is 64 characters. It is recommended to specify a password of at least 20 characters.
Setting the decryption password
Provide a password for VeraCrypt
Once you have decided on the password, click the “Next” button:
Please provide a strong password
If the password you specify is less than 20 characters long, you will see a warning that reminds you of the importance of long and strong passwords:
Short passwords are easy to crack
In the next step, you will need to move your mouse so that, based on your cursor movements, VeraCrypt generates random data for its operation. You are now a Random Number Generator!
Random Data Generation
Next, VeraCrypt will write its bootloader to the Windows 7 system disk. Confirm this action.
Writing data to disk
After this, VeraCrypt will confirm that the keys were successfully generated. Click Next.
Generated VeraCrypt keys
VeraCrypt Recovery Disk
Next, VeraCrypt will prompt you to create a recovery disk. You may need it if you are unable to start your computer normally due to problems with VeraCrypt.
VeraCrypt Recovery Disk
VeraCrypt will create a recovery disk in the path you specify. For greater reliability, it is recommended to write an image of this disk to removable media (for storage) or immediately write down the data of this image, thereby creating a recovery disk for force majeure situations.
VeraCrypt Recovery Disk Created
VeraCrypt will inform you that if you previously created a recovery disk for this system drive, it will no longer be usable due to the fact that it is now using newly generated master keys.
Only the newest recovery disk can now be used
In the next step, VeraCrypt will offer you one of the options for cleaning the system disk. If it is critical for you to prevent potential leakage of your data by physically recovering disk sectors, select the desired cleaning mode. In most cases, you don't need to specify cleanup and you can save a lot of time.
System disk cleaning mode
Data encryption pre-test
In the next step, VeraCrypt will prompt you to test the configuration. The VeraCrypt bootloader will be installed, your computer will reboot and you will be prompted to enter your password. After this, Windows 7 will start starting.
System encryption pre-test
The VeraCrypt loader has an interface in English. After restarting your computer, you will only see English text.
VeraCrypt loader interface is not localized
You will be shown detailed instructions before rebooting the system. We recommend that you read it and print it out if possible.
VeraCrypt instructions
Last confirmation before reboot.
You need to restart your computer
After your computer reboots, you will see the VeraCrypt bootloader interface. It will be entirely in English, but don't worry, we'll tell you what to do next.
Enter your password to decrypt
The “Enter password” inscription reads “Enter your password.” Enter your password. Also, you can press F5 to remove password masking and see the entire password.
Enter your password for VeraCrypt
Once you have entered your password, press the Enter key. Next, VeraCrypt will ask you for a PIM. Just press Enter again. This will be followed by a password check and decryption of the Windows 7 system disk.
Password verification
If you entered the correct password and VeraCrypt successfully decrypted the system drive, you will see the Windows 7 boot logo.
The password has been entered successfully and Windows 7 has started loading.
After Windows 7 boots, a VeraCrypt message window will be displayed. that the pre-test was completed successfully. Now you can proceed to encrypting all data on the system drive.
Click the “Encryption” button to start encrypting all data on the system drive
Start encrypting data on the system drive
Before you begin encrypting data on your Windows 7 system drive, VeraCrypt again prompts you to read and print the instructions as a precaution.
Read the instructions before encrypting the entire system drive and click "OK"
Allow VeraCrypt to make changes to the disk.
Click Yes
Now the process of encrypting all files on the Windows 7 system disk will begin. The encryption speed depends on the power of your processor and the type of disk (SSD or HDD), and the total processing time depends on the amount of data on the disk. Please note that you can pause data encryption and continue it later.
The gifting has begun!
Other disk encryption programs for Windows and Mac OS
In addition to the options described above, you can use other solutions:
TrueCrypt
At first I wanted to use this program instead of VeraCrypt. Its capabilities are more than enough for both domestic and professional use. TrueCrypt can:
- Encrypt containers. You can encrypt only the necessary information to use a small storage medium.
- Encrypt disk partitions.
- Encrypt the entire disk or flash drive.
In 2014, support and development of TrueCrypt was discontinued; the latest version of the program only allows you to decrypt data, without the ability to encrypt. A recommendation to switch to BitLocker appeared on the official website. Since TrueCrypt was one of the most popular free data encryption programs, this gave rise to many rumors about pressure on software developers. This is indirectly confirmed by the fact that an independent security audit, for which more than $60,000 was raised, did not find critical vulnerabilities in the latest versions of the program.
Today, the unofficial site is the project https://truecrypt.ch.
Fans of conspiracy theories are in doubt - which is better? Don't use BitLocker because it's very suspicious that the former official website links to it? Or not to use TrueCrypt, what if the intelligence services specially created a new “rebel” site and stuffed “bookmarks” into the source code that allow you to decrypt the encrypted data?
However, you can download TrueCrypt for Windows, MacOS, Linux on the website:
The site has an English-language support forum where newbie questions are regularly answered.
I admit, my choice was influenced by a common household factor - I don’t want to re-encrypt several disks in case TrueCrypt suddenly stops updating or is incompatible with the latest versions of Windows OS (in the screenshot above you can see that Windows 10 is no longer listed in the download list).
Therefore, I chose VeraCrypt, as, in my opinion, the most promising branch of TrueCrypt. The project is constantly evolving:
But I think you will agree with me – everything still looks suspicious, right? Who could write on Wikipedia that VeraCrypt is more resistant to possible NSA attacks, if not an NSA officer on duty?
FireVault and FireVault 2 for MacOS
Owners of Apple laptops and computers can use the official FireVault program for encryption. Essentially, this is an analogue of BitLocker, only for MacOS. The disadvantage of the first version, used in OS versions up to and including Mac OS X Snow Leopard, is the ability to encrypt only the user’s home folder. The second version of the program has been used since OS X Lion and allows you to encrypt the entire disk.
Detailed Russian-language instructions for encrypting the boot partition are provided on the official website.
If your version of Mac OS allows you to encrypt only your home folder, you can use TrueCrypt or VeraCrypt and create an encrypted partition.
CipherShed
Just like VeraCrypt, CipherShed is a fork of TrueCrypt. Supports Windows, Linux and Mac OS.
The main disadvantage is below:
Not very user-friendly, in four years the installer could have been released.
DiskCryptor
The official website seems to have come to us from the 2000s:
From the moment I chose the encryption program (and this was 3 years ago) nothing has changed. Including the fact that the main page indicates OS compatibility for version 0.9, and version 1.1 is offered for download. I didn’t start guessing “Will the latest version of the program encrypt the latest version of Windows” then, and I don’t advise you now.
The program may be useful for owners of PCs with older versions of Windows OS, which is why it is included in this list.
Windows
There are two popular ways to encrypt a disk in Windows:
- using VeraCrypt;
- using standard BitLocker encryption.
Veracrypt
We recommend using the VeraCrypt solution. This software has been independently audited several times and is considered quite reliable.
Instructions for encrypting a disk with VeraCrypt can be found here. The setup will take about 10 minutes of your time, and the encryption itself will last up to 1-2 hours. We recommend encrypting the entire disk.
BitLocker
Windows has built-in BitLocker encryption (starting with the Professional version of the OS).
Encryption in Windows 10
Search Windows for "Manage BitLocker" and open the Settings panel. By default, BitLocker uses the Trusted Platform Module (TPM) hardware crypto processor, which may not be present on the motherboard. But recent versions of Windows support the use of BitLocker without TPM.
Here you can read instructions on how to use BitLocker without a TPM. Many experts consider BitLocker encryption to be insecure. However, if there is a risk of simple loss or theft of the device, this utility will be sufficient.
How to properly store passwords?
I am skeptical about various programs for storing passwords that automatically insert the necessary data into the input field in a browser, email client, banking program, etc. Like, the main thing for you to remember is only the password for the program, and it will remember the rest of the passwords. There are several reasons:
- The program itself can be hacked.
- Today the program exists, but tomorrow it is closed. And you have an exciting quest ahead of you: transferring passwords to a new program.
- The program was installed on an outdated OS on old hardware, the motherboard burned out, and your operating system will not boot on another computer. And you are looking for the same “hardware” or trying to get passwords through the program’s technical support (if, of course, there is one, and passwords are synchronized somewhere other than your computer - which, by the way, is a potential additional vulnerability).
An easy way to store complex passwords
At the same time, absolutely any passwords can be stored even in the text file “passwords.txt” on the desktop, under one condition. Here it is:
For example, your list of passwords might look like this:
- 5g~|r57C%llRWL0
- w8T?hl$oPf69l*@
- qo9n76R2Xlk89g%
- INV8K3mbPQrONQv
- p~Uw~EpU5H05PQo
But it will be useless if you don't know how to use them. In the example above there are 5 passwords. And only you know that the first password works if you delete the first character, the second one works if you delete the second. There are many such options for which it is almost impossible to find a pattern:
- In any password you need to remove the 2nd capital letter.
- The first (or last) two characters are extra. Or the second and fourth.
- The password is correct if you add gfhjkmxbr (“password” in the English layout) to it.
- The password needs to be copied 2 times and the last 2 characters removed (what is your chance of finding a 28-character password using brute force?).
- Your option.
Theoretically, it is even possible to guess such a password. Practically – do you think anyone needs this? In addition, if the password is from an online service, then it will not be possible to find it using brute force methods, for the following reasons:
- More and more services are moving towards two-factor authentication (password + SMS), in payment systems this has actually become a standard.
- You are not the only one who knows that you can try to guess a password using brute force methods. Most often, in online services, after 3-5 attempts, you need to wait from 3 minutes to half an hour.
Encrypted archive
Although this method of storing passwords is relatively secure, you can make it even more secure. To do this, it is enough to rename the file itself into something quite tedious and unnecessary for the general public, like “Basics of echolocation of dolphins (list of references) – diploma. correspondence arr. Ivanov.txt" and add it to the archive, encrypted with a password.
In principle, a small amount of information can be encrypted simply with the free 7-zip archiver, which supports AES-256 encryption for 7z and ZIP formats. This option is suitable, for example, for removable media, which for one reason or another cannot be encrypted using other options (you need to transfer something to computers without special software).