Connecting to FTP via FileZilla
In order to connect to FTP, you will need to download the FileZilla software, then install and open it.
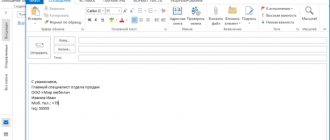
In the window that opens, fill in the following fields:
- Host. As a rule, the server's IP address is either u123456;
- Username;
- Password;
- Port (if any).
Then click on “Quick connection”.
The directory is open and you can download or transfer files.
Create a new connection on your computer
We launch the operating system and go to “Computer”. By right-clicking, we call up the context menu, in which you need to go to the item for adding a new network environment element.
Go to the next window twice and reach the point where you enter the address of the FTP connection server. The server address can be found directly on your smartphone when you launch the FTPDroid application.
Disable anonymous login and enter the details of the user whose account was created in FTPDroid earlier.
Finally, it remains to give the connection a name.
The created connection will appear in Explorer. Each time a connection is opened, the operating system will prompt the user for a password. Thanks to this, you can avoid using standard USB cables and other physical connection methods.
iPhone and Android - comparison of characteristics and differences
Via Total Commander
In the case of Total Commander, you will need to download and open it. Then open the “Network” - “Connection to FTP server” tab.
Click on “Add”.
Next we enter:
- Name;
- Server;
- Account;
- Password.
Now you need to connect to the created connection.
Creating an active server for data exchange
The first step at this stage should be to select the appropriate application from the Play Market store. The most popular application in this category is FTPDroid, so we will continue the instructions using this application as an example.
When launched, FTPDroid scans and recognizes the wireless connection, adapting to the parameters of this connection, but this does not mean that you do not need to configure anything, so the first thing we do is go to the application settings.
Android apps designed to help you quit smoking
For greater reliability and stability, you should enable autoboot from Wi-Fi and disable the settings that allow anonymity and Chroot, not forgetting to activate the application logging function.
The next step should be to create a user account with administrator rights. It is this account that will have access to the files on the smartphone by connecting via FTP. To do this, open the “Users” item.
There will be no users when you first launch the application. When setting up a new user, you should enable the advanced settings option to be able to define a default directory.
Here you should pay attention to whether the smartphone has a Root shell or not. If you received Root rights before setting up access and want to have access to all files, including system files, then you should select the root folder as the default directory. Otherwise, this folder will not be available for selection. If the path to the folder is determined incorrectly, it can be configured manually. At the end, don’t forget to activate the user.
Let's move on to setting up the computer.
On Windows 10
In Windows 10, you will need to log into “This PC” and edit with the mouse button “Add a new item to the network environment.”
Then click “Next”.
In the window that appears, you must select “Select a different network location.”
Now enter the server address.
Next, enter your username and password. If FTP does not have a login and password o.
Ultimately, you will need to give your network environment a name (needed for navigation).
Click on “Finish”.
Now the connection to the server will be in network environments and you can quickly connect to it.
Method 1 – Built-in FTP
If you use it rarely, you forget that Windows already has built-in FTP, so you don’t need to go far. But it's turned off by default, so let's start from the beginning. Using Windows 7 as an example, we try the same on Windows 10 or go to the next section, where we will install a third-party solution.
- Start – Control Panel – Programs and Features:
- Click “Turn Windows features on or off.” In the window that opens, go to IIS Tools - FTP Server. And tick all the sub-items. At the end, don’t forget to click the “OK” button.
- Let's move on to the settings. Start – Control Panel – Administrative Tools.
- IIS Service Manager:
- Right-click on the Sites element and select “Add FTP server” in the menu that appears:
- In the window that appears, set the name of the FTP site. Anything is possible, actually. We’ll call it as it is – WiFiGid.ru. And the physical path to the folder from which the exchange will take place - we have the entire D drive dedicated to this:
- On the next page we set IP, port, encryption. It's better to leave it like this:
- We define access parameters. The Anonymous checkbox allows access without a login and password. Regular – by login and password:
- All. The FTP itself has been created, all that remains is to set the correct access settings. Go to: Control Panel – System and Security – Firewall:
- Extra options:
- On the left side, select the “Rules for incoming connections” tab, and on the right we look for “FTP server” and “Traffic-FTP servers in passive mode”. Right-click on them and click “Enable”. This is how we activated the rules for incoming connections. Before this, there were no rules at all:
- Let's move on to outgoing connections and do the same for “FTP server traffic”:
- Now the server is turned on, the rules have been created, but you need to determine the users who can interact with the server. Let's go: Control Panel – System and Security – Administration – Computer Management:
- Create a user group. Local users and groups – Groups. Right-click on the free space and select “Create Group”:
- We set it like this (FTP - FTP):
- In the adjacent Users subfolder, create a new user:
- Fill in the fields for your user. Those. here is the main username and password that will be used to connect to FTP:
- Did you see your newly created user in the list of users? Now you need to push it into the FTP group. Right-click on it - Properties. And then go to the “Group Membership” tab, where we add a group using the Add button:
- Almost everything is ready. FTP is working, there is a user. But Windows simply won’t let just anyone use its resources unless you’re an administrator. Therefore, we need to allow our user to interact with the folder allocated for FTP needs. Right-click on it - Properties. On the Security tab, click on the “Change” button:
- Click the Add button and add our group. And at the same time, below it in the Allow column, check all the boxes:
- Now we return to IIS again and go configure our rules for authorization. Click on our site created here and select “FTP Authorization Rules”:
- Immediately right-click on an empty space – Add allowing rule:
- By default, access can be made without authorization, but we don’t want anything bad? (if we wanted, we could skip everything related to creating a user altogether). Here we select the item “Specified roles or user groups” and enter our FTP group:
- But as an alternative, you can, for example, allow anonymous users to connect, but limit them to read-only rights. Then they won't delete anything:
With this we finish the first option. I hope you were able to set up an FTP server.