Every photographer wants to make their photo unique and as beautiful as possible. To achieve this, various effects are often used to decorate frames. For example, recently it has been fashionable to add a glow in Photoshop, and this is not surprising, since the photo becomes incredibly beautiful. To verify this, you need to go through the lesson described in this article.
Bright glow in Photoshop
Before you begin, you need to select a photo with which the wizard will work. First of all, this should be a photo in which the glow looks natural or complements the composition.
First, open a photo in which there will be a bright glow in Photoshop. Then we create another take. To do this, right-click on the thumbnail and select “Create a duplicate layer.” And you can also create not only photographs, but also any design solutions. To begin with, a regular background will be enough to create a glow in Photoshop.
Soft light
A low-cost way to improve your photography.
To use it you need:
- Create a duplicate layer .
- Open its " Blending Options ".
- Oh and pick up the settings.
When changing settings, the marked change will be applied . Those. You can monitor how the working field changes in dynamic mode.
Creating a collage from one or more photos in Photoshop
Background for work
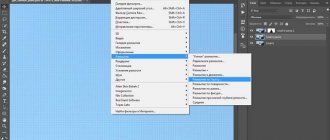
For the first time you can try it with just such a blank, it will emphasize the beautiful effect. Create a new document of any size and fill it with white. And after that we set the highlight, and to do this you need to go to the “Filter” window, then click on the “Rendering” button and then “Lighting Effects”. In the dialog box that opens, you need to select the parameters that will suit the taste of the designer or photographer. It is better to choose a dark color so that it does not blend into the background. In this case, the color is #050244.
Light ball for photography
The next step, of course, is to create the object itself. So, creating a glow effect in Photoshop is very easy. First of all, a new layer with a blending mode of “Screen” is also created. After this, you need to take the Oval tool and draw a selection that is close to an even circle. After this, you should shade the resulting object to 20 pixels. This allows you to soften the halo for future filling. It is necessary to make the glow as natural as possible. The next step is to add light, and for this you use a tool like Radical Gradient, with parameters that the photographer or designer will like. In general, it all depends on the imagination and creative mood of the person.
Creating an Edge Glow Effect from Scratch Using Photoshop
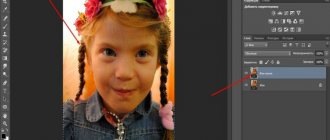
However, this technique is really great if you want to create an edge glow from scratch. For example, take this image of the Caligo butterfly. There is no glow effect on it at all.
Caligo
I separated the butterfly from the background using the Pen tool, and placed it on another background, to which I added a Gaussian blur.
Wheat
Since Caligo is on a separate layer, I added an Inner Glow from the Layer Style and changed the Blend Mode to Color Dodge, choosing a dark yellow. I wanted the wings to be highlighted by the setting sun in the background.
The Caligo butterfly was cut out with the Pen Tool in
Photoshop and placed on a different background.
I blurred the background using Gaussian Blur. I placed this Layer Style effect on its own layer. Then I applied a layer mask and painted over the yellow glow on the wings to make them look realistic. I did some more retouching by adding a gradient overlay and then applying Filter>Blur>Medium
to blend the colors of the two images.
By placing the Layer Style effect on a separate layer, I was able to apply a layer mask and paint over the glow effect on the butterfly's wings.
The inner glow was added using the Color Dodge blending mode. A gradient overlay was then added to darken the bottom of the butterfly. Then a Medium Blur was applied to blend the colors of the two images.
You will need
- To add a glow effect in Photoshop, first of all it is necessary that the object whose contours will glow be on a separate layer. How to separate an object from the background has been written many times in other articles; we will not dwell on this now in our instructions.
Instructions
So, we have a separate layer with an object. To make it more convenient to adjust the glow parameters, it is advisable to place another layer of dark color under it, against which all the nuances will be.
Select the layer with the object. Go to the Layer>Layer Style>Outer Glow menu, or click on the “fx effect” in the layers panel.
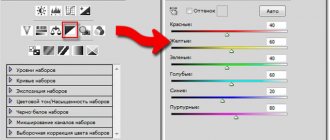
We see a fairly large field for settings:
– glow color; it can be monochromatic or change its color, depending on the distance to the object.
– halo width and glow intensity
– you can also vary the algorithm for applying the glow – the most suitable modes are Lighten and Screen. Thus, we adjust the glow of the object’s contour outward. After that, go to the next tab Inner Glow. The settings here are similar. To look natural, you need to remember that even if, logically, an object glows only outward, then any optical system, including the human eye, due to the non-absolute transparency of the cornea and lens, slightly blurs the bright highlights, they look beyond the boundaries of the source, therefore with an intense glow outside the Outer Glow contour, inside it all you need to do is play along with the light glow of the Inner Glow.
Our composition can have any number of layers with objects, each of which can have individual parameters selected - the color of the glow and its character. In addition, if we want to depict a separate point light source, we can use the Lens Flare filter (in the Filer>Render>Lens Flare menu), which simulates the reaction of various photographic lenses to the appearance of a bright light source in the frame. This way we can add any number of luminous lamps and spotlights to the composition.
By varying and combining glow effects, applying them to different layers, we can achieve very bright and memorable - fantastic and realistic results.
Video on the topic
Sources:
- glowing eyes photoshop
Instructions
Create a new document 500x500 pixels in size, and then select a gradient fill from the toolbar. Set a radial gradient and select a suitable transition (for example, a transition from black to red). Stretch the gradient on the created image, and then duplicate the layer (Duplicate layer) and change the blending mode to Color Dodge.
Now create a new layer and in the Filter section, select the Render>Clouds option with the original palette parameters - black and white. Set the layer opacity to 30%, then open the Sketch filters section and select the Chrome filter. Set the filter values to 4 and 7, and then return the transparency to 100%. Set the layer blending mode to Hard Mix.
To create glowing lines, use the Pen Tool. Using this tool, draw an arbitrary smooth line, bending it as you wish and editing the bend using anchor points. Create a new layer and, selecting a 3 px brush with a diameter of the desired color, go to the Pen Tool again.
Right-click on the created curved line and select the Stroke Path>Brush option with the Simulate Pressure parameter. Click OK and then delete the path. Change the layer blending mode to Multiply and set the Drop Shadow option in the layer style settings.
Also check the Inner Glow and Outer Glow options. Adjust the outer and inner glow
at your own discretion, observing changes in the image and achieving the best effect.
the mixing mode of external and internal glow
to Screen, and then repeat all the described steps from creating curved lines to adding lighting effects any number of times - until the number of glowing lines reaches the expected amount. You can insert any logo on top of the ready-made light lines.
Video on the topic
To make a photographic portrait expressive and lively, you need to highlight the eyes
person in the photograph.
The tools of the Photoshop graphic editor allow you not only to make your eyes
bright, but also to completely change their color, making your face attractive and memorable.
Instructions
Open Photoshop. Turn on the layers palette by pressing the F7 button. Select and open the desired photo. It is desirable, but not necessary, for the photograph to be large enough. Create a copy of the background layer. Right-click on the pinned Background layer and select Duplicate Layer from the menu.
Click on the Background copy layer to activate it. Change the blending mode from Normal to Screen in the upper left corner of the window. Click on the Layer tab in the top menu and select first Layer Mask, then Hide All. This will add a mask to the layer.
Select a brush from the toolbar or press And on your keyboard. Set the brush color to white. Enlarge your photo using Navigator. the eyes on the mask
.
Reduce the Opacity in the Layers panel to a value that suits you best. Type in the box with 100% the required value. Adding a Multicolored Glow in Photoshop
In this tutorial I'll show you how to create an interesting glow and add mood to an image. To do this we will use blending modes
(blending options), selection tools and a little of your imagination.
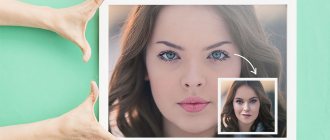
Before processing.
After.
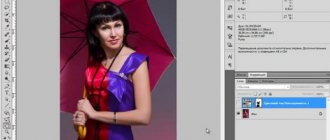
Let's start. Open the image to which you want to apply the effect. The author chose this.
Step 1.
You need to separate the girl from the background.
Do this using the method that works best for you. The author used the Pen Tool ,
drawing a path around the girl’s figure, you need to close the outline and form a selected area. Set the feathering to 1 px.
Step 2.
Copy the selection
(Ctrl+C)
and paste
(Ctrl+V)
it onto a new layer, name the layer
“Girl
”.
Step 3.
Duplicate the
“Girl” layer.
For a copy of this layer, apply a
Brightness/Contrast
in the
Image menu - Correction
(Image > Adjustments > Brightness and Contrast).
Step 4.
Select the
"Girl" layer.
Go to the menu
Filter – Blur – Motion Blur
(Filter > Blur > Motion Blur).
Set the following settings: Angle
– 40 degrees,
Distance
– 120. Merge the layers
“Girl”
and her copy.
Step 5.
with a girl and call him
“Smoke.”
Using the Lasso Tool
,
draw an area around the girl. Set the feathering to 150 px.
Step 6.
Make sure your Foreground color is white and your Background color is black.
Now go to the menu Filter - Rendering - Clouds
(Filter> Render> Clouds).
After that, set the blending mode for this layer to Overlay
(Overlay).
Step 7
Create a new layer below the
"Smoke"
and name it
"Gradient".
Select the Gradient Tool
and
click to bring up the Gradient Editor.
Set the foreground color to #c6229e
and the background color to
#1dbdda
.
Set the tool settings to Linear
. Draw a gradient from the top left to the bottom right, set the opacity of this layer to 60%.
Step 8
Set the
Gradient
blending mode to
Overlay
, then merge the
Smoke
and
Gradient layers.
You should get something like the screenshot below. You can experiment with different gradient color combinations and different blending modes for the Gradient layer.
Step 9
Create a new layer below the
"Gradient"
and name it
"Glow".
Using a soft white
Brush
, paint over the edges of the girl. This will create a glowing effect behind the girl.
Step 10
Make the Brush tool active
,
go to the brush settings palette (F5) and enter the following settings, as shown in the screenshots below.
Save this brush by clicking Create New Brush
and name it
“Splash”.
Then you can select it again in the brushes palette and use it later. Drag the customized brush over the image as in the image below. Achieve the desired effect.
Step 11
Create a new layer, call it
"Stripes".
The name speaks for itself.
We're going to make glow stripes. To make them, select the Polygonal Lasso Tool and
create a triangle. Then, using a soft white brush, paint on the opposite side of the base of the triangle. You can also experiment with different shapes and sizes to create the effects you want.
Step 12
Now let's do the lighting on the girl herself.
To do this, create a new layer above the “Girl”
and set its blending mode to
Color
Dodge.
Load the outline of the girl that you made earlier in the contours palette or use the keyboard shortcut Ctrl+click on the thumbnail of the layer with the girl. The selection will load. Using the Eyedropper Tool ,
select the color of the glow around the girl that we made earlier and use the same color, with a soft brush, to draw along the inner contour of the selected area.
Step 13
Now we will create the light lines.
Create a new layer called “Lines”
above the girl layer.
Set the foreground
color to white, select the
Brush
Tool and open the brush settings window.
Select a soft brush, approximately 9 px. In the Shape Dynamics
, set
the size
jitter control to
Pressure
. This will give your brush strokes an interesting effect.
Step 14
Using the Pen tool
,
create several lines (see screenshot).
After that, right-click and select the option - Stroke Path
.
The settings window will open. You need to select Brush
Pressure
box . Click OK. After this, your lines made with a pen will be outlined with a brush.
Step 15
Now double-click on the lines layer to bring up
Layer Styles
(Blending Options).
Apply Glow
. Use the settings as in the screenshot below.
Step 16
Using a layer mask, if desired, you can remove some parts of the lines that fall on the girl. You can also add more elements to the image to make it look even more unique.
Here's the final image.
While studying this lesson, I made this picture.
Every photographer wants to make their photo unique and as beautiful as possible. To achieve this, various effects are often used to decorate frames. For example, recently it has been fashionable to add a glow in Photoshop, and this is not surprising, since the photo becomes incredibly beautiful. To verify this, you need to go through the lesson described in this article.
How to make an object glow in Photoshop?
After the previous steps, you can hide all layers except the oval area, which must be duplicated again. Next you need to draw the elements of the flash, again so that everything looks as natural as possible.
A bright glow is created near the circle in Photoshop. And to do this, you need to open the editing window, go to the menu and find the “Transform” function and then select the “Scaling” item. After this, you need to make a strip from a spherical object.
Creative work
The next step is the most interesting, as you can give free rein to your imagination and creativity. First, filters are applied to the strip.
The first is “Wave”, it is located in the “Filter” menu and in the “Distortion” sub-item. If the effect is not satisfactory, then using “Free Transformation” you can improve the result.
The second effect will be "Twist", which is located in exactly the same path as the previous item. All filters can be adjusted to your liking, so the result depends only on how developed the imagination and creative side of the photographer is.
You can also apply all the filters more than once to achieve the desired glow. To complete the picture, the layer with the main ball is turned on, and that’s it, the answer to the question of how to add a glow in Photoshop is completely given.
Lighting effects in Photoshop
Author: NON. Date of publication: February 09, 2012. Category: Practical advice.
Photoshop has a wonderful filter called “Highlight”, which allows you to create beautiful lighting effects in Photoshop.
on your photos and create absolutely fantastic collages.
But it has one feature that, unfortunately, does not allow it to be used as we would like. The point is that if you use it in a photograph, then it is almost impossible to change its parameters, and it is almost impossible to do it the first time in a way that is suitable for this photograph. Therefore, you have to cancel the filter and apply it again, but with different parameters. And this has to be done more than once. It seemed that there was a great way out for this case - create an empty layer and apply the Highlight filter on it, but, as it turns out, this filter does not work on an empty layer. What to do? In this practical Photoshop tip, we'll learn how to apply the Highlight filter on a new layer and thus gain greater flexibility in its application. Let's learn how to make lighting effects in Photoshop
.
Similar publications:
- Understanding the Fill slider of the Layers palette
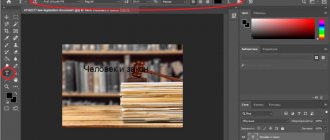
Let's open this original image. I just want to add some kind of glare or lighting effect to this picture of a starry galaxy.
Let’s create a new layer by clicking on the second icon from the right in the “Layers” palette. Let's go to "Filter - Rendering - Highlight".
A Photoshop warning window will appear, telling us that the Highlight filter cannot be applied to an empty layer. What to do?
Set the foreground color to black (press the “D” key), fill the new layer with black color - Alt+Delete and set the layer opacity to zero.
As described above, call the “Highlight” filter and set the parameters we need in the window - lens type and brightness. The question may arise: “Why did we set the layer opacity to zero in the previous step?” If we had not done this, then instead of the starry sky in the preview window we would have seen an area filled with black and, as a result, we would not have been able to position the highlight the way we needed, because you would not see any stars.
Now for the top layer, set the blending mode to “Lighten” and return the layer opacity to 100%.
We got a highlight on a new layer. So what does that matter to me, you ask me? And the meaning of this technique is that now we can apply various effects to the highlight, for example, paint it a different color using the “Hue/Saturation” window, apply free transformation, move it and do many more similar things. What we couldn't do if we applied the filter directly to the image. We have learned how to flexibly apply lighting effects in Photoshop
.
If you don’t want to miss interesting lessons on working with images in Photoshop and other useful materials, subscribe to the newsletter. The subscription form is below.
Seal
- Back
- Forward
Comments
0 Anna 04/30/2013 15:29 Why neither the glare nor the lighting effects still work when on the new top layer of black transparent color, these filters are not active
Reply | Reply with quote | Quote
0 R 05/01/2012 01:50 How can I change the color of the highlight? It turns out that the entire photo becomes a different color.
Reply | Reply with quote | Quote
0 Oleg 05/01/2012 12:37 The highlight is on a new layer and it’s easy to change its color, for example, with the “Hue/Saturation” command. If you change the color of the photo, then apply “Hue/Saturation” as an adjustment layer and create a clipping mask.
Reply | Reply with quote | Quote
0 Guest 02/10/2012 15:24 Very useful information!
Reply | Reply with quote | Quote
0 Victoria 02/10/2012 13:11 Very good advice! I'll take it into service.
Reply | Reply with quote | Quote
Update list of comments
Liked? Share:
Add a comment
Enter your name, or register on the site, so that your name is inserted automatically in the answers: it will take 2 minutes! After registering, you will be able to edit your messages and will not have to enter confirmation
.
To display an Avatar
(your picture), you must have an account on Gravatar at the same email address, it’s free.
JComments
Another way
The first points are exactly the same as in the first option. Create a layer and fill it in any way, you can use the background described above. After that, you need to apply a certain style to the image. To do this, right-click on the thumbnail and select “Gradient Overlay”, and then, for the second time, “Pattern Overlay”.
After this, they select a photo for which the glow is created. Photoshop lessons are actually very simple, the main thing is to be consistent and attentive.
Amazing glow special effect in Photoshop tutorial
In this tutorial I'll show you how to create a raised glow effect using styles, brushes, blending modes and curves. You will also learn some useful techniques.
§1. First, I created a new 600x600px document and filled it with a Radial Gradient from light brown (#922f00) to black (#000000).
§2. We need to select the center of the circle, for this we copy the layer with the created circle and change the blending mode to “Color Dodge”.
§3. Now we need to add a glowing effect, for this we will use a layer with a suitable background. Let's create a new layer and apply the filter Filter > Render > Clouds on it.
§4. Change the blending mode of this layer to “Overlay” and reduce the Opacity to 30%. It looks like we have achieved the intended effect, but we need to add a little more “haze”. To do this, apply the Filter > Sketch > Chrome filter with default properties, of course you can play with the properties, but the default properties are quite suitable for us. You can see the result in the following screenshot.
§5. To make some glowing lines we will use the Pen tool. It will be better if you do not overuse the anchor points, this will help to achieve smooth lines. We can achieve a suitable curve by changing its angles with the mouse. In the screenshot below, the stylized letter S rests on just three dots. Two points at the beginning and end, and one point in the middle to give the curve a curve.
§6. Once you have achieved a suitable curve, create a new layer. Then click on the paintbrush tool (, and change the brush to a 3 px brush without smoothing the edges.
§7. Now go back to the pen tool (P), and right-click on the curve and select the “Stroke Path” property. A dialog box will appear in front of you in which you need to change the tool to a brush (Tool: Brush), and make sure that you have o. This is very important because it is this property that creates the taper at the edges of the drawn line. Now right-click on the curve again and delete it (Delete path).
§8. You should get a similar narrow curve.
§9. Now we need to add a glow to the curve. The easiest way is to change the layer properties (layer style). First, we use the Outer Glow property with standard parameters. Another way we used to add glow is the Drop Shadow property. In addition, I used the Color Overlay property to highlight the center of the resulting glow with white color.
§10. Now you have one glowing line, but it will be great if we create several more lines using a similar method. The beauty of layer style is that in order to use the same properties on several layers, we just need to copy the style of the original layer to a new one. To do this, right-click on the layer with the style, select “Copy Layer Style”, then right-click on the new layer and assign the copied style to it by selecting “Paste layer style”.
§eleven. Now, using the methods described above, create some more curved lines. In the example, I made one line thicker than the others, using a larger diameter brush, and added one line as if connecting two shapes.
§12. Now let's add text with the same layer style as in the examples with lines. It will be very important to pay attention to the design of the text. You will need to choose the appropriate font, size, and distance between letters. Here I have styled three words by reducing the size and increasing the spacing between the letters in the words "ADVANCED and FX".
§13. Now, perhaps, let's add particles to the drawing. To do this, we will use a brush with a diameter of 3 pixels without smoothing the edges. Create a new layer and draw dots on it. The glow effect will be more visible if you use more dots in the center and make them bolder by double-clicking.
§14. Now we can colorize the resulting glow. To do this, create a new layer, filling it with a radial gradient from blue to transparent.
§15. Then change the blending mode of the new layer to “Color” and reduce the opacity to 50%. Now you can see how part of the glow has turned bluish. Let's add a few more multi-colored layers with similar properties to get a multi-colored glow.
§16. And now you got the result you were waiting for: a colored glow covered with haze. Remember this lesson, you can apply similar techniques anywhere, you can experiment with properties to get something truly excellent! Good luck!
photoshop lesson, photoshop lessons, photoshop lesson
Creating the highlight itself
For the next step you will need the Ellipse tool, which is found in Geometric Shapes. Select the color white and create a circle, which is what is required for the photo. After this, you should apply the “Gaussian Blur”, which is located in the “Filter” menu. In our case, a radius of 30 pixels was applied. Of course, it will be different for each photo. The main thing is not to be afraid to experiment.
Each photographer or designer at this stage can add his own effects that seem appropriate to him.
How does he work?
Neutral color, that is, one that does not have any effect on the image, for Soft Light
is 50% gray. The RGB channel values are 128, 128, 128.
If we apply a layer filled with 50% color to the image in Soft Light
, then the corrected image will not change in any way.
If the overlay color is lighter than 50% gray, the image will be lightened
, if darker than 50% gray -
darken
. Moreover, lightening and darkening occurs smoothly and naturally, without affecting the black and white points of the image, that is, the effect falls mainly on midtones, gradually decreasing towards deep shadows and high lights. It should be noted that the effect on shadows (both brightening and darkening) is somewhat stronger than on highlights.
The interaction with this overlay mode is channel-by-channel, that is, if the values of the overlay color are different across channels, then the effect, accordingly, will be different in each channel.
For example, let’s overlay a 50% gray layer with a color with RGB channel values of 250, 128, 20 in Soft Light
The gray layer has equal brightness of the RGB channels, as can be seen in the image below
The overlay layer has a light red channel, 50% brightness green channel, and a dark blue channel.
After blending in Soft Light
the channels look like this:
The red channel became lighter, the green channel remained unchanged, and the blue channel darkened somewhat. Moreover, the effect of the Soft light
in areas darker than 50% the gray is slightly stronger.
Sparks
To make a bright glow in Photoshop seem as natural as possible, you need to create sparkling threads. And to do this, choose a new brush with a soft white outline. You can navigate using the settings shown below, but don’t forget that the most important thing is to do as your creative side dictates. And, of course, the entire image should look as natural as possible in the final result.
After this, sparks are drawn, and the “Outer Glow” effect is added to the layer. To do this, right-click and select the required item.
And here, again, the will of fantasy opens up. All settings can be adjusted according to taste.
Monochromatic glow
The final version looks like this:
It is also called “magic” or “fairy-tale” glow . No matter how the name changes, you will have to work with the same set of tools. You should also understand that this method is good for specific examples and knowing it, you can remember about a single-color glow when appropriate. The proposed example does not reveal the full beauty of the effect. Here's an excellent way to use this method:
The same steps were used, but with proper selection of colors and source images, the results differ tenfold. The method itself is applied as follows.
the background layer (original) unchanged. Create a new one and fill it with the required color.
Open the “ overlay options ” by right-clicking (RMB) on the desired layer and selecting the appropriate section.
Here we need to set the following settings:
- for " gradient ":
- open the selected line and set the necessary control points (approximately as shown in the image):
- Now change the “ pattern overlay ” to the following values:
- in the selected window (“pattern”) you should select empty space .
Add the required element (another picture) to the work field.
Now we place the “ellipse” shape with a white fill . The fill color is selected using the foreground color setting, and the shape is selected in the corresponding section.
On the shapes tab, you need to select the Ellipse itself , otherwise a square or the last used shape will be added.
Creating a portrait or photo in pop art style in Photoshop
Add a Gaussian blur to .
To do this, open the tab “filter” - “blur” - “Gaussian blur” .
You will need to experiment with the settings to get the desired result. The size of the blur is directly related to the size of the image. For a 500x500 image, the 40 pixel option is selected.
clear rules regarding the choice , just visually see how the picture looks better.
Create a group and move Ellipse into it . It’s better to do some kind of marking right away, since there can be several groups , especially when fully processing a large image. Since this is not required for the purposes of the example, the group remained nameless.
In the specified group , add a new layer . Open the brush tool and select its settings.
You will need to set the following settings:
- Basics . Point size – 9 (can and should be changed depending on the size of the image); Hardness – 100%; Intervals – 375%.
- Dynamics of shape . Size variation – 100%; the minimum amount is 4%.
- Scattering . Dispersion – 1000% in both axes; counter – 2; counter fluctuations – 100%.
Using a brush, add dots to the image . Since we made the tool trigger randomly, by canceling and reusing the brush you can achieve the best results.
inner glow ” to the layer with the brush To achieve full shine, set the following settings :
Making smoke
This step is optional, because not every photo will look good with this conversion. But still, sometimes smoke greatly enhances the bright glow in Photoshop. First, create a new layer. By the way, it’s better to call each frame by its name in order to navigate them well. It’s better to choose the “Base Lightening” mode to get a discreet, mysterious pattern. After this, you need to use the Lasso tool with a feather of at least 40 pixels. Then the area where the fog should be located is selected. Then they set the default colors, which are black and white. This is necessary in order to create clouds. You need to go to the “Filter” menu, then find the “Rendering” sub-item and select the required parameter.
Tip: Clouds can be completely different, and to achieve the ones that look best in the image, you can repeat the step described above several times. If the result is not satisfactory, then you can take an eraser and improve it. And also use a parameter such as “Opacity”.
Multi-colored glow
It has a brighter, richer effect that looks best in photos that show movement. However, even in a static picture (the main thing is that it is in color) you can achieve interesting results.
This technique is used as follows:
- to select the necessary part in any convenient way . The specific example uses the Magnetic Lasso , although there are many variations.
- Having completed the selection, right-click inside the selected area and set the “feather” 1 .
- Copy the image to a new layer and immediately duplicate the layer . On the copy, you need to set the Brightness/Contrast along the “Images” - “Correction” path to make the work “brighter”.
- Now let's set blur on the original layer (not copies of it). For this:
- open “Filter” - “Blur” - “Motion Blur” ;
- set the following settings:
- merge the copy and the original layer.
- Create a new layer on which, using the Lasso , select the area around the image and set the feathering to 150px.
- Create a new layer, which we move under the layer with the picture. Open “filter” - “rendering” - “clouds” . In the blending parameters, set it to “overlay”.
Removing unnecessary objects in Photoshop - useful tools and their use
Important! In this case, the colors should be “white” and “black” . Otherwise, there is a risk of ruining everything.
- Create another layer and move it under the last created one. Using the “ gradient ” tool, set the following values (simply by clicking on the tool itself in the upper left corner):
- In the layer properties ( blending options ) set the opacity to 60%.
- We repeat the brush settings and adding “drops” from the previous method.
- Create a new layer and then work with it. Select the “ polygonal lasso ” and repeat the following procedure several times: draw a triangle and draw its lower side with a regular brush. The number of times the procedure is repeated is the number of strips that will fit on the image. Here you can experiment.
- Create another layer . Select any “ soft brush ” in the settings and set the following (or something else at your discretion):
- On the same layer, use the pen to draw several lines. Right-click and select “ Stroke path ”, where we set “ Simulate pressure ”.
- In the layer style (overlay options), select “ outer glow ” where we enter the following parameters:
- We arrange the layers by raising the image (its copy) to the very top. You may need to change the settings of some layers .
How to make a neon glow in Photoshop?
The previous two examples of creating highlights are more suitable for the designer, since it is very rare that they can be adjusted beautifully to the photo. The example presented looks incredibly aesthetically pleasing in almost any image. But besides this, creating a logo will also complement this effect.
First, you should create a new layer on which the initial manipulations will take place. You need to add a “Radical Gradient” to the frame. You can choose any color, the main thing is not to make too bright accents. In this example, the following combination was used: #303e4a and #151515. If the photographer has already chosen the photo he is going to work with, then the colors should be close to the shades in the image. All this is necessary in order to make the neon glow as realistic and natural as possible.
Now create the outline of the effect itself, in this case it is a circle.
After rasterizing the image, you need to right-click on the thumbnails and select the following options:
- “Color overlap” - for this item a white tint is taken, it is this that conveys the center of the neon tube.
- “Embossing” - this effect is already conveyed by glass, and therefore it should be used as gently and unnoticeably as possible. Here it is worth experimenting and choosing those values that will be most pleasing to the eye.
- “Inner Shadow” - here you select shades that will reflect the color of the effect itself. That is, if you need to make a pink glow, then take the same palette.
- “Inner glow” - it must be selected so that there is a soft transition between white and the main color.
- “External glow and shadow” - the parameters are responsible for how the effect is applied to the entire image as a whole.
Using these simple steps, you can create a glow in Photoshop, as if a real professional had worked.
The process of creating a glow
See also: “How to make a portrait in pop art style in Photoshop”
The method described below is based on layering, using the Selection function with special settings, as well as blur tools and layer style settings. Let's start creating a glow effect using text as an example.
- In the created document (the background of which, for example, is filled with black), using the “Text” tool we write an inscription, which is the basis for creating a glow effect.
- Using the “Layer…” tool (Tab “Layers”, group “New”), create an empty layer.
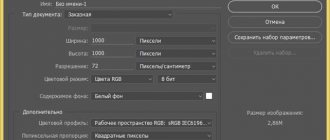
Note: You can also create a new layer by clicking the special button at the bottom of the layers palette.
- In the window that appears with the layer parameters, simply click OK.
- Hold down the Ctrl key on your keyboard and left-click on the text layer icon in the Layers panel to create a selection.
- Now we need to expand the created selection. To do this, select the line “Expand” (Tab “Selection” – group of tools “Modification”).
- In the area selection parameters, enter a value from 2 to 5 pixels and click OK.
- As a result, we see an expansion of the selection boundaries and now you can switch to a new layer (in our case, Layer 1).
- Next, you need to fill it using the appropriate tool, for which we press the combination Shift + F5.
- In the settings window, click on the drop-down list of the “Content” parameter and select the “Color” line. In the color palette that appears, make the previously selected color lighter and click OK both in the palette itself and then in the “Fill” window.
- Blur the layer using a special filter – “Gaussian Blur”. It is located in the “Filter” tab, in the “Blur” tool group.
- Set the blur radius, visually controlling the resulting effect.
- Cancel the selection (the corresponding function is in the “Selection” tab).
- Using the left mouse button held down, move the blurred layer under the text layer.
- In the layers palette, double-click on the text layer with the left mouse button (not on the inscription itself, but on the free area to the right of it, since otherwise you will be prompted to simply rename the layer).
- In the layer style settings window that appears, select the “Emboss” tool and adjust the “Size” and “Softening” parameters. If necessary, you can “play around” with other parameters, visually tracking the result.
- After clicking the OK button, we will get the result in the form of the created glow effect.