Reasons for the error: “Windows cannot connect to the Wi-Fi network”
A problem connecting to a wireless network with the error message: “Windows cannot connect to a Wi-Fi network” can occur with a previously successfully configured connection, or with a newly organized one. There may be several reasons:
- malfunction of drivers that do not correspond to the recommended ones or could be accidentally damaged during system operation;
- the router has changed or reset its settings;
- operation of anti-virus software or firewall (firewall);
- a conflict of both hardware and software, while it is impossible to clearly identify it.
Note! If the problem lies in the physical inaccessibility of the adapter (solutions will be discussed below), the above error associated with the fact that the computer cannot connect to this WiFi network on Windows 10, 8, 7, etc. will not occur .
Instead, the information panel will show the corresponding missing device information.
Fixes
The first step is to check that the physical connection to the router and the adapter to the laptop are working properly. Check all cables for fractures and damage. If the problem is not resolved, you need to move on to the next steps.
Network diagnostics
To diagnose, before eliminating the “cannot connect to the Wi-Fi network” error, you need to go to the network environment settings and click on “ Network troubleshooter ”.
When you run diagnostics, the process of identifying problems with your network connection will begin. After a few minutes, the tool will either find some problems or not. If a problem is found, Windows will offer the best solutions to fix it.
Checking the “Network Security Key”
A very simple way to solve network problems is to enter the password correctly. If such problems occur, you should always check that the security key you entered is correct.
To do this, you need to enter the IP address of the router and enter the password and login (you can read more about this in our article).
Next, you need to go to the “ Security ” item and find “ WPA/WAPI/PSK Password ”, there you will already need to look at the network security key. If the key does not differ from the one entered during connection, then you need to move on to the following methods of solving the problem.
What to do if the dynamic library comctl32.dll is missing in Windows 7
Driver Update
The Wi-Fi adapter constantly needs to update its driver. An outdated driver may be causing the "cannot connect to Wi-Fi network" error when connecting to a wireless network. To solve this problem you need to perform a number of actions:
- First you need to open "Control Panel»;
- then select “device Manager»;
- the next action is necessary select model wireless adapter and click on “Update drivers»;
- After these steps the driver update , after which you need to restart the computer.
Reconfiguring the wireless connection
Settings failure is a common cause of the “cannot connect to this network” error. To restore settings:
- Find the buttonnetwork and sharing center» on the control panel.
- Click on "Change adapter settings».
- Click on the wireless network connection and click on “properties».
- Click on "internet protocol version 4" and go to properties.
- Check the box next to “ Obtain an IP address automatically ” and “ Obtain DNS server address automatically ”.
Troubleshooting using the Event Log
If the methods described above did not help fix the error “cannot connect to the Wi-Fi network,” then this is a “special case.” To find out the reason, you need to use the event log. To fix problems you need:
- Right-click on the "My computer" choose "Control».
- Click on "Utilities/Event Viewer».
- Then select the tool "log filter» and mark all sources related to connecting to the Internet.
- Next in the list of events you need to find those that marked with a red icon, click on them and find the line “event code».
- Thanks to this code, you can find out the problem and fix it.
Why does my Android phone battery drain quickly?
Restarting the adapter
If everything is fine on all other devices, and the computer connects only when the network cable is connected, then it’s time to check the adapter. To do this you should:
- Click on “ My Computer ”, go to the “ Start ” menu and open “ Properties ”.
- Next, click “ Device Manager ”.
- Open the list of devices and click on “ Network adapters ”.
- You need to select the one you need and delete it.
- Click on the "update configuration", the removed adapter will again appear in the list of available ones, but with the correct driver.
These were the most popular errors and ways to solve them. If none of the methods work and solve the problem, then you should contact a specialist and look for problems in the computer itself.
Network diagnostics
Review and configuration of the D-Link Dir-320 modem
When Windows fails to connect to WiFi, these operating systems provide a special set of tools called the Network Diagnostic Framework (DMF) to diagnose the Network. To start it you need to do the following:
- open “Control Panel”;
- find the “Troubleshooting” section;
- in the interactive output area, the system itself will write information about the error that has occurred, after which you can launch the “Windows Network Diagnostics” utility using a hyperlink.
By the way! The “ping” and “tracert” commands are useful when carrying out diagnostic procedures to identify network errors. They should be executed from the command line (“cmd”) as follows: “ping 8.8.8.8” and “tracert 8.8.8.8”.
In the first case, information will be received about the actual presence of a connection with the specified resource, in the second - the number of nodes traversed before reaching the final goal.
Checking the “Network Security Key”
An incorrect security key is one of the most common errors due to which Windows 10.8 and Windows 7 will not connect to a WiFi access point. The simplest solution is to do the following when entering your password:
- uncheck the box next to the phrase “Hide symbols”, which will allow you to visually determine the cause of the malfunction;
- if necessary, switch the layout to the desired language or remove the upper case (press the Caps Lock button);
- If the error is successfully detected and corrected, repeat the connection step.
What are the differences between 3G and 4G networks: features, advantages and disadvantages
If you cannot remember the Network security key, you must follow the general instructions:
- go to the router’s management interface by connecting to it using the LAN port;
- go to WiFi settings;
- in the password input field, disable hiding characters;
- enter the received correct password in the request to connect to the wireless access point;
- reconnect.
By the way! This procedure can be simplified if there is a device nearby with successful WiFi access settings:
- On equipment running Windows, you need to go to the “Network Connections” section, select the desired wireless adapter, open the context menu by right-clicking and go to the “Status” dialog box. In it, go to “Wireless network properties” - the “Security” tab, check the “Display entered characters” checkbox.
- On Linux family systems, you need to go to “Settings” - “System Settings”, where you find the WiFi section, select the desired Network, go to its settings and perform actions on the “Security” tab similar to the previous section. It’s even easier to find out the encryption keys through the command line by entering the command sudo grep psk= /etc/NetworkManager/system-connections/* (if connections are managed by NM), where at the end of each entry there will be a section like psk = PASSWORD.
- On portable devices running Android, you need to go to the system settings, select WiFi connections. Clicking on the name of the Network of interest will bring up a QR code that needs to be scanned by the connected device. If this is not possible, you need to take a screenshot and scan it with a connected device, the result will be a decrypted access key.
Installing (updating) the wireless Wi-Fi adapter driver
Problems with Wifi on LG Smart TVs: finding the cause and solving the problem
To understand whether the procedure for installing a driver or its updated version is necessary, you need to perform simple diagnostics that identify the presence of errors in the software part of the wireless device. To do this you will need:
- find the “My Computer” icon (on the desktop, in the “Start” menu or the “Search” line), open the context menu by right-clicking, select “Properties” - “Device Manager”;
- Among the displayed list of equipment, find the line “Network adapters” and in it a module containing “wireless” or “wireless” in the name;
- identify the type of indicator: if an exclamation mark is displayed on the label, the driver is not working correctly.
- call the context menu for the wireless adapter icon, click properties and go to the “General” - “Device Status” section, analyze the displayed error.
If incorrect operation of the driver is detected, it must be reinstalled (updated):
- download the distribution kit from the website of the adapter or motherboard manufacturer using a third-party device;
- transfer the received file to the desired device using a USB memory, either over a network via Ethernet or Bluetooth;
- if the file is made in the form of a binary package (*.msi, *exe), you need to run it and follow the installation instructions;
- if the drivers are distributed as a set of libraries (*.dll), you need to call up the context menu for the module of interest in the device manager, select “Update driver” - “Search for drivers on this computer” (manually), then specify the path to the unpacked folder and click “Next”;
- After successful installation, restart your computer and proceed to setting up the connection to reconnect the device to the wireless access point.
If your computer can't connect to a working Wi-Fi network
Often laptops are equipped with additional function keys for controlling devices: sound, touchpad, wireless adapter. Try to find the button with the Wi-Fi icon in the top row of the keyboard (F1 - F12) and press it simultaneously with the Fn key (bottom row). If the adapter does not work (it was turned off by accident, or to reduce power consumption), then after pressing this combination it will work again. You can check whether the adapter is turned on using the wireless icon near the Windows clock: a cross on the icon or the absence of an icon indicates that the adapter is turned off.
When the wireless network works on other devices, but in the Windows tray the wireless network icon is crossed out (or is completely absent) - the problem with Wi-Fi lies in a specific computer, and not in the network itself. This means that only this device fails to connect, but the Wi-Fi itself is operational. If the icon is marked with a yellow-orange dot, then try clicking on it and looking for the name of your network. It was found, but when entering the password an authentication error pops up? The problem is the wrong layout, the Caps Lock key pressed, or simply the wrong password.
In the case of a desktop PC, you must physically remove and reconnect the Wi-Fi adapter (usually a device the size of a flash drive, connected to the USB port at the back of the case). If the adapter is a built-in type (or we are talking about a laptop), try checking its functionality: right-click on “My Computer” / “Computer” - “Properties” - “Device Manager”.
Take a look at the “Network adapters” section: if one of them, especially those with the word Wireless in the name, is marked with a question mark, exclamation mark or cross, then the problem is a conflict between this device and Windows or with another PC node. It is enough to download the latest drivers for the wireless adapter and install them again - after this operation, the computer usually sees the network again.
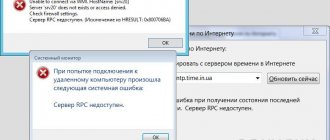
In this case, an attempt to click on this control causes a message: unable to connect to the network.
The adapter is definitely turned on, the drivers are installed and there is no hardware conflict in the Device Manager, but the Internet still does not appear on the computer? There is probably a software problem with the networks. Let's check in the Windows Network Connection Center whether the OS considers this adapter to be enabled.
Fig: Windows Network Sharing Center
In the left part of the Center you need to select the “Change adapter settings” section. All Windows network adapters will appear in the next window. Take a look at the screenshot below: the wireless adapter in this case was turned off by software (highlighted in gray). In this case, the Internet does not work solely because the adapter is turned off. To enable it, just right-click and select “Enable”.
Fig: Software enable the wireless adapter
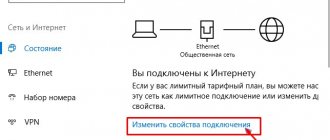
Finally, sometimes Wi-Fi experiences network incompatibility issues between devices. The router refuses to connect to the IPv4 protocol parameters that Windows offers it. You should “submit” to the router and give it the right to independently assign the network configuration. It sounds complicated, but in practice it's just one small adjustment.
Fig: Resetting the network adapter configuration in Windows
In the Network and Control Center, you need to select the current wireless connection, find the “Properties” item in it (screenshot on the left). In the dialog box that appears, find “Internet Protocol Version 4” and select “Properties” again. A window with IP address parameters will open. It is recommended to select automatic network configurations - so that the router can independently assign IP and DNS addresses (screenshot on the right). This method helps especially well if manually entered network addresses were visible in the window as in the right screenshot. This configuration is incorrect, and the computer does not see the network.
Setting up a wireless connection
It also happens that in different situations static or dynamic methods for issuing IP addresses are used. In this case, you need to configure the properties of the wireless network adapter accordingly:
- Open the Network Connections control panel. You can do this in many ways: through the “Control Panel” - “Network and Internet”, the Network icon in the lower right corner, through the search bar.
- Select the desired adapter and right-click to open the context menu, go to properties and the “Network” tab. The list of available components will include IP version 4 (TCP/IPv4) and IP version 6 (TCP/IPv6), depending on the network settings (you can find them out from the administrator or in the “Control Panel” of the router), you need to select the required one and also through context menu go to properties.
- Specify the method for obtaining the address - dynamic or static (manually), in the second case you will need to enter the IP value, subnet mask, gateway and one or two name server addresses (usually the main one is the same as the router, and the backup one is taken from a third-party server, for example, “google - 8.8.8.8").
- Apply changes and close windows.
How to fix?
The first action for any problem is to restart your computer or laptop and router. It often helps if you have no idea about the reason.
If it doesn’t help, we start remembering. Maybe they changed the password? Let's try to enter it again. If the password has already been saved and does not allow you to enter it again, you can simply “forget” this network.
Windows 10
Follow the instructions for Windows 10:
- Go to “Network and Internet Settings”. To do this, left-click on our network and select this item:
- Wi-Fi – Manage Known Networks
- Select our network and click the “Forget” button
Now you can try to reconnect to the network and enter the current password!
Windows 7
On Windows 7 this is done in a similar way:
- Through the same network icon we get to the “Network and Sharing Center”
- Wireless Network Management
- Removing a known network
The above methods are also relevant for Windows 8.
Diagnose and resolve network problems
If the problem with the unavailability of the wireless network cannot be solved by all of the above methods, you will most likely have to resort to system diagnostics. In most cases, the OS offers to do it automatically, otherwise you should launch the assistant, as described in section 2. After this, you just need to follow the instructions that appear on the screen.
By the way! Before reconnecting to Wi-Fi, perform diagnostics several times, since Windows sequentially searches for possible causes and does not always immediately find a solution to the problem.
Initial phone check
If your device is not connecting to Wi-Fi, first check if your phone is working properly. And although manufacturers are now actively working to improve the stability of mobile OSes, they can still fail from time to time.
The action algorithm for devices running Android, iOS and Windows Mobile OS will be the same. Follow this procedure:
- Restart your phone and try to connect to the access point again.
- Pay attention to the number of connection signal level indicators. If the number is less than 3, then you may be too far from the router. Come a little closer.
- Make sure the Charge Saver mode is disabled. If necessary, connect the network adapter.
- Turn off Bluetooth on your device. Because it can interfere with a correct connection.
- Make sure Airplane mode is turned off.
- Allow access to your location information and connect to your wireless network again. In some countries, Wi-Fi connection is blocked if this feature is disabled.
Finding a solution by viewing the Windows Event Log
It is logical that in order to solve a problem, you must first determine its cause. In operating systems of the Windows family, there is a diagnostic event log for this purpose, which is launched and operated as follows:
- find the “My Computer” icon and select “Management” through the context menu;
- in the list located in the left column, you need to select the line “Event Viewer” - “Windows Logs” - “System”;
- in the right column, in the filter of the current log, set the keywords “network”, “IPv4”, “IPv6”, “adapter”, and the resulting output will display messages with a marker in the form of an exclamation mark (warning) or a red cross (error) );
- select the required entry (usually the newest one), double-click on it with the left mouse button, a window will open containing a description and error code;
- Based on the meaning of the received code, you can find instructions for solving the problem;
- After eliminating the cause, you need to connect to Wi-Fi again. Run network diagnostics.
Complete reboot of the Wi-Fi driver
To completely update your wireless device driver, you must follow these steps:
- in accordance with point 4, go to the properties of the wireless adapter;
- On the “Driver” tab, click the “Details” button;
- the paths to the library files will appear in the window that opens; you need to remember them (for example, you can take a screenshot of the screen or copy it to a text file);
- return to “Device Manager”, select the wireless module and right-click on it, select “Uninstall device”;
- without restarting the computer, delete files located in previously remembered paths;
- restart the computer, after which the WiFi module will be detected as an unknown device;
- install new drivers in accordance with paragraph 4 of this article.
Clear registry entries for network settings
If the above simplest method didn't help, then it's time to take another step and clean up entries related to Wi-Fi networks using Registry Editor. This is the most common source of problems and this method should help in most cases.
Press the Windows key + R key combination and enter the following command in the run window:
freeze
Confirm the command. A Registry Editor window will open. On the left side of the window you will find folders with registry keys. Developing the relevant ones one at a time, proceed to the following path:
HKEY_LOCAL_MACHINE\SYSTEM\CurrentControlSet\Services\Tcpip\Parameters\Interfaces
Expand the "Interfaces" button. Inside you will find many minor keys with long names. Remove them all by right-clicking each one in turn and selecting the Remove .
At the end you will only get an empty "Interfaces" - you can leave it. Close Registry Editor and restart your computer. Try connecting to a Wi-Fi network. It should now work correctly.