By Andrey Share
Sysprep is a standard tool that helps with the deployment of new Windows. In a corporate environment, it is not acceptable to manually configure all the settings on subordinate computers, of which there may be 100 or more. To automate the process, special programs are used, created on the basis of ready-made operating systems (OS). However, a snapshot of one computer cannot work on another device without appropriate adjustments. The Sysprep utility helps to do just that. Below are S ysprep Windows 10 step-by-step instructions .
Sysprep – what is it?
Most programs by default are tied to hardware or a specific OS distribution. If you transfer utilities in the form in which they are on another PC, most likely they will not be able to work and will generate errors.
Sysprep is needed in order to remove such binding and ensure smooth operation of applications with the new software environment. To do this, the tool cleans the drivers of individual components, resets the SID, clears the system log, removes the contents of the temporary Temp folder, formats recovery points and resets activation (maximum 3 times). The main task of the utility is to ensure that the operating system is clean, but with preset parameters.
How to run SysPrep after upgrading Windows
I encountered a strange error when trying to run SysPrep on an already installed system that was planned to be used to create a reference image for deploying Windows 10 using System Center Configuration Manager 2012 R2. When running SysPrep, an unexpected error appears:
Sysprep was unable to verify the Windows installation. For more information, see the log file %Windows%\System32\Sysprep\Panther\setupact.log. Once the problem is resolved, test the installation again using Sysprep.
In the English version of Windows 10 the error is similar:
Sysprep was not able to validate your Windows installation, Review the log file at %Windows%\System32\Sysprep\Panther\setupact.log for details. After resolving the issue, use Sysprep to validate your installation again.
Let's open and analyze the errors in the Sysprep setupact.log utility log file. The following line immediately catches your eye:
2016-08-01 10:22:51, Error [0x0f0036] SYSPRP spopk.dll:: Sysprep will not run on an upgraded OS . You can only run Sysprep on a custom (clean) install version of Windows.
Those. The error explicitly states that it is not allowed to run Sysprep on systems that were upgraded from a previous version of Windows. In our case, this is exactly the case: one system was obtained by upgrading from Windows 7 to Windows 10, the second through an upgrade from Windows 8.1. Indeed, according to knowledge base article KB828287: Microsoft does not support the use of Sysprep to create images for Windows installations that have been updated through upgrade mode (installing the SP is not considered an upgrade). Windows only allows sysprep to be performed on systems resulting from a clean install. Is it really necessary to reinstall the system from scratch in this case?
I managed to find a simpler solution. Using Process Monitor with a filter for the sysprep.exe process and comparing clean and “updated” Windows 10, we were able to obtain a list of registry keys that are checked by Sysprep at startup to determine whether this system is clean or “updated”. So, what needs to be done to reset the “updated” system marker for Windows 10, which is checked by the Sysprep utility (everything is similar for other versions of the OS):
Important . The technique described below is not officially supported by Microsoft, and there is no guarantee that future problems will not arise with the system image obtained in this way.
- Open Registry Editor ( regedit.exe )
- Go to the HKEY_LOCAL_MACHINE\SYSTEM\Setup\
- Delete the Upgrade (if any) and the parameter named Upgrade
- In the HKEY_LOCAL_MACHINE\SYSTEM\Setup\Status\SysprepStatus , set the CleanupState to 7
- All that remains is to restart the computer and try SysPrep again
Advice . In the case of Windows 10, in order for SysPrep to work, we additionally had to remove all non-standard Modern applications that were individually (not in provision mode) installed from the Microsoft Store by system users.
This can be done by deleting all user profiles (if applicable), completely deleting all Metro applications for all users (not a recommended method), or manually deleting such applications. The last option is implemented like this:
- Let's get a list of all installed Metro applications in the profiles of all users (we are only interested in packages with the Installed status): Get-AppxPackage -AllUser | Format-List -Property PackageFullName,PackageUserInformation
- And sequentially removing them this way: Remove-AppxPackage -Package . Or like this: Remove-AppxProvisionedPackage -Online -PackageName
How the utility works
Simply put, Sysprep helps free Windows from being tied to specific PC components. All adjustments, such as removing drivers, temporary data, and others, are carried out without changing user settings. The utility does not affect previously installed programs, shortcuts, OS personalization and similar areas.
Initially, the user must create a reference Windows OS on one computer. Then its image is formed, which includes software, global system settings, and user rights. And only now we need Sysprep to eliminate application bindings to hardware. The last step is to use the program to create a backup. When the image is ready, we can quickly deploy it on any computer with virtually no human intervention. The system administrator will only need to install the correct drivers for the equipment. If necessary, we can add additional software for a specific device.
How to force sysprep to run?
The program is launched according to the following algorithm:
- Press the Win + R keys . Run command window will open .
- Enter the name of the utility and confirm.
- The folder with the utility will open . Double-click on sysprep.exe.
- A utility with settings will appear .
How to Create a Sticky Note on the Windows Desktop to Store Your Notes
You can run the program via the command line. For this:
- Open the Run by pressing Win + R.
- Enter “ cmd ” and confirm.
- In the console, enter the command: “%windir%\System32\Sysprep\Sysprep.exe ”. Press " Enter ".
- A utility window will open.
Sysprep Windows 10: instructions for use
The utility has basic functionality and an interface that has several available parameters. However, a more practical way for most specialists is to launch through the console using additional keys.
Sysprep commands:
- /audit – switch to audit mode for integrating programs and drivers.
- /generalize – system preparation stage, it must be used before the image is formed. Now IDs, rollback points and other things are being deleted.
- /oobe – restart with an immediate transition to the welcome screen to create and configure profiles and PC names.
Now, in practice, we will consider 2 main actions with Sysprep: restarting activation and removing hardware binding.
How to reset OS activation:
- Go to the path C:\Windows\System32\Sysprep and run the sysprep.exe file.
- In the next window, select the “OOBE” mode.
- Activate the “Prepare for Use” option and select the “Reboot” option.
- We set the appropriate parameters and can also create a user.
Creation of independent software:
- Launch the utility and select the “OOBE” option.
- We put the selection in the “Shutdown” position without noting anything else.
- When the PC is turned off, we can change components or create a backup.
- Turn on the computer and make the necessary settings.
Instructions for working with Sysprep
The utility has a simple graphical interface that allows you to select the desired parameter from a drop-down list. System administrators prefer to run the tool via the command line using parameters. Sysprep in Windows 10 supports launching with the following basic keys:
- /audit – audit mode, which allows you to integrate drivers and applications into the system;
- /generalize – mode of preparing the system for creating an image with deleting all identifiers, logs and recovery points;
- /oobe – Restarts the computer in Welcome screen mode, allowing the administrator to create new accounts, rename the PC, and so on.
Now let's move on to the practical use of Sysprep in Windows 10. The main capabilities of the utility are demonstrated below.
Reset activation
This function is used to extend the life of Windows with trial licenses, unbind from the current activation and remove the embedded key. The algorithm of actions is as follows:
- Go to the location C:/Windows/System32/Sysprep;
- Run the executable file sysprep.exe ;
- In the window that opens, select the transition to the OOBE window;
- Check the box “Preparation for use”;
- In the shutdown options, specify reboot and click OK;
- Configure Windows settings in the Welcome window and create a new user.
Decoupling from hardware components
It is used when creating a reference image for subsequent deployment on client computers, as well as before replacing components.
- Run the utility from the location above;
- Select to go to the OOBE window;
- In Shutdown Options, select Shutdown. Leave the “Preparation for use” checkbox unchecked and click “OK”;
- After turning off the computer, perform the necessary actions - replacing components or capturing Windows into an image from a LiveCD;
- Boot your PC normally and repeat the steps in step 6 above.
If components were replaced without using Sysprep, and this led to a conflict between the old driver and the new one, run Sysprep in the component-unbinding mode, but choose reboot instead of shutting down.
Configuring a Windows image in audit mode
Used by system administrators to create a system image that will then be deployed to corporate computers using a response file that automates the deployment procedure. Ordinary users may need the Sysprep audit mode to gain access to Windows accounts and settings from the built-in Administrator account.
- Run the utility;
- Select from the drop-down list to switch to system audit mode;
- In the shutdown options, specify reboot and click OK;
- After authorization under the Administrator account, perform the necessary actions;
- If the audit mode was selected for the purpose of creating an image, do not close the Sysprep tool that automatically starts, but make the settings you need and select the OOBE mode to decouple from hardware components.
Windows 10 Audit Mode
Audit is a special mode required for system administrators when generating a reference system image. In the future we will be able to use it for automatic OS deployment. For ordinary users, the utility will be useful for starting the system with the rights of the pre-installed Administrator.
How it works:
- Open the utility by analogy with the instructions above.
- Select the “Switch to system audit mode” mode.
- Select the “Reboot” option and click on the “Ok” button.
- We are waiting for completion of authorization with Administrator rights and carry out the desired procedures.
Notes on Information Technology
When you need to periodically install Windows with the same set of programs and settings, you can prepare your own Windows installation WIM image. Having created your image once, all subsequent installations will save your time.
Let's look at how to do this using Windows 10 as an example.
- You have VirtualBox or VMware Workstation installed on your computer.
- Windows ISO image downloaded.
Create a new virtual machine.
Install the Windows operating system (OS) on the virtual machine. During installation, create a user, for example, user.
After the OS installation is complete, install VirtualBox Guest Additions (or VMware Tools) and reboot.
Install programs , for example, Office, 7z, Adobe Reader, Google Chrome, K-Lite codec pack, Skype, etc.
Launch Word and select the Install updates checkbox.
Set the time zone: Date and time settings -> Time zone .
Open: Device Manager -> IDE Controllers. Replace the Intel(R) driver with a standard dual-channel controller .
Go to: Control Panel -> Regional Standards -> Advanced -> Current language of programs that do not support Unicode -> Russian. Reboot.
Disable tracking in Windows 10 . Launch a command prompt with administrator rights and run:
sc delete DiagTrack sc config DcpSvc start=disabled echo "" > C:\ProgramData\Microsoft\Diagnosis\ETLLogs\AutoLogger\AutoLogger-Diagtrack-Listener.etl reg add "HKLM\SOFTWARE\Policies\Microsoft\Windows\DataCollection" /v AllowTelemetry /t REG_DWORD /d 0 /f
Remove unused built-in applications in Windows 10. Launch Powershell with administrator rights and run:
Get-AppxPackage Microsoft.Appconnector | Remove-AppxPackage Get-AppxPackage Microsoft.SkypeApp | Remove-AppxPackage Get-AppxPackage 9E2F88E3.Twitter | Remove-AppxPackage Get-AppxPackage Microsoft.ConnectivityStore | Remove-AppxPackage Get-AppxPackage microsoft.windowscommunicationsapps | Remove-AppxPackage Get-AppxPackage Microsoft.Messaging | Remove-AppxPackage Get-AppxPackage Microsoft.Getstarted | Remove-AppxPackage Get-AppxPackage Microsoft.WindowsPhone | Remove-AppxPackage Get-AppxPackage Microsoft.3DBuilder | Remove-AppxPackage Get-AppxPackage Microsoft.CommsPhone | Remove-AppxPackage Get-AppxPackage Microsoft.BingFinance | Remove-AppxPackage Get-AppxPackage Microsoft.MicrosoftSolitaireCollection | Remove-AppxPackage Get-AppxPackage Microsoft.BingNews | Remove-AppxPackage Get-AppxPackage Microsoft.BingSports | Remove-AppxPackage Get-AppxPackage Microsoft.People | Remove-AppxPackage Get-AppxPackage Microsoft.WindowsAlarms | Remove-AppxPackage Get-AppxPackage Microsoft.MicrosoftOfficeHub | Remove-AppxPackage Get-AppxPackage Microsoft.Office.OneNote | Remove-AppxPackage Get-AppxPackage Microsoft.Office.Sway | Remove-AppxPackage Get-AppxPackage Microsoft.XboxApp | Remove-AppxPackage Get-AppxPackage Microsoft.WindowsMaps | Remove-AppxPackage Get-AppxPackage Microsoft.BingWeather | Remove-AppxPackage Get-AppxPackage Microsoft.ZuneVideo | Remove-AppxPackage Get-AppxPackage Microsoft.ZuneMusic | Remove-AppxPackage Get-AppxPackage king.com.CandyCrushSodaSaga | Remove-AppxPackage
Get a list of all Windows online apps with the command:
Get-AppXProvisionedPackage -online | Select PackageName
Then remove all programs except Photos, Calculator, Camera, Store using the following commands:
Remove-AppxProvisionedPackage -online -PackageName
To install updates on Windows and Office, I reboot every time until all the updates are installed.
Shut down the virtual machine and make a clone of it (if there is no second virtual machine with Windows 10 or ADK Windows 10 installed).
Enable primary virtual machine.
Remove VirtualBox Guest Additions and reboot.
Go to: C:\Windows\System32\Sysprep and run sysprep.exe Select: Switch to system audit mode , uncheck “Preparing for use”, Shutdown options - Reboot
After rebooting, do not close the Sysprep window . We'll need it later.
Go to: Computer Management -> Utilities -> Local Users and Groups -> Users. Delete the account created during installation (in our case, user).
Go to: Control Panel -> System -> Advanced system settings -> Advanced tab -> User profiles -> Advanced -> select “Unknown account” -> Delete .
Go to: C:\Windows\System32\Sysprep and run sysprep.exe
Select: Go to system welcome mode (OOBE) , check the “Prepare for use” checkbox, Shut down options - Shut down.
After 10 minutes the machine should turn off.
Connect the disk of the virtual machine on which sysprep was run to the second machine (clone).
Start a virtual machine with two disks . In this case, the original machine with sysprep must remain disabled.
Determine on which partition the Windows 10 prepared by sysprep is located (in our case: F :)
Launch a command prompt with administrator rights and run:
dism /Capture-Image /ImageFile:c:\install.wim /CaptureDir:F:\ /Name:"Windows 10"
After half an hour, our install.wim file will appear on the C: drive
Copy this install.wim to the Windows 10 installation flash drive in the sources folder and replace the original file with it.
After installing the OS, to finally configure the system from tracking and removing the hyberfil.sys file from the root of the C: drive, you must run:
sc delete dmwappushservice powercfg -h off
These instructions are also applicable to the Windows 7 and Windows 8 operating systems, with the exception of some points.
The article will be updated with information based on your questions.
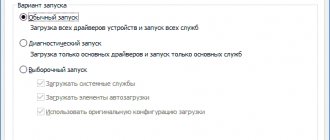
Hello everyone, today I’ll tell you what the sysprep utility is. The system preparation program (Sysprep) prepares the Windows installation for disk duplication, auditing, and delivery to the customer. Duplicating, also known as imaging, allows you to save a customized image of Windows that you can then reuse throughout your organization. Audit mode allows you to add additional device drivers and applications to your Windows installation. After installing additional drivers and applications, you can verify the integrity of your Windows installation. Sysprep also allows you to prepare an image for delivery to the customer. When the customer starts Windows, the welcome screen appears.
Sysprep should only be used to configure new Windows installations. You can run it as many times as needed to build and customize your Windows installation. However, you can reset Windows activation no more than three times. You cannot use Sysprep to reconfigure an existing, already deployed Windows installation. Use Sysprep only to configure new Windows installations.
Benefits of Sysprep
- Removing system data from Windows. Sysprep can remove all operating system-related information from an installed Windows image, including the computer's security identifier (SID). The Windows installation can then be imaged and installed throughout the organization.
- Configuring Windows to boot in audit mode. Audit mode allows you to install third-party applications and device drivers, and check the health of your computer.
- Setting the Windows Welcome screen to load. Sysprep configures your Windows installation to boot with a welcome screen the next time you start your computer. Typically, the system should be configured to boot with a welcome screen before the computer is shipped to the customer.
- Reset Windows activation. Sysprep can reset Windows activation up to three times.
Booting in audit mode
Audit mode allows OEMs, system builders, and corporations to quickly customize Windows installations. Audit mode can install applications, add device drivers, run scripts, and verify that Windows is installed correctly. In audit mode, you do not need to apply Windows Welcome settings.
Typically, Windows launches the Welcome screen immediately after installation. However, if you boot into audit mode, you can skip the Windows Welcome screen and directly boot into your computer's desktop. This will allow you to start the setup process as soon as possible.
Also, the audit mode allows you to check the functionality of the computer before delivering it to the client. You can verify that the system was launched correctly the first time, and that all manufacturer- or system-builder-specified settings and support information are present.
CTRL+SHIFT+F3 during the welcome screen .
For a silent installation, add the Microsoft-Windows-Deployment component to the oobeSystem configuration pass. In the Reseal | Mode specify “audit”. When Windows finishes installing, your computer will restart in audit mode. For more information about this option, see the Windows Silent Installation Reference.
Run sysprep /audit in a command prompt window.
Syntax
sysprep.exe [/oobe | /audit] [/generalize] [/reboot | /shutdown | /quit] [/quiet] [/unattend:answer_file]
Options
- /audit Starts the computer in audit mode. Audit mode allows you to add additional device drivers and applications. You can also test your Windows installation before delivering it to the end user. If Windows silent installation was specified, audit mode runs the auditSystem and auditUser configuration pass.
- /generalize Prepares the Windows installation before creating the image. If this option is specified, all unique system information is removed from the Windows installation. The security identifier (SID) is reset, system restore points are reset, and event logs are deleted. The next time you start your computer, a specialized setup step begins to run. A new security identifier (SID) is created and the Windows activation clock is reset if it has not already been reset three times.
- /oobe Starts the computer in Welcome screen mode. The Windows Welcome screen allows end users to set up the Windows operating system, create new accounts, rename the computer, and perform other tasks. Any oobeSystem configuration step tasks in the answer file are processed immediately, before the welcome screen even launches.
- /reboot Reboots the computer. Use this option to audit your computer and verify the functionality of the first system startup
- /shutdown Shuts down the computer after Sysprep has finished running. /quiet Stops displaying confirmation prompts while Sysprep is running. Use this option when running Sysprep automatically
- /quit Quit Sysprep after running the specified commands
- /unattend: answer_file Applies answer file settings to Windows during unattended installation of answer_file Specifies the name and path of the answer file to use
Site material
Popular Related Posts:
- Who moved the Active Directory object
- Who reset the user's password in Active Directory?
- How to remove net framework, correctly and completely
- Screen Recorder: Movavi Screen Recorder Review
- How to remove Windows 10 PRO test mode in a minute
- How to install CMtrace in a minute
Sysprep and oobe.xml
Sysprep
System Preparation Program (Sysprep) prepares the installed copy of Windows for auditing, duplication, and delivery to the end user
.
Duplication allows you to save a customized Windows image that you can then reuse throughout your organization. sysprep utility
can boot your computer into audit mode and allows you to add additional device drivers and applications to your Windows installation.
After installing additional drivers and applications, you can verify the integrity of your Windows installation. Sysprep use
by the end user. When the user starts Windows, the Welcome screen appears.
Sysprep program
should only be used to configure new Windows installations.
You can run it as many times as needed to build and customize your Windows installation. However, you can reset Windows activation no more than three times. You cannot use Sysprep
to reconfigure an existing, already deployed Windows installation.
If you plan to transfer the Windows image to another computer in the future, you must run the sysprep
with the /generalize switch, even if the hardware configurations of the target and source computers are the same. The sysprep /generalize command removes unique system information from a Windows installation image, allowing the image to be reused on different computers. If you want to install a Windows image on computers with the same hardware configuration, you can persist device and driver installations in the Windows image by using the "PersistAllDeviceInstalls" option in the answer file.
The next time you boot a Windows image, the specialize
. During this setup phase, when downloading a Windows image to a new computer, there are certain steps that must be taken for many components.
Any method of transferring a Windows image to a new computer, whether installing an image, copying a hard drive or another method, requires preparation using the sysprep /generalize command. Transferring or copying a Windows image to another computer without first running this command is not supported.
Sysprep program
provides the following benefits:
- Removing system data from Windows. Sysprep
can remove all operating system-related information from an installed Windows image, including the computer security identifier (
SID )
. The Windows installation can then be imaged and installed throughout the organization. - Configuring Windows to boot in audit mode. Audit mode allows you to install third-party applications and device drivers, and check the health of your computer.
- Setting the Windows Welcome screen to load. Sysprep your
Windows installation to boot with a welcome screen the next time you start your computer. Typically, the system should be configured to boot with a welcome screen before the computer is shipped to the customer. - Reset Windows activation. Sysprep
can reset Windows activation up to three times .
Creating a Windows image for a planned build
The build-by-plan script creates a single source image of Windows for installation on computers that use the same hardware. You can customize your original Windows installation by installing Windows itself and adding additional drivers and applications. This image is then saved and used for installation on other computers. No additional changes are made to this image.
This scenario includes the following steps:
- Install Windows on a sample computer.
- After installation is complete, you should boot your computer and install additional drivers or applications on it.
- After updating the Windows installation, run the command sysprep /oobe /generalize. The /generalize switch instructs Sysprep to remove operating system-specific data from the Windows installation: event logs, unique security identifiers (SIDs), and other data. After removing unique system information, the computer shuts down. The /oobe switch instructs your Windows installation to launch the Welcome screen the next time you boot your computer.
- You can now record your Windows installation using ImageX, creating a source image that you can then use on computers with similar hardware.
Booting in audit mode
Audit mode allows original equipment manufacturers (OEMs), system builders, and corporations to quickly customize Windows installations. Audit mode allows you to install applications, add device drivers, run scripts, and verify that Windows is installed correctly
. Audit mode does not require Windows Welcome screen settings to be applied.
Typically, Windows launches the Welcome screen immediately after installation. However, if you boot into audit mode, you can skip the Windows Welcome screen and directly boot into your computer's desktop. This will allow you to start the setup process as soon as possible.
Also, the audit mode allows you to check the functionality of the computer before delivering it to the client. You can verify that the system started correctly the first time and that all OEM/system builder-specified settings and support information are present.
There are several ways to boot in audit mode:
- For a manual installation, press CTRL+SHIFT+F3 during the welcome screen.
- If installing silently, add the "Microsoft-Windows-Deployment" component to the oobeSystem
. In the “Reseal\Mode” parameter you should specify “Audit”. When Windows finishes installing, your computer will restart in audit mode. - Run sysprep /audit in a Command Prompt window.
Limitations of Sysprep
- You should only use the version of Sysprep
that was installed with the Windows image.
Sysprep
is installed with every version of Windows and is always run from the %WINDIR%\system32\sysprep folder . - Sysprep
cannot be used for installation updates
. Run Sysprep
only on new installations. - If you plan to use the imagex /apply command to install a Windows image on a computer, the partition layout on the source and destination computers must be identical. For example, if the Windows image is stored on the D drive, you must also deploy the image to the D drive of the destination computer. The following list describes the partition settings that must be identical on the reference computer and the target computer when you use the imagex /apply command.
- The partition types (primary, secondary, or logical) must match.
If a partition is made active on the reference computer, it must also be active on the destination computer.
using the RunSynchronous command during the
auditUser
.
However, you can use the generalize
in the Microsoft-Windows-Deployment feature to automatically prepare the computer for imaging after installation.
can be used to reset Windows activation clock up to three times
. After the third run of Sysprep,
the clock can no longer be reset.
, third-party disk imaging applications, or hardware disk copy devices. These tools create binary images of computer hard drives and then either duplicate the image on another hard drive or store it in a file on a separate drive.
can only be run when the computer is a member of a workgroup and not a domain . If the computer is joined to a domain, it will be automatically removed from the domain.
Windows Welcome will prompt you to enter your product key.
To suppress such a request, Sysprep can be used in conjunction with a response file. If you specify a valid product key in the ProductKey parameter of Microsoft-Windows-Shell-Setup during the specialize
, Windows Welcome will not prompt you for it.
or Windows Welcome does not remove the strong password policy.
If a user account is not assigned a strong password before running Sysprep
or Windows Welcome, they may be prevented from logging on to the computer. It is recommended to always use strong passwords for user accounts.
Fix sysprep.exe errors
- 1 Information about the sysprep.exe file
- 2 Errors related to the sysprep.exe file
- 3 How can I fix sysprep.exe errors?
- 3.1 Scan for malware
- 3.2 System and driver updates
- 3.3 System File Checker Tool
- 3.4 System Restore
- 4.1 List of sysprep.exe file versions
File information
| basic information | |
| File name | sysprep.exe |
| File extension | EXE |
| Description | System Preparation Tool |
| Software | |
| program | Microsoft® Windows® Operating System |
| author | Microsoft Corporation |
| details | |
| MIME type | application/octet-stream |
| File type | Executable application |
| system | Windows NT 32-bit |
| Copyright | © Microsoft Corporation. All rights reserved. |
| Character set | Unicode |
| tongue cod | English (US) |
How to Fix Annoying Sysprep.exe Errors [SOLVED]
Sometimes sysprep.exe and other EXE system errors can be related to problems in the Windows registry. Several programs can use the sysprep.exe file, but when those programs are uninstalled or modified, sometimes "orphaned" (incorrect) EXE registry entries are left behind.Basically, this means that while the actual path of the file may have changed, its incorrect former location is still recorded in the Windows Registry. When Windows tries to look up these incorrect file references (file locations on your PC), sysprep.exe errors can occur. Additionally, a malware infection may have corrupted Windows-related registry entries. Thus, these corrupt EXE registry entries need to be fixed to fix the problem at the root.
Manually editing the Windows registry to remove invalid sysprep.exe keys is not recommended unless you are PC service professional. Mistakes made when editing the registry can render your PC inoperable and cause irreparable damage to your operating system. In fact, even one comma placed in the wrong place can prevent your computer from booting!
Due to this risk, to simplify the process, it is recommended to use a program to clean the OS registry. A registry cleaner automates the process of finding invalid registry entries, missing file references (like the one causing your sysprep.exe error), and broken links in the registry. Before each scan, a backup is automatically created with the ability to undo any changes with one click, protecting against the possibility of damaging your PC.
As a Microsoft Silver Partner, we provide software to help you resolve the following issues:
- WinThruster OS registry cleaner [download]
Warning: Unless you are an experienced PC user, we DO NOT recommend manually editing the Windows Registry. Using Registry Editor incorrectly may cause serious problems that may require you to reinstall Windows. We do not guarantee that problems resulting from incorrect use of Registry Editor can be corrected. You use Registry Editor at your own risk.
Before you manually repair your Windows registry, you need to create a backup by exporting a portion of the registry associated with sysprep.exe (eg. Windows):
- Click on the Start .
- Type " command " in the search bar... DON'T PRESS ENTER YET !
- CTRL-Shift keys on your keyboard, press ENTER .
- A dialog box for access will be displayed.
- Click Yes .
- The black box opens with a blinking cursor.
- Type " regedit " and press ENTER .
- In the Registry Editor, select the sysprep.exe-related key (eg. Windows) you want to back up.
- From the File , select Export .
- In the Save in , select the folder where you want to save the Windows key backup.
- In the File name , enter a name for the backup file, for example, “Windows backup.”
- Make sure that the Export Range is set Selected Branch .
- Click Save .
- The file will be saved with the extension .reg .
- You now have a backup of your sysprep.exe-related registry entry.
The following steps for manually editing the registry will not be described in this article, as they are likely to damage your system. If you would like more information about editing the registry manually, please check out the links below.
We do not accept any responsibility for the results of the actions performed according to the instructions below - you perform these tasks at your own risk.
Windows XP https://www.theeldergeek.com/windows_xp_registry.htm
Windows 7 https://www.theeldergeek.com/windows_7/registry_edits_for_win7.htm
Windows Vista https://support.microsoft.com/kb/2688326 - LetMeFixItMyselfAlways
Notes from an IT specialist
Very often, system administrators face the need to deploy an operating system on several computers. As a rule, in addition to simply installing the system and drivers, this procedure requires installing and configuring a certain set of software, bringing the user environment to certain standards, setting certain security policies, etc. Manual installation followed by system configuration takes a significant amount of time. It’s good if you need to deploy the system on two or three computers, but what if there are a dozen of them? The obvious way out of the situation is to clone an installed and configured system, but this seemingly simple operation is fraught with a number of pitfalls and must be approached wisely.
Typically, system cloning is used for this purpose using Symantec Ghost or similar programs. However, this approach has one significant drawback: all computers receive the same security identifier (SID) and name, and problems may occur if cloned computers are used in a workgroup or domain. In addition, they will have the same installation key, which is not always permissible according to licensing requirements. To avoid this situation, you must use the System Preparation Tool , intended for system administrators and equipment manufacturers (OEMs).
Initially, you need to prepare the system for deployment. It is recommended to do a clean installation of the system, install all necessary updates, drivers and applications, and make the necessary settings for the user environment.
We check the operation of the system and do a little cleaning: delete temporary files, browser cache, restore points, and empty the trash.
Then on the installation disk we find the SUPPORT , in it the TOOLS , which contains the DEPLOY.CAB from which we extract sysprep.exe and setupcl.exe .
Place these files in C:\sysprep and run sysprep.exe . In the window that appears, check the box “Mini-installation” (this item is only available for Windows XP Professional) and click “Seal the system” .
Once the necessary procedures are completed, the computer will automatically turn off. We can clone a system prepared in this way onto any required number of computers. To do this, you can use Ghost or any similar utility.
When you turn it on for the first time, a mini-installation will start on the target machine, which will determine the basic system hardware and prompt you to answer a number of standard questions and prompt you to enter a license key.
The system activation period will also be reset and the security identifier (SID) will be regenerated. It should be remembered that the systems on which you are deploying must have the same architecture (using the same kernel), and also have a compatible hard drive controller (or take care of adding the necessary drivers). This does not mean that a system prepared on an Intel platform cannot be deployed on AMD, but a system prepared on a multi-core processor may not run on a single-core processor and vice versa. If problems arise, you can additionally set the option “Detect non-Plug & Play devices” . At the end of the mini-installation, we will receive a fully configured system ready for the end user.
If the system is deployed on a batch of identical computers, you can skip the mini-installation. The system will ask for a license key, user name and computer name in the welcome window, after which the user will have access to a fully configured system. This method is convenient if the sealed computer needs to be given directly to the user; even an inexperienced user can easily provide all the necessary data and start using the system.
Important!
the System Preparation Tool utility used must match the version of the system being used, down to the service pack. So if you installed Windows XP SP2, then upgraded to Windows XP SP3, you will need Sysprep for SP3.
The most common problems with the sysprep.exe file
There are several types of errors associated with the sysprep.exe file. The sysprep.exe file may be located in the wrong file directory on your device, may be missing from the system, or may be infected with malware and therefore not function properly. The following is a list of the most common error messages associated with the sysprep.exe file. If you find one of the following (or similar ones), consider the following suggestions.
- sysprep.exe is corrupted
- sysprep.exe could not be located
- Runtime error - sysprep.exe
- sysprep.exe file error
- The file sysprep.exe could not be loaded. Module not found
- unable to register sysprep.exe file
- The file sysprep.exe could not be loaded
- The file sysprep.exe does not exist
sysprep.exe
The application failed to start because sysprep.exe is missing.
Reinstall the application to resolve the issue. Problems with sysprep.exe can be resolved in a variety of ways. Some methods are only for advanced users. If you are not confident in your abilities, we advise you to consult a specialist. Correcting errors in the sysprep.exe file should be approached with extreme caution, since any errors can lead to an unstable or incorrectly functioning system. If you have the necessary skills, please continue.