If you're the type of person who sends a ton of emails every day, then you're probably tired of putting your contact information at the end of the email. This can be easily fixed by installing the Outlook application (if it is not included in the office suite). Then we simply edit the signature, after which this document is automatically attached to the end of the letter.
It will take you much less time to create a signature. Since typing contacts at the end of the letter takes a lot of time and gradually begins to get boring.
Let's look at the main functions of the application and secrets for different versions of Microsoft Outlook.
How to make a signature in Outlook
Introduction: What can Outlook do?
This program can do the following:
- create personal address lists;
- send mass messages;
- database support (notes, addresses, phone numbers);
- plan a schedule;
- store and maintain contact lists;
- manage email.
Consists of components such as calendar, contacts, notes, task diary, summaries, email.
How to insert a picture
To install an image, you need:
- click on the “ Insert Image ” button;
- specify the path to the desired location on the disk and click “ Paste ”;
- result.
Adding a picture to a signature
You can insert not only a picture into your personal signature, but also a business card or a hyperlink.
To install an image, you need:
- Click on the appropriate icon while you are editing text.
Click on the icon responsible for inserting a picture
- Click on the picture icon and select the desired image.
Find and click on the picture, click “Insert”
Signature with picture
Video - How to insert a signature with a picture and a link to a website in Outlook 2016
Signature in Outlook 2010
- We launch the application through “Start” or by clicking on the shortcut on the desktop.
Open “Start”, then click on “All Programs”
Find and click on the “Microsoft Office” folder, then open “Microsoft Outlook 2010”
- At the very top, click on the first item “File”, in it we go down to “Options”.
Open the “File” item, go down to “Options”
- Then on the left we look for “Mail” and inside this tab there is a “Signatures” button.
Go to the “Mail” section, inside this tab click on the “Signatures” button
- Now we perform the same steps as for the 2007 version.
Click on the “Create” button, then enter the text, set the necessary parameters, and click “OK”
A little about additional features of Outlook
Read detailed instructions on how to enable auto-reply in our new article - “Auto-reply in outlook”.
Some features are called "extra" simply because they are used less often than others. We will now look at some of them:
- using this program you can configure the operation of the entire enterprise to access shared resources;
- Through your account you can receive and send faxes;
- this application can be used as a search system, not only for its elements, but also for any files in the device system;
- the ability to archive and save in any format;
- Finally, it is possible to use other Microsoft Office programs together in Outlook.
How to change Outlook signature
To edit, you must perform the following steps:
- go to the “File” tab, then “ Options ”;
- find the “ Mail ” section;
- Click on the corresponding button, thereby switching to the editing mode ;
- existing entries will be displayed on the left , which can be edited or deleted. To edit, you need to left-click (LMB) on the entry and correct it in the text entry field;
- After editing is completed, click on “ OK ” to save.
Method for Microsoft Outlook 2003
In Outlook 2003 you need:
- Login to the program. Select the “ Service ” item at the top of the workspace and find “ Options ” in the list.
- A window will open, go to the “ Message ” tab, find the “ Selecting signatures for an account: ” item, then indicate the account under which it will be created and click on the appropriate button.
- Click on “ Create… ”.
- Specify a name for the new entry and click “ Next ”.
- Specify text using built-in formatting options (font, color, size, and alignment type).
- To save changes, click on “ OK ”, after “Apply” and “OK” in the last opened window.
- To check whether it was successfully created, you need to start creating a new letter.
Outlook Express
In Outlook Express you should:
- On the tab bar, go to the path “ Tools ” - “ Options ”;
- click on the tab with the appropriate name;
- activate the “ Add signatures to all outgoing messages ” item, then click “Create”. A new entry will appear, click on it, specify the text below or attach a file;
- then click on “ Advanced ” and mark the domains of the required mailboxes in which it should be displayed;
Effective computer optimization with Advansed SystemCare 11
If everything is done correctly, it will be added automatically when creating a new letter.
Outlook 2007
Instructions for Outlook 2007 email:
- run the program and click on “ Create ”, or the key combination CTRL + N on the keyboard;
- Click the mouse to open the “ Signature ” menu and then select the appropriate item;
- in the next step, click “ Create ”;
- assign a name to the new entry and “ OK ” to confirm;
- enter text . You can use images and hyperlinks;
- Save with “ OK ” and start creating a new email message.
Microsoft Outlook 2010
To set up a signature in Outlook 2010, the procedure is as follows:
- open the application and click on the button to create a new letter ;
- find the “ Enable ” function group and find the desired button in it;
- click on “Create ”;
- assign a name and confirm with “ OK ”;
- customize and design the appearance;
- set it as the default for new and reply emails.
Creations in Outlook 2013
In Outlook 2013 the procedure is identical:
- In the open program, click on “ Create message ”;
- go to the “ Signature ” item, then in the context menu click on the button with the same name;
- click on “ Create ”;
- specify a new name and click “ OK ”;
- enter the text and save by clicking on “ OK ”.
Outlook 2016
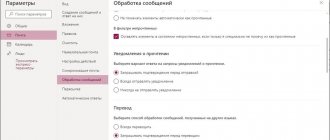
Instructions for setting up an Outlook 2020 signature:
- Click “Create message” - “Message” - “Signature”. In the list that appears, select “ Signatures and forms ”;
- Enter the required data and click “OK” to save.
Let's sum it up
The process of editing this element is similar in Outlook 2013 and 2020, so you can use the instructions described above for any version. If you do not have a created signature, you can go to the appropriate section and click the “Create” button. Next, enter the information in all fields and add your email. Don't forget to save your work.
How to set up your own signature in Outlook? This procedure is simple and does not take much time.
How to create and configure a signature in Microsoft Outlook 2003?
In order to set up a signature in MS Outlook 2003, you need to go to the “Tools” menu, select “Options”, and go to the “Messages” tab, then click the “Signatures...” button. All that remains is to click the “Create” button in the dialog box that appears called “Creating a signature”, enter the name of the new sample and generate the text of the signature itself.
Created signature samples can be modified and deleted. After the sample signature has been created, you should tell the application for which emails to use it. This is done on the same “Message” tab, in the “Signatures” section by selecting the desired signature sample from the drop-down list in the “Signature for new messages:” and/or “When replying and forwarding:” fields.
Generating a signature using a template in Outlook for an organization, on computers outside the domain
We have been using MS Exch with AD for a long time in our company, but most of the computers in remote branches are not connected to a domain, and just as long ago, our General Manager was annoyed that people used anything in their signature, just not a standard corporate template. After thinking a little and estimating further nervous expenses on explaining why this cannot be combed, I decided that it was better to do it.
Having rummaged through the Internet, I couldn’t find any examples of implementing a signature using a pre-written template, so I had to sculpt it myself.
I decided to formalize this in the form of a request from the user through a dialog box about his affiliation with the desired object. In order not to create a bunch of InputBox, I decided to implement this through an IE pop-up window, from which all the necessary data is subsequently pulled out.
- Requesting the necessary information from the user
Since the company uses 4 main brands with different logos, the user must choose his own, relative to the selected brand, his image will be inserted into the logo.
To select a position and department from the list, use the datalist, which preliminarily describes all possible options. (I haven’t come up with a better way, if anyone can tell me how to implement selection from a list using an external reference file, that would be great.)
Also, processing is inserted into the user’s selection of a brand, since our format of divisions for one brand is different, depending on the brand, the format of the establishment is selected.
'company information request Dim objIE Dim Brand Set objIE = CreateObject( "InternetExplorer.Application" ) objIE.Navigate "about:blank" objIE.Document.Title = "Signature Request" objIE.ToolBar = False objIE.Resizable = False objIE .StatusBar = False objIE.Width = 600 objIE.Height = 250 Do While objIE.Busy WScript.Sleep 200 Loop objIE.Document.Body.InnerHTML = "
"&_ "Managing Assistant "&_ " Object1 Object2 Object3 "&_ "U "&_ "M "&_ "C "&_ "L "&_ "Position "&_ "Object "&_ "Last Name First Name "&_ "Mobile Phone in +7 format( ***)***-**-** "&_ ""&_ "" objIE.Visible = True Do While objIE.Document.All.OK.Value = 0 WScript.Sleep 200 Loop If objIE.Document.All. RadioOption(0).checked=true then Brand =»U» If objIE.Document.All.RadioOption(1).checked=true then Brand=»M» If objIE.Document.All.RadioOption(2).checked=true then Brand=»c» If objIE.Document.All.RadioOption(3).checked=true then Brand=»L» If objIE.Document.All.RadioOption(0).checked=true then strCompany=»U» If objIE .Document.All.RadioOption(1).checked=true then strCompany=»M» If objIE.Document.All.RadioOption(2).checked=true then strCompany=»C» If objIE.Document.All.RadioOption(3 ).checked=true then strCompany=»L» If objIE.Document.All.RadioOption(3).checked=true then dolj= objIE.Document.All.Dol.Value+»coffee shop» else dolj= objIE.Document.All. Dol.Value+"dining room" objtj= objIE.Document.All.objt.Value strMobile = objIE.Document.All.tel.Value strName = objIE.Document.All.FIO.Value objIE.Quit At this point, we ask the user for information that we we can get it finished.
- Finding out your email address
Since we assume that this script will be launched where there is already mail configured in Outlook, the easiest way to find out the mailing address is to look at how it is already configured, and not wait for the user to enter it himself, having made a couple of mistakes in dots and letters. The simplest and most logical way, in my opinion, is to find out the name of the user logged into the system, look into his profile folder and look at the name of the OST file, which is equivalent to the address of the mailbox connected via MAPI. On Error Resume Next strComputer = "." Set objWMIService = GetObject("winmgmts:\\" & strComputer & "\root\cimv2") Set colItems = objWMIService.ExecQuery("Select * from Win32_ComputerSystem",,48) For Each objItem in colItems login_full =objItem.UserName Next Set objItem = Nothing: Set colItems = Nothing: Set objWMIService = Nothing login_find = "\" login_pos = InStr(1,login_full,login_find) login_len = len(login_full) login = right(login_full,login_len-login_pos) folder_find = "C:\ Users\"&login&"\AppData\Local\Microsoft\Outlook" Set objShellApp = CreateObject("Shell.Application") Set objFolder = objShellApp.NameSpace(folder_find) Set objFolderItems = objFolder.Items() objFolderItems.Filter 64+128, " *.ost" For Each file in objFolderItems file_name = file Next file_len = len(file_name) strEmail = left(file_name,file_len-4)
- Generating a signature for Outlook
Having collected all the necessary data, we begin to create the signature itself.
There are 2 templates, a full one for new messages, and a short one for replies. The template has several pictures that are pulled from the corporate file storage, to which everyone has read access by default. And all the logos come from there. Script comments on the text of the code strZpov = "With respect, " strTitle = dolj+" "+objtj strweb = "www.www.ru" strLogo1 = "\\cabinet\Secretariat\Logos\"&Brand&"_logo_wl.jpg" 'main logo strLogo3 = "\\cabinet\Secretariat\Logos\Ins.jpg" ' instagram icon strLogo2 = "\\cabinet\Secretariat\Logos\F.JPG" ' facebook icon strLogo4 = "\\cabinet\Secretariat\Logos\line.png" ' just a horizontal line strLogo5 = "\\cabinet\Secretariat\Logos\Save_wood.jpg" 'signature about saving the forest Set objWord = CreateObject("Word.Application") Set objDoc = objWord.Documents.Add() Set objSelection = objWord. Selection Set objEmailOptions = objWord.EmailOptions Set objSignatureObject = objEmailOptions.EmailSignature Set objSignatureEntries = objSignatureObject.EmailSignatureEntries Set objRange = objDoc.Range() 'we form a table into which the necessary records will be inserted into the appropriate blocks. 'the large signature is a table of 3 row blocks, row 2 is divided into 2 cells objDoc.Tables.Add objRange,3,2 Set objTable = objDoc.Tables(1) objTable.Rows(1).select ' row 1, select objSelection.Cells.Merge ' merge into a single line the entire width of the table objTable.Cell(1, 1).select ' select 1 line and set its width objTable.Cell(1, 1).Width = 605 objselection.font.name = "Cambria" objSelection.Font.Size = "10" objSelection.Font.Color = RGB(88,89,91) ' start filling the cell with text about the employee (full name, position, object, mob, email) ' make the email address clickable for quickly sending a letter mailto: objSelection.TypeText strZpov & strName & CHR(11) objSelection.TypeText strTitle & CHR(11) objSelection.Font.Bold = true objSelection.TypeText strCompany & CHR(11) objSelection.Font.Bold = false objSelection. TypeText strMobile & CHR(11) hyp.Range.Font.name = "Cambria" hyp.Range.Font.Size = "10" hyp.Range.Font.Name = "Cambria" Set hyp = objSelection.Hyperlinks.Add(objSelection .Range, "mailto: " & strEmail,,, strEmail) hyp.Range.Font.Name = "Cambria" hyp.Range.Font.Size = "10" 'line 2, cell 1, insert the objTable company logo into it. Cell(2, 1).select objTable.Cell(2, 1).Width = 150 objTable.Cell(2, 1).Text = objSelection.InlineShapes.AddPicture(strLogo1) ' row 2 cell 2, insert text with address and company data objTable.Cell(2, 2).select objselection.font.name = "Cambria" objSelection.Font.Size = "9.5" objSelection.Font.Color = RGB(88,89,91) objSelection.TypeText "111111, Moscow, Kremlin d1 s10, " & CHR(11) ' Below is a piece of code, initially I wanted to find out the department phone number from the user ' if it is empty, then the general phone number is inserted, if not empty, then the specified number is inserted ' also if If an extension number is used, then you can request it in the variable strintPhone if (strPhone <> "") then objSelection.TypeText "Business Center "Kremlin", " & strPhone else objSelection.TypeText "Business Center "Kremlin", " if (strIntPhone <> "" ) then objSelection.TypeText » ext. " & strIntPhone & CHR(11) else objSelection.TypeText CHR(11) Set hyp = objSelection.Hyperlinks.Add(objSelection.Range, strWeb,,, strWeb) hyp.Range.Font.Name = "Cambria" hyp.Range. Font.Size = "9.5" objSelection.TypeText CHR(9) set p_f = objSelection.InlineShapes.AddPicture(strLogo2) Set hyp = objSelection.HyperLinks.Add(p_f, "https://www.facebook.com/kremlin /",,"Image") hyp.Range.Font.Name = "Cambria" hyp.Range.Font.Size = "9.5" objSelection.TypeText " » set p_i = objSelection.InlineShapes.AddPicture(strLogo3) Set hyp = objSelection.HyperLinks.Add(p_i, “https://www.instagram.com/kremlin/”,,”Image”) hyp.Range.Font.Name = “Cambria” hyp.Range.Font.Size = "9.5" objselection.font.name = "Cambria" objSelection.Font.Size = "9.5" objSelection.Font.Color = RGB(88,89,91) objSelection.TypeText " @kremlin" objTable.Rows( 3).select ' line 3, merge into a single cell and insert the logo - take care of the paper objSelection.Cells.Merge objTable.Cell(3, 1).select objTable.Cell(3, 1).Width = 605 objTable.Cell(3 , 1).Text = objSelection.InlineShapes.AddPicture(strLogo5) "' 'this code generates a signature from the document and pushes it into outlook for new emails Set objSelection = objDoc.Range() objSignatureEntries.Add “AD Signature”, objSelection objSignatureObject. NewMessageSignature = "AD Signature" objDoc.Saved = True objDoc.Close objWord.Quit "' 'Below, a short signature is formed with the same data only for reply letters ' in order not to clutter up the correspondence with huge signatures in replies to letters ' the abbreviated template Set objWord = Createobject (“Word.Application”) Set Objdoc = Objword.document () Set Objselection = Objword.Selection Set ObjemmailOptions = Objword.mailoptions set Objsignatureob JECT = OBJEMALOMALOPTIONS.Emailsignature set Objsignaturentries = Objsignatureobject.mailsignaturentries set objrange = objdoc.ransge () objselection.font.name = "Cambria" objSelection.Font.Size = "10" objSelection.Font.Color = RGB(88,89,91) objSelection.TypeText strZpov & strName & CHR(11) objSelection.TypeText strTitle & CHR( 11) if (strMobile <> "") then objSelection.TypeText strMobile & " | " if (strPhone <> ") then objSelection.TypeText strPhone else objSelection.TypeText "+7(111)111-11-11" if (strIntPhone <> ") then objSelection.TypeText " ext. " & strIntPhone & CHR(11) else objSelection.TypeText CHR(11) "' Set objSelection = objDoc.Range() objSignatureEntries.Add "Short_Signature", objSelection objSignatureObject.ReplyMessageSignature = "Short_Signature" objDoc.Saved = True objDoc.Close objWord .Quit The actual final appearance of the signatures looks like this