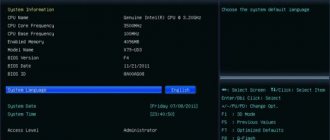
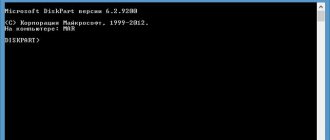
If the computer does not see the flash drive after rebooting the computer, then the first thing to do is check - is the flash drive really bootable? In order to make a bootable flash drive from an ordinary USB drive, it is not enough to simply copy data from the computer there.
BIOS does not recognize bootable USB flash drive
Also, even if you have previously used this drive and can confirm that it can be used to install the operating system, this does not solve the problem. Today there are different types of downloads, so even if a flash drive works on one computer, it is not at all a fact that it will work on another. For everything to be successful, the data needs to be rewritten according to a different principle, using different software.
Is there a function to support a bootable USB flash drive in the BIOS? Is it configured correctly?
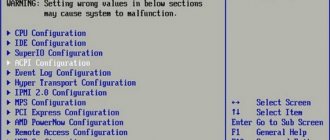
In some cases, problems arise not with the flash drive, but with the BIOS system itself. There are different boot types in different versions: USB_CDRom, USB_FDD, USB_HDD, etc.
In different versions there are different boot types USB_CDRom, USB_FDD, USB _HDD
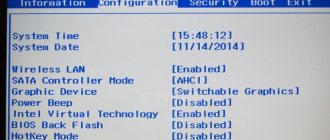
After entering the BIOS, you need to go to the boot partition present in each version. The names of the section may vary, but one way or another the word “BOOT” will be present. The line that is important to us is: “Boot priotity order,” that is, the boot order.
You need to keep in mind that the hard drive is loaded first, that is, what is located after it no longer matters - in this case it is a USB HDD, which does not get a turn after loading the hard drive. So you just need to swap these values.
Menu in “Boot priotity order” and priority boot order from the device
Interestingly, if you turn on the computer after a flash drive has been inserted, it will appear in the BIOS with a name.
Connecting a flash drive and displaying it in the BIOS
When exiting the BIOS, be sure to save all changes made.
The note! Some older devices do not initially have the option to select USB. This only means that the BIOS simply does not support such technology. This issue is resolved by firmware.
Activating the correct boot mode
If everything is clear with the incorrect recording of the bootable flash drive, then setting the boot mode correctly may be an unfamiliar procedure for many. Let's use a specific example to figure out how to change the boot mode.
Today you can find at least three types of BIOS. And regardless of whether you have an old BIOS or a new one, the menu items may differ from those listed below, but they always have approximately similar names and nesting.
If the BIOS does not see the files on the flash drive, then you can change the boot mode as follows:
- Open the BIOS (restart the computer and press the “Delete” key while it starts again).
- Find and open the “BOOT” tab.
- Find the “Boot List Option” option and change its value to the opposite.
- Exit the BIOS and apply the changes you made.
How to create a bootable USB flash drive for installing Windows
First of all, in order to create an installation disk with the operating system, you need to use a flash drive with a total memory size of 8 gigabytes or more. Why is this particular size required for the installation disk? Simply because today the volume of installation files for operating systems varies between two and four gigabytes.
When creating a bootable USB flash drive, you must use a flash drive with a total memory size of 8 gigabytes or more
So, below, the following operating systems will be used as an example:
- Windows Seven;
- Windows 8 (8.1);
- Windows 10;
- Ubuntu 15.
Windows 7
Booting Windows 7 OS from a USB flash drive
Properly preparing a USB drive for use as a Windows 7 installation source will take 15 to 30 minutes, depending on the speed of your computer.
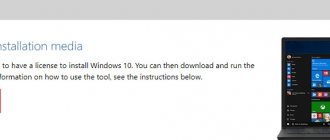
First, download a licensed ISO image of the operating system.
After that, download the Microsoft Windows USB/DVD Download Tool.
Microsoft Windows USB DVD Download Tool
Once downloaded, execute the file and follow the installation wizard.
This is a free program from Microsoft that works on Windows 7, Winsows 8, Windows 10, Windows Vista and Windows XP. You will first need to format the USB drive and then copy the contents of your Windows 7 ISO file to the flash drive.
Step 1: Launch the Windows 7 USB DVD Tool download program, which is most likely located in the Start menu or on your desktop. You will need to select the iso file: click “Next”. Find and select the Windows 7 ISO file. Then open it.
In the Source file line, click “Browse”, select the file with the Windows 7 ISO image on your computer and click “Next”
Note! It is better to download the Windows image directly from the official Microsoft website.
Step 2: Click Next to return to the first screen. After this you will be taken to the next window. Click on the “USB-Device” button, after which you will be taken to the USB drive (flash drive) selection screen.
Click on the USB-Device button
Step 3.
When the device is selected, click on the “Begin copying” button. The installation files will start copying to the media. Confirm "Empty USB device" if the "Not enough free space" dialog box pops up. After this, all files from the drive will be deleted permanently.
Click on the “Begin copying” button
Step 4: Then confirm “Yes” to move to the next window.
Step 5. Having selected the required flash drive, click the “Begin copying” button. The process of copying the installation files to the USB flash drive will begin. Also be careful, as all previously stored files on the USB drive will be erased. A notification that formatting has begun will appear for a few seconds, and then files will begin copying. This part can take up to 30 minutes, or even longer, depending on which version of Windows 7 the ISO file belongs to, as well as the power of the computer and the USB drive itself.
The process of copying installation files to a USB flash drive
On this screen you will see Status: Backup completed, which means that the bootable USB device has been successfully created.
The bootable USB device has been successfully created
Windows 8 (8.1)
Booting Windows 8 (8.1) from a flash drive
In the case of Windows 8, you will need another utility - it is called Media Creation Tool, and it can be downloaded from the official Microsoft website.
Step 1. When you launch this program, a window will open in which you will need to select the operating system, its language, version, and architecture.
Select the operating system, its language, version, and architecture
Step 2. Click “Next”, after which you will need to specify the device with Windows 8. In this case, it is a USB flash drive.
Click “Next”, after which we indicate the device with Windows 8. In this case, it is a USB flash drive
Step 3: Next, you will have to specify the specific flash media.
Next, indicate the specific flash drive
Step 4. Moving to the next window, you will come across a loading screen and a notification that a file is being downloaded. Loading files onto a flash drive can take a long time, and of course the flash drive will be formatted.
Downloading the installation file
Step 5. When the download is complete, a notification screen will appear indicating that the bootable USB flash drive is ready. Close the window using the “Done” button.
Close the window by clicking on “Finish”
Windows 10
Booting Windows 10 from a USB flash drive
If you have problems with the drive in Windows 10, then the solution will be similar to the solution with Windows 8/8.1: first download the Media Creation Tool program from the official Microsoft website and carry out the entire above sequence of actions. If you first run the program on Windows Seven or Eight, you will be offered two options: update or create bootable media. Choose the second one.
Select “Create installation media for another computer”
Create installation media using the same principles as for the G8.
Ubuntu 15
Booting Ubuntu 15 from a USB flash drive
Unlike the identical interface of different versions of Windows, Ubuntu 15 is a completely different operating system, so it uses completely different methods for creating bootable flash drives.
In the case of Ubuntu, you need to download the free UNetbootin program from Github.
UNetbootin program
- After launching the program, you need to select the distribution version (for example, 15.04_Live), device type - USB, Media - D:. After that, click “OK” and go to the next window.
Select the distribution version (for example, 15.04_Live), device type - USB, Media - D and click “OK”
- At this stage, files are extracted and copied to the media, which in this case is flash drive D.
At this stage, files are extracted and copied to the media, which is a flash drive D
- The very last window is a prompt for the system to reboot, enter the BIOS, and then boot from the flash drive.
Click the “Restart Now” button
Read detailed instructions in the article - “How to launch a bootable USB flash drive through BIOS.”
Why doesn't my computer boot from a flash drive?
Booting a computer from a flash drive is quite simple: in the BIOS you need to enter the appropriate section and set this media as the priority device. However, alas, things are not always simple. What difficulties can you encounter when trying to start a PC or laptop from an external USB drive? Some BIOS versions may provide for storage media a single item from the number of devices from which the computer can, in principle, boot.
Separate media list in BIOS
For the media itself - flash drives, HDD, SSD, SD cards, etc. – in such cases, priority is configured in a separate list. The latter is not always displayed in the same section as other boot devices (usually called “Boot”) . Such a list may be contained separately, in another BIOS settings tab. For example, in the section for installing a priority storage medium (named “Hard Drive” or something similar) .
UEFI media
If the computer runs on BIOS UEFI - modern firmware that offers certain advantages, in particular, working with GPT disks, the process of installing Windows using such advantages will have its own nuances. The installation flash drive must contain program codes that adapt it to the new format of the base firmware. Not every program that writes bootable media can yet create one that is compatible with UEFI software. The software that can do this includes, for example, the official utility for downloading and burning the Windows 10 distribution from Microsoft, as well as the third-party program Rufus .
Selecting the correct loading point
It is not enough to create a UEFI flash drive as such; you must not make a mistake in choosing it in the BIOS. On UEFI computers, among the possible boot devices, it will be displayed twice - with the usual name and the same name (same manufacturer, same marking), but also with the prefix “UEFI” . Selecting a flash drive with such an annotation and the enabled UEFI interface are two conditions that make it possible to install Windows 8.1 and 10 on a GPT .
Secure Boot
Secure Boot technology included with the UEFI BIOS is a mechanism to prevent unauthorized software from running. The technology has been developed primarily to prevent malicious software codes from entering a computer. And it is precisely this that can become an obstacle to booting from external media if the latter contains, for example, an installer for a pirated build of Windows or a homemade Live disk. In such cases, the technology must be disabled.
USB port
The installation flash drive for Windows 7 and older versions of the system must be connected to a USB 2.0 port. The distribution kit of older versions does not contain drivers compatible with USB 3.0 ports. The same applies to LiveDisk, the creators of which did not provide the ISO image with USB 3.0 drivers. But there are exceptions to this rule.
So, on certain computer devices, in particular, on some models of Acer with UEFI BIOS, on the contrary, you need to insert the Windows 8.1 and 10 installation media into the USB 3.0 port. Otherwise, the installation process will either freeze for no reason or generate errors.
No matter what situation we would be dealing with, if at a certain stage of the system installation process a failure occurs, we need to try connecting the flash drive to the USB port of a different version.
Methods for booting from a flash drive to UEFI
Now let's see how to boot devices in the UEFI_BIOS system from a USB drive. The test object will be an ordinary average motherboard MSI-A58M-E33, which has the latest existing version of UEFI_BIOS.
- In order to open the UEFI_BIOS setup menu for this motherboard, you need to have time to press the F11 key on your laptop or desktop computer as soon as the system starts to boot. This does not always work out, since Windows 10 boots very quickly, but with the proper skill, it is still possible to launch the BIOS. You will see the BIOS menu, where you will need to specify one of the disks representing that same flash drive.
After starting the UEFI BIOS system, we indicate one of the disks representing that same flash drive
- There are many options in the settings, for example, you can make the flash drive automatically boot immediately from the BIOS. To enable this feature, press “DELETE” at the start of booting. You will be taken to the main BIOS menu.
When booting the system, press the “DELETE” button to get to the main BIOS menu
- There you need to switch to the “Settings” configuration menu, find your USB drive in the drop-down list and move it to the very top.
Switch to the “Settings” menu, find your USB drive in the drop-down list and move it to the very top
After rebooting, the computer will automatically boot exactly the specified device. However, if the flash drive is not recognized by the computer even after this, then the problem may be as follows:
- the image was written to the flash drive with errors;
- The “Safe boot” safe boot mode is working (below you will see how to disable this mode);
- there is also the possibility that the problem is in the flash drive itself - for example, that since the image was written to it, it has been somehow damaged.
How to enter and configure the BIOS of a LENOVO G500, G505 laptop to install WINDOWS from a flash drive or disk
Let's look at how you can enter the BIOS of a Lenovo G500/G505 laptop to configure it to install the Windows 7 or Windows 8 operating system from a USB drive (flash drive) or disk.
We turn on the laptop. The flash drive or disk must already be installed in the USB port or CD/DVD drive, respectively. To get into the laptop BIOS, you must frequently press the “Fn” + “F2” button combination during boot.
Our laptop model has the Windows 8 operating system installed, so you may be put straight into the BIOS, or problems may arise. Problems usually arise if the Windows operating system was not shut down correctly.
To enter the BIOS in this case, you need to wait until the operating system starts loading - the loading icon appears on the screen and starts spinning. See the image below.
After this, you need to press and hold the power button on the laptop for about 5 seconds. The laptop will turn off.
Turn on the laptop again. We begin to frequently press the combination of the “Fn” + “F2” buttons. The problem should now be resolved.
After we have entered the BIOS, go to the “Boot” tab of the main menu. If you have a regular flash drive, like ours, then in the first line of “Boot Mode” change the “UEFI” value to the “Legacy Support” value. To do this, press the “Enter” button and select the desired value in the context window that appears.
Now the tab window will change, a new line will appear - “Boot Priority”, in which the default value will be “UEFI First”. We need to change it. To do this, press the “Enter” button. In the context menu window that appears, select the “Legacy First” value.
Next, go to the “Exit” tab of the BIOS main menu. Here, with the “Exit Saving Changes” line active (highlighted in white), press the “Enter” button. A context window will appear asking if we really want to exit and save the changes? Press the “Enter” button.
The computer will reboot.
When the system starts booting, we again begin to quickly and often press the combination of the “Fn” + “F2” buttons. We enter the BIOS. Go to the already familiar “Boot” tab of the main menu.
On this page we find a block of lines entitled “Legacy”. This is a list of devices arranged in the order in which the computer will access them when searching for an operating system to boot.
Since we will be loading the operating system from a flash drive, we need to move our flash drive to the first line in the list. Now, as can be seen in the image above, it is on the third line (USB HDD: USB DISK 2.0).
To raise it higher, let’s go to this line and use the “Fn” + “F5” button combination. (The combination of the “Fn” + “F6” buttons lowers the selected device from the list).
Now go to the “Exit” tab of the BIOS main menu and press the “Enter” button twice to save the changes. The laptop reboots again.
But after starting a new boot, the laptop will start using the operating system located on the flash drive.
When using a CD/DVD drive to load the operating system, we carry out all the same steps, only instead of a USB device, in the device queue list, we move the device located in the CD/DVD drive to the first line.
Link to video instructions:
- < Back
Booting a flash drive on older BIOS versions
Users using older computers can boot from a flash drive in the same way, although the rules may differ.
- For example, when using a Lenovo laptop, you can get into the BIOS by pressing the F2 key. After this, you need to go to the “BOOT” menu.
To get into the BIOS on a Lenovo laptop, press the F2 key and go to the “BOOT” menu
- On one of the submenus “Boot_Device_Priority” you need to move your USB device to the very top according to the principle already indicated.
On one of the submenus “Boot Device Priority” we move our USB device to the very top
Save and reboot your laptop. From now on, downloading will be carried out from the specified device. This BIOS model is installed on most older laptops, so it will fit 90% of models.
BIOS Settings
Check if USB device support is enabled. How to do this depends on the motherboard model. After turning on the computer, the message “Press [key] to enter Setup” will appear at the bottom of the screen. Click it to enter the BIOS. And look for a menu that has “USB” in its name.
New BIOS versions
You can work with new BIOS versions using a keyboard and mouse. There is also support for the Russian language. You will quickly understand the parameters. But even if it is not there, you will be able to configure the boot order and launch via a USB flash drive.
- Open the “Advanced” tab.
- “USB Configuration” menu.
- Allow initialization from external devices.
- This option may be in another place. For example, in the “Boot” section. It depends on the BIOS type. Focus on the “USB” parameter in the name.
- There, set the launch priority you need.
- Save your changes.
Award-BIOS
After starting the BIOS, do you see two lists on a blue background? Then you have the Award version. You won't be able to navigate through the menu by clicking the mouse. It can only be configured using the keyboard. Below or on the side there will be instructions on which buttons to press for this.
- Go to the "Integrated Peripherals" section.
- Find the "USB Controller" item.
- If the option next to it is “Disabled”, change it to “Enabled”.
- There may be several such points.
- Return to the main menu. To do this, press Esc.
- Open the "Advanced BIOS Features" section.
- Next is the “Hard Disk Boot Priority” subsection.
- You need the "HDD-USB" or "Patriot Memory" parameter. Select it and move it to the top using the “+” (“Plus”) key.
Now let's take a look at boot priority.
- Go to the previous menu.
- Open the "First Boot Device" menu.
- Put “HDD-USB” or “FDD-USB” there.
- It is better to make the second device (“Second Device”) a hard drive (“Hard Drive”). If the flash drive does not start, the bootloader will read data from the hard drive.
- Look in the instructions to see which key is used to save settings. The inscription looks something like this: “F10 Save & Exit”. The system will ask you to confirm the action. Press "Y" (the first letter of the English word "Yes").
When you are finished working with the drive, return to the previous BIOS settings.
AMI-BIOS
The BIOS AMI interface has a gray screen, blue font and a row of tabs at the top. The information block is on the right. Mouse control is also not available.
- "Advanced" section.
- "USB Configuration" menu.
- Next to all settings whose names include “USB Controller” and “USB Function”, set the value to “Enabled”.
Now you can change the bootloader parameters:
- "Boot" tab.
- "Boot Device Priority" parameter.
- Put the flash drive in first place: “Patriot Memory” or “USB”.
- Press Esc to go back to "Boot".
- Open "Hard Disk Drives".
- In “1st Device” select flash media.
- To save changes, go to the Exit tab. There will be an “Exit & Save” option.
Phoenix-Award BIOS
In BIOS Phoenix-Award there is also a gray screen. Information about which keys to press is located below and highlighted in green. If the computer does not boot through the drive:
- Open the "Peripherals" tab.
- There are two “USB Controller” parameters. Set them to “Enabled”.
- You can configure the launch priority in the “Advanced” section.
- Save your changes - go to the "Exit" tab and select "Exit & Save".
UEFI
You enabled USB support, but for some reason the flash drive is not in the BIOS? The problem could arise due to UEFI, a mode that “protects” the bootloader from malware and foreign code. This module will start the operating system even if you have configured the BIOS correctly. What to do? Disable UEFI.
Settings depend on the motherboard manufacturer. First way:
- Open the "Security" tab.
- Set the “Secure Boot” parameter to “Disabled”.
- "Advanced" section.
- “System Configuration” item.
- In "Boot Mode", select "CSM" or "Legacy and UEFI" instead of "UEFI".
- This item may be called “OS Mode Selection”.
- Save.
- Check if the PC boots via flash media.
Second way:
- "Boot" tab.
- “Boot Device Control” item.
- Select "Legacy and UEFI".
- Save.
After working with the media, re-enable “boot protection”.
Boot Legacy and UEFI, Secure Boot
Boot Legacy and UEFI, Secure Boot
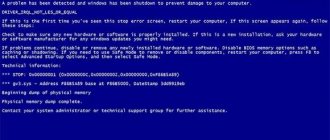
Most often, the computer stops seeing the bootable USB flash drive due to a lack of synchronization between the flash drive and BIOS (UEFI), due to the specifics of their boot modes.
Almost all modern personal computers have basically two boot modes: UEFI (the mode that is usually the default on most machines) and Legacy.
2 boot modes Legacy and UEFI
If you try to create a bootable drive for Legacy mode (Windows Seven) when the BIOS only has UEFI boot, the resulting drive will not be detected by the computer and you will not be able to select it in the BIOS.
To solve this problem, you can enable the appropriate boot mode in the BIOS. In most cases, you need to enable Legacy mode. This can be done by entering the BIOS, the corresponding boot menu (Boot), and turning on/switching to “Enabled” mode one of the following items:
- Legacy_Support, Legacy_Boot;
- Compatibility_Support_Mode (CSM).
Select mode switching in the “Boot” menu
Also, if you are using an Only Legacy boot drive, you need to turn off “Secure Boot”.
Further, if the image that is written to the flash drive can be loaded in both UEFI and Legacy modes, then it makes sense to write it without changing the BIOS settings (although this does not mean that you will not need to disable “Secure Boot”).
The already mentioned Rufus program is the most convenient device to download in this case. In the settings, you can also select boot types: MBR for machines with BIOS or UEFI_CSM _Legacy, or GPT for machines with UEFI.
Window for selecting boot settings types in the Rufus program
Read the new article - “How to make a bootable USB flash drive using UltraISO.”
You need the “right” flash drive
Perhaps it's the flash drive itself. More precisely, in the way it is written. If you copy information onto it directly, nothing will work. But why is it necessary to create a “bootable” drive? To run it, you need some kind of “software script”. Without it, the system will not understand what to do with the media.
To create a bootable USB flash drive from the LiveUSB utility:
- Insert the drive into the slot.
- Run the installer.
- Select your Flash media from the list.
- Confirm installation.
- Now through this drive you can “reanimate” the system.
To install a third-party OS, you need a ready-made ISO image and a burning program. For example, UltraISO or Rufus. Let's look at the second one:
- Insert the drive into the USB port.
- Launch the program.
- Check the “Create a boot disk” checkbox.
- Click on the disk button.
- Specify the path to the image.
- Click on “Start”.
You can create a bootable USB drive using Windows.
- Go to “Control Panel”.
- "Backup and Restore" menu. It is in the System and Security category.
- In the list on the left there will be the items “System Image” and “Recovery Disk”.
If the BIOS does not “see” the bootable USB flash drive, perhaps the problem is not in it, but in the settings. There is no need to throw it away ahead of time. First try changing the BIOS configuration.