What is a good PC? No, you don’t need to imagine a device with a modern processor, a powerful video card and an advanced motherboard. From the point of view of individual marketers, this is secondary, and the main thing in a computer is a certain substance UEFI... In fact, UEFI is by no means an attribute of cool. This is simply new, improved software (firmware) of motherboards, which replaced the BIOS. Today, this “beast” lives on all computers released after 2010-2011, and not only on gaming ones, but also on “typewriters”. Let's figure out what UEFI is, what its global differences are from BIOS, and how to find a common language with it when installing operating systems.
What is BIOS and UEFI?
Before we look at the main custom options, we need to understand what these primary systems are. There are quite a lot of differences between BIOS and UEFI in terms of work organization.
BIOS is a special chip built into the motherboard and equipped with its own software environment (firmware), made in the form of a text-based DOS-like interface, which can be controlled exclusively from the computer keyboard. To move through sections and menu items, use the arrow keys, to enter the desired options or select a parameter value - the enter key, for some other operations - function keys or keys with letters, which is most often used to exit the BIOS with confirmation saving installed options (F10 + Y).
On the contrary, UEFI (Unified Extensible Firmware Interface) is a kind of operating system with a graphical interface in which you can fine-tune the options the user needs. Many such systems are Russified, and they can even be controlled using a computer mouse. But in terms of customizable parameters, UEFI differs favorably in that the settings here look more sophisticated, not to mention the fact that several important parameters that are missing in the BIOS are added to UEFI. In particular, this concerns providing protection against malware that could theoretically start when the computer is turned on.
Configuring the UEFI software environment of popular manufacturers
Popular manufacturers of such system utilities are Gigabyte, ASRock, Asus, etc. They are configured in the same way as other manufacturers. After all, the algorithm of the program remains unchanged, whether it is setting the Asrock UEFI BIOS or Gigabyte UEFI DualBIOS. Only the general features of the interface and the presence of additional subsections in the settings tabs described above in the section change. In order to make fine adjustments for such UEFI system manufacturers, use the above guide to the program tabs.
It is worth noting that some manufacturers do not have the All Tweaker tab, which means that access to overclocking the system is not available. This phenomenon can be encountered when setting up the BIOS in the BIOS UEFI Asus. But also, on the contrary, there may be other parameters in the system menu that the manufacturer adds to improve the operation of the computer’s firmware code with your operating system.
Login to the primary system
To perform BIOS/UEFI setup, you must first log in to the primary system. But how? Everyone knows that on desktop PCs the Del key is most often used to perform such actions.
But on laptops, recently the manufacturers themselves have established the use of other keys or combinations based on function keys in combination, for example, the Fn or Esc button. On some models you can even find special buttons on the keyboard panel (like on Sony VAIO laptops) or additional boot menus that can be called up.
Multiboot in UEFI
From the very beginning of the mass distribution of personal computers, from time to time the task arose of deploying several operating systems on one PC, which could host one or more physical media. Not so long ago, the situation was significantly changed by the discovery of virtualization technology, but this did not completely eliminate the problem. In its classical sense, in relation to stations that boot using the traditional PC/AT BIOS method using the classic MBR markup, multiboot was a third-party code in the main boot sector (MBR), which loads the so-called boot manager (multibooter), which stores settings for each operating system installed on the computer and providing a menu for selecting how to boot a particular OS. If we talk about our time, that is, about multibooting in relation to media partitioned using GPT markup, then a lot has changed now. As we have already noted, UEFI can directly work with GPT disks, so the task of installing multiple operating systems is greatly simplified. Now all the functions of the multibooter are taken over by the built-in UEFI Boot Manager, the operating principles of which we described above. The OS installer only needs to do what it already does very well: place the bootloader on a special ESP partition in “its” directory hierarchy, after which this bootloader becomes “visible” in the UEFI settings. In addition to the OS installer, now the user himself, using the settings (graphical/text interface UEFI), can manually add a bootloader located on any physical media connected and visible to the system. All these bootloaders added in various ways become available through the Boot Menu, which the user can configure/call directly while UEFI is running, that is, at the initial stage of booting the PC. In other words, multibooting in UEFI is simply a matter of running UEFI applications (OS-specific bootloaders) located on mounted media on a special ESP partition in a directory hierarchy rooted at /EFI.
Basic parameters and appearance of BIOS/UEFI
Now let's move directly to setting up the BIOS/UEFI. As a rule, it is usually not recommended to change the default options, but you can reconfigure them at your discretion quite simply.
As for the main partitions and the parameters presented in them, UEFI is not very different from BIOS. True, some developers can find the placement of the main sections not horizontally, but vertically.
How to configure BIOS/UEFI to optimize processor and RAM performance
As for the most important parameters, then, first of all, you need to pay attention to optimizing the operation of the processor and RAM. How and what to change in BIOS/UEFI. In Windows 7, tweaking some options won't hurt either.
First, install some informative utility like CPU-Z or Prime95, and then look at the real CPU clock speed. It is quite possible that if you compare it with the denomination indicated in the technical documentation by the manufacturer itself, the discrepancy will be very significant. It is not always possible to increase the frequency directly in the operating system, since the limitation on such actions is precisely set in the primary system. As an example, let's look at how to configure BIOS/UEFI on ASUS motherboards.
After logging into the primary system, find the Extreme Tweaker section there (on systems from other developers, this may be something like clock speed parameters). Typically this option is set to Auto. However, the maximum value is never used. Thus, you can simply set a higher frequency, save the settings, and check the computer’s performance after rebooting.
However, you shouldn't get carried away. The best thing to do is to immediately run the above utilities and check the threshold for raising the processor temperature to a critical point. If it is exceeded, it is better to set a lower value or refuse overclocking altogether. The same goes for RAM.
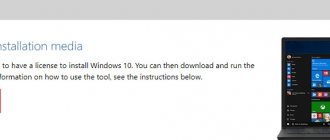
Using the Media Creation Tool to burn a Windows 10 image to a USB flash drive
Officially, Microsoft's tool for creating installation media and ISO images with Windows 10 is Media Creation Tool . You can download the latest version here: https://www.microsoft.com/en-us/software-download/windows10
The old version of Windows USB / DVD download tool for recording a Windows 7 image formatted the USB drive only in the NTFS file system. A computer with UEFI in native mode will not be able to boot from such media. Therefore, this utility is not suitable for creating an installation flash drive with Windows 7.
- Run the file MediaCreationTool2004.exe;
- Select what you want to create installation media - Create installation media (USB flash drive, DVD, or ISO file) for another PC) ;
- Select the language, bitness and architecture of the Windows 10 image that you want to burn to the USB drive;
- Then indicate that you want to burn the image to a USB flash drive;
- Select your flash drive in the list of removable devices and USB drives;
That's all. Click Next -> Next -> Finish and wait until the installation image is written to the USB drive.
In this case, all data from the flash drive will be deleted during formatting.
This USB flash drive can be used to boot on both UEFI and BIOS computers.
Hard disk controller settings in BIOS/UEFI: how to install Windows 7 and higher?
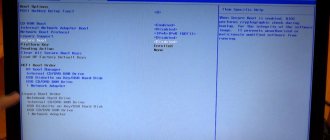
One of the most important parameters is setting the operating mode of the SATA hard drive controller. Unfortunately, by default this option is set correctly. Since the primary UEFI system is designed to work in conjunction with 64-bit operating systems and hard disk partitions with GPT style, error messages are often displayed when installing the same Windows 7 or higher systems.
To install the system correctly, in the Advanced section you need to find the parameters of the SATA controller and set the AHCI mode instead of IDE.
Troubleshooting an error that occurs in Windows 8.1
If, after installing Windows or after updating version to 8.1, a notification appears in the right corner of the monitor about incorrect secure boot adjustment.
On most computers, the problem can be solved by going to the uefi menu and turning on the “Secure boot” mode in the BIOS.
In the event that your BIOS version does not have an option to enable/disable secure boot, you need to download the update for version 8.1 from the official Microsoft web page. It is located there under the number KV 2902864 and is valid for both 32-bit and 64-bit systems.
After downloading and installing the update, your computer will restart and error notifications will no longer appear.
Features of Secure Boot mode
This option appeared in primary systems relatively recently. Its main purpose is to block all third-party processes in order to increase the level of security. Because of this, it may be impossible to even boot from removable media.
To deactivate secure boot, you must use either the Security section, which can be presented in the main menu (Main), or find an item like Launch CSM. In the first case, the Secure Boot parameter is set to Disabled or Off. In the second, the Launch CSM (Enabled) mode is activated.
Note! It is not possible to disable secure boot mode on all devices and not in all UEFI modifications. Even resetting the parameters does not help, since this option is active by default (and even when paired with the TPM module). In this situation, the safest solution is to change the firmware, which will be discussed later.
Setting up startup from removable media and requirements for flash drives
Another important parameter is setting the loading order. Apparently, many remember that in the BIOS these were options like Boot Sequence or Boot Device Priority, in which the required media was installed first in the queue (1st Boot Device).
The BIOS/UEFI setup is not particularly different in this regard, and the main section is usually called simply Boot or Boot Order. However, if there are two distribution kits on the same flash drive (for 32- and 64-bit modifications of the same system), then two media may be shown among the boot devices, one of which is marked with the EFI prefix.
How to install Windows 7? UEFI/BIOS, as is already clear, provides hints on choosing a boot device. In the case of a 32-bit system, a drive with a common name is selected, and for 64-bit operating systems, a media marked with the above prefix is used. But modern primary systems of the latest generations usually recognize the desired device on their own, so the user does not have to worry too much about this.
But it’s better to take care of the correct creation of a bootable flash drive with the required distribution in advance. In order to avoid installing the necessary options when recording an image of the future OS on the media, it is recommended to use automated applications like Rufus. In this program, you just need to select the desired image file and the connected media, after which the necessary parameters (including those related to the file system used for formatting) will be installed automatically. The user only needs to pay attention to the capacity of the flash drive (for Windows 7 the capacity should be about 4 GB, for systems of a higher rank - at least 8 GB).
Note! Keep in mind that if you install Windows from UEFI, the file system on the flash drive must be FAT32 (UEFI does not work at all with NTFS).
How UEFI replaces and improves BIOS
UEFI replaces the traditional BIOS on PCs. It is not possible to switch from BIOS to UEFI on an existing PC. You'll need to buy new hardware that supports and enables UEFI, as most new computers do. Most UEFI implementations provide BIOS emulation, so you can choose to install and boot older operating systems that expect BIOS instead of UEFI so that they are backwards compatible.
This new standard avoids BIOS limitations. UEFI firmware can boot from drives that are 2.2 TB or larger—the theoretical limit is 9.4 zettabytes. This is about three times the estimated size of all data on the Internet. This is because UEFI uses the GPT partitioning scheme instead of MBR. It also boots in a more standardized way, running EFI executables instead of running code from the disk's master boot record.
UEFI can run in 32-bit or 64-bit mode and has a more addressable address space than BIOS, which means your boot process is faster. This also means that UEFI setup screens can be smoother than BIOS setup screens, including graphics and mouse cursor support. However, this is not necessary. Many PCs still come with text-mode UEFI settings interfaces that look and act like the old BIOS setup screen.
Nuances of including equipment components
Finally, let's briefly talk about activating the equipment installed on your computer. Has it ever happened to you that some component did not work, and when viewing information in the “Task Manager” a notification was displayed that the device was disabled, but it was simply impossible to turn it on via RMB?
The reason is simply simple! The equipment is disabled in the primary system. To enable it, you will have to enter the settings of the primary system, then find the equipment section in the UEFI interface (it can be presented in the Advanced settings or as the Onboard Devices submenu), find a disabled component there and activate it using the Enabled or On parameter setting (more often In general, such actions apply to turning on USB ports, cameras built into laptops, changing sound cards if several are installed, etc.).
How to switch to UEFI from Windows 10
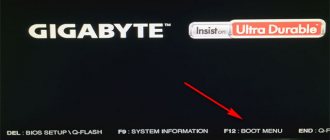
On older computers and laptops - before the release of Windows 8, to enter the BIOS settings you have to turn off the machine and press the specially designated key the next time you turn it on.
The key responds to pressing until the operating system starts loading, which is about 2-4 seconds. With the advent of UEFI and the new disk partitioning standard - GPT, only a few seconds pass from pressing the power button to the appearance of the desktop, and loading the OS begins almost simultaneously with turning on the computer. It is almost impossible to catch the moment when the system responds to the BIOS entry key. That's why Microsoft has made this task easier for users by building the UEFI migration feature right into Windows. So, to switch to the UEFI interface from Windows 10, save all open documents, launch the Settings utility and enter the “ Update and Recovery ” section.
Open the “ Recovery ” subsection and on the right next to the “ Special boot options ” item, click “ Restart now ”.
After the restart, the “ Select action ” menu will be displayed on the computer screen, where you should click “ Troubleshooting ” (in some versions of “tens” this item is called “ Diagnostics ”).
This is interesting: The touchpad (touchpad) does not work on an Asus laptop when installing Windows
The next step is to go to “ Advanced options ”.
Finally, you are almost there: all you have to do is click “ UEFI Firmware Settings ”. After clicking on this item, the computer will reboot again and take you to the right place.
The absence of a switch to UEFI option in “ Advanced Settings ” means that the computer does not support this feature. One of the reasons may be that the PC is running in BIOS emulation mode, for example, if it uses MBR disks. On such machines, you can get to the area you are interested in only in one way - the traditional one, as in the BIOS, that is, by pressing a certain key after turning it on. And to prevent this process from turning into a test of your reaction speed, you can slow down the loading of Windows somewhat. For this:
- Go through the “ Settings ” utility to the system settings, then go to the power and sleep section and open “ Advanced power settings ”.
- Click in the transition panel “ Button action ” or “ Close lid action ” (the latter option is not available on desktops).
- Click “ Change settings that are currently unavailable .” In the Shutdown Options , uncheck the Enable Fast Startup . After the next start, the computer will boot more slowly, and you will easily have time to press the button to enter the BIOS.
Reset parameters, update and flash BIOS/UEFI
Finally, let's look at issues related to updating the firmware of primary BIOS/UEFI systems and resetting parameters to factory settings. The reset is performed almost exactly the same as in the BIOS (similar sections like Load Setup Defaults are used for this). But installing new firmware specifically in UEFI, if you compare such actions with similar procedures in the BIOS, is generally simple.
It was in the BIOS that you had to look for the update section, write the firmware to a flash drive, then perform a lot of other operations to select the desired software, etc. You can update the UEFI software environment directly from Windows. After downloading the firmware file, you just need to run it as an administrator, and all other operations will be performed when you restart the computer device without user intervention. But you need to download the firmware that exactly matches your modification, otherwise you can only achieve that the entire computer system will stop working.
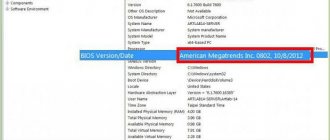
To search, the easiest way is to go directly to the official website of the manufacturer of the motherboard or a specific laptop model. You can determine the motherboard markings and the current BIOS/UEFI firmware version either through system information, or through the command line, or through the DirectX dialog, or using special informative utilities like Speecy, AIDA64, SSU and the like. Some developers add their own proprietary utilities to UEFI, allowing you to upgrade directly on the primary system.
UEFI Boot Manager operation algorithm
The UEFI boot concept is significantly different from the BIOS boot concept. If you remember the BIOS, the bootstrap code int 19h (bootstrap loader) was responsible for loading there, the task of which was only to load the master boot record (MBR) from the boot device into memory and transfer control to it. In UEFI, everything is somewhat more interesting; it contains its own full-fledged built-in bootloader, which is called UEFI Boot Manager (UEFI Boot Manager or simply Boot Manager), which has much richer functionality.
UEFI Boot Manager is a standard generic UEFI module.
Boot Manager implements a fairly wide range of functions, which include loading UEFI images such as: UEFI first-stage OS loaders, UEFI drivers, UEFI applications. Booting can be done from any UEFI image located on any UEFI-supported file system located on any physical storage medium supported by the platform. UEFI Boot Manager has its own configuration, the parameters of which are located in the form of a number of variables in a common NVRAM (Non-volatile RAM).
EFI NVRAM is a shared memory area designed to store UEFI configuration parameters, available for use by firmware developers, hardware manufacturers, operating system developers, and users.
UEFI parameters are stored in NVRAM as variables, which are classically represented by a parameter name = value pair. These variables contain a large number of parameters that relate to different functional parts of the UEFI, that is, in addition to the UEFI Boot Manager parameters, NVRAM stores many other UEFI parameters. However, for the purposes of this chapter, we are only interested in variables related to the UEFI Boot Manager. This is primarily the global variable BootOrder, which points to boot handle variables named Boot####. Each Boot#### element is a pointer to a physical device and (optionally) can even describe a file that is a UEFI image that should boot from this physical device.
All boot devices are described as a full path, that is, they contain a readable name of the boot file, so they can be added to the boot menu.
This is roughly how I imagine the algorithm for enumerating media during UEFI operation:
As we can see, UEFI Boot Manager parses BootOrder, that is, it loads the device path of each Boot#### element in the order specified by the value of the BootOrder variable and tries to boot from the specified device. If there is an error, the boot manager moves on to the next element. In addition, a so-called download list is generated. This list is relevant for the UEFI settings interface and looks like the familiar standard boot menu. The UEFI Boot List is generated based on the BootOrder variable and is used to allow the user to make changes to the order and configuration of boot devices. How is the BootOrder itself formed? And it’s very simple, for example, during the installation of the Windows operating system, the installer creates an ESP partition (if it does not exist) on the installation disk, formats this partition into the FAT file system, then places its boot loader (for Windows 7+ this is the file bootmgfw.efi) and some other files along the path \EFI\Microsoft\Boot\. Once the OS installation is complete, the Windows installer creates a variable in the EFI NVRAM called Boot#### (where #### is a hexadecimal number) that references the Windows boot manager named bootmgfw.efi.